
SkirmishCampaigns Norway!

- Description
- Detailed Description
- Reviews
Back to WWII SCENARIO BOOKS
First in the publisher's SkirmishCampaigns series of "complete campaign books for recreating skirmish-level battles and campaigns." This volume - Norway! - focuses on the German invasion of Norway in 1940. The series is designed for use with any skirmish-level set of rules.
To set the stage, the booklet provides 9 pages of background:
- an introduction
- a strategic map of Norway
- an essay on Allied and German military plans
- a description of the forces involved (Wehrmacht, Royal Norwegian Army, British Army, and the French Expeditionary Corps)
- an account of the actual campaign
- and a bibliography
The Scenarios
Each scenario takes up 4 pages, including a page of instructions, a map page, and one page for each player listing forces available. The instructions include historical background, objectives, special rules (often covering the special terrain for that scenario), optional rules, tactical advice, and the outcome of the actual battle the scenario is based upon.
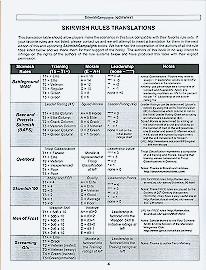
To allow the scenarios to be played with any ruleset, the scenario information is provided in a special generic format, as explained in two pages at the beginning of the booklet. In addition, specific rules are provided for using these scenarios with Battleground: WWII, BAPS, Overlord, Skirmish '90, Men of Frost, and Screaming GI's.
The scenario maps are gridded, and most are designed to be played in a 4' x 6' area when using 15mm or 20mm scale figures. Players may need to adjust the maps to fit their gaming areas or preferred scale.
In order to maximize replayability, the forces in all of the scenarios are composed of a base force plus a variable attachment, determined by dieroll from a short list of options. For instance, in one scenario the Germans have a base force of a headquarters and two infantry squads and two light tanks. Depending on their dieroll, they might also have a pioneer squad, an armored car, a light machinegun team, or a forward observer for a mortar.
| "Players will find that it is disconcerting not to get that 'perfect'
attachment - this reflects the frustration of both the German and Allied commanders
in Norway who were overwhelmed with supply problems and difficulties in moving through
the often inhospitable Norwegian terrain. While this format may seem unconventional at
first glance, we think players will enjoy the unpredictable nature and replayability
this system brings to each scenario."
- Attachments SkirmishCampaigns Norway, pg. 3 |
The ten scenarios in the booklet are:
- Road to Lillehammer - Encounter at Roa
- 16 April 1940. The Germans, with 3 squads and probably some light armor support, need to secure a bridge and a vital building overlooking a road key to the general advance. In opposition are 3 Norwegian squads, with possible aid from British anti-armor units or a Norwegian ski squad. Terrain includes heavy woods, hills, a paved highway, and a deep stream.
- Fallschirmjager Crossroads - Dombaas I
- 16 April 1940. German paratroops must take a barn which overlooks the vital rail link between the front lines and British supplies on the coast. The Germans have two squads and will probably receive no support, but a good dieroll will add a light machinegun or squad leader to their force. The Allies may enter from north, south, and/or west, and consist of four Norwegian squads, plus possible support by a French Alpine squad, a British machinegun team, a Norwegian ski squad, or off-board artillery. Terrain is clear with patches of light woods, a hill, a stream, a small marsh, a highway, a railroad line, a ruined house, and a barn. Light snow is optional.
- Fallschirmjager Gut Check - Dombaas II
- 17 April 1940. Continuation of the previous scenario, with the Allies tasked with clearing German paratroops from the barn. German forces as before, but with greater chance of additional paratroops straggling in overnight. Allies have 2 Norwegian squads, a ski squad, and a light machinegun team, plus possibly a French Alpine squad, a British machinegun team, or off-board artillery. Same map as before. Germans are low on ammunition.
- Gateway to the Valley - Lillehammer I
- 18 April 1940. The Germans need to capture this bridge and crossroads in order to relieve their paratroopers at Dombaas (see previous scenarios). They have 3 squads and 2 light tanks, with possible support from a truckload of pioneers (with flamethrower), a light machinegun team, an armored car, or mortars. The defending Bergen Division provides 3 Norwegian squads and a sniper team, plus a possible British anti-tank gun, a British anti-tank rifle team, a British machinegun team, another Norwegian squad, or a Norwegian ski squad. Terrain is restricted, with several roads, multiple buildings around a crossroads, hills flanking the road, a stream, and belts of light and heavy woods.
- Allied Counterstroke - Lillehammer II
- 19 April 1940. Determined Allied resistance has slowed down the German advance, allowing the Allies to launch a counter-attack. There are three buildings at a crossroads. The Allies win by capturing at least one building, but the Germans win by successfully retaining at least one building. The terrain is complex, with small hills, muddy fields, belts of heavy woods, a stream, a marsh, and several roads. The Allies have 3 British and 1 Norwegian squad plus mortars and light machineguns, with possible reinforcement by a Norwegian ski squad, various British detachments, or artillery. The Germans have three squads and a light tank, plus possibly another squad, a light machinegun team, mortars, an armored car, or another tank.
- Final Stand - the Defense of Tretten
- 23 April 1940. The Allies last major defensive stand before retreating to the coast. The Germans have 4 squads (in soft vehicles) and a light tank, plus one or two additional armored vehicles and possibly artillery. The Allies have 3 British and 1 Norwegian squad, an anti-tank gun, mortars, a Norwegian ski sniper team, and a wide variety of possible attachments (including British anti-armor units or a Norwegian ski squad). The map is narrow, with the Germans needing to advance up a highway flanked by light and heavy woods, hills and a cliff, and a marsh. A stream choked with run-off is impassable to wheeled vehicles, and crosses the highway twice at stone bridges.
- Next Stop Trondheim - Engagement at Kvam
- Last stand in the south, as Allies attempt to prevent the Germans from cutting the Allies off from the coastal ports. The Germans need to push across the board, but are faced with a highway between two cliffs, flanked by light woods and several buildings, and vulnerable at two bridges over a swollen stream. They have 4 squads and a light tank, with 1-2 additional armored vehicles and possibly artillery. The Allies consist of 3 British squads and 1 Norwegian squad, with mortars, a light machinegun team, and a ski sniper team, with possible support from an extra Norwegian squad, or British help in the form of an anti-tank gun, an anti-tank rifle team, or a machinegun team.
- Storm Off the Fjord - Bjerkvik
- 13 May 1940. The French Foreign Legion storms ashore with 4 squads, plus possible support from 3 Norwegian ski squads, 3 French Alpine squads, 3 Polish Podhale squads, and/or possibly a French H-39 tank. The Germans have 3 squads, plus possibly an anti-tank gun, a light machinegun team, or an additional squad, and are set up in a small town (over a dozen wooden buildings, some of which are on fire and putting out thick smoke) or on an overlooking hill (with entrenchments).
- Relief for Dietl - Stien
- 17 May 1940. Scots Guards must delay an advance by a German Mountain Division, to allow time for the Allies to take Narvik. Map is a series of rocky outcroppings in a narrow neck between three bodies of water and several areas of heavy woods (no roads). The Germans have 3 squads and a mortar team, plus either an additional squad, a light machinegun team, or an anti-tank rifle team. The Scots Guards comprise 3 squads, and might have a mortar team or light machinegun team.
- Assault on Narvik - Orneset
- 28 May 1940. The French Foreign Legion launches an early morning assault to take a vital position near Narvik, with German defenders on high ground and shielded by a railroad embankment. The Allies have 3 Foreign Legion squads and 2 Norwegian squads, plus 1 or 2 more squads and possibly Royal Navy fire support (if not driven off by the Luftwaffe). The Germans have 4 squads (including impressed sailors), plus another squad or a light machinegun team.
The Campaigns
Since this is a skirmish campaign book, two campaigns are indeed provided: the Narvik and Southern campaigns.
The Narvik Campaign is the simplest, and consists of playing the last three scenarios (Bjerkvik, Stien, and Orneset) as a series. While the scenarios are unified by their role in the overall campaign, they do not actually have an impact on each other (success or failure at Bjerkvik does not effect Stien, for instance).
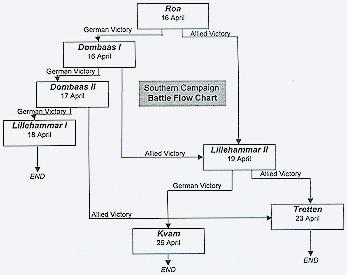
The Southern Campaign is, however, entirely determined by the result of the preceeding skirmishes. Seven scenarios are involved, but players will only play 3 or 4 games in each campaign. A flowchart indicates how the scenarios link together - so that, for instance, how the players do at Dombaas I determines whether the following scenario is Dombaas II or Lillehammer II.
A "mini-campaign" is provided in the form of the two Dombaas scenarios. Rules allow these scenarios to be linked, so that losses in the first scenario count against the Germans in the second scenario. These rules also apply to the Southern Campaign game.