Help support TMP


"6mm infantry" Topic


12 Posts

All members in good standing are free to post here. Opinions expressed here are solely those of the posters, and have not been cleared with nor are they endorsed by The Miniatures Page.

Please remember not to make new product announcements on the forum. Our advertisers pay for the privilege of making such announcements.

For more information, see the TMP FAQ.


Back to the WWII Painting Guides Message Board


Areas of Interest

World War Two on the Land

Featured Hobby News Article


Featured Link


Featured Showcase Article

Command Decision: Test of Battle

The Editor almost has a heart attack...


Featured Workbench Article

Straightening StuGs

Personal logo Editor in Chief Bill The Editor of TMP Fezian discovers that painters aren't mind-readers.


Featured Profile Article

First Look: Battlefront's 15mm Rural Farm Buildings

Safe to ship? Personal logo Editor in Chief Bill The Editor of TMP Fezian looks at how these pre-painted buildings are packaged.


Current Poll


Featured Book Review


Featured Movie Review


1,243 hits since 10 Jul 2019
©1994-2024 Bill Armintrout
Comments or corrections?


TMP logo

Membership

Please sign in to your membership account, or, if you are not yet a member, please sign up for your free membership account.
captaincold6910 Jul 2019 8:49 a.m. PST

My first attempt at painting this scale. Love to hear any suggestions as how to get as much detail without spending godly amounts of time (I know that from several feet away it won't matter much)

Zeelow10 Jul 2019 9:22 a.m. PST

Didn't get any pictures with post? Love to see your work.

captaincold6910 Jul 2019 9:27 a.m. PST

Sorry, I haven't started yet…hence my first attempt, not first completion :)

robert piepenbrink Supporting Member of TMP10 Jul 2019 9:52 a.m. PST

1) buy decent sculpts.
2) rely very heavily on washes and dry-brushes.

For what it's worth, I'm plowing through white-primed Adler 8th Army with the new GW "Contrast" Skeleton Horde, and I'm quite pleased with speed and result. If you have to have Waffen SS in cammo smocks, I don't know how to advise you.

And it UNgodly amounts of time. Godly time is spent with different priorities.

Dynaman878910 Jul 2019 11:19 a.m. PST

Subtle color variations are a waste of time – nobody will notice them. Get an optivisor if you don't have one. Use lighter colors then you think you will need. Contrast is more important then true colors.
My method is
1 – Base coat the lightest predominant color.
2 – Boots (black or brown)
3 – weapon. Very often black but will go with light brown if it offsets enough from the color of the uniform.
4 – skin
5 – helmet
6 – the dunk in future with klear and black paint in a 20 to 1 or so ratio. get rid of excess dip, all done.

Personal logo Extra Crispy Sponsoring Member of TMP10 Jul 2019 11:54 a.m. PST

I'm with Dynaman, with one difference. Paint the whole figure in the uniform color. Then give a light brown wash. Then pick out a few details.

What you'll mostly see, in any case, is uni and helmet.

And yes, brighter colors than you think you need.

I don't bother with any dry brushing. Beyond 6" you can;t see it anyway, and I'm making game pieces.

picture

Zeelow10 Jul 2019 4:36 p.m. PST

Thanks gents for the enlightenment. I'm getting really close to falling off the precipice of indecision and into 6mm scifi.

stephen m10 Jul 2019 6:25 p.m. PST

I am in Extra Crispy's corner. Base paint is whatever the largest part of the uniform colour is. Then details as needed. For automatic weapons pretty much all black, for bolt action rifles a wood brown and if I am feeling adventurous maybe a stripe of black or gunmetal on the top of the rifle for a barrel or for WWII Soviets the bayonet on the ends.

As for multi colour camo I base paint the lightest colour (usually the base colour of the uniform), then I find the oldest scraggly brush and use that to spot on the other colours. I go for dabbing as opposed to say holding the brush and wiping a finger across "splattering" it on as I find the latter gives too variable results. Trying to brush multiple colours is just too awkward and usually the strokes are way to big.

Martin Rapier10 Jul 2019 11:22 p.m. PST

Spray base uniform colour, pick out boots, weapons, bigger bits of webbing, flesh, then do a dark ink wash.

Maybe a very light dry brush, paint the hat or helmet.

In 6mm you only see the hands, faces and helmets, so focus on those.

Personal logo Legion 4 Supporting Member of TMP11 Jul 2019 2:32 p.m. PST

Some of my 6mm Grunt …

picture


Detail … detail … detail and then more detail …

stephen m14 Jul 2019 3:58 p.m. PST

For 6mm IMHO I avoid washes. They take what is a small and hard to differentiate item and make it an almost uniform morass. In my case I want to pick out items not make them disappear. I use a base colour and in addition to the above I usually try to make the various pouches, tools and carried detail items a different (not very much) colour. So on a khaki uniform the belts may be dark brown, the boots black or brown, puttees (if used) tan or sand, pouches tan, sand and olive all on the same figure. Usually one can "interpret" colours on various uniform artwork is different ways and of course once into WWII items of different suppliers, period and ages would all appear slightly different.

That is why I have 3 different khakis and who knows how many differing sands or greens all from the same manufacturer.

Mark 1 Supporting Member of TMP15 Jul 2019 6:55 p.m. PST

From my thread in the 6mm WW2 topic: TMP link

I agree with several points others have said, but with some subtle changes.

I undercoat with white spray primer. I use automotive primer from the auto parts store – cheap and cheerful compared to hobby sprays, and works very well for me. I find undercoating in white helps lighten the overall colors (easier than re-mixing your paints for smaller scales) and also contributes to highlighting as the uniform color gets thinned on the ridges during subsequent steps.

Then the molded-on base around the figure's feet. I paint this the same color as I will use for the dirt on my stands (a craft paint in a dirty brown color called Mushroom). I do this early, and don't worry about other colors getting on it, as it is to represent dirt, and dirt colors vary. I also don't worry about getting some of the dirt color on the figures, as I'm going to point over it anyway.

I then paint the uniform color. Sometimes (I know, I know, but I can't resist sometimes) I paint trousers a different color from blouses/jackets, as national uniforms indicate. But yes, as others have said, paint everything in the uniform color(s). Everything on the figure, that is. Not the dirt around them. At least not on purpose.

I am among the dark-wash enthusiasts. Early. Right after the uniform basecoat. Helps make every detail more visible to me even as I'm painting. I use all acrylics. My preferred wash now is a VERY dark brown/green, but I have used flat black with good results too. I dilute about 10 or 15 to 1. Blob it on completely. Then after about a minute wick it all off with a dry brush. Even beat up the figures a bit with the brush. Helps bring out highlights.

Then if you plan to paint a lot of the webgear in your detailing, skip this step. If you don't plan to paint the webgear, do a dry-brushing with a tan or light green color. This will pick up much of the webgear. But also rifles and helmets and boots, etc. But that's OK 'cuz you're about to paint over the highlighting on those.

Webgear is next. If you have the patience use two colors for different items, great! But don't fret if it is exactly the right color. Tan, beige, or light green. More detail in the color selection is pointless.

Then boots and guns. Boots are black or brown (depending on the nation). Don't bother with leggings, regardless of national uniform. I've done guns in all black, but unless we are talking moderns with all-plastic / graphite guns I just don't like it. So I do brown stocks and gunmetal tips and tops. For my WW2 Soviets I did bayonets in silver. I know Russian bayonets were blued just like the barrels, but I do it anyways. You can't see that they are bayonets unless they are a different color from the gunmetal. They add "character" to my Russian riflemen.

Then flesh for hands and faces.

Then helmets. (OK helmets and/or hats). The hands and helmets are indeed the most visible aspects of your paintjob. Helmets are sooo important. Best if they are a distinct shade from the uniform. Even if the national uniform was trying to match the colors, metal will look different than cloth, so paint 'em a different shade. Usually darker. And if they are a bit more metallic (glossy) that's OK.

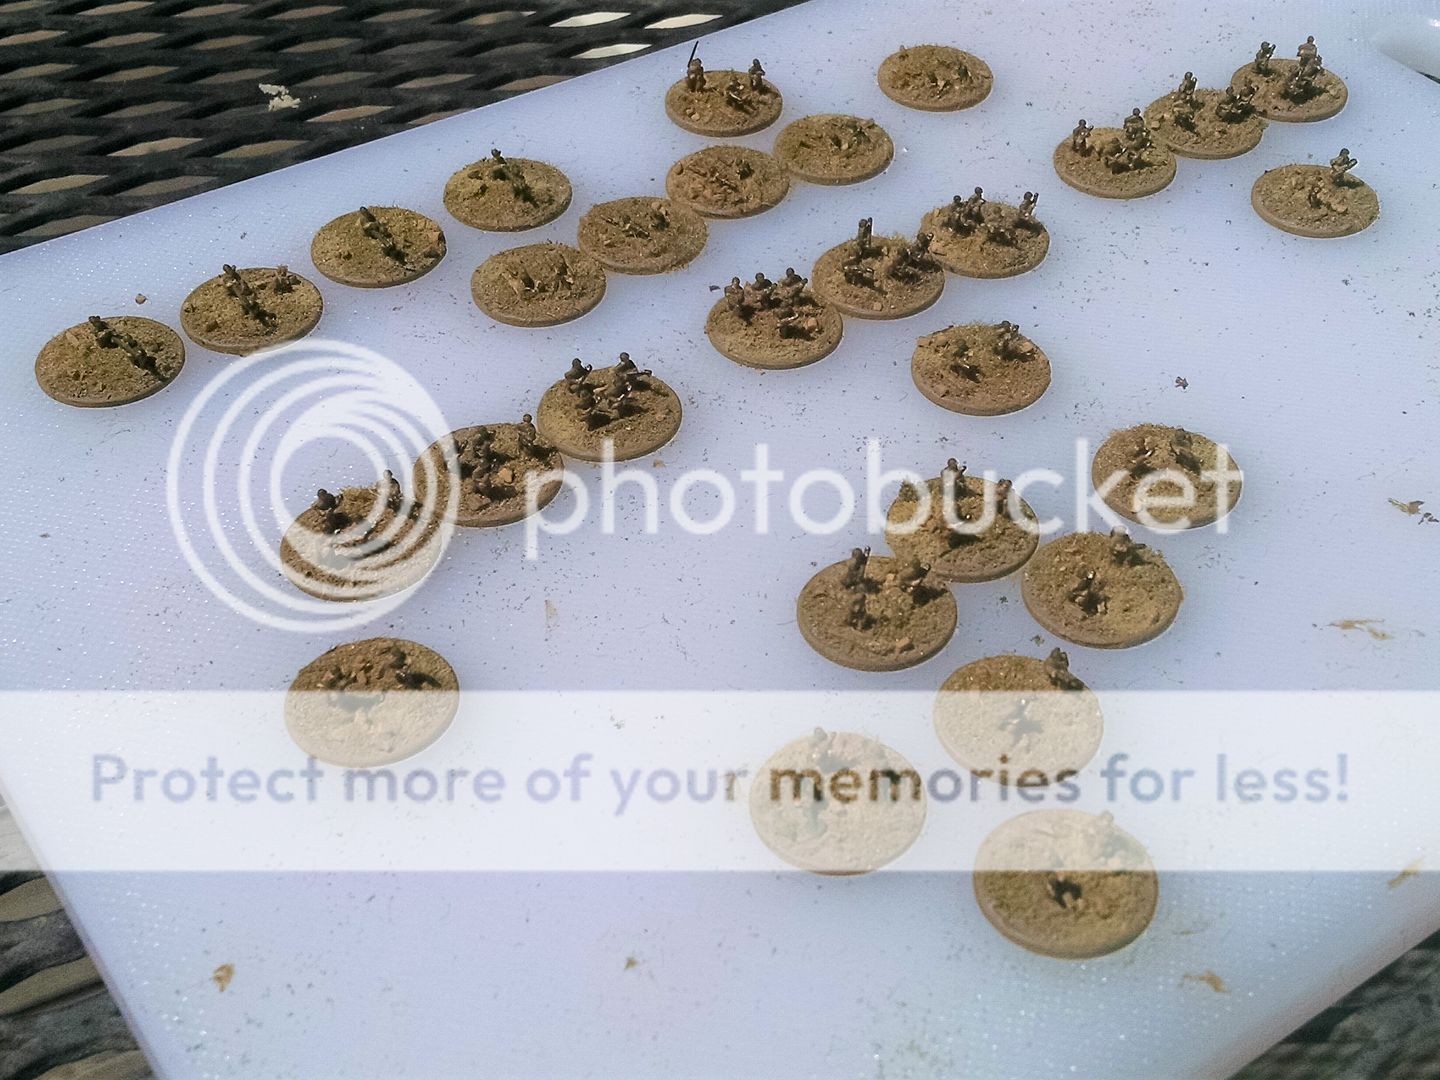
I use Acrylic Gel Medium to mount my figures on my stands. I use US Pennies as my stands. I basecoat with my dirt color. I mix a bit of the dirt color in the Acrylic medium to give it some tint, then I put about 1mm thick gel medium all over the top of a coin. Push the figures into it. Use a modestly fine brush to "mush" the gel up to and even over the edges of the figures molded-on bases so there are no gaps. Then put my terrain stuff (model RR talus, shrubs, static grass and flocking, in that order) all over it. The medium acts as paint, depth and glue.

When it has dried, turn and tap the coin's edge on the table to get the loose stuff off, and put 'em on a board for 2 sprayings of dullcoat. Like to let the dullcoat dry in the sunshine if I can -- makes a stronger more durable sealant.

I have progressed over the years. I still have infantry that was only painted the dominant uniform color (nothing else). Then I started adding faces and hands in flesh tones. Liked that better. Then I started adding black guns. OK that's pretty good. Then boots. Even better. Then helmets. BIG impact -- looks much better. Then wood and gunmetal rifles. Ooh like that too. Then web gear, trousers and blouses. LOVE IT LOVE IT LOVE IT.

Yep, it's a matter of time. And most of the time they are seen from 2-4 feet away. But I pick them up to place them and move them. So does anyone else that uses my figures. And every time I pick up a stand of my stuff and look at it, or another gamer picks one up a looks at it, it is a small jolt of delight for me. So when I can, I spend the time.

Your mileage may vary.

-Mark
(aka: Mk 1)

Sorry - only verified members can post on the forums.