
| | This comprehensive set of
rules covers naval and air combat at both tactical and strategic levels.
Designed as a visual system, the game uses colorful markers and extensively commented tables and charts in
order to minimize dependence on the rulebook. The naval, air, and strategic rules can be used
separately or in any combination. A hexgrid is used to mark and resolve gunfire, but has no
effect on naval movement.
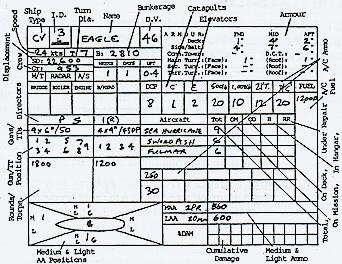 The naval game is played in a series of Bounds (turns), composed of these steps in this order: write orders/place gunfire markers/resolve movement/resolve gunfire/resolve torpedoes. Orders consist of movement plots (i.e., "9F 15S 6F" would mean 9 knots forward, 15 knots starboard turn, 6 knots forward) and instructions for miscellaneous actions (i.e., laying mines, launching aircraft), but written orders for gunfire are not required. "Light craft" do not require orders. Gunfire consists of two types: salvo fire, intended to hit a specific target; and barrage fire, designed to create a "wall of fire" through which an enemy might move and incur damage. During the second phase, players place splash markers and barrage counters to indicate their targets this turn. Range and type of fire direction determines a target number; if the firing player fails at his dieroll, the target deviates to another hex. In the third phase, Movement Protractors (game aids) are used to implement the written movement orders. A ship's turn radii depends on its data rating plus current speed. Any ships which move near a barrage marker must check for damage. 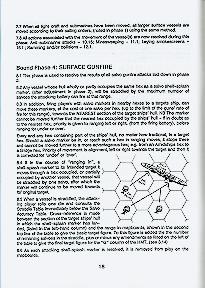 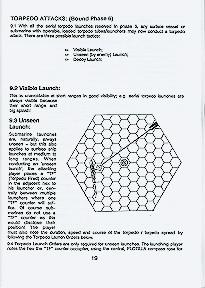 The fourth phase begins with both players adjusting their salvo markers (if needed), with each hex adjusted reducing the power of the attack. Since most ships will span more than a single hexagon, the final target hex helps determine which part of the ship is hit (bow, stern, amidships, or bridge). A target number is determined by comparing the range versus ship location, modified by rate of fire at this range and situation (i.e., visibility, under fire, other ships firing, etc.). A dieroll is made against this target number, and compared against the number of guns firing to determine whether the shot hit or a near-miss, and what the damage modifier is. A score is determined by taking the weapon's Strike Value, dividing by the target's Defensive Value, plus the modifier (if any). A dieroll is then made against this score, modified by type of shell, target type, whether shot was a hit or a near-miss, and by penetration (comparing armor penetration for the weapon at this range vs. armor factor, modified by angle of fire). This determines a Cumulative Damage result (in percentages). Going back to the hit-or-miss table, a new dieroll is made to determine how many (if any) Critical Damage dierolls are allowed. For each Critical Damage roll allowed, a dieroll is made and compared against the type of ship and the cumulative damage result to determine specific results - such as Engine Room, gun directors, or magazines being hit. In most cases, a dieroll must also be made to determine the severity of any fires which might have broken out. Special rules detail the results of all Critical Hits. In addition, Cumulative Damage requires a dieroll for each 10% increment, and may result in the ship taking on a list, losing speed, losing power, etc. When a torpedo is launched, the player secretly notes the launching hex and a "target hex" on the edge of that hexboard - used together, these determine the torpedo's firing vector. The player then keeps track of the torpedo's position, and when he calculates that it is near a target, he reveals his plot to the opponent. The torpedo plot may also be revealed if the opponent detects the torpedo (either at launch, or later by hydrophone or visually). Torpedo attack is resolved similarly to gunfire combat, except that the initial target number is modified by target angle, speed, and location hit. If the dieroll determines that the torpedo "misses," it remains in play and may strike another target. The naval rules also cover submarines and anti-submarine warfare, ramming and other collisions, survivors and rescue, minefields, barrage balloons, repairs, smoke screens, nets and booms, and night fighting. The air game can be played stand-alone, or can be combined with the naval game by adding one phase to the turn sequence. Each aircraft model is placed on top of a marker indicating its flight status, with the symbols and colors revealing whether the plane is level, angled, or vertical, and whether it is going up or down (or in a spin). A second counter, placed in front of the model, shows the aircraft's speed and altitude (from 0 to 9,000 feet). When the aircraft exceeds 9,000 feet, a clear plastic altitude counter is placed beneath the model (one for every 10,000 feet). Unlike the naval game, the air game uses the hexgrid for movement purposes.  The order in which aircraft take their actions during the aircraft phase is determined by the type of plane, pilot experience, speed, and place in formation. Ties are resolved by dieroll. At the start of movement, a plane can change its "speed band" by one level (stall/economical/combat cruise/full throttle). The speed band is compared against the plane's altitude to determine the player's available movement for the turn. As aircraft move, they may dive or climb, roll and bank. Severe maneuvers risk entering a spin or a stall, damage to the plane, or that the pilot might black-out. Planes must "spot" each other before aerial combat can commence, requiring a dieroll modified by range, altitude, where the sun is, and situational factors. Taking into account the gunners' skill level, both planes' speed and angle, a dieroll is made to determine how long the target was successfully fired at (in seconds). This is then used, along with range, altitude difference, type of guns, and a dieroll, to determine the final weight of fire, which provides the target numbers for critical damage and morale. If critical damage is scored, there is also a change that structural damage occurs. A morale roll is required after every attack, taking into account the current state of the aircraft as well as the terrain beneath. Depending on how badly the morale check is failed, the aircraft may simply abort the current attack, or it may jettison its payload and head for base. Whenever a plane fails a morale test, a risk marker is placed next to the plane - risk levels add a penalty to future morale rolls, but can be cleared by a successful morale roll. Planes may attack ships using level bombing, dive bombing, torpedoes, rockets, and strafing. The combat resolution is similar to the gunfire system, but level bombing must dice to see if the target is hit ("misses" may hit another hex). Special rules apply for strafing warships and for kamikazes. Pilots and crew may attempt to bail out of damaged planes, or to land damaged planes at an airfield. The strategic game is not played with miniatures, but uses maps and counters to generate encounters than can be resolved using the air or naval game. There are three levels of maps - the block represents 30 tactical hexboards, the next map shows a grid of 10 x 10 blocks, and the campaign map (not provided, but any graph paper will do) uses 1 square to represent each block. Players use separate maps in order to preserve secrecy. Ships and models are organized into units for the strategic game, each represented by three counters (one for each map level). One turn is played for every 10 tactical turns. Colored plastic chips are placed on the time track to remind players when sunrise, sunset, twilight, and full night occur (depending on latitude). Phase of the moon and available moonlight are also tracked. The strategic game also provides a system for generating weather. Dierolls are made twice daily, modified by season of the year and world location, to determine if a new "pressure system" appears at the edge of the campaign map, and what its type (high or low) and strength are. Weather systems move every 3 or 6 hours (depending on type), with direction of movement determined by world location and dieroll. Weather for any particular mapblock can be determined, when needed, by comparing distance to the nearest high and low pressure systems. This provides the wind speed and degree of cloud cover present. Large white disks are used to mark any tactical hexboard which is cloud-covered. Cloud cover is taken into account along with latitude, region and season to determine the degree of precipitation. Cloud height is also tracked for use with the air game. As units move, logistics are expended. Everything has a fuel endurance factor, whether rated in hours (planes) or weeks (ships). Endurance is expended as movement occurs, depending on the speeds used. Ships can be refueled (to the limit of their bunkerage). Ships in harbour also expend a small amount of fuel. Ammunition usage is also tracked. The strategic game also allows players to search each other out, using naval or air patrols. The search system does not require an umpire, but the conducting of a search will tip off the opposing player to the general area where the searching units are (but not the precise location). Also covered in the strategic game are dockyard repairs, aircraft operation and maintanence, neutral shipping, and communications. Counters are provided for marking unit status: submerged (subs), zigzagging, at anchor, refueling at sea, minelaying/minesweeping, radio transmit, radio intercept, and search results.  The databooks and reference cards provide information for all of the major and many of the minor powers in WWII:
The naval lists include everything from carriers and battleships down to oilers, MTBs and midget submarines. Ships are given as they were at the start of the war, with notes indicating refits during the war.  Most aircraft types are covered, but not every variant of every type. | ||||||||
|---|---|---|---|---|---|---|---|---|---|
| Period | World War Two | ||||||||
| Scale |
| ||||||||
| Basing | Individual | ||||||||
| Contents | 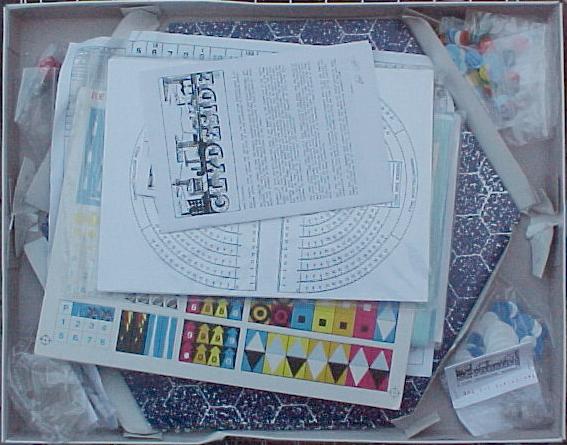 | ||||||||
| Designers | W.G. Gilpin | ||||||||
| Publisher | Published 1989. Copyright by W.G. Gilpin, distributed by Clydeside Models |
If you would like to add your opinion to this webpage, use the following form or send email to the editor.
If you know of resources for this game, or if you have material you would like to make available to the Net, please let us know.
| Last Updates | |
|---|---|
| 8 June 1999 | page first published |
| Comments or corrections? | |