| Kmfisher | 02 Aug 2013 2:05 a.m. PST |
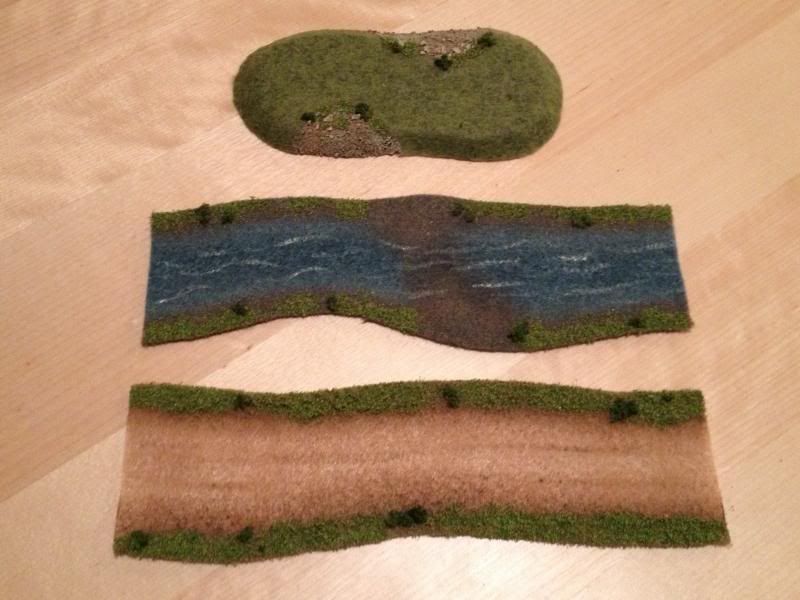
I've been procrastinating on finishing an army and don't have any more projects I can start yet, so I've been experimenting with felt and making terrain. I really like how easy felt is to transport and use, but I've never been all that happy with the way it looks. I'm also a huge fan of the cost, cheap! So here are my results, unfortunately I'm not a photographer, but all in all I'm pretty happy with them.
I'm going to be using them for big based 6mm DBA, IMPETUS and any other game I can play on a 4' x 3' or smaller board. I think the hill needs to be taller, I used 1/4" foam. I think 1/2" would be better with a larger slope. It definitely needs to be bigger. |
| BrotherSevej | 02 Aug 2013 2:10 a.m. PST |
These are beautiful. How did you do it? |
| COL Scott ret | 02 Aug 2013 2:30 a.m. PST |
Yes those look great esp the river, I really like the look and would love to flatter you by doing the same for my table. |
| Texas Jack | 02 Aug 2013 3:12 a.m. PST |
I agree,these are really lovely. Will there be a tutorial forthcoming???  |
| Dynaman8789 | 02 Aug 2013 3:28 a.m. PST |
YES! You have to let us know how you got those results! That is fantastic. |
| taskforce58 | 02 Aug 2013 5:12 a.m. PST |
Very nice! I would appreciate a step by step guide. BTW how thick is the hill? |
 Sgt Slag Sgt Slag  | 02 Aug 2013 6:05 a.m. PST |
These punch all the correct buttons: cheap; super-flexible to use over non-flat terrain; look quite good; self-made, so completely customizable to quantity, and scale… [Sigh!…] We really need a tutorial. Without a tutorial, we will all just need to hack it -- and that won't be pretty. Just sayin'… >;-) |
| justBill | 02 Aug 2013 6:56 a.m. PST |
Very nice work! Another vote for a tutorial! |
| haywire | 02 Aug 2013 7:33 a.m. PST |
Wow! yes. tutorial Please!!! |
| TiberiusAugustus | 02 Aug 2013 7:40 a.m. PST |
Gonna have to join the rabble and ask for a tutorial. Those look amazing! |
| sumerandakkad | 02 Aug 2013 8:03 a.m. PST |
Having bought a Holtz mat recently I would like a tutorial also. Looks very good. |
| Nick B | 02 Aug 2013 8:09 a.m. PST |
They look great – yes – please a tutorial! |
 optional field optional field | 02 Aug 2013 8:16 a.m. PST |
another vote for a tutorial. On the other hand you could probably sell these for a decent price… |
| Kmfisher | 02 Aug 2013 2:15 p.m. PST |
Thank you for all the kind words, I never expected this kind of response. If enough people are interested (looks like there might be) I'd be happy to post a tutorial on each piece. May be a few days before I can though, real life and all that. |
| Mooseworks8 | 02 Aug 2013 2:43 p.m. PST |
|
| Texas Jack | 02 Aug 2013 2:56 p.m. PST |
Ditto that, I think all who posted here would love to see how you did it. |
| Cambria5622 | 02 Aug 2013 3:17 p.m. PST |
Yet another 'vote' for the tutorial – I think they look really good! |
 Flashman14 Flashman14 | 02 Aug 2013 3:31 p.m. PST |
What does white glue do to felt? How permanent is static grass applied thus? |
| redbanner4145 | 02 Aug 2013 3:34 p.m. PST |
How the heck did you make those? |
| thabear | 02 Aug 2013 3:37 p.m. PST |
Fantastic result , would love to make some of my own as well . Waiting eagerly for tutorial . cheers Tom |
| Joes Shop | 02 Aug 2013 4:04 p.m. PST |
Looking forward to reading it! Regards, J. P. Kelly |
| Skeets | 02 Aug 2013 6:18 p.m. PST |
Looking forward to your tutorial as well. |
| jgibbons | 02 Aug 2013 7:31 p.m. PST |
I'm with the tutorial crowd! Awesome! |
| Old Smokie | 03 Aug 2013 5:07 a.m. PST |
Looking forward to your tutorial |
| Ammianus | 03 Aug 2013 6:41 a.m. PST |
I really like your little hill, very nice! |
| Ivan DBA | 03 Aug 2013 9:39 a.m. PST |
Excellent! Can't wait to see how you did this. |
| skinkmasterreturns | 03 Aug 2013 1:07 p.m. PST |
If I had to guess,looking at the road,light tan felt was the base.the dirt streaks look airbrushed.The edges brushed with Beacons Felt glue or similar and flocked.Am I right? |
| RexMcL | 03 Aug 2013 1:27 p.m. PST |
Flashman14- I've had good luck with spray adhesive. Haven't tried PVA. See the bottom of this page:
link |
| MajorB | 03 Aug 2013 2:08 p.m. PST |
Want to know how you do this! |
| Kmfisher | 03 Aug 2013 9:42 p.m. PST |
Here's a down and dirty version of how I did these, I'll post a pretty version, with pictures and some more stuff as soon as I can. The road and river both started as strips of plain felt. The road was a golden brown color, and the river was a darker grey blue. I planned for each to be about 1" wide then added a 1/2" to either side for banks/ditches and flocking. For the road I started with a dark brown craft paint and a 1" cheapo house brush. I loaded the brush by tapping it in the paint and scrubbing most of it off on a paper towel and then scrubbing along the edge of the road. I kept doing this till I had built up the color as dark as I wanted then did the same with a lighter brown covering a smaller area. For the flock I used a PVA glue and brush and kind of randomly applied the glue along the edges making sure to leave some of the brown showing through. I sprinkled the flock on both sides and placed a clean sheet of paper over the whole thing and gentle pressed and smoothed down the whole piece. Pulled the paper up and gently blew off the excess flock. For the bushes I used woodland scenic foliage clumps torn up into small bits and super glue. A small dot of glue, press the foliage down and leave it. Once everything has dried I hit it with really cheap hairspray to hold everything together. For the tracks in the road I used an old dry brush that looked to be about as big as a wheel and my lighter brown. I kept the brush dry and slowly built up the color till it looked right. The river was done in basically the same way, but I used a medium grey first then an antique white. I brought the colors in farther than on the road to allow for a shore line. Once I was happy with the look of the water I used the same colors on the very edges as on the road. Then finished the river using the same method for flocking as the road. For the ripples in the water I used my smaller brush and pure antique white. I didn't have it as dry, so they came out a bit more opaque than I would have liked. Then the hair spray to bind it all together and seal it. Just remember to keep the brush dry, and use a cheapy 1/2" to 1" wide brush. I also did not rinse the brush between colors, I think this gives a smoother transition between the colors. Both the road and river sections are 2" wide and 8" long. I think this technique would easily allow you to do any length or width. You would need to adjust the ratio of bank/ditch to open area, and glue the flock in sections. The felt soaks up the glue pretty fast. All told, these two pieces took me an hour to do, so I'd guess doing enough to cove a small table shouldn't take more than an evening. Sorry for the wall of text, if enough people are interested I'll put together a PDF with photos of all the steps. |
| skinkmasterreturns | 04 Aug 2013 4:51 a.m. PST |
Thanks for posting.I did something similar awhile back with strips of felt,but I didnt paint the edges,just used glue and flock,and the edges curled like crispy bacon,so I abandoned this method.I'm going to revisit it,as I need to make roads,its the only terrain feature I dont have for my stuff. |
| vtsaogames | 04 Aug 2013 9:23 a.m. PST |
One more vote for a tutorial. |
| MajorB | 04 Aug 2013 12:04 p.m. PST |
|
| skinkmasterreturns | 04 Aug 2013 2:24 p.m. PST |
I just got back from the store with a piece of new felt and some mid brown fabric paint-I'm gonna give it a whirl.:) |
| Old Smokie | 05 Aug 2013 6:07 a.m. PST |
a PDF with photos of all the steps would be great |
| Altius | 05 Aug 2013 10:22 a.m. PST |
This looks great! I'm trying it, and I too am wondering about the hill. |
| skinkmasterreturns | 07 Aug 2013 2:56 a.m. PST |
I did about 6 feet of straight pieces.They didnt come out exactly like the ones pictured,mostly because I have a different flock,and my streaking in the road is a little darker.But all in all,a good process.I'm doing curves and junctions next.Overall my roads have cost me about $2 USD,so far. |