Help support TMP


"Painting Pea Dot camo in 20mm" Topic


19 Posts

All members in good standing are free to post here. Opinions expressed here are solely those of the posters, and have not been cleared with nor are they endorsed by The Miniatures Page.

Please use the Complaint button (!) to report problems on the forums.

For more information, see the TMP FAQ.


Back to the WWII Discussion Message Board

Back to the 20mm WWII Message Board


Action Log

01 Aug 2020 11:47 p.m. PST
by Editor in Chief Bill

  • Changed title from "Painting Pea Doit camo in 20mm" to "Painting Pea Dot camo in 20mm"

Areas of Interest

World War Two on the Land

Featured Hobby News Article


Featured Link


Top-Rated Ruleset

Battleground: World War II


Rating: gold star gold star gold star gold star gold star gold star gold star gold star gold star 


Featured Showcase Article

1:72 Italeri Russian Infantry, Part VI

Pistol-waving command figures.


Featured Profile Article

First Look: Barrage's 28mm Streets & Sidewalks

Personal logo Editor in Chief Bill The Editor of TMP Fezian looks at some new terrain products, which use space age technology!


Featured Book Review


2,434 hits since 1 Aug 2020
©1994-2024 Bill Armintrout
Comments or corrections?

LeonAdler Sponsoring Member of TMP01 Aug 2020 11:20 p.m. PST

ust done a quick giude to painting Pea dot camo uniforms, a pdf is here
home.clara.net/adlermin/PAINTING PEA DOT.PDF


Painting Pea Dot camouflage
Pea Dot camo is one of those things that has a reputation for being difficult to do. Is one of
those things that gets people agitated a bit whereas in fact its quite simple if you approach
it it in the correct way.
This simple guide hopes to help in getting the right effect.

As many of you may know my preferred medium is enamels but here I've used the AK
acrylic set 3020 M44 CAMOUFLAGE UNIFORM set as acrylics are the most popular me-
dium for many of you.
One of the major problems with Pea dot is having the confidence that you have got the col-
ours right and this set is pretty much spot on. These paints are really designed for 1/35th
figures but with minor adjustments they do very well for smaller scales.
A wet Palate is very useful of this more later.
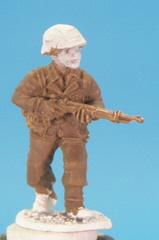
STAGE 1


The basic primed figure. In this case white though grey works just as well. Black will alter the colour tone way too much and in my opnion is way too
harsh.
Painted in the base colour 3021 slightly darkend with a little dark brown 3031. The pure colour is just a little too light. I like to add a touch of retarder to help flow.
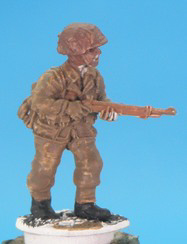
STAGE 2
No helmet covers were issued in Pea Dot so most had one of the number of helmet cover variations.
This is painted in 3061, make sure you paint the underside of the helmet rim.


At this point I'm going to suggest something counter intuitive. Instead of getting into the interesting bit of getting the camo scheme on
this is the point where you paint all the gear on the figure. Rifle, belts, bread bag gas mask canister etc.
Why?
Well if you leave painting the kit till after the camo if you make a mistake and get say black on the camo you might have to go in with several colours to clean up the error.
Whereas if the kit is painted now any errors can be made good using the first applications of the camo colours rather than having to re touch.
Once you have done the kit get a base coat of flesh on.

STAGE 3
Then in the case of this figure you need to paint the bits of tunic around the cuffs,collar and bottom edge of the tunic with field grey.
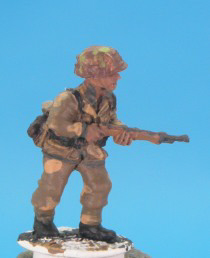
Right having done all the donkey work of the kit its time to get the first camo col-ours on.
First off the light sand tone 3022 in patch-es. Go easy always easier to add more patches when the other colours have gone in than to delete some.
Some people suggest doing the patches and the dots in one colour at the same time. Personally I find this confusing and prefer to do the patches and dots separately.
This is where you can tidy up any errors made while painting the kit and tunic
Added 3063 patches to the helmet.

STAGE 4
Adding the dark green patches 3023. Added 3064 patches to the helmet.

STAGE 5
Adding the first dots with 3023
Dots should go on the light patches as well as the base colour.Go easy with the dots, much easier to add more late than to erase un-wanted ones.

STAGE 6
Adding the light green dots 3024.If some of your dark green spots are too large you can pop a light green dot onto it to reduce its size.
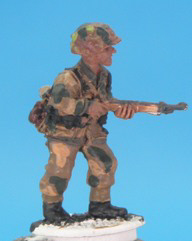
STAGE 7
Adding mid tone green dots with 3025 and the light tone dots with 3022

STAGE 8
Right now you have all the colours done we need to add some definition, some 3D dimesntionality.I give the figures a quick light spray with a matt aresol varnish to seal the paint so far done.
Then I mix up a dark brown wash with artists oils and with a No 2 brush wash the figure. If its too dark just add a little thinners to a clean brush and thin the wash down.
Same process with the flesh using a red brown. Just wash the flesh areas to add definition.
Once these washes are mostly dry ( 20 mins or so) mix a near black wash to go in to add definition to kit weapons, tunic collar, cuffs and gaiters.


Adding the beasic wash to the figure.This is using an oil wash but of course you can use inks or acrylic washes.
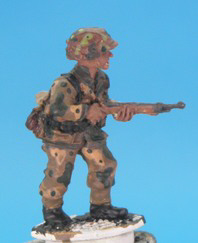
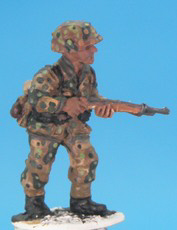
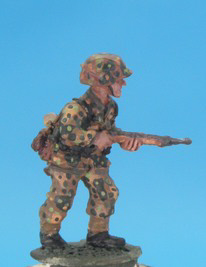
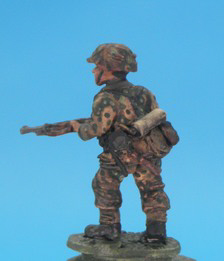
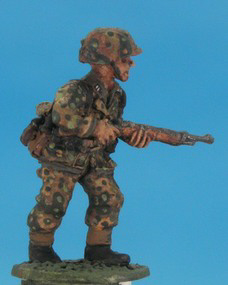
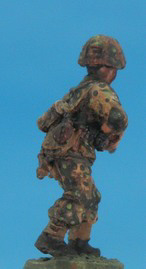
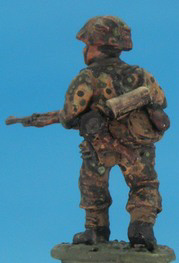
Stage 9
The finished figure with added flesh highlights and a few dots added.SS runes are decals available from Adler Miniatures.
As you can see pretty simple really just about getting the stages done in the correct order.


L

LeonAdler Sponsoring Member of TMP02 Aug 2020 1:56 a.m. PST

Oops missed this bit off.

MATERIALS
The basic paints are from the AK sets AK3020 and AK 3060.
Brushes I use the Spotter series 107 brushes by Pro Arte and various sizes of
Abteilung brushes.
Artist oil paints, Black,Mars Brown ( for flesh) and Burnt Sienna.
A wet pallete is very useful for this job, if you've not got one you make your
own using a Chinese Takeaway plastic tub. Lay in a piece of the thick kitchen
‘Sponge cloths' soak this in clean water first. Spary with anti bacterial. Cut a
piece of Baking paper to size to fit on top of the sponge.

This then is your paint pallete, pop the lid on and it will keep the paints useable
for days.

Good references are Micheal Farmworths Modelling and painting World War 2
German Military figures and German Army Grenadier by Stephen Andrew.

Both invaluable.

Uparmored02 Aug 2020 2:04 a.m. PST

Nice, but I thought you said no helmet covers were issued in pea dot?

deephorse02 Aug 2020 2:43 a.m. PST

Hi Leon. Your .pdf link isn't working for me, and that's after copying and pasting it into a new browser address bar.

LeonAdler Sponsoring Member of TMP02 Aug 2020 3:59 a.m. PST

Uparmored,
Might look like Pea dot on the helmet cover but slightly different pattern and colours. Dammed tricky to tell in 20mm it has to be said lol.
Deephorse,
Not sure why that is, I have been uploading ammended versions this morning so you might have tried during one of the 'delete new upload' sessions.
Thers a link from the Waffen SS infantry page on the website as well.
L

Marc33594 Supporting Member of TMP02 Aug 2020 6:23 a.m. PST

Worked fine for me. Thanks Leon for taking the time to put this together and post it, much appreciated.

pzivh43 Supporting Member of TMP02 Aug 2020 9:16 a.m. PST

Link worked for me, too. Very timely as I'm painting some 20mm right now. Thanks!

Thresher0102 Aug 2020 10:20 a.m. PST

Thanks for sharing the tutorial and photos. Your work is superb!

The PDF link isn't there.

They were known to make their own helmet covers in the field, so that isn't impossible.

Personal logo Legion 4 Supporting Member of TMP In the TMP Dawghouse02 Aug 2020 10:28 a.m. PST

Very nice !!!! thumbs up

LeonAdler Sponsoring Member of TMP02 Aug 2020 11:50 a.m. PST

On the web page the link is right down at the bottom of the page.
L

captaincold6902 Aug 2020 12:20 p.m. PST

Thanks Leon…you da man!!!

Frederick Supporting Member of TMP02 Aug 2020 1:04 p.m. PST

Very helpful – thanks for sharing!

deephorse03 Aug 2020 4:56 a.m. PST

Hi Leon, I have again copied the link you gave in your first post into an empty address bar and I still don't get the .pdf.

So I trawled around your website and eventually found It. The address bar for the .pdf gives this however …

PDF link

Edit Ok, TMP converts the full text of the link to just PDF Link. What I was trying to show is that the correct link contains characters that your initial post does not. Anyway, I found it.

Thanks.

Uparmored03 Aug 2020 5:10 a.m. PST

Cool Leon but before I posted I did look real real close. The rear and left side shots I can detect subtle differences in the pattern but right side I can't. I'm basically colorblind too.

So nice work anyway, looks very cool and battle ready. If I ever get around to doing WW2 I will definitely look closely at Adler. Excellent combat posing and feel. And I love 20mm.

4th Cuirassier03 Aug 2020 8:00 a.m. PST

I don't need any SS, but I do need 20mm Germans and I didn't even realise Adler did any, so that's useful to know.

Guderian11105 Aug 2020 10:40 a.m. PST

Thanks Leo, I´ve just received all the SS figures and soon I´ll start painting em all ;)
Would like you have include the spare NCOs, next time I hope they´d be on the shopping list ;)

@ 4th Cuirassier , Leo does have Heer, he has Panzer Lehr figures and are really great, I´m painting them now, and I highly recommend his figures

link

historygamer06 Aug 2020 6:49 p.m. PST

Outstanding post. Thanks for sharing.

Sebastian Palmer27 Oct 2020 3:43 p.m. PST

Great post/tutorial. Thanks for sharing

French Wargame Holidays30 Oct 2020 12:42 p.m. PST

Fabulous thank you Leon

cheers
Matt

Sorry - only verified members can post on the forums.