| Mark 1 | 16 Apr 2022 8:04 p.m. PST |
My next project was also a refurb, but in this case was a notably larger of a project. And I thought to get a couple of "before" pics to set against the "after" results of the refurbishment.
This is what my US Army 105mm Howitzers looked like before this project. Kind of yuck. I mean, at least they are painted and based with gun crews. But they certainly don't show much pride-of-workmanship.
The guns are GHQ (I think). They were spray painted with Testor's Model Master Medium Forrest Green. The crews are older H&R figures -- I think maybe Soviet WW2 arty crew figures. They were spray-painted Testor's MM Olive Drab. The bases were just cut cardstock, swirled in a dull earnthen color with a brush. No detailing at all.
I removed both guns and crew figures from the bases. I created new bases mounted on pennies, with a mix of kneeling and standing crew figures, a couple ammo crates, and some empty brass. The crew figures are painted in US Army uniform colors from the Vallejo collection, with Field Drab trousers, Olive Drab tops, and Brown Violet helmets (that's the name of the color, what can I say?), with Green Grey webbing/packs. I added a battery HQ for each battery, with a table with radio and map.
The guns were painted US Olive Drab, washed, and tires in Grey Black.
The guns drop right onto the stands for when they are set-up in firing position. They can be removed at any time for towing, or if the crews or guns take separate damage, etc.
I have two batteries. A full battalion should be three batteries plus battalion HQ and fire-control center. That seemed like a much taller order, and a scenario requiring the whole battalion to be on-table seems like a somewhat remote possibility, so I'm happy to leave it at just a couple batteries.
Here is one of my batteries shown in the artillery positions I have made from self-drying clay (which have been shown in prior postings). They drop right in, giving a reasonably nice presentation for a battery getting caught by a sudden breakthrough, etc. I'm happy enough with the results. Certainly will be a bit more pleasing on the table than they were in their prior state. -Mark
(aka: Mk 1) |
| Captain Pete | 23 Apr 2022 6:49 p.m. PST |
I love the 105s, Mark! That is a very nice refurbishment of existing models. I have not done any refurbishment on my models as you have but recently did some repairs to my Russian support weapons. This was just regluing the guns, and in some cases the crews, back on their bases. |
| Mark 1 | 25 Apr 2022 10:43 p.m. PST |
Hi Pete - Thanks for the comments. I also refurb'd a battery of 155 Howitzers, but I have not taken any pics of those. Not too different from the 105s, except that there are no empty brass casings lying around, and instead of ammo crates there are palettes with projectiles and linen charge bags. Unhappily, no sooner had I finished the refurb of the Valentines (prior page) than I found out those are GHQ Valentine Mk IIs, rather than Mk IIIs! Ouch! So the turrets are wrong -- I need the elongated turrets. (The French in Tunisia actually received Valentine Mk Vs. But those are pretty much indistinguishable from Mk IIIs, the only difference being that they are equipped with GM Diesel engines rather than the famous Leyland Bus engines of the earlier Valentines.) I came across this little gem of information when I went to the box-of-pewter-toys in the garage and dug up the un-opened pack of later marks of GHQ Valentines to paint up to accompany these in my Russian force, and found that it was a pack with 2 Mk III turrets and 3 Mk IX turrets for 5 hulls. Well I'm not too upset about buying and painting up more of the Mk IIIs (2 just ain't enough), but what am I going to do with the Mk IIs I now have in French colors? Sigh … -Mark
(aka: Mk 1) |
| Mark 1 | 26 Jun 2022 1:54 p.m. PST |
Here is a rather large project I finished a few months back (before the artillery refurb shown above). But it took me longer to get the pics all squared away… I mentioned somewhere in the prior postings (maybe back with the posting of the Armored Cav platoon?) that I had enough US infantry figures left over that I might do another unit. With so many nice Sherman companies coming into my collection, I felt the need for some armored infantry.
So here is my US Armored Infantry Company.
As with the Armored Cav, this is a pretty complex ToE. There are 3 infantry platoons, an AT gun platoon, and a Company HQ.
Each platoon has 3 squads of infantry. I have used the "pulpit" M3A1 halftracks to identify my platoon leader tracks (the platoon leader traveled with one of the squads, to that track is one of the 3 squad tracks).
Each platoon also had its own support, with 1 MG halftrack (with a .50cal and 2 x .30cal MGs) and an 81mm mortar halftrack.
That makes a total of 5 halftracks per platoon. And that makes a lot of firepower at the platoon level.
The models seen so far are all GHQ M3 / M3A1 Halftracks, with figures from the GHQ Armored Infantry pack. The only variance is a few standing rifleman figures I have placed shooting over the edge in some of the halftracks, as part of my deliberate effort to mix up the composition of the figures to give an impression of the busy nature of these vehicles in combat areas.
I have the company dismounted as well, of course. That's part of what makes this such a big project. First it is a complicated TOE. Second, I am in effect modelling two companies -- one of vehicles (mounted figures) and one of infantry (dismounted figures). The infantry figures are almost all from H & R. I mount my figures on US pennies.
When occupying terrain the standard operating procedure was to dismount the support weapons too, so each platoon has a lot of stands. In addition to the MG support, each squad had one (or often two) BARs and a bazooka. So again, this is an infantry unit with A LOT of firepower!
I can't think of another infantry company in WW2 that had so much firepower at the platoon and company levels.
And we should also bear in mind that there was a full platoon of AT guns in each company.
As is my general approach, the gun crews are based and the guns are loose. This allows me to use the same company both for Tunisia/Sicily (37mm AT guns) and ETO (57mm AT guns). Or I can use the gun crew stands, without guns, as infantry. Some units in ETO preferred to leave their guns behind and just have more riflemen. This was probably a good choice when clearing a mostly infantry-based opponent out of towns and woods.
There was a reasonably complex company HQ as well. The CO had a squad-sized retinue to support him, the XO was also available (and as I understand it was trained to gather the mortars from the platoons to form a single 3-tube battery under his command when the situation warranted), as well as supply and maintenance sections, and a medic who was usually attached (not in the ToE) from battalion.
And they all needed their own wheels as well. Although some portion of those vehicles (and men) would typically form a rear area HQ at the "rally point", or remain with battalion HQ, when combat was expected. So there's the company. Oy, that's a lot of stuff. Hope they do well on the battleboard! -Mark
(aka: Mk 1) |
| Mark 1 | 27 Jun 2022 11:42 p.m. PST |
With so many muddy tracks and dirty boots, maybe it's time to go back up in the air for a bit. How about some Speedy-D action?
Here are a pair of my recently-completed SBD Dauntless dive bombers.
I painted them up in the colors used by VS-41 abord USS Ranger during Operation Torch: Medium-blue uppers, and a yellow ring around the fuselage-side stars.
Time to go hunting for some tanks.
Although the disappointing thing is, that the tanks these birds got to hunt were neither German nor Italian … but French. Now before anyone asks … yes, the evidence that a sharp-eyed observer might pick out from the terrain below my Speedy-Ds is that they are in fact flying around over Tunisia, not Morocco.
As is evidenced by the Roman-era ruins. This is a scratch-build I put together as a terrain scatter-piece for my Tunisian scenarios. But it could probably serve as well in any scenario in or around the Mediterranean. Some years ago I set up a game based on February 1943 battles fought near Hir Moussa in the Ousseltia Valley. My research into the terrain around that battlefield showed Roman ruins just 2 or 3 Km outside of the town. I had nothing to put on the game board at the end of that particular dirt road. Next time, I will! -Mark
(aka: Mk 1) |
| Captain Pete | 28 Jun 2022 2:36 p.m. PST |
More great looking stuff from you, MK1! I really love the Mech Infantry Company. I have plenty of American WWII unpainted M-2 and M-3 halftracks and variants that will require some tender loving painting one of these days. In the meantime, I will admire yours. |
 deadhead deadhead  | 29 Jun 2022 1:04 a.m. PST |
Terrific attention to detail in both the modelling and composition of the units. I thought, seeing the photos of the Dauntlesses, before reading the text, "He has that wrong. The yellow ring was peculiar to Operation Torch". I should have known. Terrific How about no Roman ruins in Morocco? Never knew that. Those Vichy tanks do not stand a chance, unless they wave white flags very quickly |
| Captain Pete | 30 Jun 2022 6:34 a.m. PST |
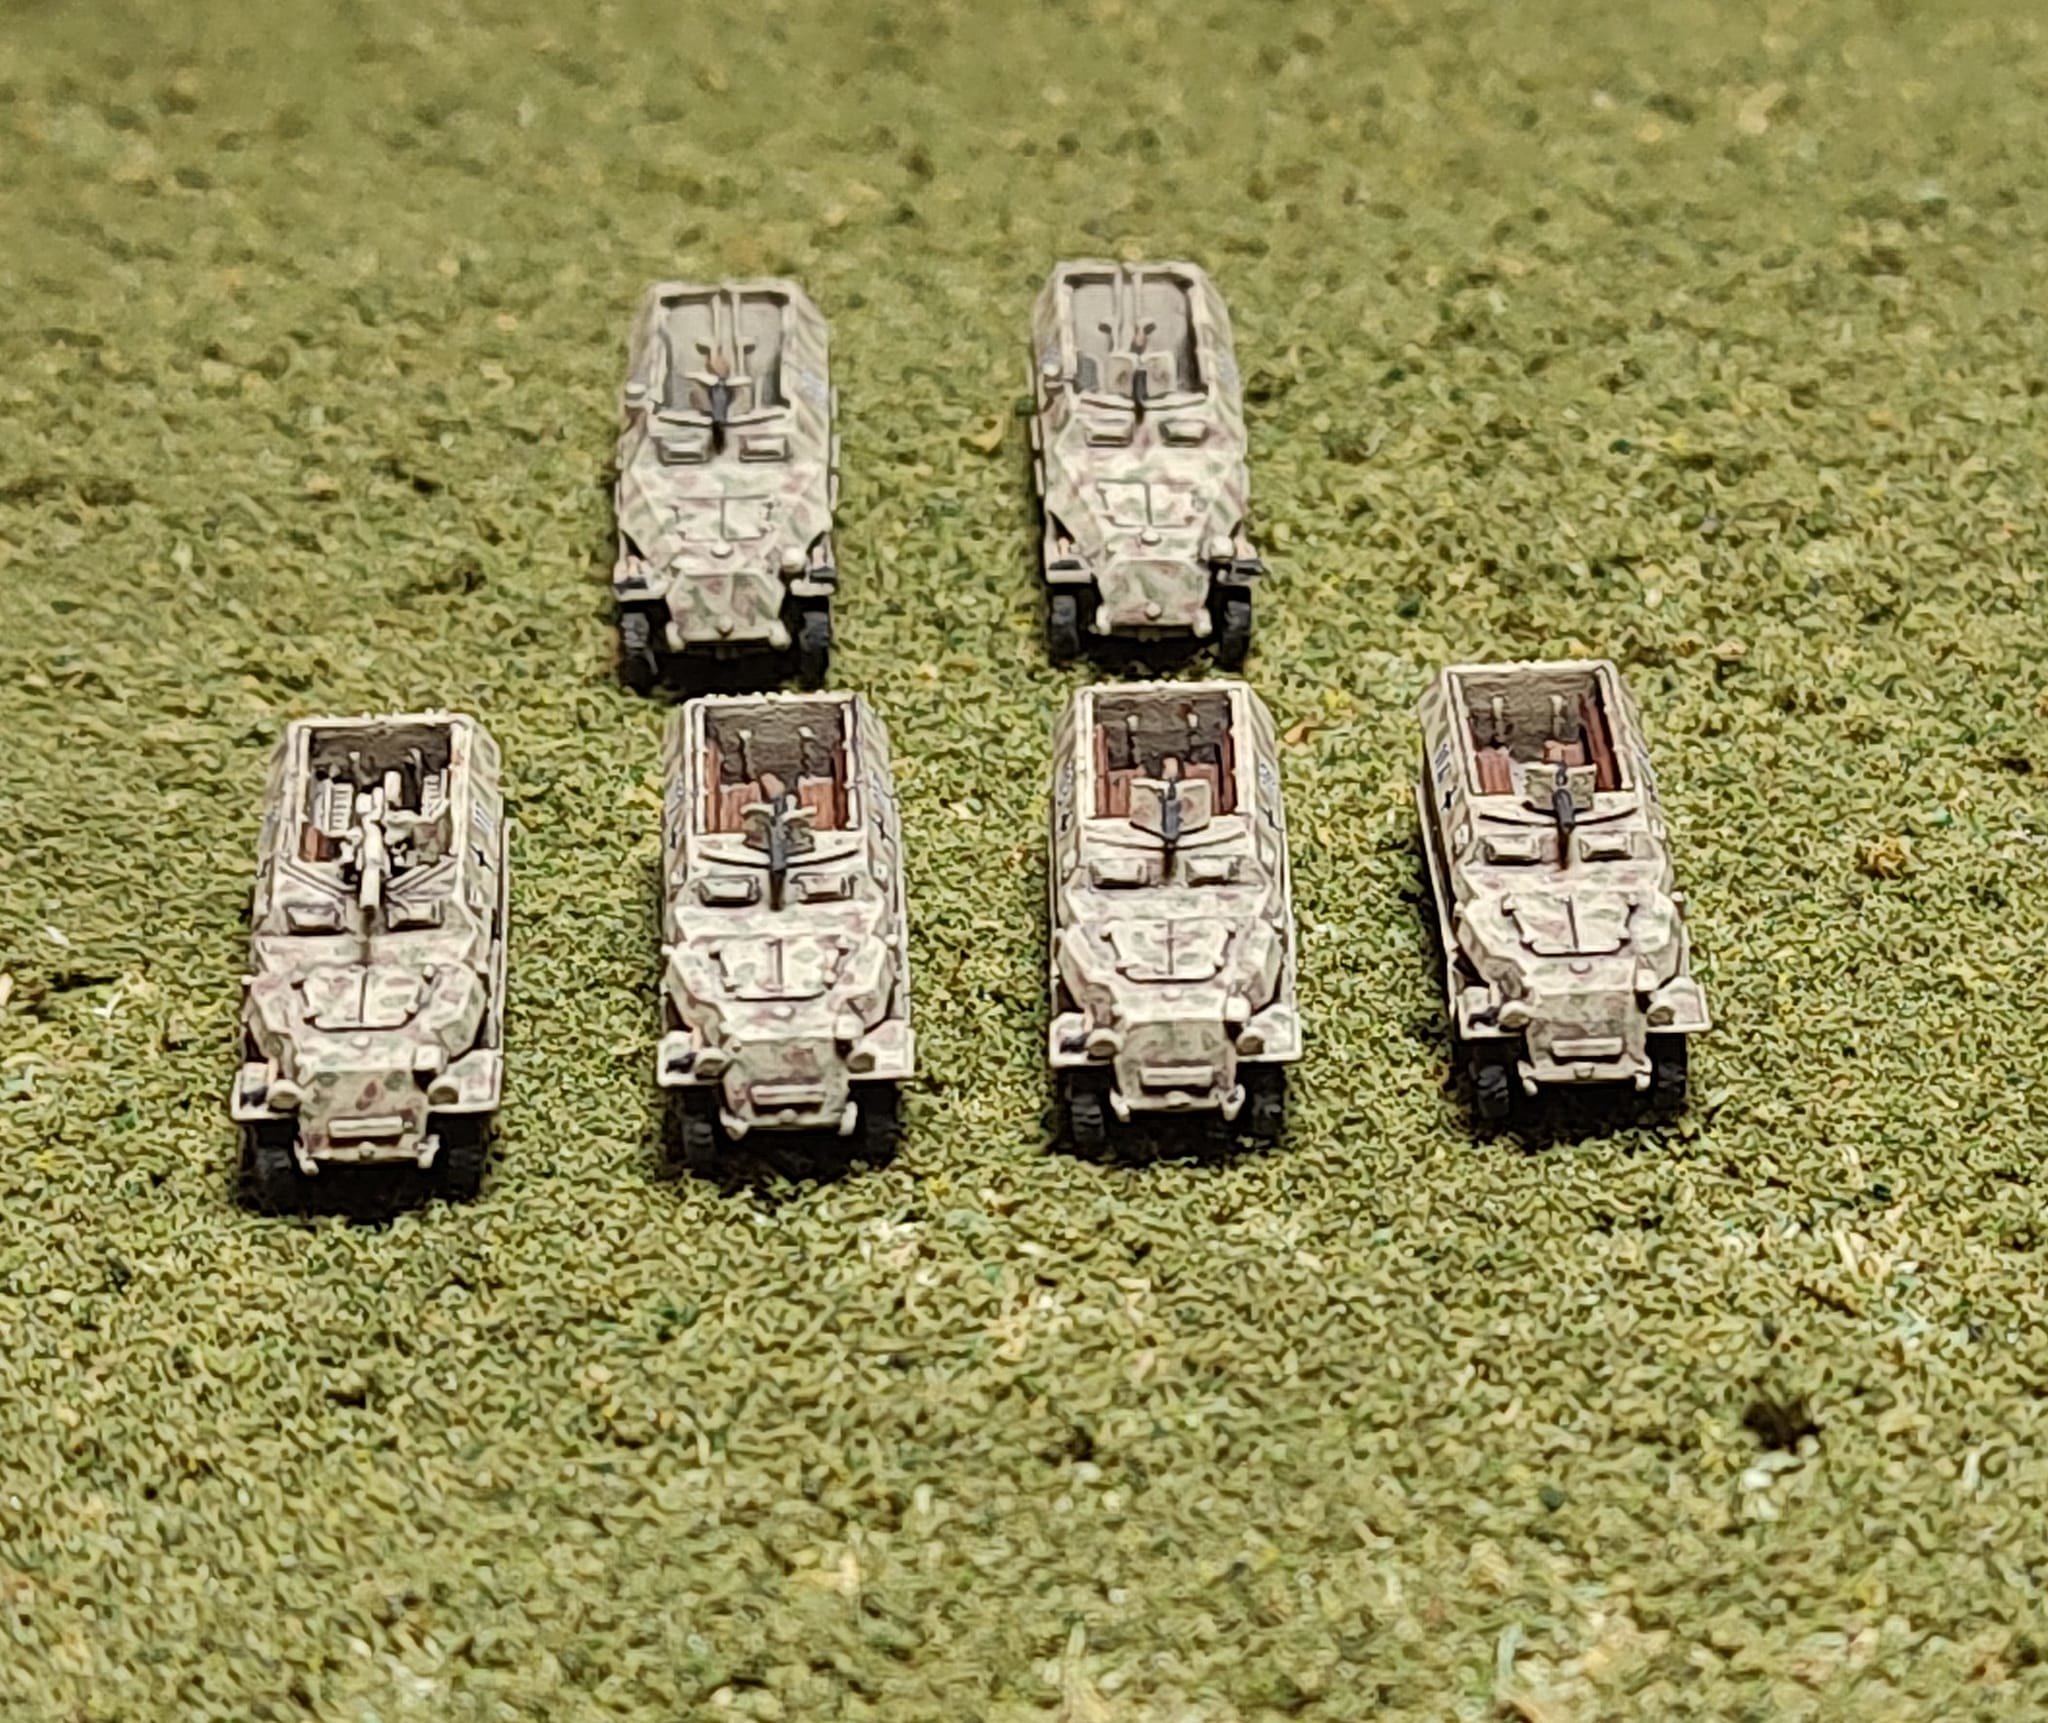
I recently completed 6 German Sdkfz 251 halftracks for my mid and late War Germans. I have quite a few more on the workbench waiting to go. The tactical numbers and the crosses are by Flight Deck Decals. They have an excellent selection of WWII and even Modern decals for 1/285th and 1/300th scale vehicles.
|
| Mark 1 | 01 Jul 2022 11:15 a.m. PST |
Pete – Your micro painting skills are just at a different level. Consistently so. Those "Hanomags" are really superb, but that's no surprise after all the other superb units you've posted. I often mumble my frustrations at my lack of photography skills and/or my lack of a decent camera. But my work does not stand up under the scrutiny of really good, clear, photography. At least not the way yours does. The edges of the camo blobs, the wheel rims and the tires, the shading of the slatted wood of the interior benches, the shading of the gap between the engine access panels, the consistent (to minute detail) placement of the decals, as well as how they are flowed in to the painted surfaces … there is so much to appreciate when looking at the models under the pocket e-microscope effect of a digital camera. Really nice work. -Mark
(aka: Mk 1) |
| Captain Pete | 01 Jul 2022 2:04 p.m. PST |
Thank you so very much, Mark! I guess I am just a bit OCD sometimes. I always love seeing your work posted here. I also enjoy seeing what other people are doing in our scale as well. |
| Mark 1 | 02 Jul 2022 12:16 p.m. PST |
I also enjoy seeing what other people are doing in our scale as well. Me too, Pete. Me too. I used to have to go to the local hobby shop to buy wargaming magazines to see pictures of how other people approached the hobby. My learning curve was pretty slow in those days. I wish the hobby shops were still around, but alas there is no hobby shop I know of in my area that stocks any 6mm stuff anymore. I still make the treck over the hill to an almost local (only ~20 miles away) hobby shop that stocks miniatures stuff, and I always find an excuse to give them some of my money when I'm there (paints, brushes, something…), but they don't have anything in 6mm, and when I ask they are clear that 15mm is about as small as they are going. Which is OK, can't blame them, but it leaves me without … Except I now have online fora that give me better pics than I ever got in wargaming magazines anyway, pics that are real work done by other real gamers, sometimes staged and photographed well, sometimes just shown on a workbench or game table as one would actually see them in person. Sometimes far beyond my skills (something to strive for a learn from) and sometimes newcomers tracing some of the same steps I followed in my own path. And I get to chat with those folks. Folks from all over the country, even all over the world, about their models, the vendors they go to, the techniques they use, the rules they play, their experiences on the game table, etc. My hobby experience is greatly enriched by this. In short, I loves me some wargaming chat. And if it is populated by eye candy, so much the better! -Mark
(aka: Mk 1) |
| deadhead | 02 Jul 2022 2:39 p.m. PST |
I love your tale of supporting your local modelling store. This side of The Pond, I drive a few miles to our local market town (North Yorkshire and very, very, rural). For some daft reason a modelling store moved out there, because city taxes were so massive and crime rates were horrific. So, every time I go in I try to buy something that I really do not need at all. Brushes, Humbrol enamel paints (never use them), modelling tools ( I have two boxes full) but I feel I have to do my tiny bit to keep them going….for a year or two anyway |
| Captain Pete | 02 Jul 2022 7:55 p.m. PST |
Hi Mark If I remember correctly, you live in the Bay area. They used to have a couple really good model and hobby shops there including San Antonio Hobbies and another one. I actually did buy some Micronauts at the other one in early 1998 while up there for my cousin's wedding. I still can't quite remember the name of it but it was pretty decent as I recall. |
| Mark 1 | 02 Jul 2022 8:31 p.m. PST |
Pete:
Yep. San Antonio was a great hobby shop up in Mountain View near the Palo Alto boarder. They moved to a smaller shop space (just around the corner in the same open mall) for a couple of years, but then eventually just closed up and went away. The other really great shop was D & J Hobbies in San Jose. Both of these were large, well stocked, very popular shops. But alas both are gone. There was a big shop in downtown Oakland for several years. I can't remember the name right now -- only went there two or three times. Anyway, they're gone too. Some of the larger hobby chains used to have shops in the Bay Area. Hobby Lobby was one -- they had 3 or 4 stores in the area. All that I know of are closed … if any remain, I don't know of them. There also used to be a lot of smaller shops scattered around. A few of them still remain. GameKastle is one, that I mentioned above. It's a good shop. The folks who work there are knowledgeable and quite friendly. They have made good recommendations to me on paints as my old favorites Polly-Scale disappeared. They have a couple of tables in a back room for scheduled gaming and painting/modelling events. But they don't have any 6mm stuff. I've considered scheduling a game and trying to drag at least one known contact to come play, to see if we could troll any newcomers to join us. But their schedule seems full enough of games using stuff they sell, and my schedule is full enough of working to pay the bills and keep up on the house, and I just haven't done it … yet(?). Maybe some day. -Mark
(aka: Mk 1) |
| Captain Pete | 04 Jul 2022 7:24 p.m. PST |
MK1 I do believe it was D&J Hobbies that I went to in 1998. I remember buying a few WWI Micronauts there. Here in the greater Phoenix area we have a number of game shops here and there but most cater to the Fantasy and Sci Fi genre. My favorite store that is reasonably close is Imperial Outpost Games. They don't carry 6mm historicals but they do carry Flames of War and a fair number of historical board games as well as the Sci-Fi and Fantasy stuff. They do have game tables for open gaming when there isn't some sort of tournament going on. I have run a number of Mein Panzer games here over the years. I will have to do another one soon. |
| Wolfhag | 06 Jul 2022 6:17 a.m. PST |
There was a big shop in downtown Oakland for several years. I can't remember the name right now -- only went there two or three times. Anyway, they're gone too. That was End Game. Great place with lots of table space. They closed about 2 years ago. There was Centurion Hobbies in Pleasant Hill that closed down about 15 years ago. Games Workshop had a store at Sun Valley Mall but closed down a number of years ago. I think they may still have one in Pleasanton. My understanding of San Antonio Hobbies was that the owner died and the wife didn't want to run it. There is an active one in Concord called Black Diamond games. Wolfhag |
| regia marina | 18 Jul 2022 7:37 a.m. PST |
Such fond memories of the San Antonio Hobby Shop. I grew up in Mountain View and use to ride my bike there to buy my GHQ and CnC ships, tanks, rules, books, etc. That was back in the early 80's. That's where I got my start! The guys behind the counter give me tips on how to use my airbrush and paint the minis. I liked D&J too but I had to get my parents to give me a ride. Mickey's Model Shop in Sunnyvale was cool too! I got a lot of tips from Mickey since he was always sitting at his desk painting something. |
| Mark 1 | 20 Jul 2022 3:02 p.m. PST |
RM Mickey's Model Shop in Sunnyvale was cool too! I got a lot of tips from Mickey since he was always sitting at his desk painting something. Was that the small shop in the "Town and Country" set up between the Sunnyvale mall and the train tracks? I remember a small one-room model shop, with very nicely done models in a display case in the window, various shelves stacked with Revell and Monogram model boxes, and the owner sitting behind his counter painting / building a model every time I walked in. It looked more like a man cave than a retail store, but he was a very friendly and engaging fellow. Going the that shop was more of a hobby entertainment experience than a shopping experience, at least for me. A chance to chat, see some cool stuff, maybe learn a new technique. He had maybe one small counter-top display tree with some GHQ microarmor packs. I tried to find something to buy every time I went there, but it was a bit of a challenge as he was really focused on models and I have been a 6mm buff for too many decades. In fact, as I scratch my head and noodle it, I think the Valentine tanks I posted in this thread a few months ago may have been bought from that shop. Maybe. I mean, as I stopped trying to collect British kit in about 1978 or so, and I painted those up originally in the late 1990s, I don't really have much reason for those to have been in my collection other than that I bought them on a lark just because they were in front of me and I was itching to spend some money. Which happens in retail settings but does not happen online (at least for me … I do know that some/many folks are inclined to spur-of-the-moment online purchases, but I am not). Anyway, I hope we are describing the same shop. If we are, then yes, it was indeed a cool little place. -Mark
(aka: Mk 1) |
| regia marina | 22 Jul 2022 7:02 a.m. PST |
Hi Mark… we are describing the same place. My brother and I spent a lot of money there buying 1/32 scale Airfix soldiers. That was the gateway into GHQ and CnC minis. I still have all those Airfix soldiers in a basket. I keep telling myself that one day I'm going to paint some of them. You're right though, it was more of a man cave and hobby experience than anything else and I don't remember ever leaving empty handed. Good times!
John |
| Mark 1 | 30 Jul 2022 5:29 p.m. PST |
Some nice memories of the shops that used to be around. In some ways it is surprising to me to find I have so often walked through the same doors as online friends I've chatted with virtually for years, but never met in person. In other ways it is not so surprising -- the miniatures gaming community is not so large that we should not expect to be walking through the same doors often enough. All of that said, back to some modelling work. Here is a bit of a quick scratch-build I recently completed. First, some of my inspiration:
Refueling is one of the common activities any tanker will know. All tanks in all armies must be fuel conscious, and in many cases you can read accounts of both the challenges of trying to refuel during intense combat operations, and importance of refueling points as tactical objectives. I bought some "extras" packs from H&R recently that included petroleum drums. I've often wanted a refueling point as a piece of scatter terrain for my battleboards. So I went looking for some pictures of tank refueling during WW2. Most of the shots that have refueling directly from barrels were of German armor -- odly even though the "Jerry can" was copied from the Germans, it became so prevalent for the western allies that almost all pics of combat area refueling involve Jerry cans rather than barrels. And I can't find a source for 6mm scale Jerry cans. Oh well. So I went with the German pics, and build a refueling point.
Even though I don't run Germans, I can use it for my Romanians, my Italians, and probably for my French without eliciting too many complaints from gaming compadres. I only did 2 pieces. First is the actual refueling team of 2 soldiers, with a barrel set up with a fuel pump and fuel hose, and a second barrel close by just for visual effect. Second is the fuel depot, with many barrels under a tarp with a bit of camo netting spread about for good measure.
They are pictured here with a French fuel truck and a Romanian R2 tank just show how they might appear at game time. The figures of the fueling team are an H&R Italian standing artillery crewman and an H&R American kneeling gun crewman. The fuel pump and hose are just bits snipped off of nylong/plastic sprues that come on clothes (holding the price tags). The fuel depot was done with a comple bits of balsa to give some bulk, cut with some indents along the edge to give a hint of rounded tops, with a few rows of false barrels on top and at the front of the first level to give more sense of barrels under the tarp. These false barrels are cut from plastic rods. In the past these were my best available approach to barrels, but as can be seen from the fuel truck (done years ago) it is very hard to cut them to a uniform length, and the shape, while cylindrical, does not give many other indications of being a petroleum barrel. The H&R barrels are much nicer, but I did not want to use them all up on this one project, so went with the balsa and rod covered by aluminum foil (to be my tarp) to extend the impression of a lot of barrels, using the H&R barrels only sparingly on the outside of the tarp. The camo netting is foam packing material, melted down and held in place by superglue, and then painted.
Supply dumps of various sorts can be important objectives in games, so they are useful bits to have available. I have some commercially products resin casted supply dumps, but none that are exclusively fuel dumps. I know at least one vendor offers such pieces, but I had the barrels, and this seemed like a fun little project, so there it is. It does add a useful extra to my bits and pieces. -Mark
(aka: Mk 1) |
| FlyXwire | 31 Jul 2022 6:51 a.m. PST |
Doing these custom vignettes always seem most enjoyable, until you need a dozen more required by some rule set as game "markers"….then it starts to feel more like work to me. Keep the fun going Mark! |
| Captain Pete | 05 Aug 2022 12:27 p.m. PST |
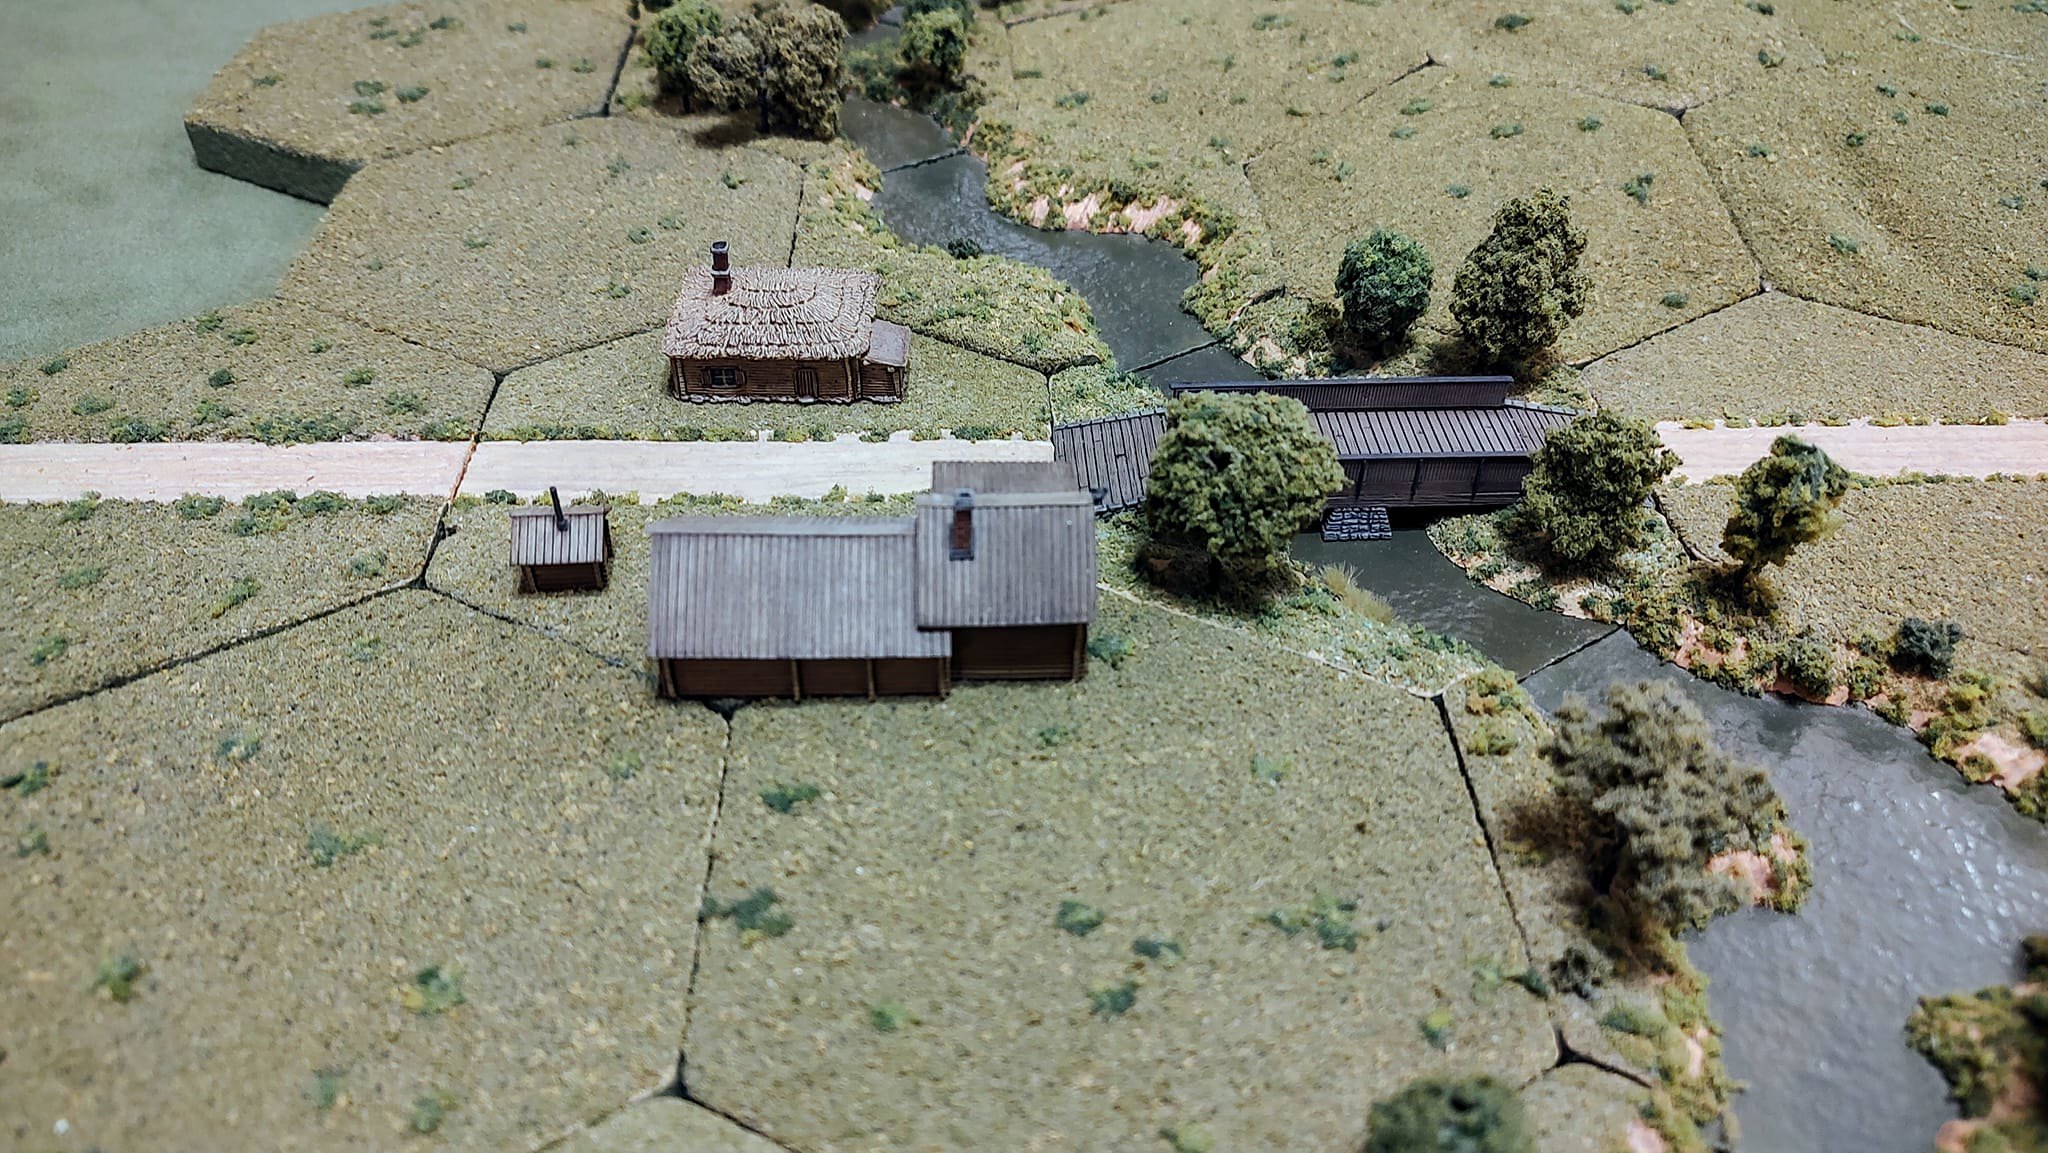
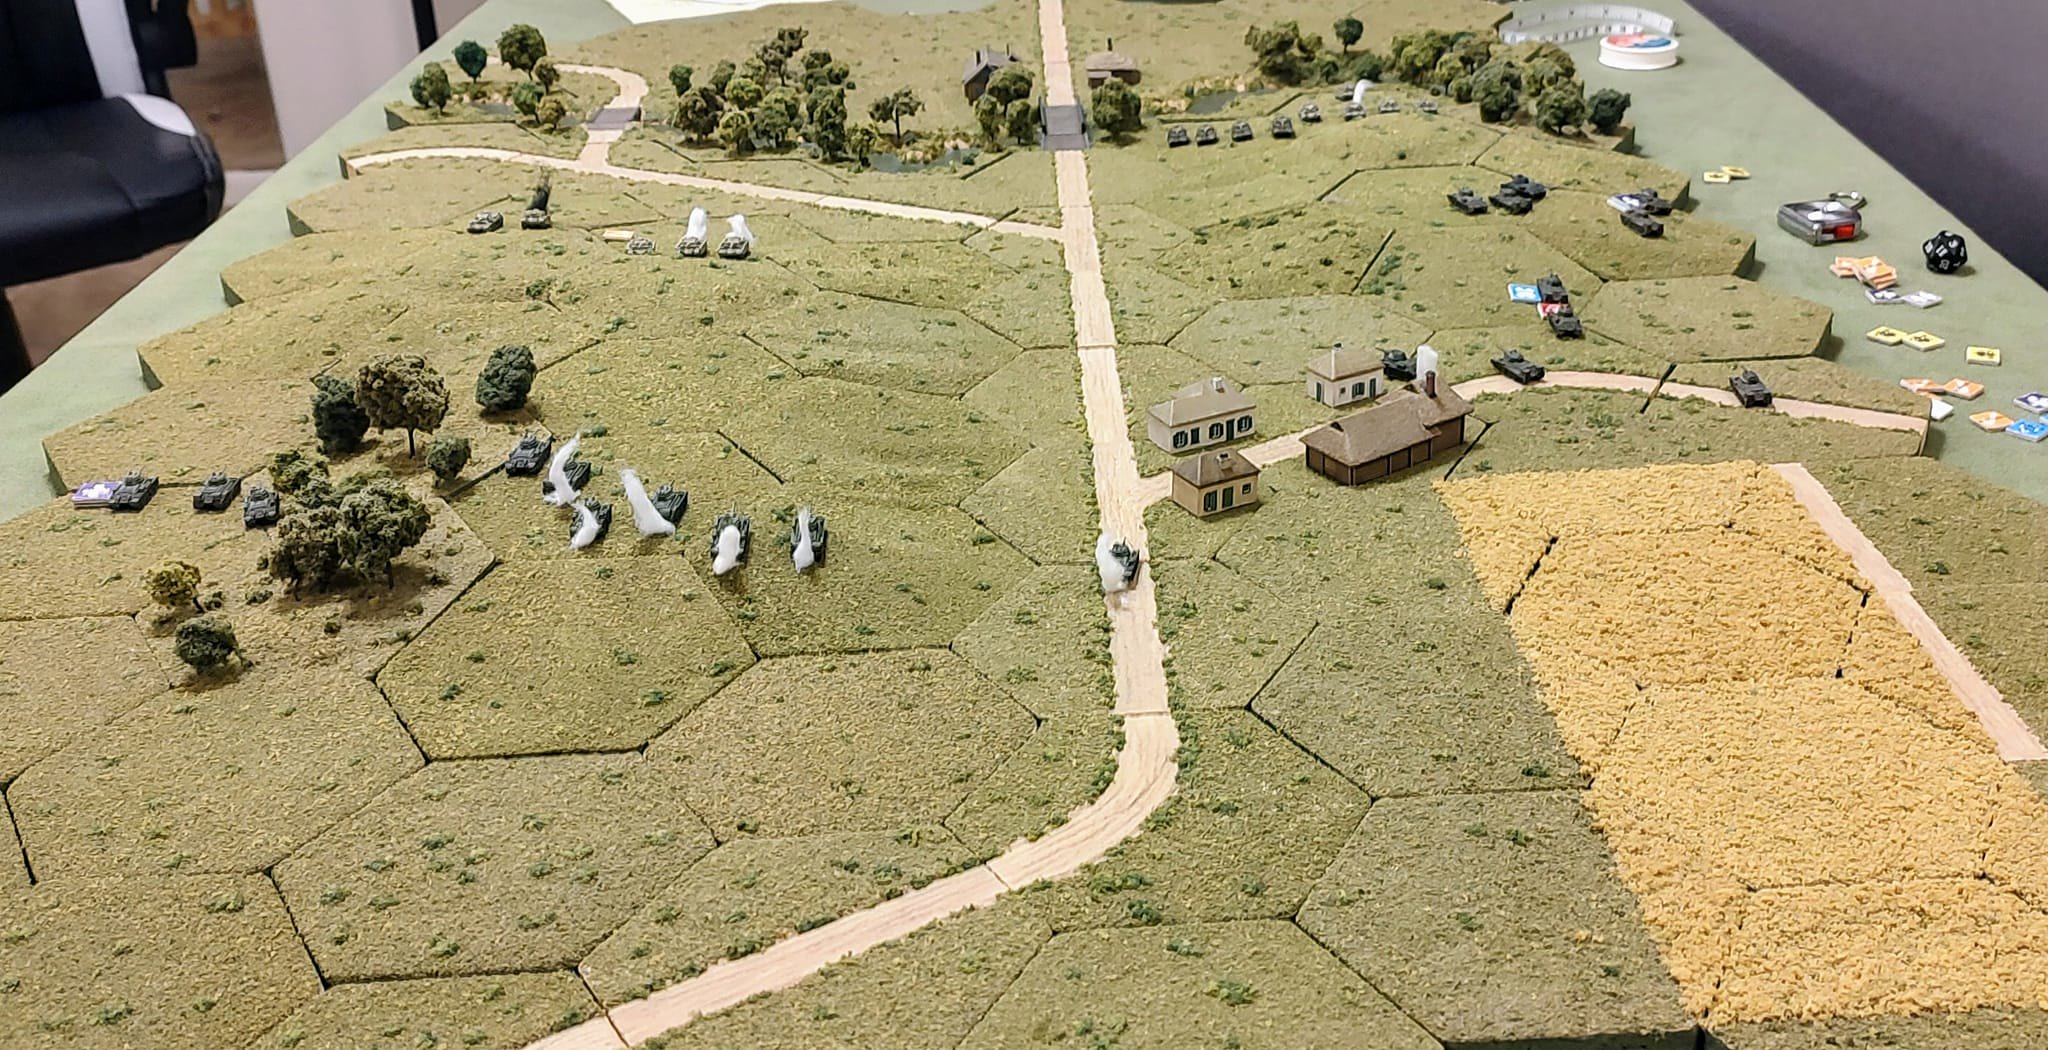
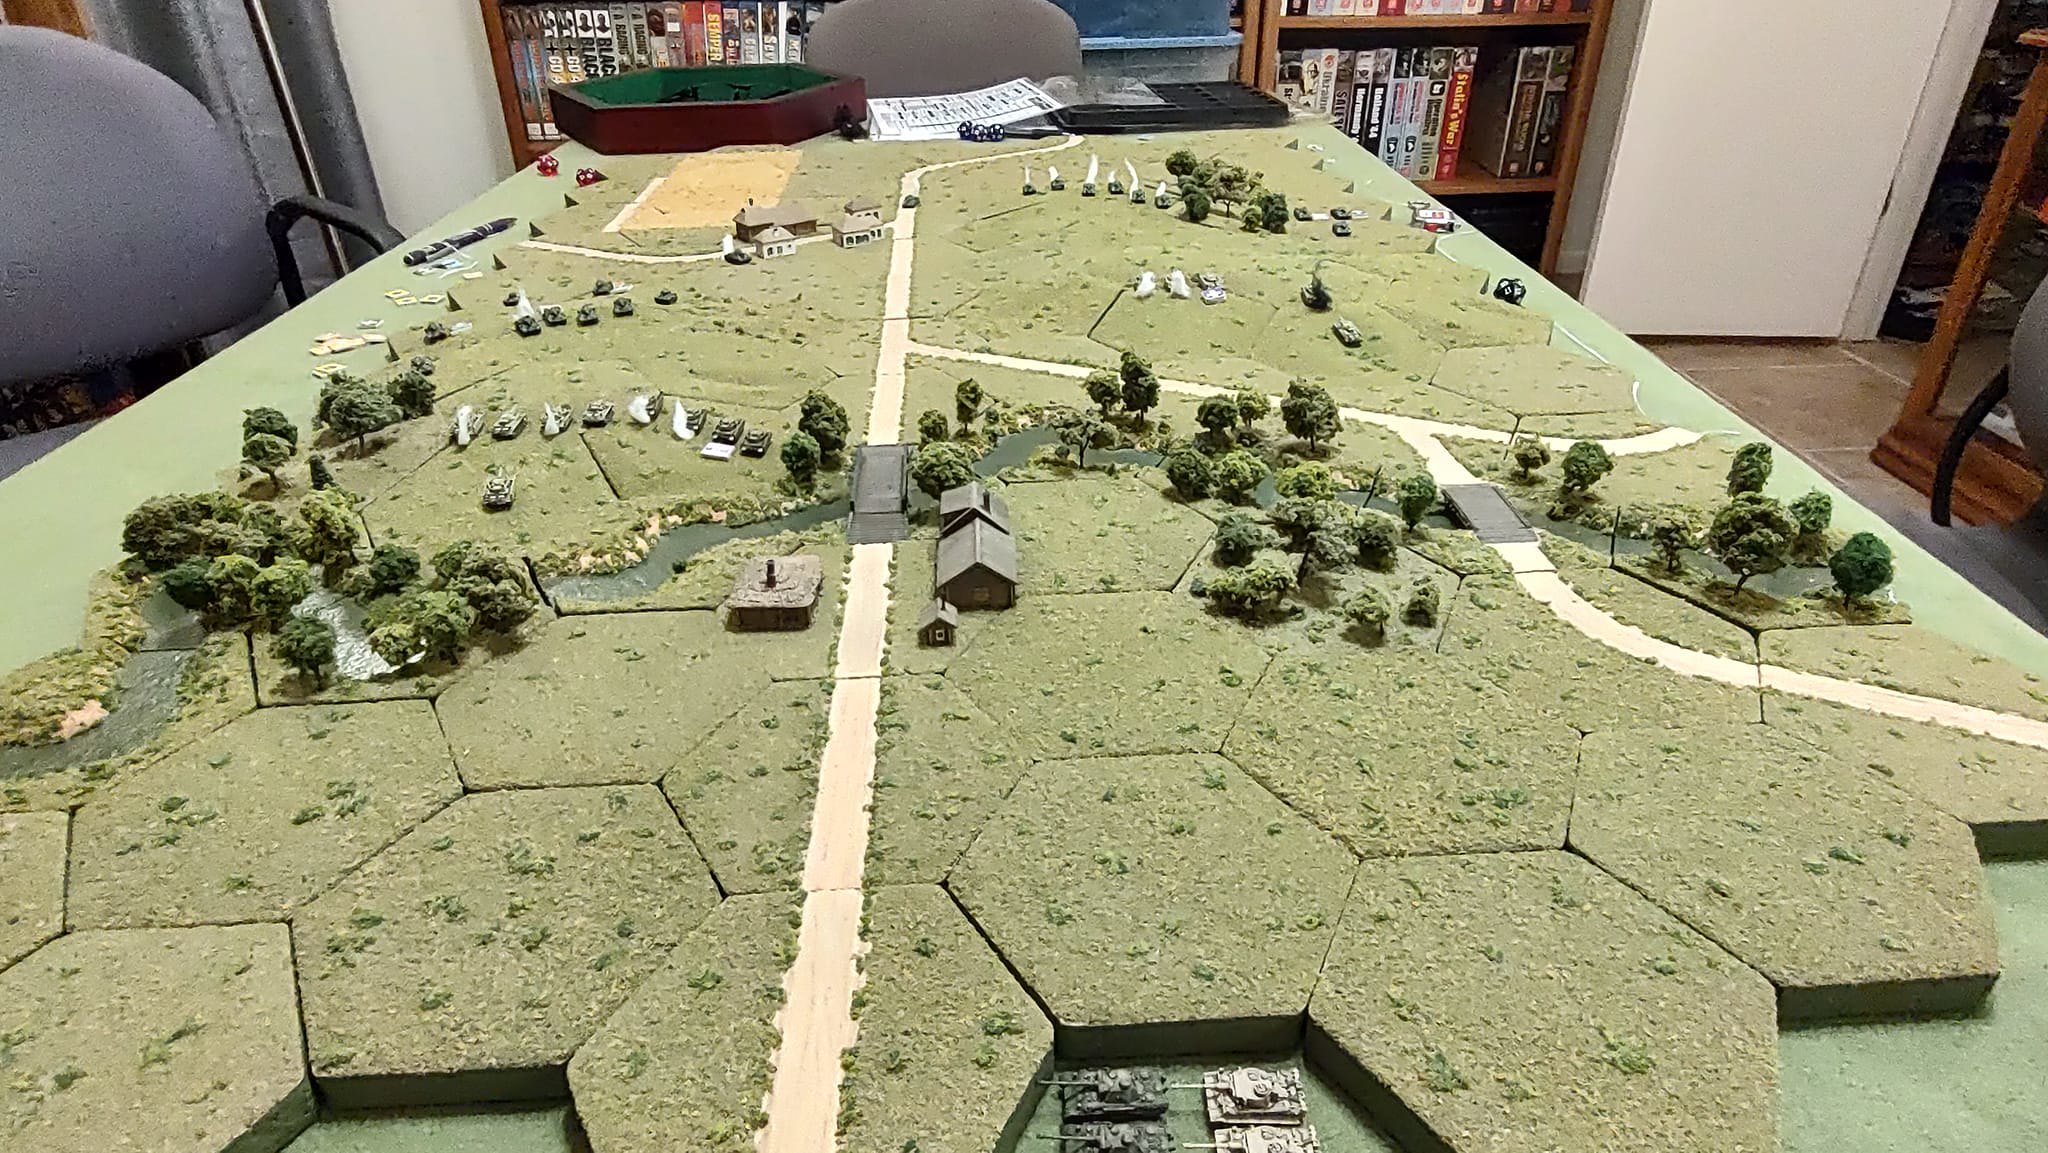
I recently played a solo game of Mein Panzer. Here are a few pictures of the board and the action. This was a scenario set in August 1943 on the Russian Front as the Russians are going on the offensive. The Russians had 2 companies of T-34s while the Germans had a mixed company of Panzer IIIs and Panzer IVs.
|
| Mark 1 | 05 Aug 2022 4:20 p.m. PST |
Whatever we may do to showcase our miniatures work … it's always better when they actually look that good at gametime! At least that's my view. I remember an experience, many (many!) years ago, when I was introduced to gaming on a game table with well constructed game boards (these were large rectangles rather than Pete's GHQ terrain hex system). It was with a gang of guys that called themselves the Mid Penninsula Wargaming Club that met at one member's property in East Palo Alto in the SF Bay Area. Prior to that time, I had mostly been the guy who organized any games I played in. I didn't know of any gaming clubs, or gaming conventions. I just bought the miniatures, read the rules, and tried to figure it all out. But here I was with a group of guys with this amazing modelled terrain and these really nice minis, and I was pushing my tanks down this road that wasn't just a piece of tape on a table, but was a modelled roadway, going up and over a rise, with a bit of a cut (higher banks, sunken roadway) as the terrain rose, with hedges along one side. And I was just wow'd by the whole thing. It was like an epiphany, a light going off, a bell ringing in my head. This was REALLY COOL! It was so engaging of my imagination that I lost track of the game, and of whatever the other guys were saying or doing, for a moment. I just stared, totally absorbed, at the tanks as I pushed them along the road. I had the sensation of being transported into a movie or TV show or something, where I could see this tank driving along this road in this area, except that I could actually write that movie as I went along. So many years later I still experience a bit of that sense of wonder when I see good looking miniatures on a good looking game table. Ping ping ping -- you rang my bell there, Pete. Thanks! -Mark
(aka: Mk 1) |
| FlyXwire | 05 Aug 2022 5:34 p.m. PST |
Beautiful landscape Pete. Oh wait, and you use it for playing games on also? That board and models are an inspiring gift for the eyes! |
| Captain Pete | 06 Aug 2022 1:24 p.m. PST |
Thank you both very much, Mk 1 and FlyXwire. I started my Terrain Maker project back in the early 1990s and have added a few pieces here and there over the 30 years or so that I have been doing this. My latest pieces were some hardball roads and 4 bridged stream hexes, 2 of which were used in this game. I too really appreciate nicely painted models on great looking terrain. It was great seeing pictures from Joy of Six and Historicon and seeing some of the really neat layouts people were doing. Seeing pictures of other people's Terrain does inspire me and sometimes I ended up using some of their ideas for myself. Here are a couple more pictures of the table in action.
This picture shows German dispositions on the left at the end of Turn 1
This picture shows 1st Platoon with Panzer IIIs on the German right. The XO tank is with this element. This is around turn 2 or 3. The Germans had a lot of misfires in this game.
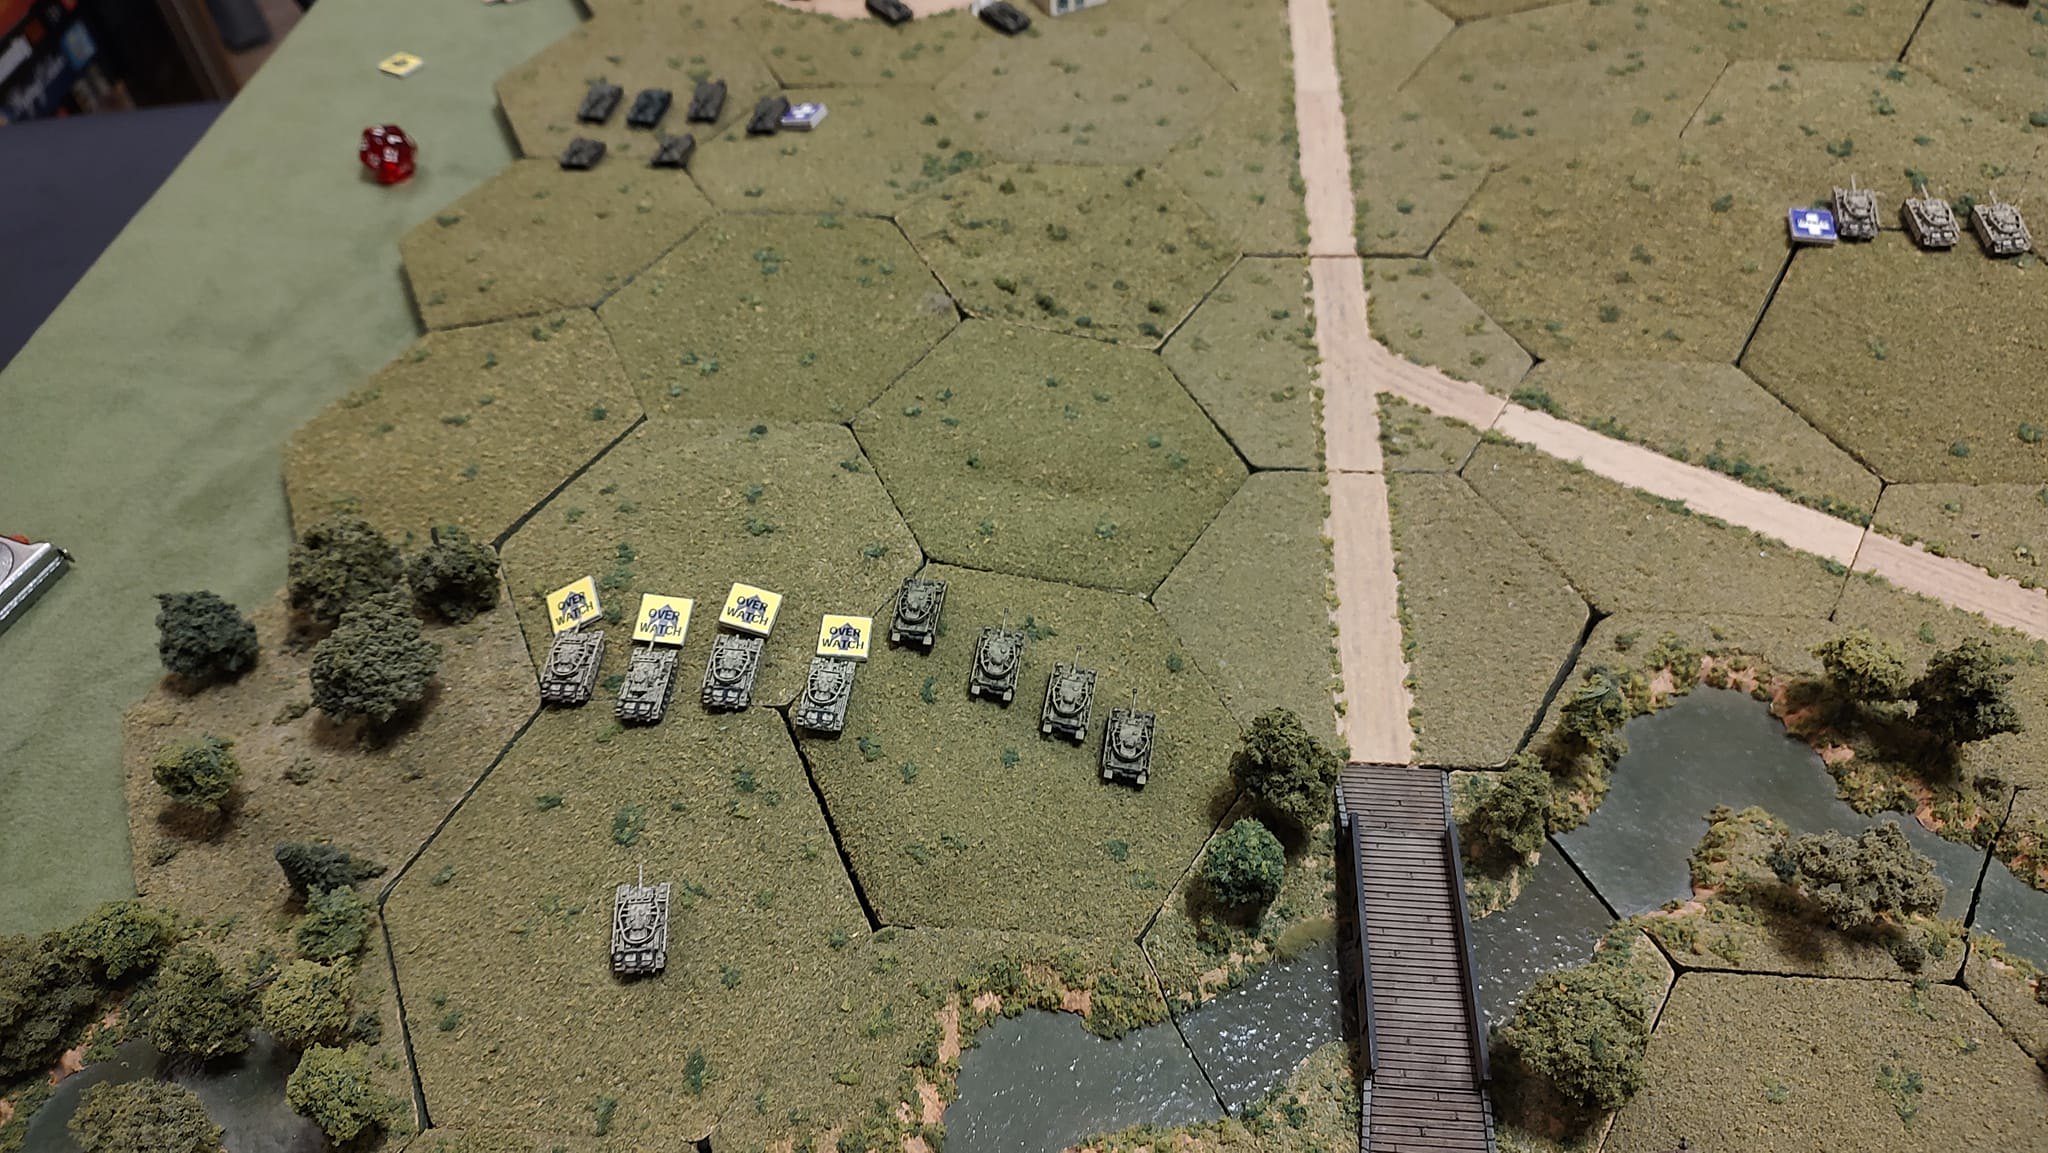
This is another picture of the situation on the German left at the end of Turn 2. The Panzer IIIs of 2nd platoon have gone into overwatch. The Panzer IVs are to their right. The Company CO tank is the Panzer III that is a bit behind the front line. The Germans await the onslaught of T-34s. |
| FlyXwire | 07 Aug 2022 3:07 a.m. PST |
Nice! Your road verges look well done, and work to blend the ground work between the two surfaces. Was the road-side foliage something you added along the way to those tiles, or did you apply this at your initial TM tile making? (sometimes I don't think of terrain enhancements to make, until I've had plenty of time "staring" at a board…..then *bing*) |
| Captain Pete | 07 Aug 2022 4:04 p.m. PST |
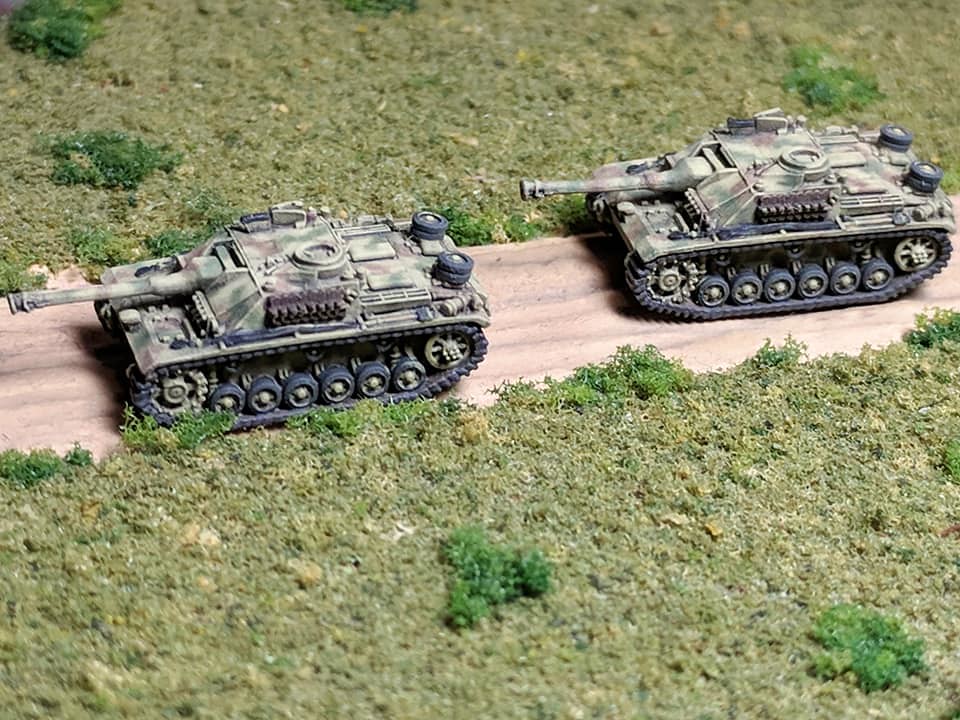
Thanks very much, FlyXwire! The simple answer is that the coarse foliage "weeds" along the edges of the roads were added in the process of creating the roads. Here is a closeup of a road with pair of StuG IIIs on it.
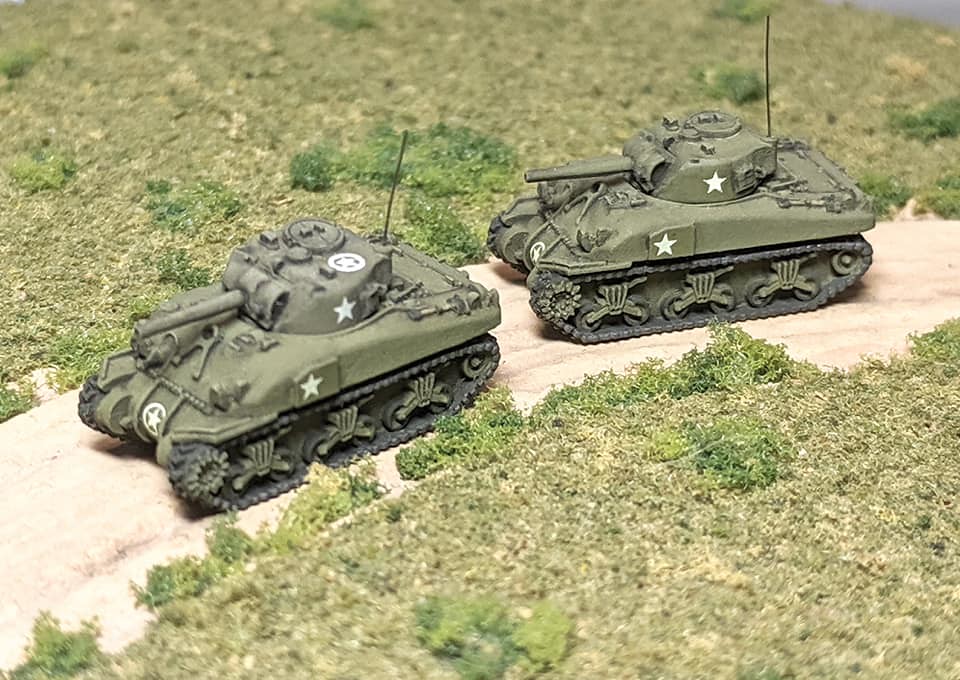
Here are a pair of M4A1 Shermans on another road hex.
|
| Captain Pete | 11 Aug 2022 7:02 p.m. PST |
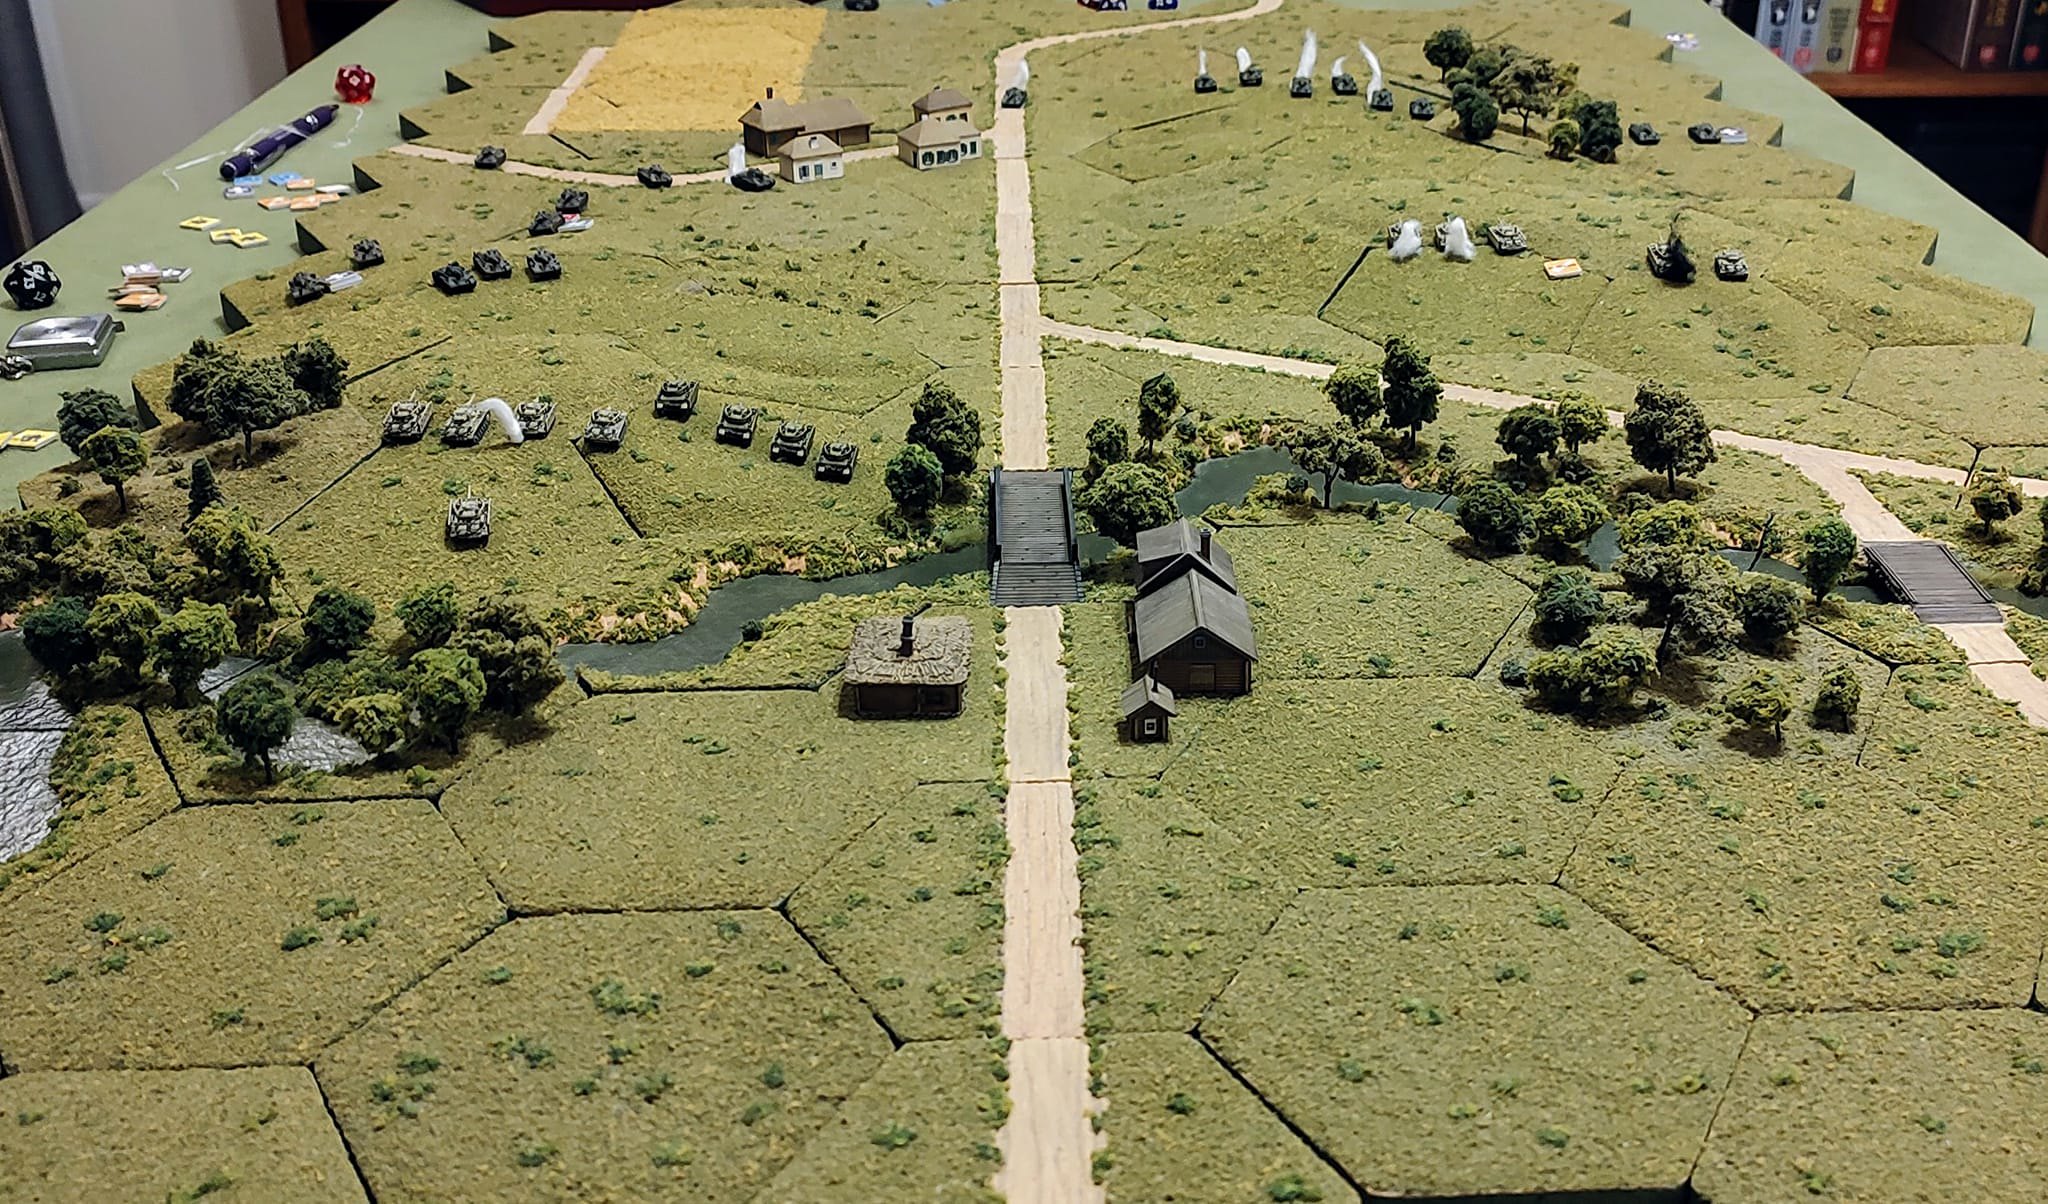
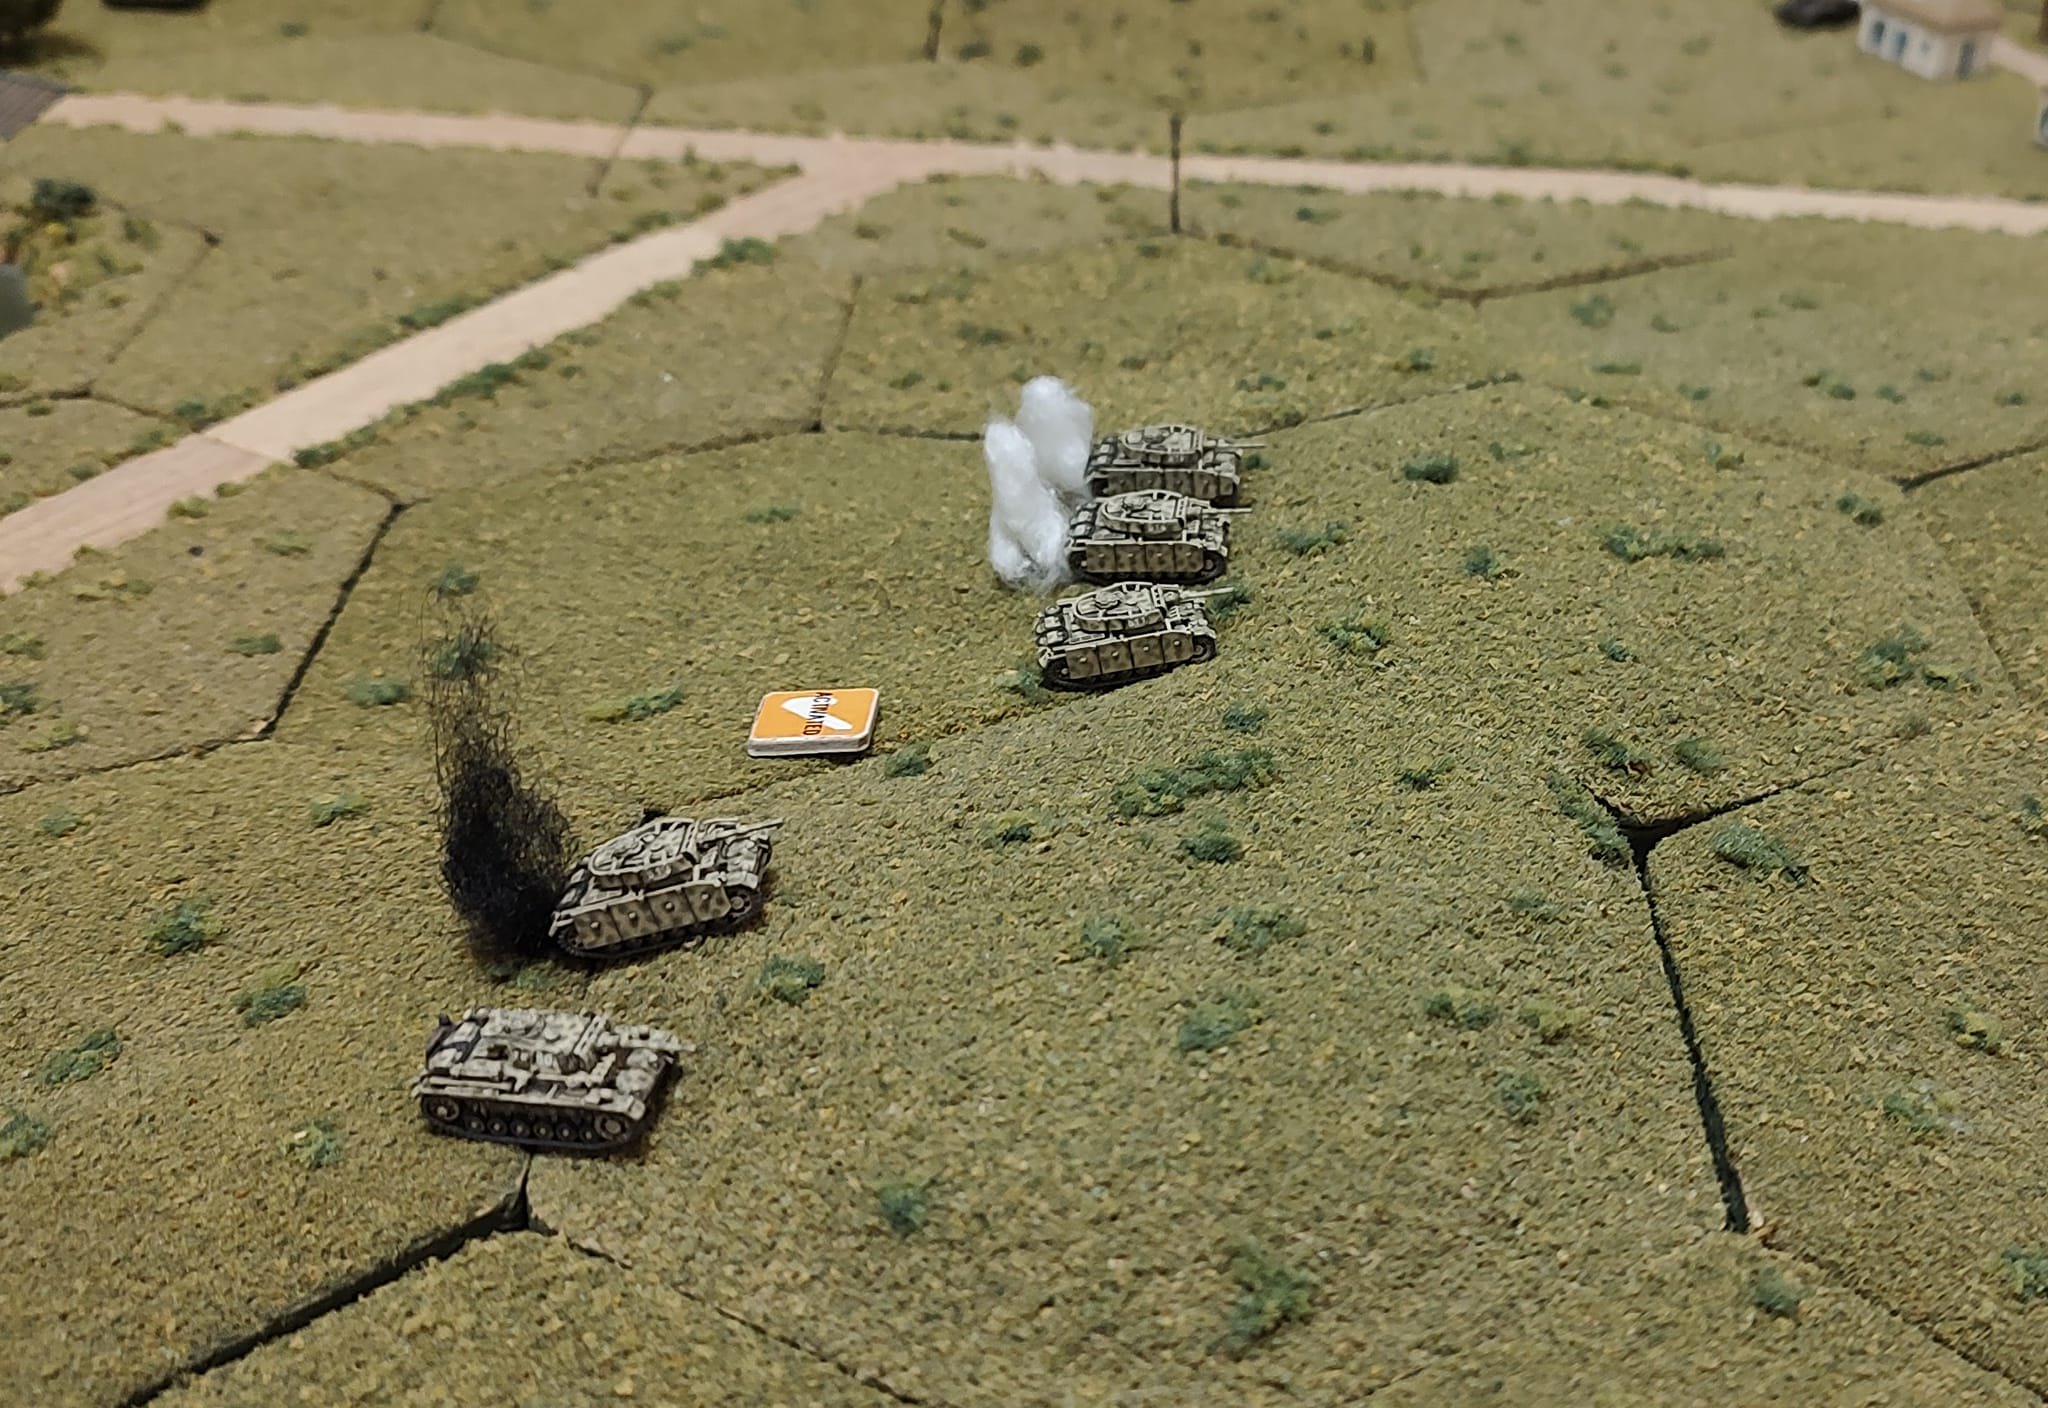
Here are a couple more pictures from my solo game of Mein Panzer. The 2 Russian 2 T-34 Companies were attempting to seize the 2 bridges over the river. The Germans were attempting to stop them. This was a classic match-up between the Russian T-34 and the German Panzer IIIs and IVs in the Summer of '43. The Russians had the better tanks overall but the German Veteran Troop Quality made up for it. I opted not to give the German Panzer IIIL and Ms any special APCR ammo. I think that would have made it really tough for the Russians. I did give the 2 Panzer IIINs HEAT ammo which helped them a bit. The short 75mm gun is not great for tank to tank engagements as it tends to lob the shells and the stats show this.
This shows the situation around the end of Turn 4. The Russians actually had a bit of luck that turn and managed to knock out several Panzer IIIs.
Part of the 1st T-34 Company attempted to flank the German positions while the remaining 2 platoons slugged it out in a frontal engagement. This game ended up being very close and I was happy with the results. |
| FlyXwire | 12 Aug 2022 6:31 a.m. PST |
From the Psel to the Mius……."to seize the 2 bridges over the river." Classic. This is how we learned to play armor, and this scenario confrontation for a river crossing never grows old (it inculcates the essence of tactical battlefield problems). Of course, we didn't have the great terrain to immerse ourselves into as you do here Pete, but these battlefield exercises still came off in full force……..Micro-scale let us do this (3mm lately can allow this also), where these scales enable these Lost Victories to be played…..even now, after chasing the shiny penny into the larger scales confined the battlefield in a box [and a tiny one at that]). Pete, it may be a classic, when sometimes there remains little room for improvement. |
| Captain Pete | 12 Aug 2022 6:05 p.m. PST |
Thank you very much, FlyXwire! This is indeed a classic situation with bridges that are objectives. Here are more pictures from Turn 4 which was a big turn. The Germans managed to knock out 3 out of 4 Panzer IIIs of 1st Platoon including 1 catastrophic kill indicated by the black smoke. The problem for the Russian 1st Company that is opposing them is that they have hit their break point and must check to see at the start of Turn 5 if the remaining tanks continue the mission, hold in place, or start to withdraw or even rout.
Here is a view from the German side.
One intact Russian platoon starts to crest the hill.
The 1st Platoon suffered 3 knocked out tanks.
1st Company has hit its break point after losing 5 T-34s. |
| Mark 1 | 01 Sep 2022 5:50 p.m. PST |
Pete - Your game pics are fantastic. Really good looking models and terrain. Also love any gaming AAR, but a feast of delicious 6mm wargaming eye candy is VERY welcome. -Mark
(aka: Mk 1) |
| Mark 1 | 01 Sep 2022 6:02 p.m. PST |
I've seen a number of pics from other folks with structures on bases with a bit of surrounding terrain. Never really done much of that myself before. But I have admired how good this looks when other folks do it, so after the Roman ruins I showed earlier in this thread came out looking as good as it did (to my eye), I thought I would base a couple of my buildings. So here they are.
Both of the buildings have appeared as background in earlier pics in this thread. Just a couple of reasonable houses from my collection.
I wanted to do a couple of rather different approaches, just for some distinction on the game table.
I wanted to show front and back yards, and try a couple approaches to hedges and walls. So there they are. Not sure how robust they will be in storage, but I'll be quite pleased if they still look like this if/when I find the occasion to put them on a game table. -Mark
(aka: Mk 1) |
| Captain Pete | 01 Sep 2022 7:12 p.m. PST |
Your finished houses on their bases look really great, Mark 1! Each building is its own little vignette. It gives them a bit more character that way. I am toying with the idea of doing this myself for some of my buildings or maybe even create a whole section of town terrain where the buildings are removable but look like a natural part of the terain. Right now, I just kind of plop my buildings down on the side of the road or intersection. While they don't look too bad, I like the way others have approached this. |
| Mark 1 | 01 Sep 2022 7:52 p.m. PST |
From an earlier posting in this thread:
Unhappily, no sooner had I finished the refurb of the Valentines (prior page) than I found out those are GHQ Valentine Mk IIs, rather than Mk IIIs! Ouch! So the turrets are wrong -- I need the elongated turrets.(The French in Tunisia actually received Valentine Mk Vs. But those are pretty much indistinguishable from Mk IIIs, the only difference being that they are equipped with GM Diesel engines rather than the famous Leyland Bus engines of the earlier Valentines.) I came across this little gem of information when I went to the box-of-pewter-toys in the garage and dug up the un-opened pack of later marks of GHQ Valentines to paint up to accompany these in my Russian force, and found that it was a pack with 2 Mk III turrets and 3 Mk IX turrets for 5 hulls. Well I'm not too upset about buying and painting up more of the Mk IIIs (2 just ain't enough), but what am I going to do with the Mk IIs I now have in French colors?
Well, I have now rectified "mon petit problem"…
Here are my new French Valentine tanks for Tunisia. They are sold as Mk IIIs, but I will use them as the visually indistinguishable Mk Vs.
Something more than 60 of these were provided to the French during the Tunisian campaign. The 2pdr gun was getting a bit long-in-the-tooth by the spring of 1943, but it was better than a French 47mm, and the tank itself was pretty solidly reliable, which is far more than can be said for the barely serviceable Char D1s and the very few S35s in French service at that time.
The lighting seems to have pushed the color in this photo to look more like a yellow desert sand color or some such. They are actually painted French khaki green over a white undercoat. But alas, this Polly-S bottle of paint is getting pretty thinned out after so many years, so they did indeed come out being a bit lighter in shade than prior paintings with the same color. But still, in person, they are a lighter green, not yellow. And as to the question: "what am I going to do with the Mk IIs I now have in French colors?" Well the obvious answer:
I now have a variety of LL Valentine tanks to serve in my Red Army forces, from early models for 1942 actions in the Caucasus right through 1944/45 Valentines spearheading the drive into Vienna and Budapest. OK, so that worked out well enough. Any challenge that can be solved by buying a few more tanks is a challenge I'm up for. -Mark
(aka: Mk 1) |
| Captain Pete | 02 Sep 2022 6:44 a.m. PST |
Great work on those Valentines, Mark 1! I also have some of the later GHQ Valentines and will probably do some up as Late War Russian Valentines. I think have have about 10 altogether. I will probably need to order more of the late turrets though and maybe take off the muzzle brake as most pictures I see in Russian service have them removed. |
| Mark 1 | 02 Sep 2022 2:47 p.m. PST |
I will probably need to … take off the muzzle brake as most pictures I see in Russian service have them removed. Was this meant as a subtle hint, Pete? I mean, you'd think after my first gaffe with the Valentines I would have looked more closely at them for the second go-around. But noooooo …. You are right. They are indeed Mk X1s with a muzzle brake on the end of the 75mm QF gun. And here I was thinking they were Mk IXs with 6pdrs! D'oh! Yes, most pics you will see of Valentines in late war Russian service will not have a muzzle brake, but I believe that is primarily because the 6pdr didn't have a muzzle brake (only a flash suppressor), and the Mk IX (and Mk X -- a Mk IX with a co-ax MG added back in) were far more common than the Mk XI with the 75mm gun. I suppose it could also be that the Russians removed the muzzle brakes from the 75mm guns, but I kind of doubt it. The Red Army was not big on altering things of there was no real reason. I have read several WW2 Russian accounts assessing and reviewing combat experiences with Valentine tanks. I can't recall seeing a single one describing the muzzle brake as a problem or shortcoming. Lots of praise about the quietness of the motor (this was the GM diesel), and the superior cross country performance (always better than a T-60 or T-70, sometimes as good as a T-34), as well as the shortcomings of armament (no one liked the 2pdr, the 6pdr was well enough regarded except lots of complaints about lack of a co-ax and lack of enough HE), an including such odd details as that you can't tow it backwards in soft ground when it has shedded a track (the rear bogies would pivot and drive the last road wheel down into the ground). Lots of comments, not one that I recall about a muzzle brake. So anyways, I guess I got to get out the clippers and trim those barrels down a bit. Want mine to be Mk IXs or Xs. Thanks for the heads-up. -Mark
(aka: Mk 1) |
| Captain Pete | 02 Sep 2022 10:23 p.m. PST |
Hi Mk 1. I actually wasn't trying to drop a hint just my observation of the real ones. Yes, I do think GHQ advertises these Valentines as Mk III and Mk XI with the Mk XI having the 75mm gun. My recollection is that not too many of the Mk XI were produced and it would be a pretty rare beast in general. I have asked GHQ to do a Valentine IX which were pretty common in Russian service. They have not done it yet but they will be producing some other Russian vehicles this year that I wanted so there is hope. They also have a Churchill Mk VI on the schedule. I hope this is a typo and really a Mk IV with the cast turret which the Russians used a bit. The Mk VI only saw 200 copies while the M IV was much more widely produced. GHQ is also producing a M4 later this year as well. Looking forward to that one. Anyhow… Great to see your Valentines and your other contributions to this page as well as many others. |
| Captain Pete | 04 Sep 2022 1:08 p.m. PST |
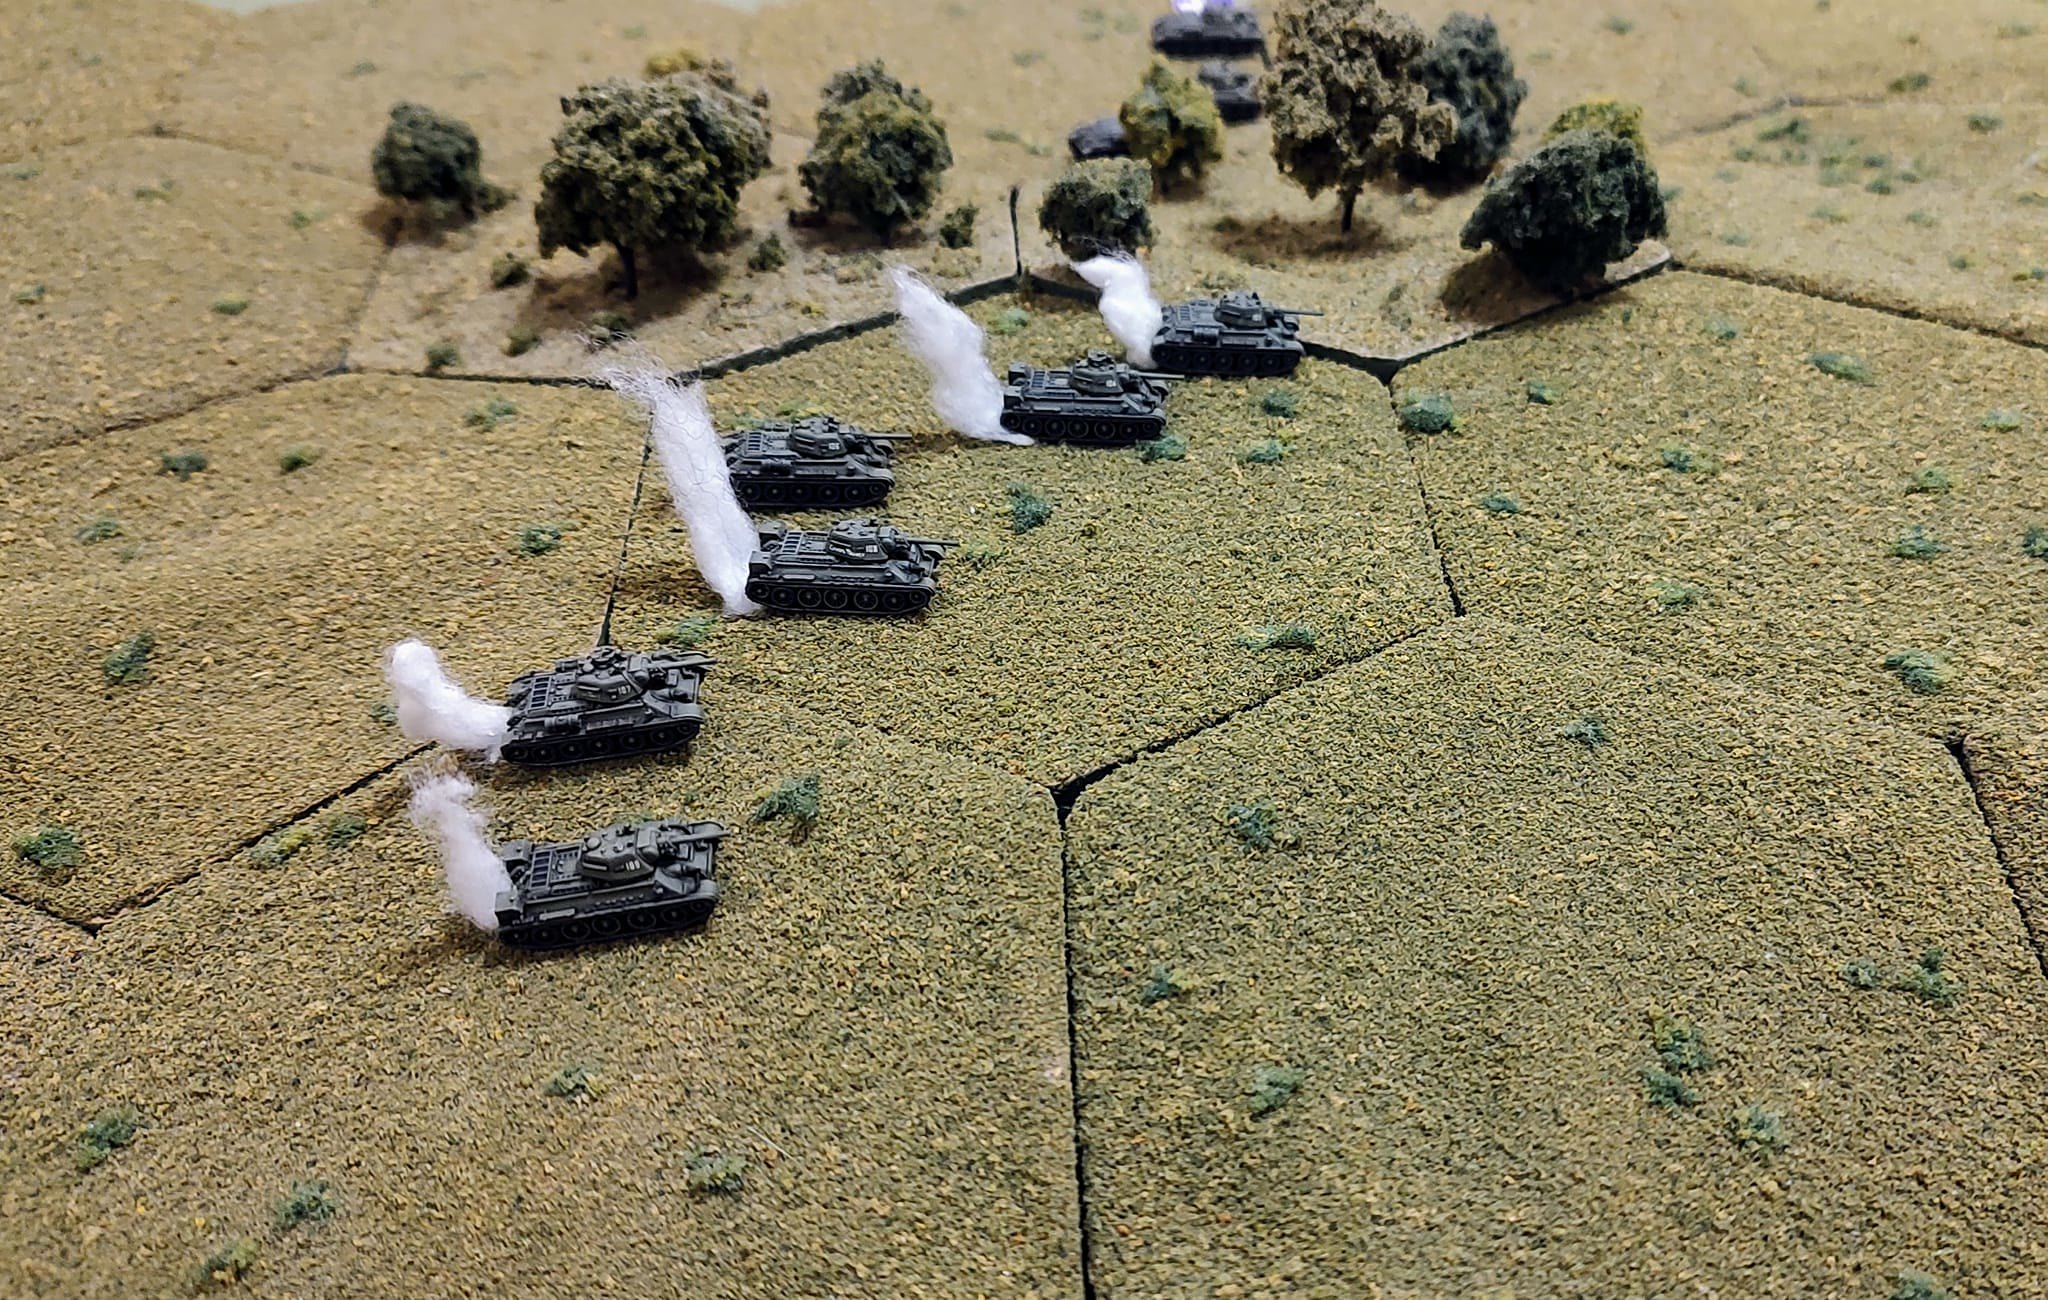
Here are a few pictures of the action on Turn 5. This was another big turn in the game. The Russians get the initiative and opt to go first. The Russians passed their morale check for 1st company this turn and continue to press on the German right flank. 2nd Company, on the German left, starts to get more tanks up the hill and a short range gunnery duel ensues with both sides losing some tanks. The Germans are now starting to feel the pressure on both flanks but the Russians are starting to run out of steam on the left.
End of Turn 5 from the Russian viewpoint.
End of Turn 5 from the German viewpoint.
The Russian 1st Company has taken heavy losses.
A T-34 attempts to engage a Panzer IV to its right.
Russian 2nd Company tanks are cresting the hill and getting into short range gunnery duels with the Panzer IIIs and IVs on the other side. I did not give the German Panzer IIIL/Ms any APCR ammo for this scenario which would have made them much more deadly. The Germans did have Veteran Troop Quality with those added benefits, one of which is a bonus shot which is in addition to the normal Panzer IIIL/M rate of fire (ROF) of 2 for a total of up to 3 shots in an activation.
The German 1st Platoon on the right flank suffered losses of 3 of 5 tanks on turn 4 including 1 "Brewed-Up" as indicated by the black smoke. The Germans have lost 2 of their precious Panzer IVs this turn as well as another Panzer III. They will need to check their morale at the start of Turn 6 to see if they stick around or soldier on. For those of you interested in a bit more detail on some of the mechanics of Mein Panzer, feel free to check out my ongoing Tutorial in the Core Rules section of the ODGW website. |
| FlyXwire | 04 Sep 2022 4:32 p.m. PST |
Rugged! Pete, I'm looking forward to the next turn installment….. (one thing, I'd hate to be those PZ IVs with their backs up against the river) |
| Mark 1 | 22 Jan 2023 2:15 p.m. PST |
Here is my most recent refurb project. This was in part inspired by an AAR posted by Mark Luther a while back, in which he featured an older casting of a GHQ Tiger II that was the star of his game. I have more than a few older GHQ models in my "ready forces" box, and can only hope that they make as proud of a showing if/when they wind up on a gaming table. Well, can only hope if I do nothing to improve their appearance. Can do more than hope if I get my %## in gear and complete a few more refurbs. So here is one. I had refurbed some of my T-34-85s a while back (posted earlier in the thread). But in that case only one tank out of a full company was an older casting. The rest of the company were late 1990s castings (still current) that are beautifully modeled but had not been painted up to the level that did justice to the castings. I have a fair quantity of T-34-85s -- enough to make 3 full companies + brigade command. This includes about 15 of the older castings from the 1970s. As I had only refurbed one company, I decided to bring the rest of them up to my current painting levels.

This is how the older 1970s GHQ T-34-85s looked before the refurb. They were originally spray primed, then spray painted with Testor's Olive. A poor choice of colors, and not a very well done painting job. The pray paint was too heavily applied, obscuring some of the detail on models that didn't have a lot of detail to start with. In the background you can see some of their brothers who have already been repainted, to see where I was going with this.
Here is the company of all-1970s castings after the refurb. The color is a richer forest green (looks a bit darker in the pic than it is in person). I did not strip the old paint, but used washes and dry brushing to bring out some of the detail that was otherwise so washed out. I added a few extra items -- ammo crates and unditching logs -- just to give some interest to the otherwise rather barren old models.
My old way of identifying command tanks was just to put colored smudges on the undersides. Red indicated platoon command tanks. Yellow was a company commander.
In my prior refurb I decided to use the GHQ castings with rolled tarps on the back of the turrets as the platoon command tanks, with an added commander in the hatch as the company commander.
So I did the same with these as well. The tarps are made from rolled aluminum foil. The company commander is a clipped upper body of an artillery crew figure. These old tanks are veterans of many game tables. Next time they make their way out, I will no longer feel as disappointed in their appearance. -Mark
(aka: Mk 1) |
| FlyXwire | 23 Jan 2023 5:57 a.m. PST |
Mark, nice refurb project! (there's just not much substitute for superior surface detail when the comparisons get up-close) |
| Captain Pete | 23 Jan 2023 2:54 p.m. PST |
Nice work on your refurbishment project, Mark! Although I much prefer the 1980s T-34s that GHQ produced to their earlier models, it is nice to see what can be done with old castings when give a bit of "love". You have indeed put a lot of "love" back into these older models. |
| rhabstclair | 03 Nov 2023 1:23 a.m. PST |
|
| Captain Pete | 09 Nov 2023 6:57 p.m. PST |
Nice work rhatsclair! Is that the GHQ Sherman? |
| Mark 1 | 10 Nov 2023 5:38 p.m. PST |
Nice work rhab indeed! Very impressive detailing. The rolled tarp catches my attention. I have tried several techniques for creating rolled tarps, but none have come out as well as your did. I am also impressed by the crate -- in that you also created a strap / tie-down to go over it. I did something with a thread on one of my tanks several years back, but found that it was so much effort and so unsatisfying when seen after, that I have not picked it up as a regular addition. But yours looks far better, and is a result I would have been quite proud of. Really should put a pic from the link into the thread here for all to enjoy. But in the thread or in the link, that Sherman is a treat to the eye. -Mark
(aka: Mk 1) |
| rhabstclair | 12 Nov 2023 11:08 p.m. PST |
Thanks! I'm new at this picture posting, so I'll give it another shot:
|
| rhabstclair | 12 Nov 2023 11:25 p.m. PST |
Captain Pete: Indeed, GHQ Sherman M4A1, I believe. I chopped off the head from one of the GHQ infantrymen to get the helmet draped on the right side of the turret :D. Here's a few open-topped guys where I mounted some modified infantry as crew:
|
| FlyXwire | 13 Nov 2023 10:43 a.m. PST |
rhabstclair, these look very impressive! The Panzerjager crews, painted and placed so nicely, really seals the deal. |
| rhabstclair | 13 Nov 2023 8:53 p.m. PST |
|
| FlyXwire | 14 Nov 2023 2:39 a.m. PST |
Nice work – again, the custom-crews are really excellent. |