Mark 1  | 09 Mar 2021 11:16 a.m. PST |
Hey Pete! Stunning Shermans! Weathering is superb, decals perfectly placed, and I also observe your attention to the details of which Sherman versions you present. For those less versed in Shermanisms, Pete has built two of the Sherman types that would have dominated many of the higher-numbered armored divisions (4th, 5th, 6th, and 8th USADs, for example). These are 75mm Shermans with late war split-hatch turrets, mated to late war production M4A3 VVS hulls. This combination is not offered in the GHQ catalog, it has to be constructed by buying extra turrets to mate to the hulls of the GHQ M4A3s (which come with turrets with cupolas, which were kind of rare until the very end of the war and the post-war period, and are better mated to hulls with HVSS). It shows a real appreciation for what you model. Oh, and the Panthers look da bomb too. Nice camo, nice weathering and detailing (the engine grills and spare track links look great!) and again perfect decal placement. All in all a treat for the eye! Glorious additions to the thread. Thanks for posting them! -Mark
(aka: Mk 1) |
| Captain Pete | 09 Mar 2021 5:04 p.m. PST |
Thank you very much, FlyXwire and Mk 1. I appreciate it. Here is a group shot of 30 Shermans. This picture shows a mix of the different Sherman types I had painted up to this point. It includes M4A3 75s, M4A3 76s, M4A3E8s, a couple of M4A3 105s, and some M4A1 75s and 76s that I had completed late last year. I have added a few more since then and working on 12 M4A1 75s with the single piece transmission covers. My goal is to have at least a company each of M4A1s and M4A3s. I have the M4A3s covered right now.
|
| FlyXwire | 10 Mar 2021 5:52 a.m. PST |
You have nice versatility with your companies here, and being able to feed in your 76s to the mix depending on your scenarios. Btw, I've used dog-brush bristles for radio antennas on my 1/144th scale stuff, but your staffs are super-thin. Is this stainless steel wire you're using? The effect looks great! |
| Captain Pete | 11 Mar 2021 6:45 a.m. PST |
Thank you, FlyXwire! The antennas are made from fine black nylon thread that I picked up at Joanne's Fabrics a long time ago. One spool will last a very long time. |
| Captain Pete | 20 Mar 2021 3:42 p.m. PST |
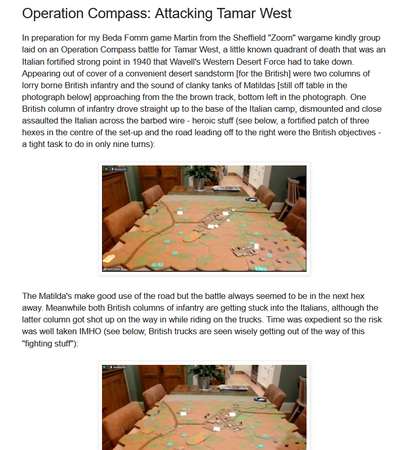
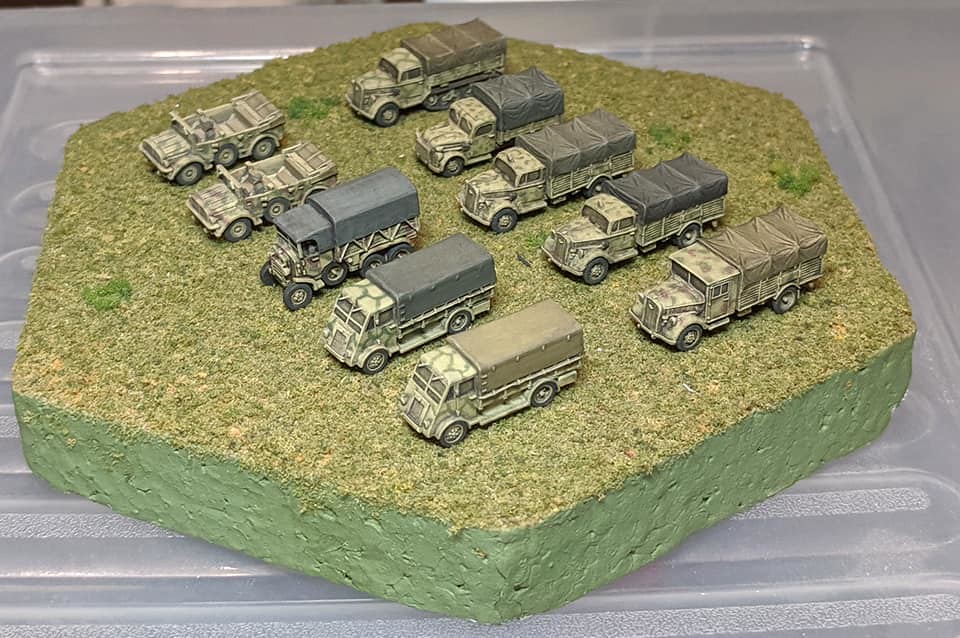
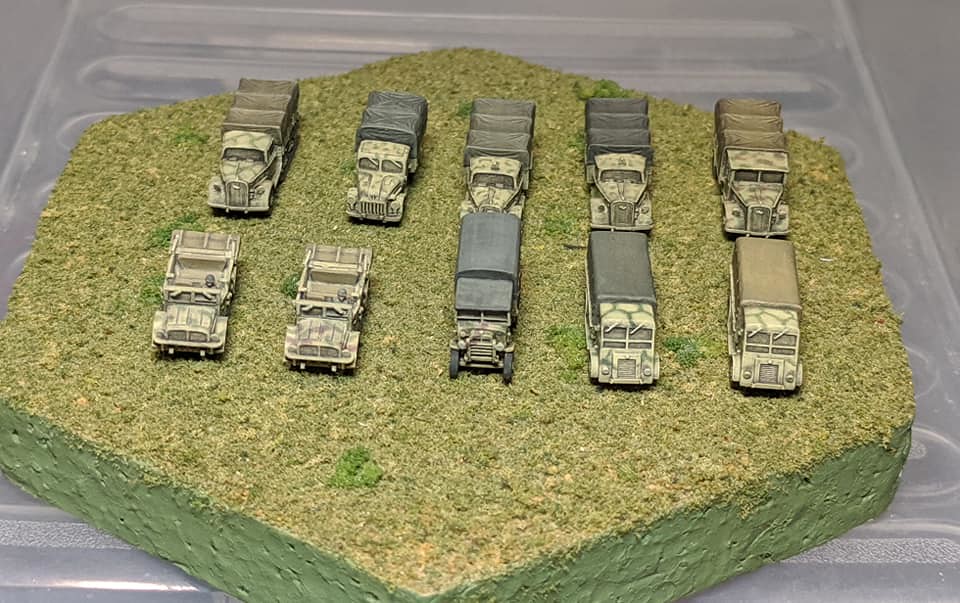
Here are some of my WWII German trucks and transports. These models are all by GHQ.
|
| Mark 1 | 17 Jul 2021 5:17 p.m. PST |
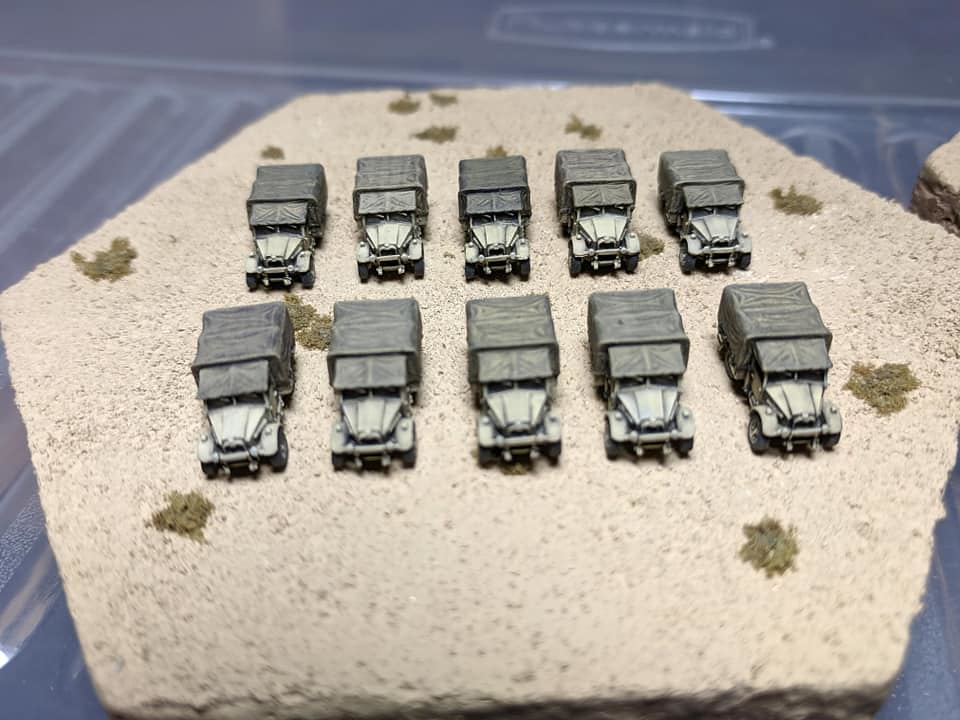
Been a while since I posted any pics… So back at it! In December (actually not that many posts ago … I've been that slow to put anything up) I posted images of a small kit-bash, where I made an Italian Fiat 508 Torpedo field car from a GHQ Polish PZInz302 model. My closing comment was that if I ever found the other Polish car I might actually wind up with TWO Italian field cars. Well I found it.
This time I did the conversion to be a Fiat 508 with the tarp roof up rather than down. Means I didn't have to paint up another Italian officer to sit pompously in the back seat.
I used the roof from a GHQ Jeep as the starting point for my Fiat. The struts of the Jeep roof got clipped and the inner corners got filled a bit, the sides got filed a bit to reduce the back-to-front taper, the back corners got softened a bit (they are quite sharply angled on the Jeep), and the front got clipped to shorten it a little, as the Fiat's roof, when up, did not extend from the windshield all the way to the rear of the vehicle, but only back to the start of the rear deck surface.
Then the spares got clipped/filed off, the open doors got filled, and a new spare got placed on the rear, and we are good to go!
So now two of my fine gentlemen will be able to ride in style. Small additions, and not my very best work, but they were quick and easy and kind of fun and I think they'll be a novelty when (if ever!) they appear on a game table. -Mark
(aka: Mk 1) |
| Mark 1 | 17 Jul 2021 5:47 p.m. PST |
Now stepping further afield, from kit-bashing all the way to scratch-building for a moment… Here is my latest trenchworks:
This is the second platoon-sized trenchwork I have completed with my current approach. (I say "current" with some trepidation, as it has been mumble-mumble years since I came up with this scheme.) The process of creating these is not too tough at all.
I use self-drying clay from the crafts store. I kneed some water into the clay to make it reasonably soft and easily formed, and roll some out on a piece of wax paper (to prevent it sticking to the hobby workboard). Four pennies (my current infantry bases) are then pushed into it to give me my eventual infantry positions. Then a trenchline is carved into the clay with a coffee-house stirring stick (or perhaps a handy clay working tool if you have such devices). This assembly is then left to dry for a day.
I then spray the whole thing, top and bottom, with diluted white glue. My intention is to seal it, as otherwise the clay can easily absorb water and become malleable again. Then I paint it an earth/dirt tone (I use cheap acrylic craft paint in a color called "mushroom"), and then paint the trenchline in a color gradient getting darker towards the bottom. This gradient is done by painting the bottom (darker color) first, then painting the next lighter color on both sides, they wet-washing that lighter color before it is fully dray to blend a bit where it goes over the darker color, then repeating that process with one further lighter color. The purpose for this gradient is to try to give an optical effect showing the trenchline being deeper than the indents that the infantry stands will fit into.
Then everything except the trenchline is flocked and given some bits of talus and shrubbery. Here even the coin-sized indents are flocked, to make them less obviously deep. Now when the piece is not occupied the trench line itself is the dominant visual artifact, and the coin-sized indents are less obvious.
This is the second trenchwork I have created using this approach. This new one is deliberately a bit more compact, and I have used colors with a bit less redness for the trenches. I very much like this approach.
Here a platoon of my Romanian GHQ infantry are positioned in the trenches, ready to provide a stiff defense against the Red Army. By putting 5 positions in each trenchline I have the ability to use command stands and support weapons in the front lines with my standard infantry platoons. The Romanian infantry platoon has 4 squads, and is backed up by a 60mm mortar in the trenches behind their front line. I very much like this approach, as infantry in trenches were a real thing throughout WW2, and up to this time I have not had a practical and visually appealing way to present it on the table top. -Mark
(aka: Mk 1) |
| Mark 1 | 17 Jul 2021 5:56 p.m. PST |
So with that trenchwork I also showed another small recent kit-bash.
This is a German 37mm Flak gun in Romanian service, in a gun pit. The gun itself was removed from a GHQ SdKfz 7/2 Flak 36 SP gun model:
I somehow wound up with one of these in my collection, and not running Germans I decided to remove the gun and reduce the vehicle to a battlefield wreck. The gun was then placed on a three-leg mount from the extras bin (I think the mount was originally for another vendor's post-war Soviet 122mm D-30 Howitzer, but I may be wrong on that). And I mounted it in a gun pit with some sandbags made from self-hardening clay.
Nothing fancy, but a useful enhancement to a fixed position that my Romanians may want to defend. -Mark
(aka: Mk 1) |
| Mark 1 | 17 Jul 2021 6:02 p.m. PST |
There was also another scratch-built item shown in the last pic of the trenchwork above: a wire obstacle.
The idea for these came to me after watching a WW2 film about Italian troops in the desert, which showed expansive wire entaglements in front of their positions. I already have rolled concertina wire, but during WW2 this was more often a hasty defensive obstacle. More permanent positions would typically have staked wire entanglements. I used the same approach as shown several posts ago for marked minefields, except this time with old emery boards as my bases (less depth, more width), and posts on the interior as well as the periphery. Took a bit more thread to wrap not only around but through, but all in all it's not a hard thing to create.
I might have to make a few more of these. They came out pretty well, in my opinion. -Mark
(aka: Mk 1) |
| FlyXwire | 18 Jul 2021 6:09 a.m. PST |
"Now stepping further afield"…..and some fine fieldworks here too. Very sharp how your created these recessed 'sockets' for your troop bases, but if you vacate the scenic of its troops, these positions don't look unnatural unoccupied (or even if partially occupied due to ongoing casualty removal). This is a beef I have with many of the horde bases made and sold for larger figure stands, that when a figure is removes from the base, there's a distracting hole left. Some guys place round plugs in the holes too, but even if they're nicely flocked, the socket's outline still shows.
|
| Captain Pete | 18 Jul 2021 7:41 a.m. PST |
Great looking pieces there, Mk1! I really like your barbed wire entanglements. Pete |
| Mark 1 | 20 Jul 2021 11:52 a.m. PST |
FlyX thanks for the kind and thoughtful remarks. It took me quite a while to come to this approach to trenches, but so far I rather like it. Seems a good combination of functional for the game and pleasing to the eye. Not perfect by any means. But about the best I'll manage. The trenches are more hasty trenches than fully fixed position -- ie: tell a platoon to dig in and they'll make a trenchwork like this in a few days. But by the third of fourth time you've rotated another unit into the position, you'll find it vastly improved with floorboards, bracings for the walls, and sleeping bunkers. I've not put myself into that yet. Not sure if I will. But for this level, I've got my approach. Might do one more, for a central position (these are kind of constructed to be left and right end positions). Pete thanks to you also. I should note that I very much like the softskins you posted. As I have mentioned before I really kind of like when the trucks on a battlefield look good. For myself I have too often overlooked them as sort of background stuff (compared to the tanks tanks tanks), but in more recent years I have really come to appreciate good looking terrain, and guns, and trucks, etc. as adding quite a bit to the overall aesthetics of a game. At this point I imaging your armies are quite substantial. I am beginning to think about putting my entire armies out at once, to get some pics of the full sweep of what a 6mm collection might look like. Of course I would want to finish a few projects first … the problem being there is NEVER an end to the "few projects" I want to finish before I show of an army! But maybe I'll just do some pictures of the motor pool of one or two of my armies. That might be a reasonably sized task… -Mark
(aka: Mk 1) |
| Mark 1 | 20 Jul 2021 12:12 p.m. PST |
Here is another scratch-build that was on the workbench at the same time.
This is another dug-in position I recently completed, on the same model as some I did (and showed) before. I have now completed several positions on this model. My observation from the many photos I have seen is that on the Eastern Front, gun positions and command dug-outs, etc. were more often constructed with logs than with sandbags. This is probably due to the ready availability of trees, and the reduced logistical burden of not having to provide sacks made of cloth that could otherwise go into uniforms, coats, bedrolls etc. I now use dried spaghetti to make these, and well every time we serve a pasta dinner at home there are a few broken bits lying around in the kitchen waiting to be swept up and discarded. So now they just get discarded into my hobby room, and eventually turn into gun pits.
This close-up gives an impression of the texture of the painted pasta. It takes paint quite well, and has a sort of rough surface that is actually noticeable at this scale, and which I find attractive for a purportedly wooden object. The ground looks a bit glossy in this pic. That seems to be an odd artifact of the photo, though, as in person they are quite matte. Maybe how my phone's camera, or the image editing software manages lighting levels, as these pics were all taken out doors in indirect sunlight (ie: in the shade).
Here I put an Italian command stand (GHQ figures mounted on a penny) in to show the size. Although this is intended primarily as a gun pit rather than a command bunker. Still it can serve in a pinch. The stacked logs in the background is just a terrain scatter piece I made from actual broken sticks. Just for fun, and because sometimes you want to show a lumber camp or some such, and I also wanted a comparison point between my pasta-as-logs approach vs. actual wood. -Mark
(aka: Mk 1) |
| Mark 1 | 20 Jul 2021 12:24 p.m. PST |
Here are a few more items recently completed. These are ad hoc ferry rafts.
The models are from the long-standing DB Miniatures line, now available through Legions IV Hire. They are resin castings. For such models I always wash them first in warm soapy water. These have then been primed, painted, and then received a few dark washes and lighter dry-brushings. Any details you see are visible primarily due to these treatments, as I didn't actually do any detailed painting (beyond the wood-tone vs. shiny gray rubber).
Although they are described by the vendor as improvised ferries, I can see them serving equally well as improvised bridging. Nothing to carry tanks, mind you, but maybe enough to man-handle an AT gun across a stream. They are described as German, but I can see them fitting equally well for Romanian, Russian or even Italian forces. Almost any nation other than the US and the British might have used such improvised ways. The Americans and Brits, while also likely to improvise when needed, just seem to my reading to have been far more likely to have good engineering bridgeworks and amphibious transports available to them. That's it for now. More from the workbench, but not yet photographed and prepared for posting. So more pics are likely in a few days. -Mark
(aka: Mk 1) |
| FlyXwire | 20 Jul 2021 12:24 p.m. PST |
Mamma Mia! pasta con bunkers! How you made these is real food for thought, or, as they say in the old country - May your game room never have want for good and wholesome things from the earth. ;) Oh, just saw your new raft posting here too…..I "ate" buying it next you'll be telling us those are actually tube pasta! |
| Captain Pete | 20 Jul 2021 9:21 p.m. PST |
Thanks, Mk1! I have given some thought to posting pictures of my various armies. I don't know if I could a whole group shot or maybe a series of company group shots. My North Africa Germans and British are fairly large but also have a fair number of Russians and Germans for Europe as well.
My Americans, until recently, were my smallest group but adding 2+ companies of Shermans has given them a lot more teeth. I will be working on some Russians very soon including infantry and some of the new GHQ T-34 1940s. I hope to be able to do some Barbarossa scenarios one of these days. |
| Mark 1 | 21 Aug 2021 6:16 p.m. PST |
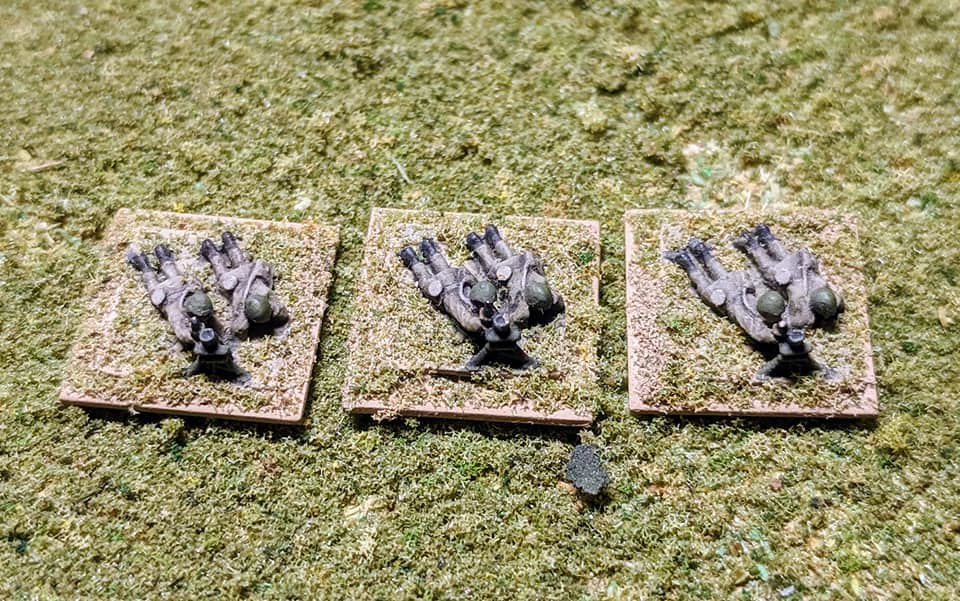
I will be working on some Russians very soon …. I hope to be able to do some Barbarossa scenarios. I beat ya to it, Pete! If you want some Barbarossa scenarios, when the Red Army didn't even have it's AT rifles in the hands of the troops yet, you will need to give your infantry something to use against those Panzers, right? Well how about some Ampulomets? Yes, the Red Army's own universal wonder-weapon.
For those who are unfamiliar with this soldier's delight, it was a 125mm tube that used 12-gauge blank cartridges to fire a spherical glass ampule filled with petrol and an igniter chemical out to a range of about 100 150 meters. It was issued as an infantry battalion heavy weapon to support assaults against emplacements and defense against tanks.
It was not well liked. It was grossly inaccurate, not particularly likely to ignite on impact, no more damaging than a molotov cocktail when it did ignite, and almost as likely to shatter and ignite when fired as when striking the target. But hey, it was issued, and used.
I made my ampulomets from H&R M1910 "Tula" HMGs. Carved off the shield, clipped off the end of the barrel, and voila! An easy kit-bash that looks reasonably convincing to me.
Most units never got their full allotment, even if they got any. So I did not feel compelled to provide a platoon's worth. Two will probably do just fine.
This is my latest "spaghetti pit", which was on the workbench at the same time.
So of course I have to try out putting my newly cherished ampulomet into a firing position.
And since Pete seems to like my wired entanglements, I've added one just for effect. Wow, bet them panzer boys gonna be scared of me now! -Mark
(aka: Mk 1) |
| Mark 1 | 21 Aug 2021 6:42 p.m. PST |
Next in line are some Soviet M1939 37mm AA guns. I mean, I gave a 37mm gun to my Romanians. Can't favor one side vs. the other, right?
The guns are H&R. I have 2 in deployed position (shown here) and two in towed position. In truth I'd rather have more deployed, as I am not likely to be towing them around too much. The H&R guns do not have any gun crew figures, so of course I had to add some. I used H&R kneeling gun crew figures for the seated gunners. After clipping them off their molded-on bases they only actually have one leg (they were kneeling after all). But I discovered with my jeeps and other crew-in-vehicle projects that this detail is not visible when the models are finished, so one-legged seated gunners are my go-to now. All the wartime pics and vids I've seen of this gun show loaders standing beside the guns as well as the gunners shooting them, so I added a standing H&R Artillery Crew figure as well. My standard for unit-scaling is that 3 figures equals a full-sized gun crew, and 3 looks busy enough for me, so it will do. What I was not able to come up with was a way for the crew to be set on a base, with the gun added or not as appropriate (as I do with my AT guns and artillery). So if the crew needs to be separated from the gun at game time (due to the crew being destroyed, or failing morale, or whatever), I guess I'll just put the towed gun models (which don't have crew figures) in place of these deployed models.
I actually put some thought into how I might base crews separately, and then add the guns, but it just didn't work. The guns come on a molded-on base, and it would be too much to try to trim that away. And besides, the gun needs seated gunners! But that doesn't mean I can't make bases for the deployed guns. And so I did. These bases, new additions to my "spaghetti pits" collection, are specifically sized for my Soviet M1939 guns.
They are not quite as good looking when empty as my trenchworks. The lip of the indent for the guns is a bit more distinct. But I don't actually expect these to be empty on the battlefield. The guns may be in these prepared positions, or the guns may be just on open ground. But it is unlikely that the gun positions will be left without guns.
The guns drop right in to give me effective AA gun pits.
So now I am as ready for the Stukas as I am for the panzers. Получите это, фашисты! -Mark
(aka: Mk 1) |
| Mark 1 | 21 Aug 2021 6:56 p.m. PST |
That's enough "spaghetti pits" for now. Let's go for some simple stuff. Just some tanks maybe.
Well, kinda just tanks. Maybe just tanks with something extra. Here are my Soviet PT-43 minerollers.
These are GHQ models. Of course the models themselves are absolutely beautiful. I have tried to paint them up well enough to do justice to the modelling standards we have some to expect of GHQ's product line.
My goal was to give a pretty clear indication of the mud and dirt that the rollers themselves would kick up, without completely mussing up the tanks.
The mine roller apparatus just glues onto the lower front hull of the T-34 models. I was not sure if this would be robust enough for game table use, so I added some plastic sheet, glued onto the hull and mineroller from below, as a sort of "splint" for the joint between the two. I hope this will provide me with fewer post-game repairs. We'll have to wait and see. -Mark
(aka: Mk 1) |
| Captain Pete | 21 Aug 2021 7:04 p.m. PST |
Excellent work on the T-34 Minerollers and the 37mm AA guns, Mark. I have both that will need some paint one of these days.
Right now I am working on some GHQ Russian infantry with a few 2D6 Russians thrown in for variety. |
| Mark 1 | 21 Aug 2021 7:06 p.m. PST |
And if they do break down at gametime, I also now have a way to get in a pull them out again.
This is a GHQ Stalinets tractor, with an H&R figure added as driver. Early war, these were about all that the Red Army had as dedicated recovery vehicles (beyond the other tanks in a given unit). It was only later in the war that dedicated recovery tanks, usually made from the refurbished hulls of tanks that had lost their turrets in combat, became more common.
The GHQ Stalinets model is as nice as any they make. But without a driver it looks a bit barren.
Once again, the seated figure is actually a kneeling gun crew figure. When clipping him off of his stand, his back leg was lost. But as I think the pictures here show, even in this exposed position (not nearly as cluttered and busy as the AA guns above) you really don't observe that this seated crewman is one-legged. A very small kit-bash, but again I think adding crew figures adds some distinction and character to the models. Your tankage may vary. -Mark
(aka: Mk 1) |
| Mark 1 | 21 Aug 2021 8:12 p.m. PST |
And now one more, not related to the others, but coming off of the workbench at the same time.
This was a GHQ M4A1 Halftrack Mortar Carrier. They come packs of 5, but they fought in units of 3 or 4 (providing motorized close support for the Armored Infantry units, among others). So I had this extra M2 halftrack with lots of "stuff" in it. And I thought I might make use of it.
I added a few crew figures in the back, and an M2 .50 cal up front for the skate ring.
I'm not really sure how I'm going to use it. But I figured that a halftrack full of stuff could fit into and HQ unit (full of extra radios) or into an engineering unit (full of engineering stores) or even into a tank recovery unit (full of maintenance supplies). So a couple guys get to ride around in an over-stuffed M2 halftrack for a while as I look for somewhere to put 'em. -Mark
(aka: Mk 1) |
| Captain Pete | 22 Aug 2021 11:28 a.m. PST |
Great work on the Stalinetz tractors and the repurposed mortar carrier, Mark! My GHQ Stalinetz tractors did come with a molded on crew member with a soft pilotka style hat. They also came with a covered cab that could be glued on over the open cab for inclement weather as well. I did my cabs open and painted the crewman. |
| Mark 1 | 23 Aug 2021 5:15 p.m. PST |
My GHQ Stalinetz tractors did come with a molded on crew member… Right you are, Pete. As usual … Seems my Stalinetz tractors are C-in-C models, not GHQ. All these years (had a fair few for at least 25 years, but just found this one in the extras bin and decided to have-at) I have been attributing them to the wrong vendor. Oops. I did my cabs open and painted the crewman. FAKE NEWS! Nope, ain't gonna believe nuthin' 'til you provide some evidence. Got any pics to share? Of your Stalinetz tractors that is. You certainly have shared a generous portion of your work, but I don't think I've seen any of those yet. -Mark
(aka: Mk 1) |
| Captain Pete | 24 Aug 2021 7:11 a.m. PST |
Hi Mark! Here are a couple of Stalinetz tractors I painted for GHQ's T-34/85 Combat Command back in 2000. I also included a couple pictures of the T-34/85s that I painted at the same time.
|
| Captain Pete | 27 Aug 2021 5:09 p.m. PST |
Here are some more Russian infantry. The crouching light machine gunner and the ammo carrier are by 2D6. The other 2 are by GHQ and include an antitank rifleman and officer/NCO.
|
| Mark 1 | 28 Aug 2021 1:28 p.m. PST |
Pete: Thanks for posting the pics of the GHQ Stalinetz tractors. It's helpful to see and compare. You are right, I can see the drivers' pilotka side-caps -- that's a nice touch from GHQ. I always appreciate the quality of your painting. But in this case I'll offer one comment -- those tractors look awfully clean. I mean, they are tractors after all. I also like the infantry shots. Your camera skills (and detailed painting skills too) clearly exceed mine. Those 2D6 figures are nice -- very dynamic poses. And it's hard not to love GHQ's infantry, where you can see not only the weapons in detail, but even the expressions on the faces! I like your approach of flocking the figures' cast-on bases. I think I will take a lesson from this for my own work. I have usually relied on the flocking of the stand after the figures are mounted to flow over onto the cast-on bases. But I do place a high value on hiding the cast-on bases of the figures on the stands. I will try doing it the way you show next time, to see if I get a better result. Always something more to see, to learn, and to try. -Mark
(aka: Mk 1) |
| Captain Pete | 28 Aug 2021 5:40 p.m. PST |
Thank you very much, Mark! I appreciate it. Stalinetz tractors Yeah, I know they are not as "dirty" as they probably would be in real life. These were done 20+ years ago but have held up well overall.
They are sprayed with a light coat of "Dust" out of my airbrush. This is a very thinned out mixture of earth tones hitting the area around the suspension and front and rear a bit more heavy than the top.
It is pretty subtle, maybe so subtle no one really notices. The problem with weathering anything at this scale is how much to do. I choose to do some but not so much as to cover the fine details that I spent time on. I hope that makes sense. Believe it or not, I spray some "Dust" around the boots of my infantry figures as well, especially any exposed soles. It keeps the boots from appearing too new especially for these figures "in the field". For the small infantry bases, I use a small spotter brush to carefully apply tan House Paint around the boots or the whole figure if prone. I then apply my Woodland Scenics "Pete's Special Blend" of turf to the bases while the paint is still wet. I usually thin the paint a bit but not too thin. I find this works for me in the long run as I don't have to try to paint the small bases once they figures are grouped on the larger bases. I also find it easier to glue down a couple of figures on the larger base, flock, then glue the others and flock again. For me, at least, it keeps me from accidentally getting paint, and or flock, where I don't want it. Overall, I like GHQ infantry better, but the 2D6 is very good also. They have some cool poses that are more dynamic than some of the GHQ poses. They do make the Maxim MG with 3 man crew and the 82mm and 120mm mortars with 3 man crews. I may look into getting some of those in the future. I would love to see GHQ add another heavy weapons pack. Thanks very much for your kind words, Mark. I always value your input. |
| Captain Pete | 02 Sep 2021 10:52 a.m. PST |
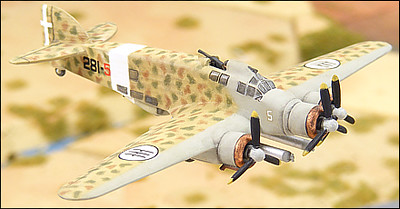
Here are some WIP pictures of the SM-79 I painted for the GHQ catalog.
|
| Mark 1 | 02 Sep 2021 11:56 p.m. PST |
Pete those Gobbas are so good it almost hurts to look at them! I think I sprained my eyes! I always considered the SM.79 to be a good looking plane, but wow you are doing the job on them. The soft edges on the camo patters, the neutral camo tone of the leading edges and engine nacelles, the detail work -- I mean not only the cockpit panes, but the edges around the cockpit glass too?!? Beautiful stuff. Stunning. Quite a treat. Thanks for posting them. -Mark
(aka: Mk 1) |
| Captain Pete | 03 Sep 2021 7:22 a.m. PST |
Thank you so much, Mark! This was one of my hardest and most time consuming projects back when I was painting for GHQ. There were lots of little "problems" to be solved such as doing the fuselage band, the tail cross, and getting a good, straight line on the front of the nacelles. I think I spent close to 20 hours on this model. Here is the SM-79 as she appears in the GHQ catalog. The picture was taken by Nicki who did an excellent job.
|
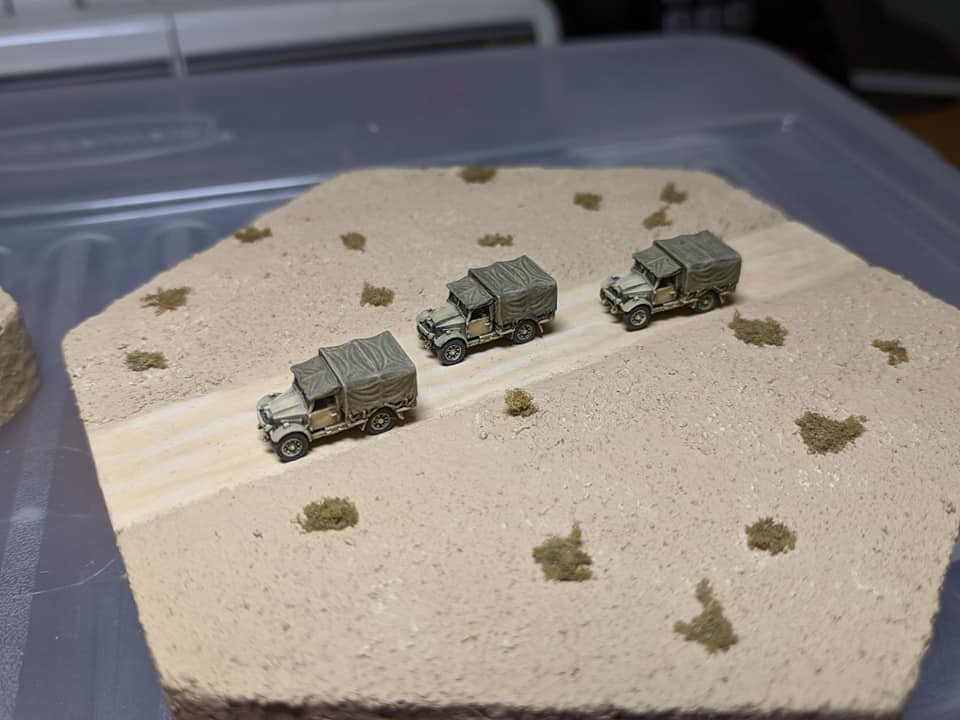
| Captain Pete | 24 Sep 2021 11:31 a.m. PST |
Here are a few British trucks for my Eighth Army. Those infantry need to get around somehow. These are Morris trucks by GHQ.
|
| FlyXwire | 24 Sep 2021 12:43 p.m. PST |
Pete, are these the truck roaches you mentioned in another thread? ;) Nothing roachy about these coaches in the least! |
| Captain Pete | 24 Sep 2021 4:01 p.m. PST |
Thanks very much,FlyXwire! These are not exactly the "truck roaches" as I described but could become those in a similar type scenario set in North Africa. The term "truck roaches" was actually coined by my very good friend, Dale aka Begemot. It derives from both of us playing East Front from Talon Soft years ago. When playing with the fog of war rules in this tactical game, if you happened upon the enemy's rear area, the trucks (and assorted rear echelon personnel) would be seen scurrying away as your tanks or infantry approached their position. Just like cockroaches scurrying away when the light is shined on them. |
| FlyXwire | 24 Sep 2021 5:23 p.m. PST |
Talon Soft! (I enjoyed a few of their titles back in the day too) |
| Captain Pete | 03 Oct 2021 10:55 a.m. PST |
Here are a couple pictures of my paved desert roads I did a few months ago. They can be used as the Coastal Road for WWII games or for Modern era games as well. My next project is to create some similar paved roads for WWII France and NW Europe. Question: Does anyone have any information on WWII paved roads or at least better maintained dirt roads in Russia for WWII? I'm thinking Minsk Highway.
|
 deadhead deadhead | 03 Oct 2021 11:53 a.m. PST |
Imagine what metal tracks will do to a road like that. Remember the rubber shortage once that Japs entered the war. Add to that a Russian "chilly night". My US Marine Altama boots (OK, they were hot weather boots I do admit) froze in Red Square in one February. It was cold (very very). Within 24 hours they cracked across the soles….both boots) ….full thickness, I still have them for gardening or Moors walking in the snow (they cannot get any worse now). Our winter motorways are poor these days. US are infinitely worse. Imagine USSR in 1941! Is it freezing, or is it just after a thaw and heavy rain? It is the weather that decided East of Berlin in 1941, not the "quality" of the road surface. Are we talking about July and dust and heat, or October and three feet deep mud, or January and you simply have to experience that? |
| Captain Pete | 04 Oct 2021 8:27 a.m. PST |
Hi Deadhead I was just wondering if there were any paved roads or at least well maintained gravel, dirt, macadamized etc. in Russia. I know the Russians had several "highways" but was wondering what they were made of and if better maintained than standard country roads. |
| Captain Pete | 04 Oct 2021 8:38 a.m. PST |
Here are some of my support weapons for my WWII Russian infantry. There are 4 45mm AT guns, 2 76.2mm infantry guns, 3 50mm mortar teams, and 6 medium machine guns. These are all by GHQ. The gun crews are actually GHQ American crews as the Russians they have are in Winter uniform and I wanted the summer look. I think they look fine at this scale. I would have liked GHQ to provide a second crewman for the MGs. They did it for their German MGs but I guess the Allied forces only need one guy to man their guns. Oh well.
|
| FlyXwire | 04 Oct 2021 2:56 p.m. PST |
Pete, your desert terrain and those road hexes display some wonderful craftsmanship! Hey, pardon this pic below, it's the only one I have left showing my hex terrain with old Monopoly buildings on them (I've recently cracked all these buildings off the hexes to use with some new 3mm stuff), that also shows a section of black non-skid tape on one hex. This is the type of safety tape that can be bought in hardware stores, for putting onto step edges to provide grip for people to safely walk up and down stairs, or on slippery surfaces, etc.. I thought the grainy stuff looked a lot like small asphalt roads -
Now doing curves could be a problem (since the tape can't be bent for these), but curves can be cut to proper angles and matching road widths from the larger, step-size sheets of this non-skid material that's also sold in hardware stores. Another thing that can be done with the tape, is that it can be made removable, if the protective backing is left in place on the adhesive side, and the tape (or pieces) just stuck in place with weaker double-stick tape. As an example, that one hex above with the arrow pointing at it shows the non-skid tape length lightly stuck to a hex that has a painted dirt road underneath (so the same hex could be used for either type of road surface). |
| Captain Pete | 05 Oct 2021 6:05 p.m. PST |
Hi FlyXwire That is a very nice selection of buildings you have there. Can you tell me who the manufacturers are and the various scales? It looks like some 6mm, maybe a couple 10mm and the big one maybe 20mm. A long time ago, I bought some material for asphalt roads from Noch. It was sort of a crepe paper material and I decided not to use it. I experimented with the 600 grit sandpaper glued on .020 styrene sheet with spray adhesive. It turned out pretty well and the already fine grit is rendered even less abrasive by adding some thinned down dark gray paint in a couple layers. I will be starting a project soon to create some paved roads for Western Europe using the same method. I was pretty satisfied with the way the desert roads turned out. |
| FlyXwire | 06 Oct 2021 5:01 a.m. PST |
Pete, with your crafting skills, I'd say you've nailed the making of roads for your terrain kit they do look good! Those '2-3mm' buildings above are Monopoly game pieces. :))) Some cut down to single story size, or with those destroyed foundations those are hotel buildings or square styrene tubing sliced down and notched with an electric rotary tool. The 6mm Ukrainian huts there on the left front I cast 30-40 years ago they were upgraded over time too, eventually getting better looking static grass roof tops (than as seen below). I made the masters out of wood and putty, and then made latex molds for them (using that type of brush-on latex mold material meant for plaster models, then resin cast them). They were always sort of lumpy, but I blame the wiggly molds for that. :)))
The 1/144th scale buildings at the top right in the photo are Pegasus Models, and an N-scale railroad building I bought off of ebay (w/custom made yard bases Noch-brand fencing if I'm remembering correctly). The 20mm-1/72nd buildings are Scenic Effects models. Still have these, about a dozen, plus destroyed ones. (hey, thanks for asking gives me an excuse for spamming more pics) ;)
|
| Captain Pete | 06 Oct 2021 7:24 a.m. PST |
Those are some more great pictures, FlyXwire! The 20mm buildings look fabulous and the 6mm buildings you designed and cast are also very nice. I would love to see some other companies, such as Total Battle Miniatures, start doing 6mm Russian and Ukrainian style buildings. I have some other East Front buildings by other manufacturers and they are generally okay but things have gotten better over the years. |
| FlyXwire | 06 Oct 2021 8:34 a.m. PST |
Pete, that's a great point! Btw my buddy Dave, who I've posted a few pics of his 6mm minis on the forum here he's going to be getting up a targeted 3mm collection too (Brit-sector-Normandy). The cool Total Battle Miniatures buildings that are available, and the quick setup ability for this small stuff was, I think, just too tempting for him to resist. (anyway, off-scale and off-topic for the thread here, but TBM buildings definitely would be cool in 6mm!!!). |
| Captain Pete | 12 Oct 2021 2:05 p.m. PST |
Here are some of my WWII German vehicles for North Africa. These are all 1/285th scale GHQ models.
|
| FlyXwire | 12 Oct 2021 4:54 p.m. PST |
I mean come on, look at these beauts! Not only are GHQ minis amazing castings, but Capt. Pete has done an amazing job in popping the details by contrasting the recesses, and bringing out all those sculpted features. Finest work Pete! |
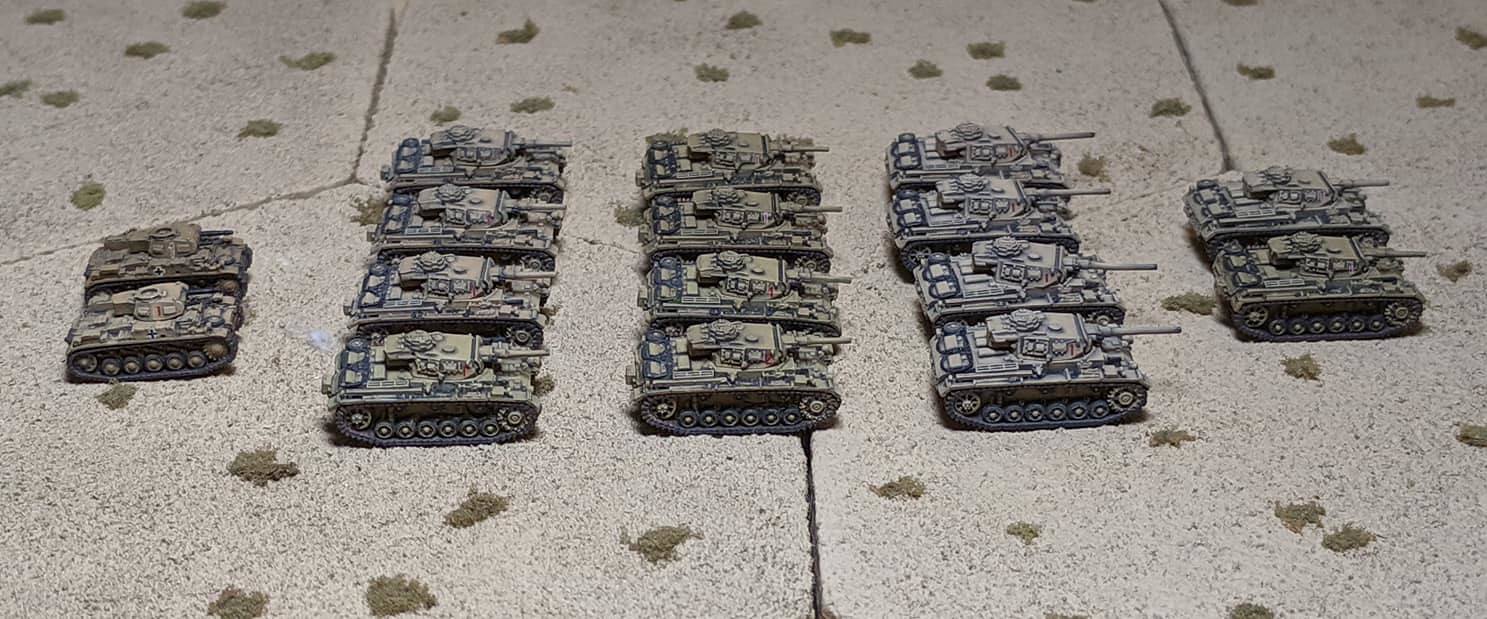
| Captain Pete | 12 Oct 2021 11:05 p.m. PST |
Thank you very much, FlyXwire! Here is one of my Panzer III companies painted for North Africa. I have a mix of short and long barreled Panzer IIIs in the company as well as a couple of Panzer IIs. The second picture is just the HQ element.
|
| Valderian | 14 Oct 2021 10:03 a.m. PST |
Beyond compare is what I have seen here, at least according to my knowledge. Awesome, Captain Pete! I've seen a couple of 28mm painted models but many are well below these. You not only have the right skills, but you also really know what you are painting on each and every tank. |
| Captain Pete | 14 Oct 2021 12:49 p.m. PST |
Thank you very much, Valderian! I do think that the GHQ models have great detail and in some cases more detail than their larger scale brethren. |
| Mark 1 | 16 Apr 2022 7:38 p.m. PST |
Been a while since I posted anything. Due more to the recent "upgrades" to my phone's OS than to any lack of hobby work on my part -- I just find it substantially more difficult to get the pics out of my phone and onto my PC than I did before, so things progress more slowly. Excuses aside, here is a very small refurb project I did recently, taking some GHQ Valentine Mk IIIs I had originally painted for British Western Desert use, and repainting the for French use in Tunisia.
The French received a few Valentines from the British, which saw service during the latter part of the Tunisian campaign, replacing or supplementing some of the earlier French-produced tanks. I already have Renault R35s and D1s and Somua S35s. So a few Valentines really helps me carry through to the end of the campaign in mid-1943. Unfortunately I did not think to take any pics of the Valentines before embarking on the re-paint project. They were in fact the first models I ever did a wash and dry-brush process on, some 20 years ago or so. The results impressed me enough that I have followed the process ever since. I do not have a British force. I have toyed with the idea of putting together a British force from time to time, so there are a few random units in my collection. These were among them. But I never really pursued it enough to build up a credible gaming army, so they are mostly idle. Now, these Valentines have a much better chance of actually making it onto a game table.
In researching the French use of the Valentines I saw that they had been painted in solid green. So I painted over the desert sand yellow with Poly-S French Khaki, a medium green hue which I use on most of my French and much of my Romanian kit. The French tri-color was present on these tanks too. I have placed it on only one tank, to give me a way of identifying my platoon commander, and to leave the rest of the tanks to do double duty for my Russian forces, where Valentines were used in larger numbers than almost any other Lend Lease tank. I have some unopened later marks of Valentine that the French didn't use, but the Russians did. These may get completed in the same (or similar) colors to build out a lend-lease mixed composition Valentine company. Although the British classified it as an Infantry Tank, which was as close as they got to a heavy tank, the Russians considered it a light tank and often provided it to reconnaissance units. It was not very fast, but it was quiet and it seems to have had good cross-country performance, which was a real shortcoming of the T-70 light tank that it mostly replaced.
It was not exactly a first-class combat tank by April of 1943. But it was about the best the French had going. And so it will be a welcome addition to my French Tunisian force. -Mark
(aka: Mk 1) |