"Recent 6mm Work -- Show us your stuff!" Topic
226 Posts
All members in good standing are free to post here. Opinions expressed here are solely those of the posters, and have not been cleared with nor are they endorsed by The Miniatures Page.
Please don't make fun of others' membernames.
For more information, see the TMP FAQ.
Back to the WWII Models Review Message Board Back to the Getting Started with WWII Message Board Back to the WWII Land Gallery Message Board Back to the 6mm WWII Message Board
Areas of InterestWorld War Two on the Land
Featured Hobby News Article
Featured Recent Link
Featured Ruleset
Featured Showcase Article Pre-painted models from the World Tank Museum.
|
Pages: 1 2 3 4 5
| Mark 1 | 11 Jun 2020 4:43 p.m. PST |
The old "at regular gaming distance they all look like blobs" bit has never really affected my love of 6mm. Why not? Because I pick them up when I move them. And I get down to check line-of-sight, and a dozen other things happen at gametime that give me a close-up inspection of the models. So even if they are blobs at 3 feet, I have dozens of occasions during the game when they are only 3 inches away. And the other guys in the game do too. I get a jolt of delight every time I pick up a nice-looking miniature to move it from here to there. I get a jolt of delight every time I put the side of my head (or my periscope -- I have one, do you?) down on the table and see a vista that actually looks like a real, scaled, landscape. And I get a jolt of delight every time another guy in the game (whether a team mate or opponent) picks up one of my miniatures, holds it up for inspection, and says "would you look at this thing?" I've even had passersby at gaming cons or game shop games … parents with 10 or 12 year old kids who were walking through but not playing, stop at the table, start to examine what's going on, and call their kids over "Hey Billy, come look at this! There are some little tanks and … oh there are some soldiers too, and look, you can even see their little faces and hands. Oh, there's a horse and a wagon over there" etc. It's kind of like a good landscape painting -- you get the big sweep on first glance, but if you look at it long enough and closely enough you'll find more and more aspects that the artist has hidden in plain sight. So with 6mm miniatures, at first sight you might take in the sweep of maneuver. But if you explore, there is a depth you can discover in the units themselves. I do drone on sometimes … maybe I should switch to decaf. -Mark
(aka: Mk 1) |
| wildphilldude | 17 Jun 2020 1:24 p.m. PST |
Here is something I done just recently
|
| FlyXwire | 17 Jun 2020 4:57 p.m. PST |
Very much enjoying the pics here, and the discussion about reaching out to younger recruits too. |
| Mark 1 | 17 Jun 2020 10:01 p.m. PST |
On Donner, on Cupid, on Comet …
… wait for it …. waaaait for it …
AND BLITZEN!
(as in the plural form of Blitz, as in more than one Arado 234 Blitz). (See, it was a joke. A pun. Some word play. Yeah I know, don't give up my day job to become a comedian. OK.) So nice Blitzen there WPD! Must admit I've never had to face one on the game table. Great way to make your games a bit more memorable for all involved, I would think. More fun, too. Good stuff! -Mark
(aka: Mk 1) |
| Mark 1 | 17 Jun 2020 10:36 p.m. PST |
Just a brief follow-up here. When I posted my M10s and M36s I lamented that I could not find my M20s to complete a full TD company. Well, I found them.
Here is an overhead view. This pic is taken in indirect sunlight. I didn't have to do any real modelling on these pieces. Just some touch-up painting.
This view is taken with different lighting. Makes a substantial difference. This pic was taken under fluorescent lights.
Each US Army TD platoon had 4 guns, and two scout cars (for the CO and the platoon SGT. There are three platoons. The platoon leaders are in M20s posed standing with binoculars (from artillery crew sets). This makes it easy for ME to determine which is the command vehicle. The platoon Sgts are just manning the .50cals in their M20s (being the practical types that most platoon Sgts seem to be). In the pics I have 1 M36 and 3 M10s in each platoon, but I can vary that ratio as I see fit with the extras I have. The company HQ had a recon section with two scout cars recon section, a maintenance and supply section, and the CO and XO each had jeeps. I gave the CO a jeep with the tarp up to help me spot him on the table. I am going to keep the HQ elements separate, so that they can serve my M18 TD company as well as my M10/M36 TD company. I also have a full TD company for Tunisia with M3s (with a platoon of M6s if I want 'em). That company has it's HQ vehicles boxed with them, as the M3 Scout Car was used only in Tunisia, but both the M3 TDs and the M3 Scout Cars were replaced by the time the TDs were in action in Italy or ETO. I tell you what, this project took me a lot longer than I expected. After all the infantry I painted up over the last few projects, I think I'm done with infantry and vehicle crews for a while. Maybe just some tanks or something simple -- a little painting, some detailing, some weathering, and bang I'm done. Yeah, that's likely… -Mark
(aka: Mk 1) |
| Mark 1 | 17 Jun 2020 10:48 p.m. PST |
My next project is some M8 "Scott" assault guns.
I only painted up a couple of them. I have one company of M5 Stuarts, and these make a useful support section for the company HQ. But I can't see what I would do with all 5 that come in the package. Still even if it's only a couple of them, I think they came out looking pretty nice.
Did I say my next project would not have crews? You didn't actually BELIEVE that, did you? These guys were actually on the workbench at the same time as the TDs. So more part of that project than a separate project. Next one won't be quite so fiddly. Really. Unless I change my mind… -Mark
(aka: Mk 1) |
| FlyXwire | 18 Jun 2020 5:26 a.m. PST |
Mark, Super detailing! Getting those crews painted and in place really pops your units here. Hey, I've got a PDF link you might like to check out….it's on the organization and combat action of US Task Force Butler in the 'Champagne Campaign' - PDF link I'm using TF Butler as the focus for a 3mm game project, and you've got the troops here in 6mm that you could use for scenarios inspired by this history too. The thesis by Major Volpe is a good read any which way great on doctrine, and how that training helped ensure the combat effectiveness of TF Butler in the field. |
| Mark 1 | 18 Jun 2020 1:21 p.m. PST |
FlyX - Thanks for the kind words. And for the link. Anvil / Dragoon has long been a topic of interest to me. I have read up quite a bit on the exploits of TF Butler, but I don't think I have any primary sources, so I am very pleased to now have the thesis from the link. Hopefully I can put together a scenario or two from the stories recounted in the doc. Good stuff! -Mark
(aka: Mk 1) |
| FlyXwire | 18 Jun 2020 1:58 p.m. PST |
Keep your 6mm exploits coming, please! A good friend of mine has kept his Micro-Armour collection updated, and we swap game hosting duties back and forth in our respective WW2 scales. |
| Mark 1 | 25 Jun 2020 9:56 a.m. PST |
In my 6mm gaming experience, minefields are usually just marked with a paper chit on the table or some such. Mien Panzer even comes with cut-out counters you can use (as your paper chits) to mark the location of your minefields. Having seen marked and wired minefields used in several game AARs of games in larger scales here on TMP, I felt … shall I say … left out. So I have created a few marked minefields for my gaming terrain.
They were pretty easy to make. I cut out 1 inch by 2 inch (approximately) rectangles of sheet styrene, put some fence posts around the perimeter, put a bit of acrylic gel with earth-tone paint on top, flocked 'em, and ran a thread around the fenceposts.
I did two of the bases with diagonal edges, to provide some level of flexibility. They might go alongside other terrain (like rivers or hills), or they might be put together into a network of fields that provide "access" for infantry patrols to go out, but channel any attack coming in to make it vulnerable to bunching up and flanking / grazing fire. A simple and quick project, but something I've never had before. -Mark
(aka: Mk 1) |
| FlyXwire | 25 Jun 2020 10:04 a.m. PST |
They look good Mark (w/excellent ground cover appearance too). |
| Mark 1 | 27 Jun 2020 2:37 p.m. PST |
Those pics of WDP's Arados got me itching for some aircraft. And since I was a bit fatigued with small fiddly bits (not only the crewmen, but the AAMGs on the TDs and M8s got to be a bit much), and there is no actual modelling to be done on most of the aircraft I buy at this scale (except occasional trimming, and drilling a hole for the stands), I thought I'd do some planes. So I present my new Hs-129s, painted up to support my Romanian forces.
I bought these some time ago. They've been in the "to be painted" bin for years now. IIRC these are from the H&R German Aircraft line.
These are only the 2nd type of aircraft my Romanians have at their disposal. There is one statement over on the worldwar2.ro website that gives this aircraft credit for saving the lives of more Romanian soldiers than any other single support weapon.
This is an older pic of my Romanian JRS-79Bs. This is the Romanian twin-engined version of the famous Italian SM.79 tri-motor bomber. These served during the 1941 and '42 campaigns, but were withdrawn after that in favor of more modern aircraft (before being returned to service in 1945 when Romania was desperate for any aircraft to serve against the Hungarians and Germans). Romanian operations with the Hs-129s began in early/mid 1943. So it would not quite be right to call them stable-mates, but the combination gives me air cover for the whole war.
The Hs-129 was known for direct battlefield tactical support. So it fits my needs quite well. But the Romanians didn't operate them with the under-fuselage gun pods as the Germans did (with 30mm or even 75mm cannons), instead just using a typical load-out of 6 50Kg (110lb) bombs with delayed fuzed under the fuselage for low level bombing runs, along with strafing with the twin 20mm autocannons and twin 7.92mm MGs. The noses turned out to be the most fiddly bit of this project, trying to get the right combination of yellow (ground-to-air recognition) nose, with camo green upper nose slope, with smoke marks in the troughs of the two guns on each side of the nose. And while I'm here, some more pics that are more completely gratuitous.
Here's a pic of my Red Air Force Pe-8. This is also an H&R model. I say gratuitous because this is not recent work. I painted this up about 10 years ago. But I have never photographed it before, and when I was digging in the active air forces box for my flight stands for the Hs-129s, well it was just calling out to me saying "hey, how come you never showed ME off to anyone?"
I really can't come up with any micro armor gaming scenarios what might involve this baby, except maybe sitting on the ground in some "defend the airfield" battle. These were used to bomb Berlin in late 1941. But never in large numbers, as the Soviets were more interested in putting their limited resources and talent into activities that had tangible, observable impact on the Wehrmacht forces around Moscow and Leningrad, than impact on war production or national will that economists and historians would try to measure for 50 years.
Here I've placed it with some H&R Yak-1s, just to give a sense of the size of this thing. It is huge!
Specs wise, the Pe-8 compares reasonably to a B-17. But it's combat history was nothing like as extensive, nor did it ever generate the level of crew loyalty expressed by B-17 airmen. No idea really how well it would have held up to the rigors of aerial combat, as it never achieved the scale of operations that could generate useful statistics. By mid-1942 it was out of production, and the remaining planes were mostly relegated to VIP transport.
I guess since I'm on the subject, I might as well put in a pic focusing on my Yak-1s. These are early razorback versions. They are my top Red Air Force fighters for the early war period (I also have I-16s for my "not top" fighters). By mid-war my La-5s and P-39s can take over. None of them would have been useful for escorting Pe-8s, in any case. For that I would need some Yak-9s. But they were not in service yet while the Pe-8s were conducting their bombing ops, so I guess I don't need to add them to my list … just yet. That's if for today. Maybe. Unless I find something else to photograph. -Mark
(aka: Mk 1) |
| FlyXwire | 27 Jun 2020 3:38 p.m. PST |
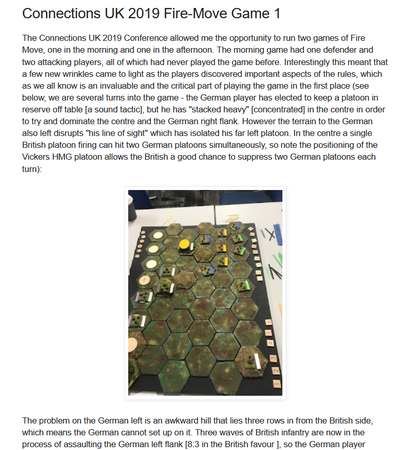
I still have my 6mm plane collection painted in the 1990s (that was before you could get decals for the scale, except for GHQ tank insignia sheets). Here's some showing my multi-part/applied insignia, etc. (well the bars were rub-on transfer strips over hand-painted blue fields, and a pain to apply individually).
Our local group played with these using my modified version of the Mustangs board game rules. |
| Mark 1 | 27 Jun 2020 5:21 p.m. PST |
FlyX those planes are beautiful! Really well done. Lots of individual character in the plane art and the weathering. I don't have either P-40s or P-51s. My Americans rely on P-38s and P-47s. I can also see a P-39 just peaking in up in the corner. I'm guessing that you did up 4 of them (I notice the pattern of 4s in your others). Would love to see them more fully. I do have P-39s, but they are quite old and I never fully committed to whether they should be painted for my American forces or my Soviets, so they are kind of a limbo scheme between the two. And they are scratch-builds from when I was in high school (actually I think from when I was in Junior High), and so are not exactly worth showcasing. I still have my 6mm plane collection painted in the 1990s (that was before you could get decals for the scale…) Yeah, I did much of my aircraft even before the 1990s, scratch-building before there were commercial plane models available at this scale. My painting skills moved forward throughout the 90s, though, and many / most of my older planes have been repainted at least once. Never did get with the decals, though. After spending so much time developing my detailed painting skills, I guess I'm just too lazy to figure out the fiddly bits of such small decals. I have two of the old GHQ tank decal sheets, but I've never tried to use them. But I must say they sure make for some good looking stuff! -Mark
(aka: Mk 1) |
| FlyXwire | 28 Jun 2020 5:52 a.m. PST |
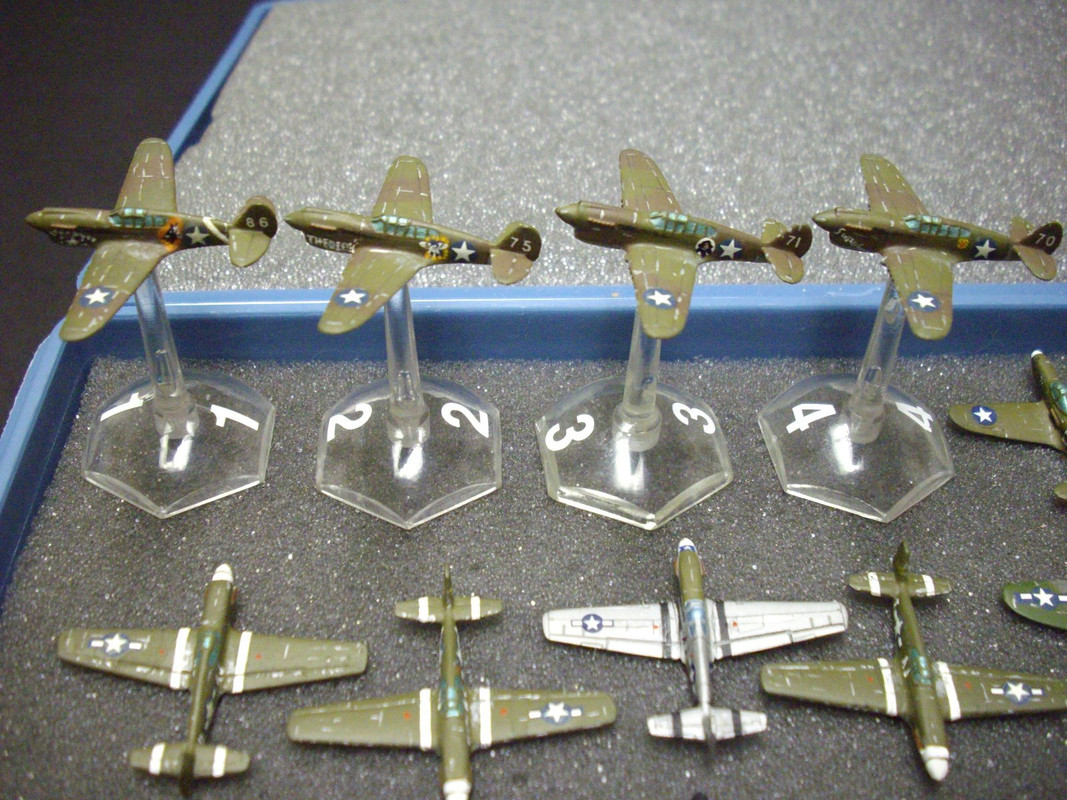
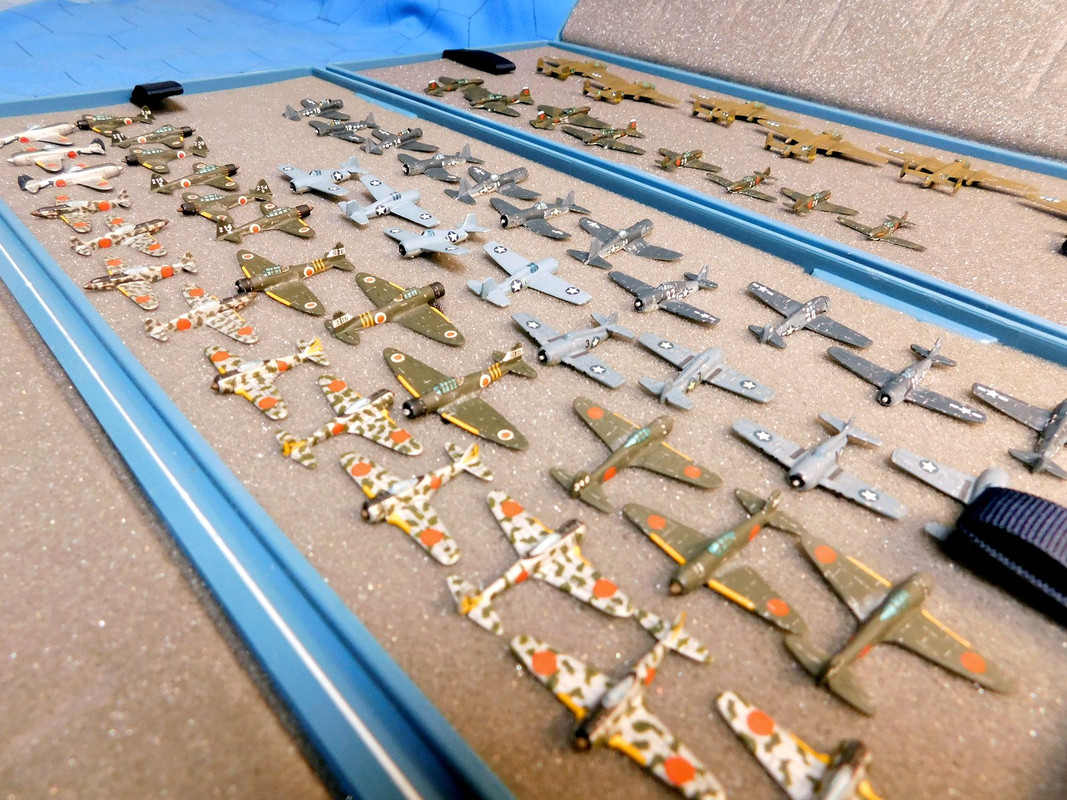
Mark, we've probably been on parallel flight paths in gaming over these decades! :) I collected the aircraft for Flights of 3 as Vics, or 4 per for Finger Four formations for when gaming our 3D Mustangs setup, players ran up to 3 planes each, but usually just a pair of them to keep the work load down. Here's what I collected the Battle Of Britain planes seen at the top of the first photo below, my best friend and lifetime gaming cohort decaled for me recently (with those fancy, pre-made decals available today)….. ;) The others are mine top to bottom -
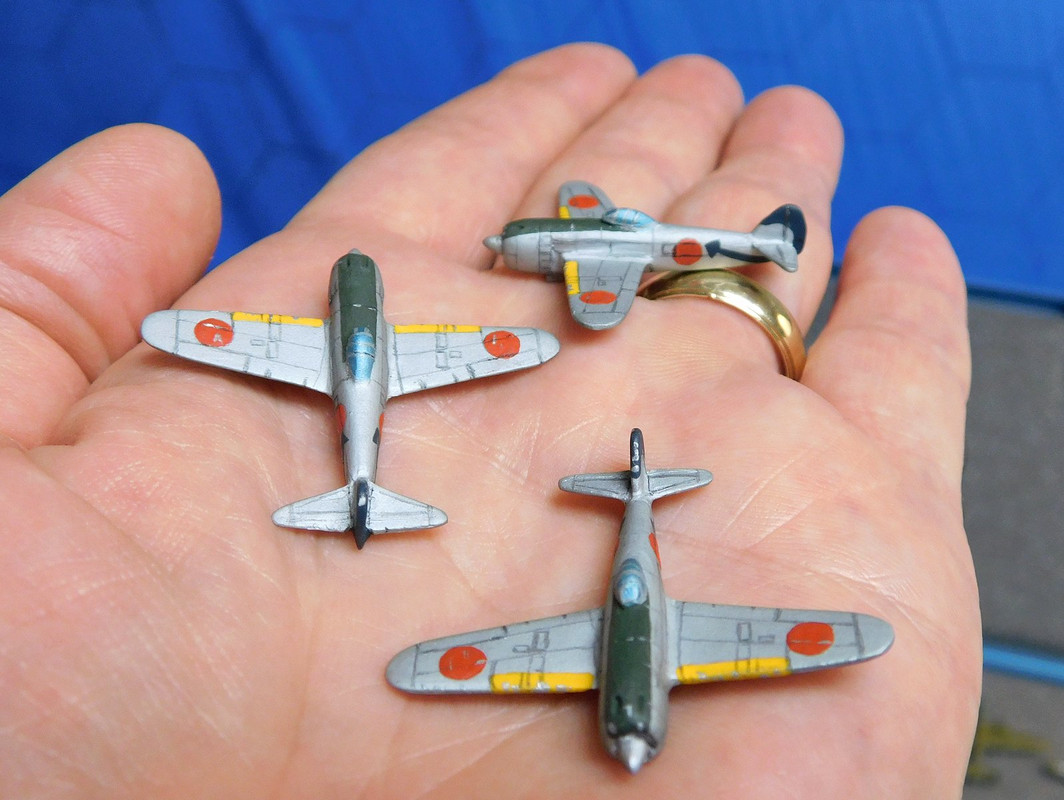
For the Japanese miniatures and their Hinomarus, these were hand painted, or were punched out from colored decal sheet and assembled circle within a circle (the effect was as good as I could get for homemade) -
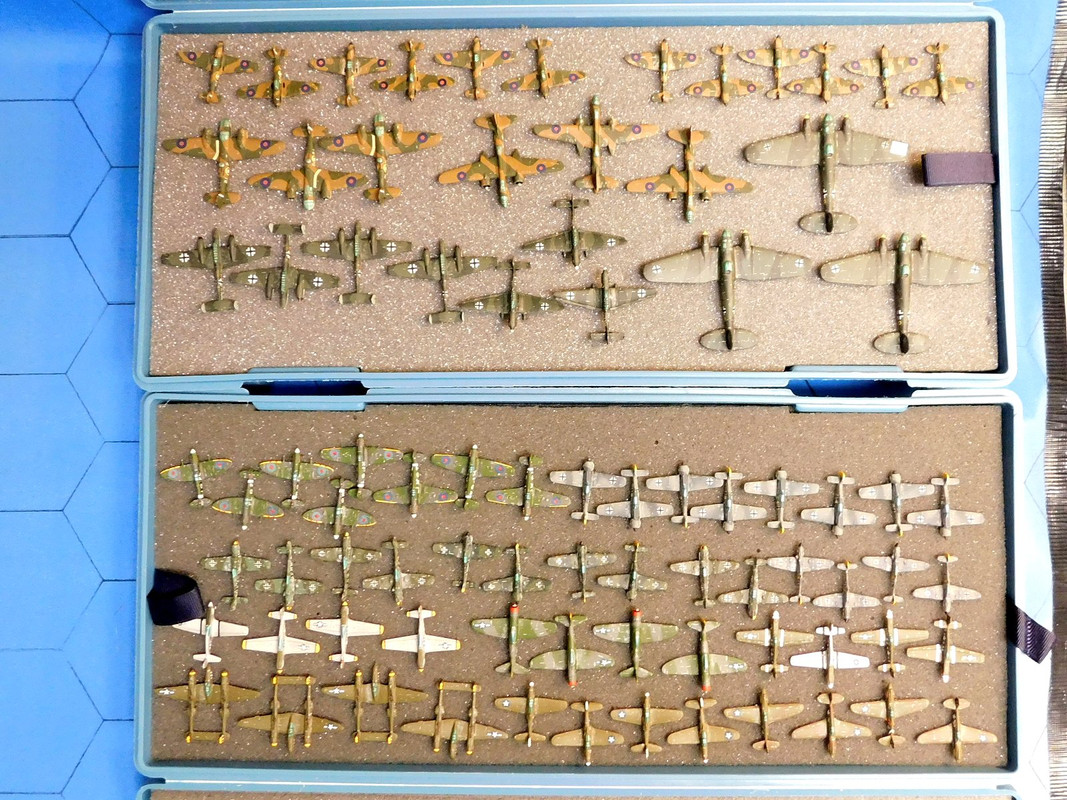
Looking over the pic of the Japanese and US Navy miniatures above, I can count at least 6 different makes amongst those unfortunately, the sizes and scaling varied noticeably between them, and between the 1/285th and 1/300th scales too. One of my favorite "finds" at the time was Leading Edge Miniatures out of the UK. Saw an advert in a gaming mag and wrote a letter to get a catalog sent back. Mailed off a small order, and was so pleased with the sculpting that I ordered all my BoB British planes form Leading Edge (I wonder if the gentlemen/proprietor is still in business?) such nice minis and good customer service back then pre-internet sales. Mark, you mentioned doing scratch-builds, and I didn't do much of that. I did customize some 1/300th scale P-47s to turn them into Japanese Franks, and liked the results (I'll call these my 'scratch-builds') -
-Dave |
| Mark 1 | 29 Jun 2020 10:25 p.m. PST |
Wow, FlyX, that's some amazing stuff. Quite a collection, and beautifully done, top-to-bottom! Your painting of the aircraft is far beyond what I've managed to achieve. There is much for me to observe and learn there. The bare metal (silver) flake effect is very well done, and the joint lines along the planes' skins and around control surfaces are superb -- really finely detailed, easily seen and yet not overpowering (as I have seen in some cases). And all of the special surfaces -- wing walk panels, leading edges, etc. … you've got it all right there! Makes me want to work on some more aircraft! And to learn how to do more, do better… Quite inspiring. -Mark
(aka: Mk 1) |
| FlyXwire | 30 Jun 2020 6:12 a.m. PST |
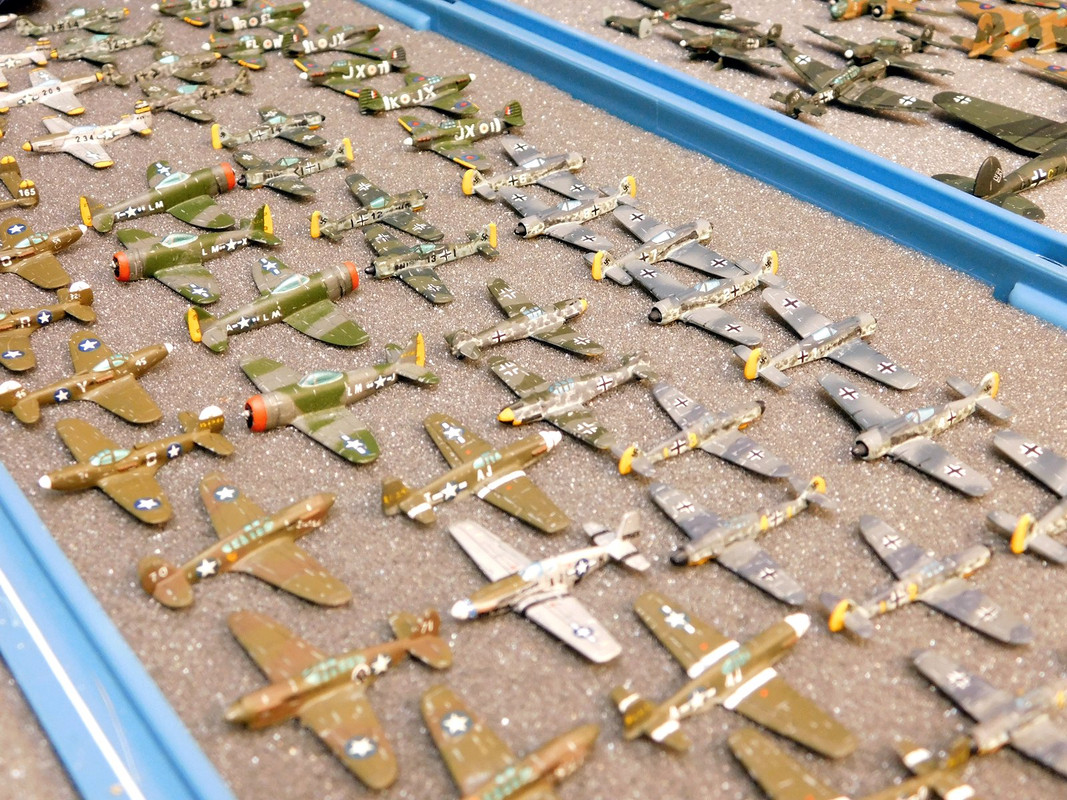
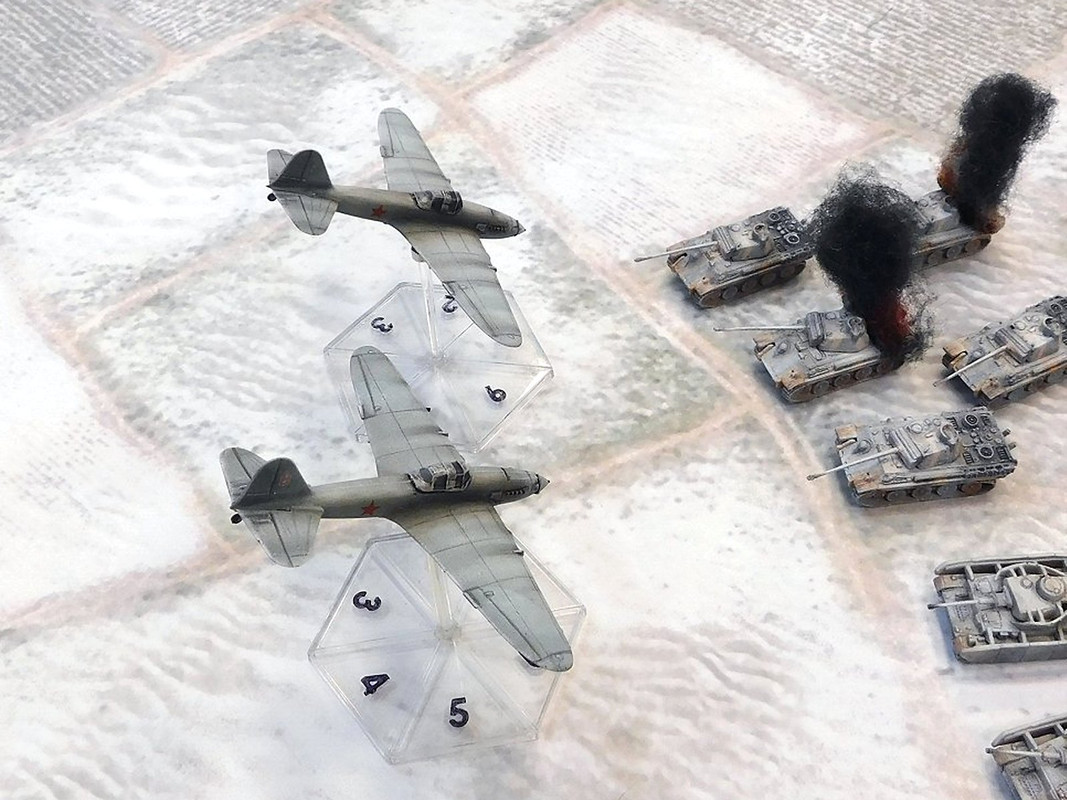
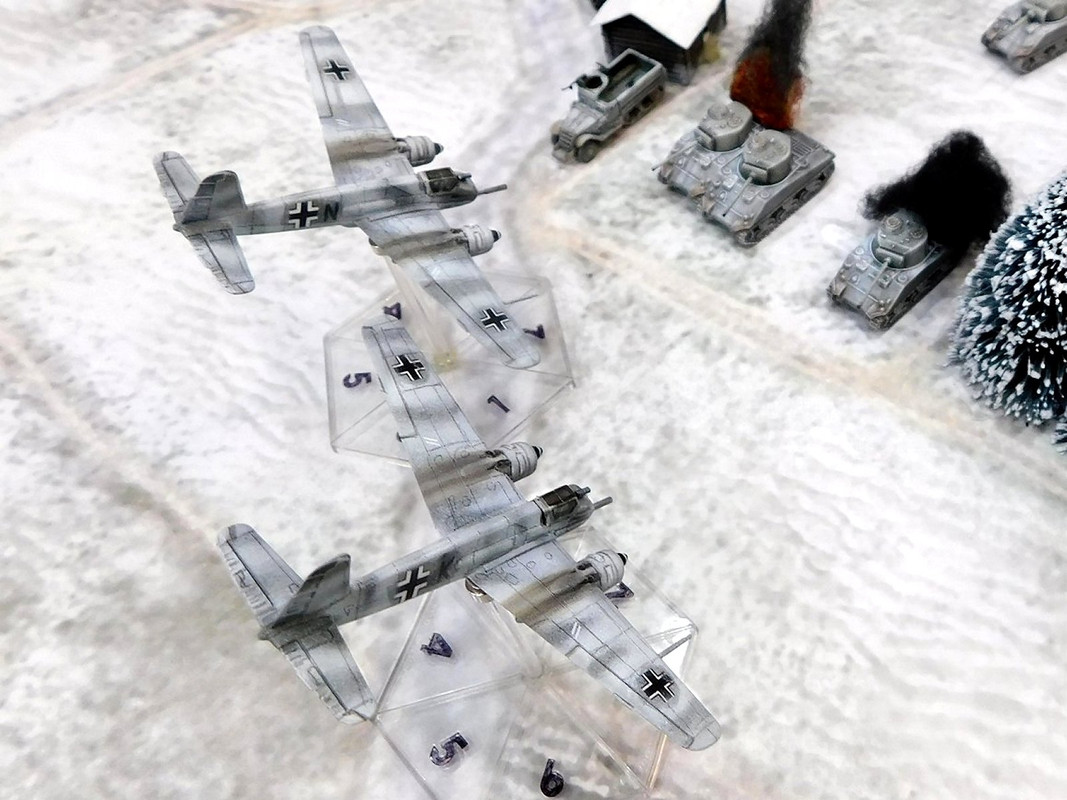
Mark, thank you for your super-generous comments! One of the easy techniques I used a lot on these planes, was to mark the panel lines with a pencil (done after an initial, thoroughly-dry spraying of flat clear lacquer to make the paint surface 'hard'). Once the pencil lines were drawn, and after a final dull-coat layer was sprayed on, the worn-off silver painted highlights could be applied. The graphite pencil lines turn dark gray when locked in with clear spray paint. For over rounded areas (like fuselage panels lines), a slip of stout paper can be cut out and wrapped flush against the mini, and used as a straight edge guide (or the lines can be free-handed). Btw, I still use pencil marking today with other model scales, and it works really well to bring out the outlines of etched panels, frames of hatches, around cupolas, tools, etc. Used this technique a lot on my 1/144th scale miniatures (it's for any scale really, where there's good etching that can be traced along with a pencil point). Of course on AFVs, the idea is to create the illusion of shadowing and shading along the edges of raised areas it's an exaggeration technique to pop details that our eyes couldn't naturally see at tabletop viewing distances. Combined with a dry brushed "swipe" in a light color (I actually use white, or off-white for this) the top surface details can be made to pop out at us. So and easy etching of pencil lining (maybe over a good thin initial wash of the base/camo colors), then a light color dry-brushing pass (basically to imitate 3 reflective light fudges base color(s), penciled/washed shadow effect, and dry-brushed highlights). This works good and can pop the fine detailing on most miniature AFVs. Found a few game pics to show the pencil technique works fine for aircraft models in larger sizes too (these 1/144th scale) -
The Henschel plane panel lines, access covers, and control surfaces here just brought out with 'pencil lead' -
|
| Mark 1 | 05 Sep 2020 2:20 p.m. PST |
My latest work is a company of early production M4A1 Sherman tanks. This model, with the narrow M34 gun mantlet, is the right Sherman variant for my US Army forces for Tunisia and Sicily battles -- among my favorite theaters of operation.
Here is an overhead view of the company. There are three platoons of 5 tanks, and a company HQ with 2 tanks (CO and XO). There is also a HQ Support platoon with maintenance/recovery and supply sections.
Here is a side-on view of the company. I put stars on all the turrets, and stars on the hull-sides of the command tanks (both HQ tanks and each platoon CO). The XO's tank, and each platoon sargent's tank, has some extra ammo crates on the rear deck. This allows me to easily keep track of my command vehicles at game time in a way that is non-invasive to the look of the game (and non-obvious to my opponents).
The company CO's tank is identified by Brad Pitt up in the hatch pointing the way (with one hand to the mic).
I resisted the urge to put too many crew figures into this unit, mostly to "get 'er done". These tanks have been aging in the "to be painted" bin for a couple years now.
Here is an overhead of the HQ tanks. I tried to scratch-build some Jerry Cans to supplement the ammo crates. You can see one on the XO's tank. But they didn't come out too well -- maybe not "wrong", but clearly not detailed enough to make it obvious what they are. Oh well.
The models are all GHQ. Really (REALLY!) well done models. In case you don't know, the Sherman had a smoke-grenade launcher pistol inside the turret, with a port for firing the grenades in the turret roof next to the gunner's seat. You can clearly see the port on the turret in several of these pics. That's a level of detail I quite frankly was not expecting. Most rulesets don't even provide for them, but the models have 'em!
The support platoon is not new to this project. I created this years ago with my M4A3 late-war Sherman company. Fortunately I used an M31 ARV (based on the M3 Medium Tank) at that time, so it is an entirely appropriate support group for my early war Shermans too. GHQ is now scheduled to release mid-war production M4A1s (with applique armor and wide M34A1 gun mantlets) later this year. I will undoubtedly get a company of those too. It would be appropriate to mix the two (early and mid- production versions) in any Italy or maybe even Dragoon scenarios. So maybe I need to think about building a second company support platoon, so I can have two on the table at once. But then, the support units don't always get on the table anyways, so maybe that last bit can wait.
Here is the company on a paint board being dullcoted, along with some terrain pieces that were on the workbench at the same time. This pic is in full direct sunlight. All the others were taken in indirect sunlight (in the shade on a sunny day). The minor differences in the colors in this pic may help you get an accurate impression of color of the tanks.
I really like the way this company turned out. Well I guess that's it for now. Got a couple odd-ball Italian vehicles on the bench for my next project. We'll see how that turns out. -Mark
(aka: Mk 1) |
| FlyXwire | 06 Sep 2020 6:35 a.m. PST |
Mark, great looking Sherman company, and with its Maintenance Section (I can tell it's Brad Pitt too)! :) Smart, non-invasive way to denote your command vehicles, and seeing your custom jerry can in one of those overhead views above. Impressed you went with hand-painted stars (?). |
| Mark 1 | 19 Sep 2020 4:49 p.m. PST |
Now that my US Army force for Tunisia and Sicily has a new company of Shermans, I need to bolster my Italians. I already have most of the mainstream Italian kit in my ready forces box, so now I am adding a few non-mainstream Italian vehicles …
Let's start with some Autocannone da 75/27 CK su Cieranos. This was primarily an AA gun, to my understanding. Won't be a whole lot of use against the fast moving P-38s or P-39s in my American force, but perhaps some day I'll get some B-25s or even A-20s. And, as we all know, most AA guns also found a secondary role against ground targets, and having a a few extra 75mm guns in hand won't hurt my Italian ground forces one bit.
These are H&R models. They are pretty new in the H&R line, and as with most of the newer stuff they are pretty nice. I already painted up some of the Cierano trucks (scroll up a bit to see those), and seeing how well they came out was a key motivating factor for me to get some of these.
The models come with 2 crew figures molded onto the gun, and a driver molded into the truck cab. Being one who can hardly resist the opportunity to add crew figures, though, drove me to dive in to the Italian artillery crews I already purchased from H&R to find an additional loader figure to add to each gun.
The loaders have soft hats on, while the gunners are wearing helmets. I do them in different colors to help make them somewhat more distinct.
The crew figures on the gun are somewhat less detailed than the free-standing artillery crew figures. But still they combine well enough, and I'm pleased with the end result. Now moving on to something that might be more specifically useful against the Shermans …
Say hello to my little friend, the Semovente da 90. This was a rare bird indeed, as only about 30 were ever built, all in 1942. As useful as they would be for my Italians on the Eastern Front, most sources agree they only saw service in North Africa and Sicily.
There was almost no crew space, so I have bolstered the one crew figure I put on the vehicle with two who can do their work standing behind it. The various newsreels I've seen of Italian self-propelled guns indicates this was a reasonably common practice.
The vehicle is an older H&R model. The crew figures are a mix -- the one actually on the vehicle, looking over the gun shield with his field glasses, is cut from an 81mm mortar-and-crew from the older GHQ en-bloc style infantry support weapons. The gunner standing behind the vehicle is one of the new H&R Italian artillery crew figures, and the loader holding the ready round is a GHQ artillery crew figure.
I put the two standing crewmen on a base that the vehicle can be placed on, to sort of hold them together when they are in a firing position. Exactly how the crew was supposed to travel with this self-propelled gun is unclear to me … maybe sitting on the front hull like tank-riders?
What I need to do now is add a turretless L6 as the ammo tractor that was supposed to accompany this vehicle. As my model is H&R, I'll probably add an L6 to my next order, and do a bit of kit-bashing. They would also sometimes (often?) tow ammo trailers, but I will probably not bother with that, as I expect that the 24 rounds or so carried by the tractor itself will probably be enough to get me through any game where this thing appears. All in all an interesting bit of a project, and notably smaller than most of my last few. Next up on the bench will be my first tentative steps into the world of Shapeways 3D printed models… -Mark
(aka: Mk 1) |
| Mark 1 | 17 Oct 2020 5:19 p.m. PST |
I noticed as soon as I posted my Semoventi da 90 pics (above) that, in my rush to dullcoat and wrap up that project, I had neglected weathering this model. Oops. So I did some weathering, and tried to re-match one or two of the above pics.
Odd thing how much impact the lighting has on the colors. This is the same box, same ground colors as in the pics above. In both cases (and the pics to follow) these pics were taken in indirect sunlight. But in this particular case the pics were taken on a cloudy day, vs. being in the shade on a sunny day on the pics above. Such a minor difference, and yet it looks like entirely different color.
Did a couple of washes (with "baby poop" -- an actual wash color, over the whole vehicle, and with "gray black" on the running gear to draw out a bit more depth, then with rust over the running gear again to make it all dirty and rusty), and then hit it with a dry-brush of "sand" to make it a bit dusty. I might have been able to do a bit more detailing on this model. For example I didn't paint the muffler on the side of the vehicle. But I really don't know if it will ever get onto a battleboard, so I'm just going to call this one done and move on. -Mark
(aka: Mk 1) |
| Mark 1 | 17 Oct 2020 5:24 p.m. PST |
Impressed you went with hand-painted stars (?). Didn't mean to ignore this question. Yes, all my insignia are hand-painted. I don't do decals at this scale. At least, I haven't tried any yet. Might well change my tune some time, as I do like the way they look. But hand-painting is what I know how to do, so that's what I do. -Mark
(aka: Mk 1) |
| Mark 1 | 17 Oct 2020 5:41 p.m. PST |
Now for a bit of terrain stuff that was on the workbench along with the projects that follow.
First some burned-out houses. These are cast resin ruins I bought some years ago that have been waiting for some attention. I've taken to "enhancing" my commercially bought burned-out ruins. I add some sheet styrene strips as wooden planks, and some model RR talus as bricks and stones and other random bits. I've taken to using a couple colors of talus -- red for those structured with red tile roofs, gray for those with gray tile roofs, and tan/stone as a general purpose bits and pieces. I base them on sheet styrene to give me some area around the structure for fallen debris. In some cases I also add a door. To my eye nothing says abandoned house more than a door being ajar. This too is just cut sheet styrene, scored with a blade to look like plank-work. In some cases I also add the remnants of a chimney -- something commonly left standing after a fire. These buildings were all timbered structures. On the two in the front I covered the walls with Acrylic Gel Medium before painting to try to hide the timbering, so that they could serve as more basic stone or cemented wall houses.
I also made a couple of gun emplacements. These are made with dried pasta as logs (spaghetti for the thicker logs, angel hair for the smaller vertical logs). The cut pieces of pasta were glued down to a sheet styrene based, then a couple layers of dirt-tinted Acrylic Gel Medium were added to raise the ground on the front (and back corners), and to texture the area in the gun pit. Then the
Then a couple shades of brown and tan were used to give a color gradient to the textured area behind the log wall, to give the impression of a dug pit for the gun. Finally the portions that were raised were flocked (with some model RR shrubs and a bit of talus added).
The guns, which I usually place on crew stands mounted on pennies, fit right in. In this case I am showing it with my US Army 57mm AT guns (a recent refurb project described above).
Not too complicated, fits the guns well, makes a nice impression. I like 'em! -Mark
(aka: Mk 1) |
| Mark 1 | 17 Oct 2020 6:45 p.m. PST |
And now for my first foray into 3D printed models. We'll start slowly. I thought I'd start with a civilian vehicle or two. They are mostly just background to my battles, and I don't usually spend too much time on them. I thought doing a civilian vehicle or two would allow me to find out how they take paint, if I have to prime them, etc. And so …
My French Renault 1934 buses. I believe these were actually pretty common during the war. Renault had managed to sell them well, although my choice here is strictly the colors of the iconic Paris City bus line. They were used by the French to move troops around in the 1940 campaign. There are also documented cases of the Germans picking some up for transport of Axis troops, and a few of them managed to appear on the Eastern Front. In both cases they were mostly for back-area use, not for frontline purposes, although it seems they may have been pressed into service closer to the fronts for evacuations of wounded from front area combat hospitals (very large ambulances, as it were). I have wanted to have a bus or two for some time, as I can imagine a variety of uses ranging from just terrain bits in urban scenarios, to victory point objectives for evacuation scenarios.
These are from Masters of Military on Shapeways. These, and the military vehicles that follow, were my first purchases of 3D printed stuff in 6mm scale. The buses are very large, bigger than tanks (as is correct, if you've ever seen a WW2 tank next to a bus). They are beautifully modeled -- I don't have a single point to criticize. Detailed, crisp, well scaled, well proportioned, just very nice. I washed them, and they painted them with acrylics. The paint didn't stick quite as well as I might have liked, so on my follow-on projects I sprayed an undercoat of enamel primer on before painting. I think the brushwork here kind of shows how the paint didn't quite flow on as smoothly as I might have liked.
Still I am pleased enough with the overall appearance. Of interest, though, is that for all of their size they are very light. I'm wondering if, as I gain experience actually using 3D printed models at this scale, I will start to look for ways to add weight to them. These things seem like a sneeze will knock them across the table. With the buses it's like, so what? But with some of the smaller military vehicles, they seem a bit fragile, and having them flipping around every time a door opens or a paper fans the table might not work so well. We'll see. -Mark
(aka: Mk 1) |
| FlyXwire | 18 Oct 2020 5:35 a.m. PST |
Mark, great additions! The Germans retreating from Southern France also used a fair number of French buses to "mechanize" their troops, some within their unit structures, and others appropriated. Thinking of doing any of these in German dark yellow, and/or with camo-stripes (with piles of gear and stowage all over their roofs)? Keep these progress updates coming – everything's looking great! |
| Mark 1 | 18 Oct 2020 11:55 a.m. PST |
FlyX I love your idea! As I was not fully satisfied with how these came out (kind of a "good enough" rating, but not more) I am now thinking maybe I'll do one of 'em up as you have suggested -- dunkelgelb, maybe with some green camo striping, and a pile of gear on the roof. Probably be my quickest cycle from original to refurb on record, but hey, I like having the one-off cool bits and pieces to add character to my games (when and if I ever get back to a game table, that is…). And … I appreciate the hint on "mechanization" of German forces in Southern France. Might well work that into any Dragoon scenarios I come up with (given that I have such excellent source material now to work up said scenarios).
-Mark
(aka: Mk 1) |
| Mark 1 | 18 Oct 2020 12:37 p.m. PST |
Returning to my recent work, and my purchases from Masters of Military on Shapeways, I present my Italian Autocannone da 75 su TL37s:
As the Autocannone da 75s I was able to get from H&R were AA guns, and I am more interested in mobile artillery for my Italians, I thought I would try a couple of these. These are really beautiful models. Any concerns I had about what quality levels 3D printing could achieve at this scale are answered right here. They are absolutely top notch, with lots of fine detail. They don't come with any crew figures, so I added 2 gunners. I was a bit afraid of trying to squeeze a figure (or even partial figure) into the driver's seat, as the thin details are pretty fragile on these things. The two crew figures are a seated infantry figure and a kneeling gun crew figure, both from my extras bin. Both are GHQ -- the seated crew figures are sliced off of a row of soldiers from a GHQ US Armored Infantry pack, while the kneeling crew figures were sliced off of en bloc mortar crews.
I worked to match uniform colors to the crews in my Sahariana, which were done more than 10 years ago. The Sahariana vehicles themselves were spray painted with Testors Afrika Mustard, which I feel is a bit dark for Italian kit. These Autocannone were done in Italian Camo Yellow 2, the darker of Italian camo yellow colors in the old Poly-S line.
I put a string of white glue along the gun barrels before painting, to try to re-enforce them a bit. They do appear to be pretty fragile. I'll have to see how well they hold up, but if I need to replace broken barrels, well that's something I'm used to doing even on cast metal vehicles so no big deal. They are very light, though. I mean, the two infantry figures and the paint probably double the weight of the models themselves. I do wonder if they're going to just blow off of the table some time. These will be welcome additions to my Italian force for Tunisia, which is one of my favorite theaters to game, and Sicily, for which I have ambitions (but have never yet done a game). But I don't want to leave my poor French exposed to such growth in my Italian forces in Tunisia, and so …
I also added some French Char D1s to my force. These were the primary reason for my Shapeways purchase. I have wanted these for some time. This late 1920s design was intended to replace the FT in French service, but turned out to be too expensive to build, and too finicky to keep running, and so was quickly replaced by the cheap and easy R35. The remaining D1s were then shunted off to colonial service, primarily in North Africa.
D1s equipped a few battalions in French North Africa at the time of the Torch landings and the Tunisia campaign (French forces were re-organized more than once, so there is no single answer to how many formations).
They were equipped with the 47mm SA1934 gun, the same gun as in the turrets of the Char B. This made them the most powerful tank in French service in North Africa, until the arrival of some S-35s that road-marched all the way to Tunisia from central Africa.
The 3D printed models are just beautiful. Really stunning. As with the Autocannones I was a bit concerned about how fragile they appeared to be. The odd frame antenna that is one of the characteristics of the D1 seems particularly fragile, and would be hard to re-create if they break off. I re-enforced them with some white glue, but still … However, some source material indicates that by the later stages of the Tunisia campaign these antennas were no longer present anyways. So if I lose one or two, I guess I'm OK. It seems the hull extensions at the back, which were there to assist in crossing wide trenches, were also removed by the latter stages of the Tunisian campaign. I considered clipping these and the antennas off, but …
Some D1s were also shipped back from Algeria to France during the 1940 campaign. These were all in their original form (with antenna and trench-spade extensions). So I have left them all on.
If you notice some bumpiness or powdery effect, it seems that is related to my application of dullcoat. I sprayed these guys on an overcast day, and the humidity seems to have affected the spray. Or maybe I just didn't shake the can well enough … not sure. But I don't think it had anything to do with the 3D printed models. I am so pleased with these models. A great addition to my force. -Mark
(aka: Mk 1) |
| FlyXwire | 18 Oct 2020 1:19 p.m. PST |
Mark!!! Love your latest here. The Italian Autocannone and Sahariana look awesome, really so cool, and those French tanks came out well for the pictures (can't really see any issues with the Dulcote spraying here). Hey, I still use a few bottles of precious Polly S that haven't gone dry yet (the Armor Red Brown always my favorite for mud splatter). :) These 3D prints are looking nice and crisp. |
| FlyXwire | 19 Oct 2020 6:30 a.m. PST |
Mark, I must add appreciate you spot-lighting your micro-scale collection, and these newly-completed additions. There's gaming that these scales do best (and we must emphasize these capabilities). |
| Gerard Leman | 19 Oct 2020 3:52 p.m. PST |
|
| Mark 1 | 08 Nov 2020 9:27 p.m. PST |
The Germans retreating from Southern France also used a fair number of French buses to "mechanize" their troops, some within their unit structures, and others appropriated.Thinking of doing any of these in German dark yellow, and/or with camo-stripes (with piles of gear and stowage all over their roofs)? This suggestion has hung with me. Problem is I don't do German forces. But that doesn't mean some other army in my collection couldn't commandeer a civilian bus, slap some paint on it, and make it a part of their motorpool. And so, I have now prepared one of my Renault buses to play a military transport role.
I decided to go green rather than German mustard yellow. I am thinking this can fit in my French, Romanian or even Italian forces.
With such a large roof, I have prepared it to play the role of a gypsy caravan. Maybe it is moving an HQ unit, or a medical unit. Hardly matters. Someone put a rack on the roof, and this bus has since collected lots of stuff. In this case it looks like an evacuation. War is coming, and the supplies and folks in this petit village need to get out.
War is hell, and even the French air force can't save the village if the Germans get there first. Here are my new French Breguet ground-attack planes, escorted by a couple of MS.406 fighters.
I appear to be wholly incapable of getting my phone to focus on the planes instead of the terrain behind/beneath them. These are H&R aircraft I got in my last order. I have a fair bit of H&R planes, but I am thinking maybe I should look at other vendors. The detailing on these was kind of disappointing vs. what I see on Raiden planes, for instance.
But they'll do. I don't actually fight too many battles in 1940 France. But if/when I next do, I will now have some extra weight to throw into the fray. -Mark
(aka: Mk 1) |
| FlyXwire | 09 Nov 2020 7:31 a.m. PST |
Mark, you did real good with your bus conversion as you mentioned, it could be used for many theaters/forces, or as an added scenic to amp-up the static of the fray (cool pics btw)! |
| Armournaut | 14 Dec 2020 6:45 a.m. PST |
I have just read through the entire thread – a fascinating read and some excellent skills on display. I'm particularly impressed with FlyXwire's Sturmoviks and Mark 1's GHQ M4A1s – fantastic work and very inspiring. |
| Mark 1 | 27 Dec 2020 6:08 p.m. PST |
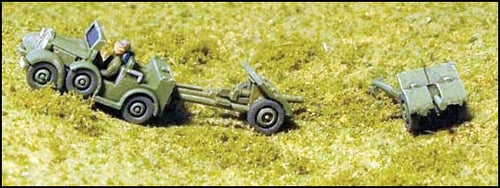
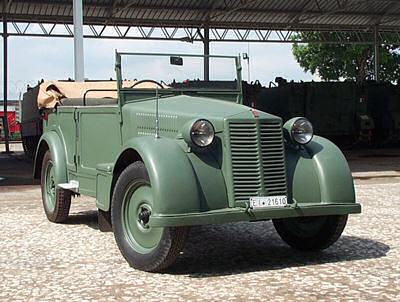
Here is a quick one-off I did, a bit of a kit-bash, while working on another more complete unit (yet to be shown). I was inspired by a recent TMP feature on "Painting the Fiat Torpedo 508 CM ( TMP link ) For those who don't know, the Italian Fiat Torpedo CM was roughly the Italian equivalent of the VW Kubelwagon. It was a probably the most common staff and utility car for Italian forces in WW2. It was based on the Fiat 508, a civilian vehicle, and the reference to "Torpedo" comes actually from the civilian line of cars, being a convertible with 4 doors. It was also made for African duty with wider tires, in which case it was also called the Fiat Coloniale. Anyways, I have a reasonably broad set of Italian kit, and yet can not find this vehicle offered anywhere in 6mm. So … what to do? Well, after a bit of thought, and the happy coincidence of rummaging through the extras bin while this was on my mind … and I came across a Polish PZInz302 car. It is from GHQ, and can be found in their Polish line as the prime mover for the Bofors 37mm AT gun:
I happened to have this because I bought this set from GHQ for my Romanian force, which also used the Bofors 37mm AT gun during the initial phases of WW2. But they didn't use Polish cars to pull them, so eh, into the extras bin. Looking at it in my hand, I began to wonder what this car actually was. A quick search and whadyano, it's a Polish-built Fiat 508! So now, with this pic (from the TMP article) to guide me:
It was time to make my own Fiat Torpedo CM. And here it is:
I cut off and filed down the spare tires along the sides, filled in the open doors, added a folded-down roof along the back edge, added an officer in the back seat, and added a spare tire on the back to complete the kit-bash.
Not a big project. I was doing a lot of infantry figures in vehicles anyways, as I am putting together some Armored Cavalry (Armored Recon) for my US forces. It will probably be a common addition to my Italian gaming. Might dig around for the other one (they come 2 to a pack with the guns) and do that one too some time. But for now at least one of my Italian gentlemen can ride in style. As for the rest of 'em, it's just "get in the truck, Signore". -Mark
(aka: Mk 1) |
| FlyXwire | 28 Dec 2020 8:46 a.m. PST |
Mark, not a big project, but a successful one! I'll bet you got a free manicure at the same time too. ;) |
| Mark 1 | 16 Jan 2021 8:45 p.m. PST |
And here is another small project. This one even smaller! I showed some motorcycle troops above. I mentioned that it came out that I used all of my motorcycles. Well, not quite. One of them fell into the carpet, and only emerged recently from it's plush safari. So it got painted up, only this time not as a French motorcycle trooper, but as an American dispatch rider.
I've done the same with a single mounted cavalry figure for my Soviet army. Many times in my wargames I have given players some side-issue to worry about. Maybe it's a field hospital that needs to be protected. Or a high ranking officer that needs to survive. Well… why not a dispatch rider? Yeah, this one was a small project… -Mark
(aka: Mk 1) |
| Mark 1 | 16 Jan 2021 9:21 p.m. PST |
Wait a minute. Did someone say cavalry? I think maybe I mentioned a cavalry figure… But cavalry does not necessarily mean horse-mounted. So how about some US Mech Cavalry! BTW all of the below also applies to US Armored Recon … the orgs and equipment were the same, only the names were different.
The US Cav has a bit of a complicated TOE, so I focused on making a single platoon to make the project manageable. There was an armored car section of 3 A/Cs, and a jeep-mounted section of 3 x 2-jeep teams. Each jeep section had 1 MG-jeep and 1 jeep carrying 3 men and a 60mm mortar.
In Tunisia the A/C section was mounted in M3 Scout Cars. I've always loved M3 Scout Cars … don't know why, but I just love 'em.
All the vehicles in this platoon are GHQ. The M3 Scout cars are enhanced by .50cal and .30cal MGs and gunners from the GHQ Mech Infantry pack (made for halftracks, but they work just as well in the M3s).
The jeeps from GHQ come molded with the driver. The front seat passengers are cut from the 3-in-a-block seated figures that come with the Soviet Komsolmolets gun tractors, with their legs cut off just below the knees. The rear seat passengers are H&R kneeling gun crew figures with their back legs lopped off.
The GHQ jeeps come with MGs as an accessory. All that was needed for the MG jeeps was to add a seated figure as the gunner.
In the US Army, Cav (and armored recon) are expected not only to be the eyes of the division, but also to undertake economy-of-force combat operations, screening, mobile defenses and delaying actions (among other tasks). It was SOP for the Cav to dismount as infantry if there was to be any heavy fighting. Each A/C and each 2-jeep team could dismount a fire team. In my basing system I use 2 figures to a stand to represent a half-squad sized base.
In this pic you might just be able to see that the Platoon command section has 3 dots on the back rim of the stand. Very low vis if you are just looking at them on the table, but obvious to me as I am placed behind them pushing them around. The infantry figures are H&R US infantry. I have plenty more left over after making a US infantry company a little while back. This used only very few, so I'm now thinking maybe I should make a second company. Always another project waiting out there for me…
I mentioned that the jeeps also carried 60mm mortars. So these are another dismount option. I am not sure what the idea was for using these. Seems like a very slow-to-deploy item compared to the rest of the unit, but maybe it was mostly for masking with smoke or delaying by forcing enemies to deploy for hasty attacks before withdrawing.
You may notice that I am now in a more temperate climate than the Tunisia pics. That's because I built this force to serve in either Tunisia -OR- ETO.
The only thing that changes is the A/C model. We upgrade from the M3 scout car to the M8 armored car, and voila! We are ready for France!
I don't know if the cav boys tended to stay in the M8s to fight more often than their M3s. What I've read of the doctrine indicates they were still expected to dismount for heavy combat. But did they actually? IDK.
I put one figure in each turret. There should be 2, but they are just too small to fit 2 figures in. I've been in an M8 A/C and indeed it's a very tight squeeze. The platoon leader's A/C is identifiable in both cases. In the M3s for Tunisia the PL has a star on the hood. For the M8s, the GHQ models are so nicely festooned with extras (box on the front slope, and tarp rolls around the turrets) that I could not find space to put any stars. So I put the CO standing in the PL car.
To make both Tunisia and ETO, and to give the unit all the flexibility it had in actual history, I had to put together 6 jeeps in 2 configurations, and 6 A/Cs of two models, plus 6 infantry stands and 3 mortar stands. Kind of complicated for just one platoon. But I like the way they came out. Gonna be fun when they get onto a game board… (Oh, and the Mech Cav battalion had a company of light tanks and a battery of assault guns, and I am well stocked for those, so they can be mixed in to a mobile force with a bit of punch in the right scenario.) I think that's all for now. -Mark
(aka: Mk 1) |
| FlyXwire | 17 Jan 2021 8:48 a.m. PST |
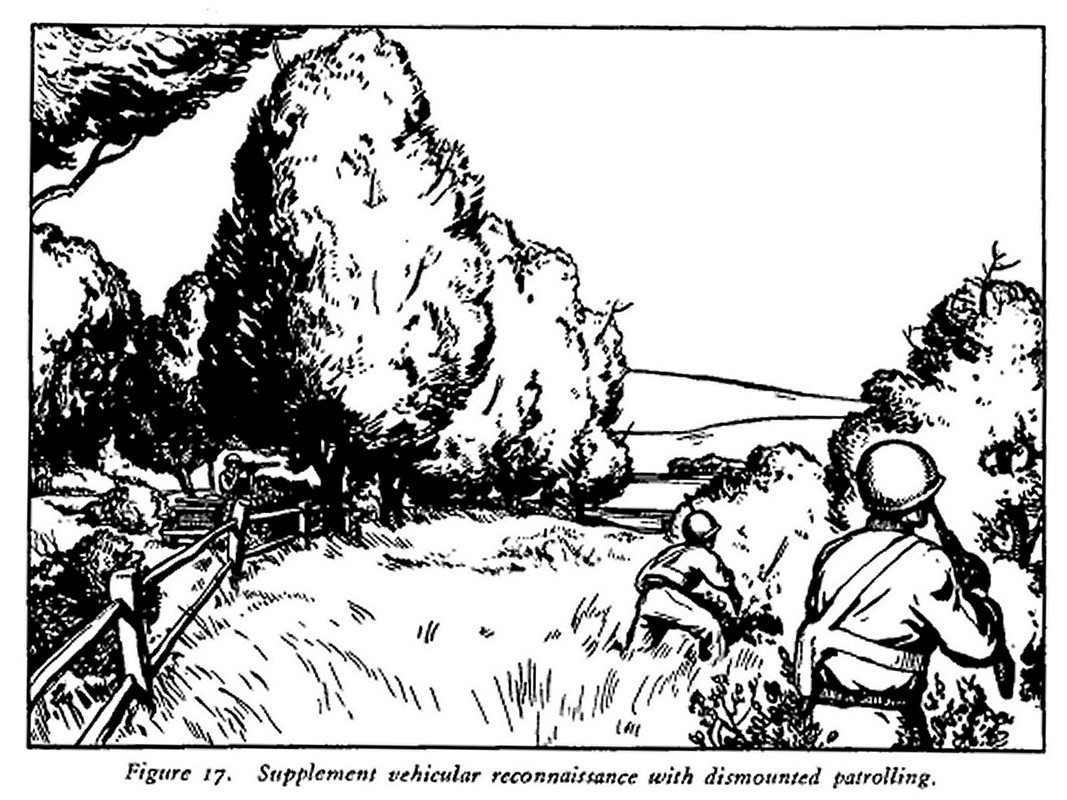
"I think that's all for now"……hah, we viewers know better. ;) This is another excellent series of postings Mark, and you've included tactical doctrine too. Mk 1 patrol manual illustration -
I've thought too to use the yellow stars on some early Mediterranean paints, but then expected some wisecracking from the buds, "hey Dave, your white stars looked like they've yellowed". :))) On your M8 crews dismounting for heavy combat? Thinking the peep crews could/would still perform for the dismounted role, and the M8s detailed as support, but war is hell. |
| Mark 1 | 17 Jan 2021 1:24 p.m. PST |
Thanks for the comments FlyX, and for the illustration from the FM. These were indeed very flexible units, by design and doctrine. And so they shall be on my game tables, too. I've thought too to use the yellow stars on some early Mediterranean paints… I was a bit torn on this. There is ample written suggestion that the yellow stars were spec'd for pre-war maneuvers, but that the spec had changed before Torch and the whole North Africa campaign. I can find lots of photographic evidence of M3s in Tunisia with white stars, and white stars-in-circles, but I have not seen any photos of M3s with yellow stars. But I have seen lots of photo evidence of other vehicles still mounting the yellow stars in Tunisia. And so I have kind of adopted it for most of my Tunisia-targeted forces. To wit:
My company of M3 "Lee" Medium Tanks.
My company of M3 Tank Destroyers. (Which also has some M3 scout cars. And a couple M3 halftracks.) I also have a company of M3 "Stuart" light tanks, which I don't have a pictures of, that carry yellow stars. But not just things called M3.
My T19 105mm SPGs are also adorned with yellow stars. As with the M3 Lee tanks they even got the stars-and-bars treatment. (These pics are not of recent work. Nor are they even recent pics. This stuff is all 15+ years old.) But not all of my forces for Tunisia have yellow stars. As pictured in my posts above, my early version M4 "Sherman" medium tank company got white stars. This is in part because, again, all of the photo evidence I found shows Shermans in Tunisia with white stars. And besides I also want to use them in Sicily, and maybe even Italy, and there the case for the obsolete yellow stars is even weaker… So I'm not actually sure that yellow was the right choice historically for the scout cars, but it seemed at least justifiable, and it gives them a little more character. -Mark
(aka: Mk 1) |
| FlyXwire | 17 Jan 2021 3:28 p.m. PST |
Mark, the Lees here look striking! Hey, your TD's have a convincing-looking camo net over their gun shields was that an added bit by you? |
| Mark 1 | 17 Jan 2021 4:30 p.m. PST |
Hey, your TD's have a convincing-looking camo net over their gun shields was that an added bit by you? Yep.
In some cases it is stowed along the back of the track, as was the guidance for the load-out in the FM. In more cases it's on top of the gun shield, as was more often the practice by the crews in Tunisia, as it allowed a more hasty deployment over the front of the vehicle when taking up a firing position. And in a few cases it's actually deployed over the front of the vehicle as it might have been in combat. (By doctrine it was to be put up on poles over the vehicle to hide the vehicle from aircraft, but the crews wanted it mostly to allow them better chances of being un-seen by adversaries on the ground.) The netting is made from small slices of soft packing foam (as was used in days of yore in GHQ and C-in-C packages). Turns out when you put cyanocryllic glue (super glue) on the foam it kind of melts down into a more compact form-fitting lump. Works pretty well, and is easily applied and painted. -Mark
(aka: Mk 1) |
| Mark 1 | 01 Feb 2021 6:58 p.m. PST |
After looking again at the pics of my lovely M3 TD company (one of my favorite units… well, maybe better described as one my MANY favorite units), I kinda got the urge for a little more halftrack foolery. So how 'bout some T30 SPGs?
This pair is painted up for my US Army in Tunisia.
The "75mm Howitzer, Motor Carriage, T30" served as the "assault gun" of US mech and armored formations from the entry of forces into French North Africa through about the end of 1943. Assault Gun batteries were found in the TOEs of Tank and Armored Rec / Mech Cavalry battalions. So these guys can serve the Mech Cav and M3 Medium Tank (Lee) companies I showed above, as well as my M3 Light Tank (Stuart) company (not shown in this thread).
Whereas these T30s, with white stars, are now available to support my M4A1 Medium Tank (Sherman) company as shown above. I never really understood the value of adding a different type of vehicle optimized to throw 75mm HE to a tank unit equipped with tanks with 75mm guns, but hey that's the way the US Army rocked for the first half of its involvement in the war. I can see adding 75mm SPGs to a light tank formation with only 37mm guns. The HE firepower was quite a boost to the units' abilities against any sort of dug-in defenses, I'm sure. For an interesting read on T30s supporting M3A1 Stuart tanks, try this article I researched, drafted and illustrated for the Chieftain some years back: link Later in the war the US Sherman tank formations got the Sherman 105mm SPGs to fill this role, and the M5 Stuart tank formations got M8 75mm SPGs (in the thread a ways back).
The T30 models are all GHQ, and the figures are either GHQ standing artillery crew or seated armored infantry. A small enough project that it didn't take me forever to complete… -Mark
(aka: Mk 1) |
| FlyXwire | 02 Feb 2021 6:25 a.m. PST |
Outstanding Mark! I've printed out your encounter report linked above, and will enjoy reading it in-depth. I did see the mention of the Semoventi's possibly involved I have some 75/18s (that used an effective HEAT round), and perhaps these might have been in service at the same time too? (just considering what I might need in 1/144th scale if I were to do an "inspired-by" scenario or two) |
| Mark 1 | 14 Feb 2021 5:35 p.m. PST |
Here's a project that was fairly simple and straight-forward. French R35s from GHQ.
I don't have a full company at this point (yet?). Should be (to my readings) 13 tanks, in 4 platoons of 3 tanks each with a single tank at company command. I have 10 tanks. I suppose I could compose 3 platoons and a company command tanks. But I have not, so far, done so. So for now, just some tanks on parade.
This was a bit of a refurb. I had two sets of R35s -- one set of 5 tanks, done in green, with short guns (the 37mm SA18 gun), and another set of 5 tanks , done in camo, with the longer (but at L33 not really long, just longer) 37m SA35 gun. Not wanting two separate 5 tank formations, and not needing so many with the SA35 gun (the up-gunned R35s were fairly rare, and usually mixed in to existing formations where they were given to the commanders), I decided to downgrade some of the tanks and repaint the camo unit. Fortunately I still had (and still do have) a fair few R35 turrets in the extras bin.
An interesting thing … you can kind of see which tanks were originally green, and which tanks were the recent refurbs. The recent refurbs seem to be a darker green. I used the same color paint (Polly-S French Khaki Green) for both. But the white primer under the original green tanks gives them a lighter look than the camo undercoat under the refurbs.
This is actually one of the reasons I prefer white priming at this scale. A lot of guys mix white or light yellow into their base colors to lighten their paints for a "scale effect". I find that using white primer seems to give me much the same result with no read extra effort. Except perhaps that I should have re-primed my refurbs before painting the green…
Anyways, they are done, and ready to march off to war. A small project. Maybe I'll pick up another few, and complete the company some day… -Mark
(aka: Mk 1) |
| Mark 1 | 14 Feb 2021 5:49 p.m. PST |
And while I'm at it, here are some new AT guns for my Romanians. These are the H&R Romanian "Resita" M43 75mm AT guns.
This gun was of Romanian design and manufacture. Performance was similar to the German Pak40 if my readings are to be believed, which makes it quite an achievement and a real boost to Romanian AT firepower.
The gun crews are also H&R. In this case their kneeling Russian gun crews. These are older H&R figures -- not up to the level of their newer stuff (see the Italian gun crew figures posted earlier in this tread). Not as nice, but still adequate, and I have many of them.
Only the guns are new. The crew stands were already in my Ready Forces box. As I have mentioned elsewhere, I build my gun crew stands but keep my guns loose, to be placed on the stands at game time. This lets me build a few gun crews and have them man a reasonably wide variety of guns as my scenarios may indicate.
I have 4 AT gun crews for my Romanians. And now I have a choice of 4 different types AT guns that they might use. For early war I have GHQ Bofors 37mm guns (far right) and H&R Boehler/Breda 47mm guns (second from right). For mid- and late-war I have C-in-C Pak 97/38 75mm guns and now the H&R Resita M43 75mm guns.
So my Romanians might have some actual anti-tank punch, or perhaps more like a minor sting, depending on how well they are equipped. Allows an interesting twist at game time. -Mark
(aka: Mk 1) |
| monk2002uk | 16 Feb 2021 4:27 a.m. PST |
An example of a 3D printed 6mm Russian T-34, with a Total Battle Miniatures village in the background:
Robert |
| Mark 1 | 17 Feb 2021 12:07 p.m. PST |
An interesting 3D print there, Robert-the-monk. I can see some of the track and road-wheel details, which is beyond what I've seen before on home prints at this scale. I also like those huts quite a bit. Will have to look into the Total Battle Miniatures line more closely… -Mark
(aka: Mk 1) |
| Captain Pete | 08 Mar 2021 8:05 p.m. PST |
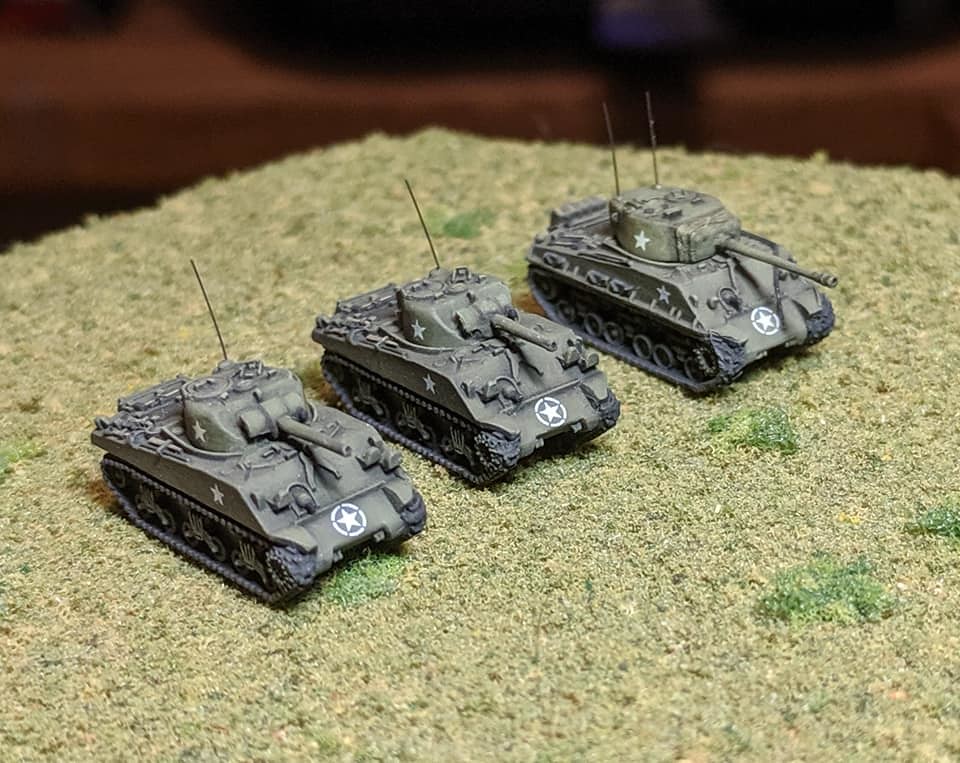
Here are three of my American Shermans which I completed recently. I have 33 total completed for 1944-45 NW Europe. The models are by GHQ. theminiaturespage.com
"TMP link |
| Captain Pete | 08 Mar 2021 8:16 p.m. PST |
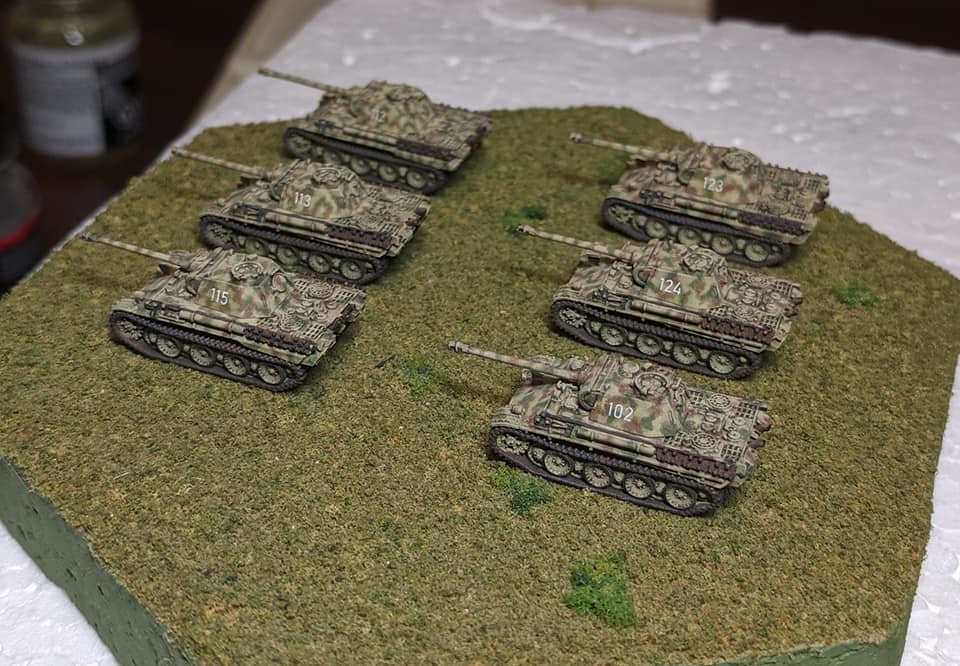
Here are some Panthers I painted a few months ago. These are also GHQ models.
|
| FlyXwire | 09 Mar 2021 6:41 a.m. PST |
Captain Pete, you've done an excellent job on these….I can even see the rubber rings on the Panther road wheels! |
Pages: 1 2 3 4 5
|