Help support TMP


"Perry french ambulance" Topic


15 Posts

All members in good standing are free to post here. Opinions expressed here are solely those of the posters, and have not been cleared with nor are they endorsed by The Miniatures Page.

Remember that you can Stifle members so that you don't have to read their posts.

For more information, see the TMP FAQ.


Back to the Napoleonic Discussion Message Board

Back to the Napoleonic Painting Guides Message Board


Areas of Interest

Napoleonic

Featured Hobby News Article


Featured Link


Featured Ruleset


Featured Workbench Article

Painting 1:700 Black Seas French Brigs

Personal logo Editor in Chief Bill The Editor of TMP Fezian paints his first three ships from the starter set.


Featured Profile Article

First Look: Barrage's 28mm Roads

Personal logo Editor in Chief Bill The Editor of TMP Fezian takes a look at flexible roads made from long-lasting flexible resin.


Featured Book Review


1,622 hits since 21 Nov 2018
©1994-2024 Bill Armintrout
Comments or corrections?


TMP logo

Membership

Please sign in to your membership account, or, if you are not yet a member, please sign up for your free membership account.
LeavingTMP21 Nov 2018 2:39 p.m. PST

Having some problems assembling this.
Any help?

Personal logo deadhead Supporting Member of TMP21 Nov 2018 3:06 p.m. PST

Tell us more.

Is it the roof? (Oh yes)

If so then Nils R might have summat to say.

Or do you just mean where to start, rather than bits that do not fit together?

LeavingTMP22 Nov 2018 12:31 a.m. PST

All of the above!

Personal logo deadhead Supporting Member of TMP22 Nov 2018 10:20 a.m. PST

The roof is the biggest challenge. Mine is grossly out of true and it has put me off assembling it so far.

Let me photograph all the parts to show where they go…or they should at least.

LeavingTMP22 Nov 2018 11:51 a.m. PST

Thanks very much

Personal logo deadhead Supporting Member of TMP22 Nov 2018 12:13 p.m. PST

Working on it. I had forgotten how much work is still needed with files and sanding to get things to fit!

Tomorrow. Far too good a supper tonight, I really did not intend that we would open the second bottle.

Personal logo deadhead Supporting Member of TMP23 Nov 2018 2:53 a.m. PST

Now apologies for filling this with pictures and I wish you luck with this. You will curse and there is much cutting and filing to do. Look at the flash and pins on those wheels! The roof simply does not fit and there will be much sanding of the ambulance front face to do so.
OK first this is roughly where the parts will go;

picture

Note next how the horses must be orientated due to their harness (I have offset slightly to clarify). Also I am trying to show how the draught pole and swingle trees come together. Note that the former is lying on its side and there is a curious triangular thing on what will be its upper surface
picture

Those wheels and again you will see how the draught pole will eventually slide as a snug fit into the front axle assembly (once rotated of course)
picture

picture

Now this is probably where you struggled. There are four C springs, which, on the real thing suspended the carriage but here are decorative basically. There are four raised segments on the chassis members (arrowed) which show you where they should go. They butt up against them, once glued to the upper surface of the sub-frame;
picture

Now here I have tried to show how it will come together. In practice I would not stick the springs on yet and I took them off again as soon as I photographed this. Also, the roof. Notice there is a "lip" on the undersurface nearest to you? That fits over the open door, so the roof must go on that way (if it fitted).
picture

Now this is how the carriage really is secured. In theory there are two projections on the resin undersurface , one to glue to the rear axle, one to the back of the circle on the front axle. In practice neither reaches, but they are useful guides for placement and once more those four raised segments are where you will glue. Now I would attach the springs. The straps will need a slight trim and it is now obvious where Perrys intended them to go……..they wanted you to secure end to end to resin pins in each corner. I would just tuck them in as far more robust and glue.
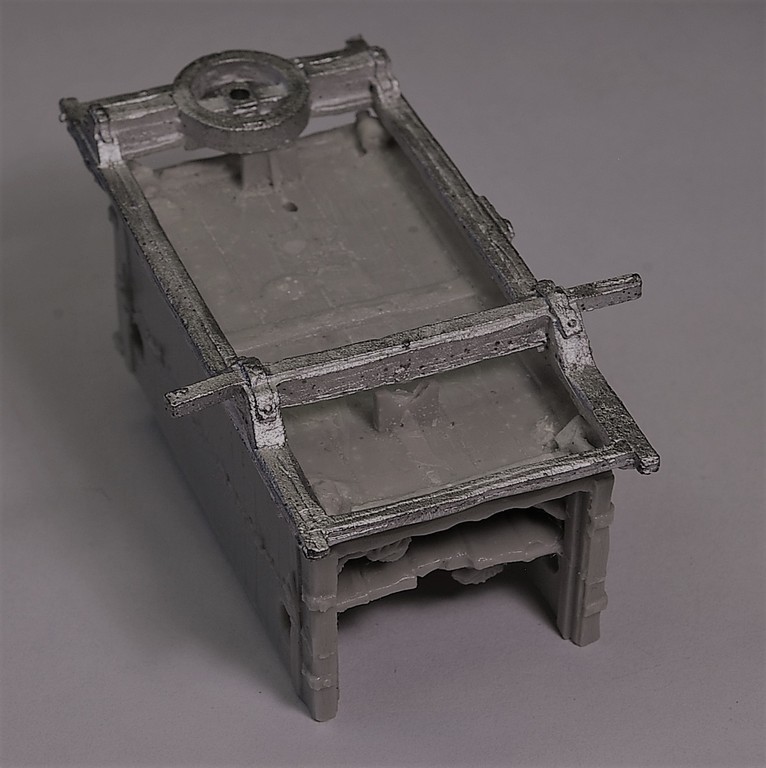
picture

Sliding doors at the side, open or closed as you wish. The Z is inside and the handles inferiorly. Rear doors are arched and the fit is obvious, open or closed. The ladder arrangement fits into, not on top of the very rear of the chassis. There are meant to be two slight hollows (you can just make out the far one) to accommodate the pivoting cross member. (raised or lowered and notice the angled base of the feet, so as not insert upside down)
picture

and finally. Back to the draught pole. The chain is underneath and should be attached to the swingle tree. (Good luck with that). The two front horses pull through that. The weird triangle on top. Chop off the side nearest the carriage and bend the more solid bit as shown. Mine here is a bit oversize and not well angled but you'll get the idea. If you are wondering, that carried a chain to the two rear horses' collars to allow braking or even reversing.

The other message is how to attach the horses. I seem to have lost one swingle tree somewhere, but bend the single straight bit before securing to the horse (not as here!). Check carefully as mine are all different lengths and not all will fit all horses. Once well set, drop the curved bit down into the rings as shown. Mind you the horse I show here is a rear horse anyway!

picture

Any further problems happy to help

79thPA Supporting Member of TMP24 Nov 2018 7:52 a.m. PST

Wow, deadhead, that was very kind of you.

Personal logo deadhead Supporting Member of TMP24 Nov 2018 8:05 a.m. PST

No problem. the wretched thing has been sitting there for two years now. Like everything else, I just need to get down to it. Maybe after the Black Musketeers?

No doubt at all, once assembled, this can be a fabulous model. One of NR's best ever, but I seem to recall he was unhappy with it in the end.

Personal logo deadhead Supporting Member of TMP26 Nov 2018 8:21 a.m. PST

Let me change one suggestion.

6th and 7th pictures above. The resin base has the two projections that are too short to reach the chassis?

The obvious answer is of course to add a block onto the uppersurface of the two axles. Then the carriage does look suspended.

Heard back from Niels R who says the instructions above are correct. He is a really nice helpful chap, with great talent.

Trajanus26 Nov 2018 9:21 a.m. PST

The incumbent of the lower deck looks "fun" to paint!

Personal logo deadhead Supporting Member of TMP26 Nov 2018 9:32 a.m. PST

Heck I cannot even imagine undercoating this with a spray can. But I guess one day I really must. How tempting must it be to assemble with the doors shut?

The other thought is the roof lettering. I did scan a copy of Joineau's French Imperial Guard Vol 5 back cover page and printed onto high quality photographic paper. Scale it up or down to fit, one inverted and the middle filled in black. Easy done on modern PC software eg a Powerpoint slide.

Personal logo deadhead Supporting Member of TMP17 Jan 2019 7:34 a.m. PST

Strange.

I was just wondering whether the pics had helped and I see three have disappeared!

Let's try again in the order they should be seen above;

(How weird, soon as I posted them below the second two reappeared above)

Now all three are back. Let me delete the copies then and instead ask….any luck?

Sir Able Brush19 Jan 2019 10:20 p.m. PST

This is very generous sharing deadhead

Personal logo deadhead Supporting Member of TMP20 Jan 2019 11:55 a.m. PST

It is not an easy construction and I gather that Niels R had "his doubts", shall we say, over the end result (I will leave it at that).


It is one of so many projects in my garage. Do you European folk remember when you kept your cars in the doors that lifted up? In N Yorks now we have two SUVs on the drive and a garage space filled with…basically junk ……I guess.

Sorry - only verified members can post on the forums.