Help support TMP


"Panting tanks without airbrush" Topic


21 Posts

All members in good standing are free to post here. Opinions expressed here are solely those of the posters, and have not been cleared with nor are they endorsed by The Miniatures Page.

Please be courteous toward your fellow TMP members.

For more information, see the TMP FAQ.


Back to the WWII Discussion Message Board

Back to the WWII Painting Guides Message Board


Areas of Interest

World War Two on the Land

Featured Hobby News Article


Featured Link


Top-Rated Ruleset

Spearhead


Rating: gold star gold star gold star gold star gold star gold star gold star gold star 


Featured Showcase Article

Follow Up: The Early War 1:56 Scale T-34s

Personal logo Editor in Chief Bill The Editor of TMP Fezian goes into repair mode when painted models are damaged in shipping.


Featured Workbench Article

Staples Online Printing & Web Binding

The Editor dabbles with online printing.


Featured Profile Article

Our Stalingrad Winners

At long last, the Stalingrad winners have been revealed.


Current Poll


Featured Book Review


3,774 hits since 13 Mar 2018
©1994-2024 Bill Armintrout
Comments or corrections?

Gunfreak Supporting Member of TMP13 Mar 2018 1:40 p.m. PST

I want to give this a go. It's ment as a one of project (gift) so I won't invest the time and money to buy and learn to use an airbrush.

I plan on using the various AMMO stuff, but it's the actual highlights I'm worried about.

I find it very hard to highlight machines, I never know were to highlight, it's often many flatish surfaces that have no obvious place to do any highlights.
It's a 28mm British Sherman if that is of any consequence. And I think it will be Rubicon.

wrgmr113 Mar 2018 1:58 p.m. PST

Try this tutorial:
YouTube link

whitphoto13 Mar 2018 2:01 p.m. PST

Warlord Games has several vehicle tutorials for Bolt Action that don't use airbrushes. Look at the different army painting guides, particularly the German one.

forrester13 Mar 2018 2:26 p.m. PST

I don't have an airbrush. I deluge the tank in a darker wash and when its dry, dry brush over it with a light colour to pick out the raised bits and hull edges.

I think that might be a bit old hat as there are all these mysterious pigments and filters around…

Ceterman13 Mar 2018 4:05 p.m. PST

I've painted every tank I've ever built with a brush & a can of spray paint!
link

link

Personal logo Yellow Admiral Supporting Member of TMP13 Mar 2018 4:31 p.m. PST

I have no experience with 15mm or larger tanks, but I do now with 1/144 aircraft, which present similar problems. Drybrushing looks all wrong to me on large surfaces, except in very specific circumstances.

On larger models my technique is very similar to forrester's: drybrush edges/corners/tubes to (re-)highlight them, but use washes to pick out panel lines, crevices, depressions, etc. A combination of washes and some very spattery-looking drybrushing can simulate dirt nicely. Multiple coats of drybrushing with very thin grays and browns can simulate gunpowder and exhaust streaking nicely.

One way I still use drybrushing on larger models is to simulate fading and chalking paint. A very light drybrushing of light color across the upward side of a large area with some uneven mottling can look very nicely like paint fading in the sun.

I am also all at sea with the new selections of pigments, panel liners, filters, pre-formulated washes, etc. I suspect they are all totally unnecessary, since I haven't been able to do anything with them that I wasn't already doing by thinning acrylics. But maybe I just haven't explored the options enough.

- Ix

mwindsorfw13 Mar 2018 4:42 p.m. PST

Here was my version. Paint your base coat. Tear some newspaper strips and tape them across your tank. Then spray paint on your second coat, but don't overdo it. The newspaper will have some movement, and the end result looks like you used an airbrush. If you wAnt sharper lines, use tape.

nnascati Supporting Member of TMP13 Mar 2018 5:19 p.m. PST

I've painted loads of tanks without an airbrush for a regular client, as well as aircraft. He has always been pleased with the results.

Martin Rapier14 Mar 2018 12:03 a.m. PST

You don't need an airbrush to paint tanks. I haven't used one for 40 years now.

Washes and dry brushing, especially pin washes.

deephorse14 Mar 2018 2:07 a.m. PST

Same here. Bought one about 40 years ago, top of the range too. Used it once and put it back in its box. Brushes are fine for 20mm stuff.

LeonAdler Sponsoring Member of TMP14 Mar 2018 5:09 a.m. PST

Yep Martin Rapier is spot on.
I do use an airbrush a lot on tanks, German mostly as in real life they were often painted using an airbrush. But Allied armour doesnt need an airbrush very often.
Problem with airbrushes you end up spending more time faffing with the things than actually painting lol I tend to airbrush in a large batch setting aside a couple of days to get through the backlog of stuff waiting ( currently at 12………)

The Firefly in the pic was done as follows, all done using enamels and artist oil washes, I hasten to add, I find acrylics dry too fast to allow for blending and I cant be bothered with faffing with retardents etc.

Sprayed with a PSC British green can.
Large brush ( no2 -4 flats) a slightly lighter green overall though leaving the darker tint in deeper areas.
Another slightly light shade rather more lightly done.
With enamels the top coat will blend with the still ever so slightly wet underlayer as the thinners in the top coat 'reactivate' the layer below.

Gloss varnished.

Wash overall with a very dark green/black.
then pin washes in all the panel/wheel etc detail with a very dark brown.
Almost black wash on engine areas.
Decals added.
Then with pastels ( you can use pigments the Tamiya weathering sets are excellent)) give a nice coat of varying densisties of dust on the flat areas. Dont forget its the receces were dirt/dust collects NOT the high points. Try to keep the high points green.
Graphite pencil for a bit of wear on hatches/crew access areas, keep to the minimum easy to overdo it and 'chip' it to death.
It will be pretty much matt now anyhow but a spray of matt varnish to seal things in.
Bit of mud/dust added to tracks lower hull.


Hope that helps
L

mysteron Supporting Member of TMP14 Mar 2018 6:43 a.m. PST

I have never used an Airbrush because I hate the things. They just take too long in setting up and cleaning can be a nightmare. But I dare say the more modern ones are far better.

For the complex German camo on 20mm models I have used the Artists coloured pens and soften the edges with a moist brush. The patterns then get sealed with dullcoat or similar type spray . This prevents the inks from bleeding or lifting. Once dry brushed with a buff type colour they look pretty good.

I would have to say anything above 20mm would be better done with an airbrush unless its an allied tank in a single colour. A good tip here if you are brush painting is to add a little of Artists Flow Enhancer to the paint mix. Then let down with water until it becomes a milk like consistency . One applied to the tank and dried it looks like it has been spray finished ie no brush marks .

LeonAdler Sponsoring Member of TMP14 Mar 2018 6:51 a.m. PST

mysteron,
'never used an Airbrush because I hate the things' if you had used one you'd hate the things even more lol
Yes they have improved over the years, more reliable, easier to clean but if it wasnt for doing 35th stuff not sure Id have one…………..as it is I have 4 and a second hand Aztek to try out next session.
L

mysteron Supporting Member of TMP14 Mar 2018 7:18 a.m. PST

Hi Leon

I have actually used one and own one . Its a double action Badger with 3 interchangeable heads. It now lives in the loft never to be used again! I used it in my railway modelling days. I used to spend more time setting it up and cleaning it , than actually spraying with it. Other people love them and get great results with them . But they are just not for me :)

LeonAdler Sponsoring Member of TMP14 Mar 2018 9:42 a.m. PST

'just not for me ' I think that everytime I have to clean the nozzle lol
L

catavar14 Mar 2018 10:50 a.m. PST

When not using an airbrush I would paint the mini's base coat (black for vehicle, brown for people) first.

Second I'd dry brush a thick coat of the main color (for a Sherman dark olive I believe).

If I wanted to add a dark (black) wash I'd do that next.

Then I'd lightly dry brush a high lite color (a very light olive color for a Sherman).

Last I'd paint any details like tracks and equipment stowed on top.

I've been very happy with the results doing this. Good luck.

Gunfreak Supporting Member of TMP14 Mar 2018 10:53 a.m. PST

Thanks for all the help, I'll just see what i can do.

captaincold6914 Mar 2018 5:59 p.m. PST

I really enjoyed this thread.

I've been airbrushing these last couple months some 1/35 kits and while it has been enjoyable, the airbrushing part of it is a giant PIA. Most of it is my inexperience, but I can't tell you how many times my brush has clogged (using Vallejo paints)

Anyways, I'm getting back into ww2 15mm gaming and I just do not want to use my airbrush.

Thank you!

You can get good results using just a brush!

Garand16 Mar 2018 10:53 a.m. PST

Thing about airbrushing is that it gets easier the more experience you have. It also helps in setup time if you can have your own dedicated spray booth. I've been airbrushing for more than 20 years & use it on just about every project in one form or another, whether its to apply basecoats, clearcoats, or the like, whether its 1/35 scale models or 15mm little tanks.

Damon.

captaincold6916 Mar 2018 2:27 p.m. PST

I'm sure it does get easier over time, but I've had nothing but issues to start with and I just do not know if I want to continue to struggle with it even knowing full well that it may get better.

Who knows, maybe I need more practice AND patience :)

Mark 1 Supporting Member of TMP16 Mar 2018 7:47 p.m. PST

I've been airbrushing for more than 20 years & use it on just about every project in one form or another, whether … its 1/35 scale models or 15mm little tanks.

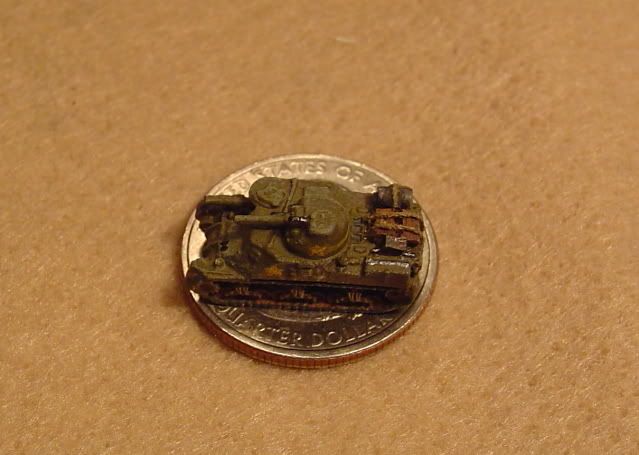
We got to work on your definition of "little" tanks.


Unless of course you mean a tank that is 15mm long. Then yeah, we can use the term "little tanks".

Of course, the principal advantage of "little tanks" is "bigger tank units".


Which means that the painting techniques I use may not necessarily apply, both because, well, the techniques for painting smaller stuff might not apply the same way to larger stuff, and because the techniques that one chooses when faced with 15 or 20 tanks to paint in a day might not apply to the techniques one chooses when faced with only one or two tanks.

But, that said …

I have never used an airbrush. I know folks at micro armor scales who do. I'm not one of them. Don't know if I'd like it or not. But I don't (at least so far).

My approach is:

1 ) Prime in white with spray paint. I have tried other colors of primers (black, gray). I have used modelling specialist primers in the past. But now I go with generic auto store or hardware store white primers, like Rustoleum.

Leave in the sun to bake for an hour or so, turning the models at least once.

2 ) Spray the base coat. I like Tamiya ModelMaster enamels.

Leave in the sun to bake again. Ah, the joy of California weather.

3 ) If doing camo, this is a good time to do it. Also a good time to do national markings (I don't use decals -- not against 'em, just find 'em too fiddley at this scale). Most of my detailing paints are brush-applied acrylic hobby paints. I love(d) Poly-S, but now am resolved to switching over to Vallejo. Not a big fan of Tamiya Model Master acrylics, except for a select few colors. I have some enamels that I use mostly when I need to match the spray base coats for some reason.

4 ) Do a dark wash. I use oily black or perhaps very dark brown acrylic, diluted heavily with water. I use a pretty large brush (by my standards), and completely cover the tank in the wash. Then move on to the next tank. This is really nerve wracking. The whole bloody tank, that I spent so much time painting, is a big black blob. But just hang on for about 4 or 5 minutes… After I've blobbed the wash all over the third or fourth tank, I go back to the first with a big old brush, and start dabbing. Dab dab, squeeze the brush in a dry cloth. Dab dab dab. Squeeze again. Wash the brush if needed, squeeze it dry, and get dabbing. Let my paranoia get the best of me, and try to wick that nasty old wash off my pretty tank. I must save it! But don't take too long, 'cuz I got to save 3 more, so I only have 3 to 4 minutes for each.

5 ) Dry brush, using a lighter tone than the base coat. Sometimes it's a white or yellow mixed with the base, sometimes it's another color but in the same hue. Dry brush the whole thing.

6 ) Detailing. VERY small brush to do whatever I choose -- picks and shovels, tow cables, crew figures and hatches if I've put 'em in. Gun muzzles (always dab black on the bore of the gun!). Headlights. MGs. And tracks! Gun metal if the tank should have metal tracks, black if the tank should have rubber tracks. Some times armies painted metal tracks black (Germans tended to do this. But I don't build / collect Germans, so it's of little concern to me.).

7 ) One more wash of the tracks and running gear, using a rust color, not as heavily diluted as the black wash. Only a little blotting this time -- enough to push the wash into recesses, not enough to wick much of it away.

Put back in the sun to bake.

8 ) Spray with Testor's Dullcoat. Bake in the sun, spray again.

9 ) IF I'm going to use a fine-point pen for any of the marketings, now is the time. Made this mistake more than once. Paint before dullcoat = good. Ink before dullcoat = bad, very bad.

So some results:


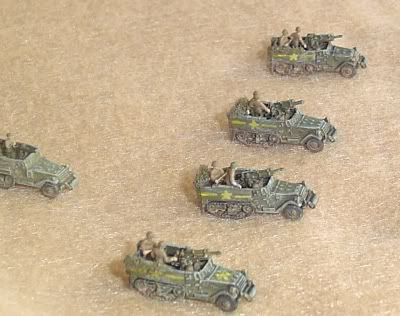
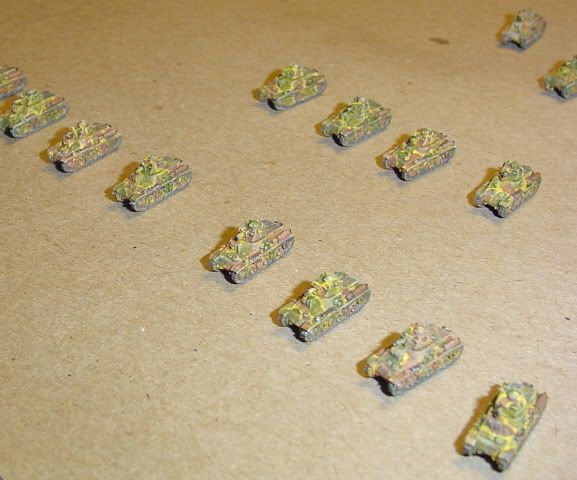
A battery of US Army T19s to support my M3s in Tunisia.

This is an example of crew figures and national markings.


French tanks are fun for the camo. Here I've used a national roundel to identify the platoon commander. The red and white circles were painted. Then after the dullcoating, a blue ink pen was used to complete the tricolor. An extra dab of oily black wash was applied to the engine grills, and not wicked off as aggressively.


And a reminder that, at this scale, it is units, not elements, that count.


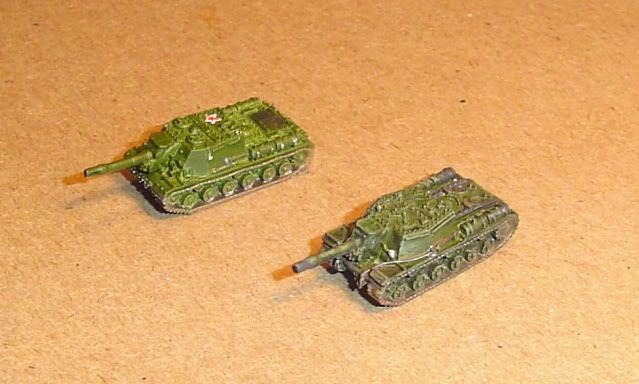
An interesting comparison to see the evolution of my techniques.

The ISU-152 in the back got white priming, Medium Green base coat, and detailing. A black wash was applied only to the engine grill.

The SU-152 in the front got the whole treatment I described above. Same white priming, same Medium Green spray base coat. But got the dark wash, the dab dab dab, and the dry brushing. Much impressed as I was with the results of white primer under the sprayed base coat -- a technique I fumbled around into on my own in the early/mid 1990s, I much prefer the results in front, from the approach I derived from my readings on various online fora in the mid-2000s, primarily an adaptation of Troy Ritter's approach (https://ritterkrieg.blogspot.com/).


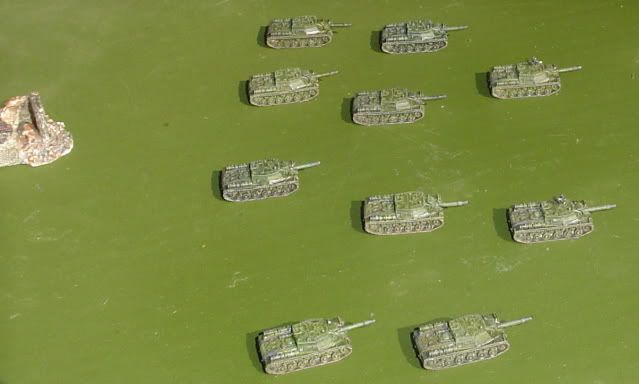
Of course, no matter how much I like any one, keep in mind this is a batch technique.

That's how I manage. Adopt, adapt, or ignore at your discretion.

-Mark
(aka: Mk 1)

Sorry - only verified members can post on the forums.