A couple of days ago I was able to finally try out the "Naval War, The WWII Miniatures Game" system for the first time, albeit playing both sides myself. The goal was to focus on learning the rules/system; tactics were of secondary importance. The models are Shapeways 3D-printed 1/4800 ships and they worked well with the system, which can be used with any scale from 1/1200 to 1/6000. More information on the system and the rules, play aids, OOBs, and ship data cards are all available for free download at the Naval War website:
naval-war.com
The game was also a playtest of a draft demo/learning scenario I created set in Ironbottom Sound, which involves six USN ships (1 x Northampton CA, 1 x New Orleans CA, 1 x Atlanta CL, and 3 x Gleaves DD) and five IJN ships (1 x Aoba CA, 1 x Furutaka CA, 1 x Yubari CL, and 2 x Kagero DD). Both sides were led by Captain-equivalent leaders.
DEPLOYMENT
[URL=http://s1305.photobucket.com/user/Bez1-7/media/IMG_2334_zpsa79bohxe.jpg.html]
[/URL]
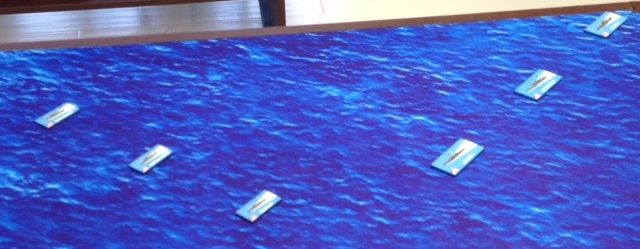
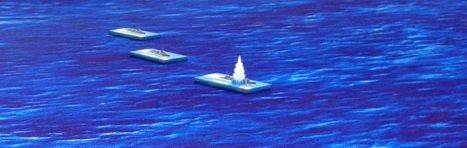
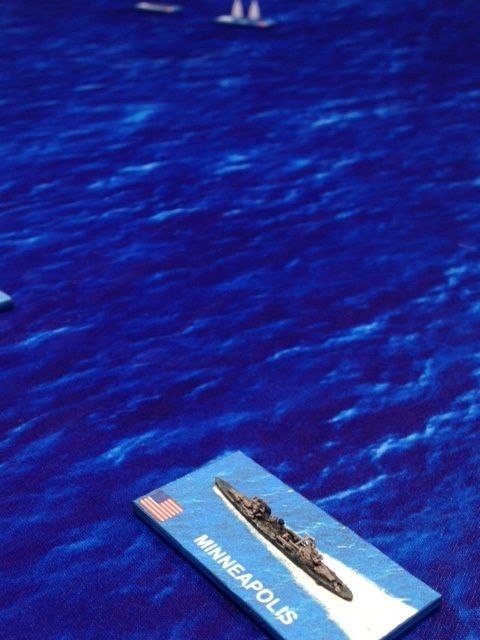
The US side won initiative for set up and elected to have the Japanese begin deploying. The first IJN squadron set up in line-ahead formation: CL Yubari (lead/Flag), DD Kagero (center), and DD Amatsukaze (reat). The first USN squadron set up in line-abreast formation: DD Duncan (port end), Aaron Ward (center/Flag), and Buchanan (starboard end). The second IJN squadron deployment was CA Aoba (starboard end/Flag) and CA Furutaka (port end) in line-abreast formation on the port beam of Yubari 2-3 movement distances away. The final deployment was the USN cruiser squadron in line-ahead formation: CL Atlanta (lead), CA Minneapolis (center/Flag), and CA Chicago (rear); Atlanta was off DD Duncan's port quarter aft.
[URL=http://s1305.photobucket.com/user/Bez1-7/media/IMG_2337_zpsbubwjw3p.jpg.html]
[/URL]
[URL=http://s1305.photobucket.com/user/Bez1-7/media/IMG_2338_zpsxvlkpgzc.jpg.html]
[/URL]
TURN 1
The Japanese won initiative and made the US take the first activation. The USN DD squadron went to flank speed (IJN disruption attempt failed) and shifted into line-ahead formation with a slight turn to port.
IJN DD squadron increased speed to flank (no USN disruption attempt) to close the range on the USN DDs and moved into line-ahead formation echeloned trailing to port (remained out of range of US DDs).
USN Cruiser squadron went to flank speed (IJN disruption attempt failed) and turned slightly to port maintaining line-ahead formation to remain out of IJN CA range and to try to bring the IJN DD squadron into full broadside range (the Japanese squadron ended up being just out of range).
[URL=http://s1305.photobucket.com/user/Bez1-7/media/IMG_2339_zpsdwaz8lfz.jpg.html]
[/URL]
IJN CAs increased to flank speed (USN disruption attempt failed) and turned to port into line-ahead formation with Furutaka leading to present broadsides to US DDs.
All IJN ships were out of range so the US side spent four unused disruption counters to unlock the "US Radar Assisted Firing Solution" capability. If Minneapolis or Chicago (8-inch primary batteries) had led the USN cruiser squadron rather than Atlanta (5-inch primaries) they would have been able to begin ranging in on Yubari.
Furutaka opened fire on Duncan but failed to range in (Aoba was just out of range).
Turn 1 ended after the Phase 2 Direct Activations because no Phase 3 Indirect Activations were applicable or necessary.
TURN 2
Initiative: USN won and had IJN start direct activations.
IJN DDs conducted a standard move and turned slightly to port.
Duncan, the only US DD in range, fired on Yubari with Radar Assist (IJN disruption attempt failed) and scored two hits, damaging Yubari's forward guns, leaving the forward battery temporarily out of service.
[URL=http://s1305.photobucket.com/user/Bez1-7/media/IMG_2342_zps8h1isbrw.jpg.html]
[/URL]
IJN CAs made standard move forward with a 30-degree turn to port to keep their broadsides on both US squadrons.
USN cruisers went to flank speed (IJN disruption failed) and advanced in an attempt to bring broadsides to bear on the IJN DD squadron (IJN CAs still out of range).
IJN CAs opened fire: Aoba spent an additional order counter to use the IJN "Veteran Ship Crews" advanced activation order ability and succeeded in ranging in on Duncan; Furutaka failed to range in on Atlanta (only cruiser within range).
[URL=http://s1305.photobucket.com/user/Bez1-7/media/IMG_2343_zps9dira34j.jpg.html]
[/URL]
USN cruisers fired: Chicago attempted radar assist attack on Yubari but was disrupted by the Japanese; Minneapolis fired on Yubari and succeeded in ranging in; Atlanta's 5-inch guns remained out of range.
[URL=http://s1305.photobucket.com/user/Bez1-7/media/IMG_2344_zpsg4wcurl3.jpg.html]
[/URL]
With all activation counters expended by both sides, Yubari's damage control teams succeeded in repairing one of the forward guns during the Indirect Activations Phase and the turn ended. The US side spent three unused disruption counters to unlock their Adapted Tactics capability.
TURN 3
Initiative: USN won, elected to have IJN activate first.
IJN DDs decided to attempt to force a close-range engagement and to damage the US cruisers with torpedoes. Three activation counters were spent to activate the squadron, go to flank speed, and conduct a "Torpedo Run" special attack. The Americans reacted with "Adapted Tactics" but failed to pass the Japanese disruption attempt. The IJN DD squadron moved 1 distance (5cm) turned 45 degrees to starboard (half their total 90-degree turn capability), raced forward 25cm (remaining 5 distance measurements at flank speed) and turned 45-degrees to port and fired Long Lance torpedoes from one center-line torpedo mount each (Yubari 2 torpedoes, Kagero 4 torpedoes, Amatsukaze 4 torpedoes) to cross the anticipated movement track of the US cruisers.
[URL=http://s1305.photobucket.com/user/Bez1-7/media/IMG_2346_zps52wvflj2.jpg.html]
[/URL]
USN DDs went to flank speed and moved into close range of Yubari and Kagero, placing the squadron between the IJN DD and CA formations.
IJN DDs engaged USN DDs with main battery fire: Yubari missed or failed to damage Duncan (short range); Kagero hit Aaron Ward's bridge causing one damage (short range); and Amatsukaze failed to range in on Duncan , which was 2cm beyond the short range limit.
USN DDs fired torpedoes from one each of their centerline mounts: Duncan at Kagero (5 torpedoes); Aaron Ward at Yubari (5); Buchanan at Yubari (5).
[URL=http://s1305.photobucket.com/user/Bez1-7/media/IMG_2347_zpsowhfudke.jpg.html]
[/URL]
IJN CAs conducted a standard move with a 25-degree turn to starboard.
USN cruisers continued flank speed and turned 90 degrees to starboard to comb the wakes of the IJN torpedoes. They had to turn to starboard due to the close proximity of a small island to port and to try to maintain squadron command integrity, but the maneuver also brought the into range of the IJN CA 8-inch batteries.
[URL=http://s1305.photobucket.com/user/Bez1-7/media/IMG_2348_zpskszgplg8.jpg.html]
[/URL]
IJN CA squadron spent the last Japanese activation counter to try to range in on Minneapolis, the closest US cruiser to both Japanese ships. Both succeeded due to the fact they were able to present their full broadsides to the now on-coming US ships (in effect crossing their "T").
[URL=http://s1305.photobucket.com/user/Bez1-7/media/IMG_2353_zpsrcatigos.jpg.html]
[/URL]
The USN CA squadron (Atlanta was now about 3cm beyond the Minneapolis's command range due to the maneuver) used the last US activation counter to try to range in on Furutaka. Only the forward USN CA batteries could bear: Chicago succeeded, Minneapolis failed.
During the Indirect Activations Phase Yubari's damage control parties failed to repair the remaining damaged forward 6-inch gun.
TORPEDO RESOLUTION DURING THE "END OF TURN" PHASE
The USN cruiser squadron's sharp turn to starboard and flank advance succeeded in moving Chicago and Minneapolis out of the Japanese torpedo spreads. Atlanta also cleared the spreads fro Yubari and Amatsukaze, and the two eligible torpedoes from Kagero missed!
[URL=http://s1305.photobucket.com/user/Bez1-7/media/IMG_2351_zpsxkiw0vku.jpg.html]
[/URL]
Unfortunately for Atlanta she was just within the spreads of the torpedoes fired by Aaron Ward and Buchanan. Three each of Aaron Ward's and Buchanan's torpedoes were applied to Yubari (total of 6) and two each to Atlanta (total of 4). All 6 US torpedoes missed Yubari, but 1 torpedo (from Aaron Ward) hit Atlanta causing three waterline damage points and three flooding. Atlanta managed to pass its command check to remain in the fight, although now requiring activation counters to be spend for any direct action orders. All 3 eligible torpedoes from Duncan missed Kagero.
[URL=http://s1305.photobucket.com/user/Bez1-7/media/IMG_2352_zpszccc9ksv.jpg.html]
[/URL]
[URL=http://s1305.photobucket.com/user/Bez1-7/media/IMG_2350_zps2xl1oyrd.jpg.html]
[/URL]
TURN 4
Initiative: IJN won and decided to activate first.
IJN CAs fired on Minneapolis: Aoba scored one damage point on Minneapolis's engines, reducing her speed to 2 (10cm). Furutaka missed but spent an additional acivation counter to invoke the Japanese "Veteran Ship Crew" advanced activation order, which allowed her to re-roll all misses. The second roll secured two damage points on Minneapolis's AA batteries, disabling them.
[URL=http://s1305.photobucket.com/user/Bez1-7/media/IMG_2356_zpsosl6fqmx.jpg.html]
[/URL]
USN DDs activated to fire main batteries at Yubari at short range. Duncan and Buchanan missed or failed to overcome Yubari's armor saves. Aaron Ward scored three damage points on Yubari's ready ammo magazine, which disabled her aft 6-inch batteries and started one fire. This left Yubari only three damage points away from sinking, but her tough crew passed their command check.
[URL=http://s1305.photobucket.com/user/Bez1-7/media/IMG_2355_zpsxmt7p8q3.jpg.html]
[/URL]
Regrettably, I had to stop at this point because I ran out of the time I had available to play. Things were looking pretty grim for the US at this point with one CL heavily damaged and flooding badly, one CA with moderate damage and reduced speed, and a DD with light damage. More significantly, despite Yubari's considerable damage, the IJN CAs were unscathed and had the range of the US CAs, and the IJN DDs were now in a position to launch a torpedo attack on the US CAs with no chance of the US DDs reversing course quickly enough to intervene. I believe the IJN was poised to inflict another devastating defeat on the USN in the waters off Guadalcanal!
This was an extremely fun and exciting game and I'm impressed with how the system works and look forward to playing again soon. I especially like the use of the activation order counters, which forces you to really think about what you want to try to do and the order in which you need to execute. The command stations and the possibility of disrupting your enemy's advanced activation orders add a lot of flavor, uniqueness, and fun. For me the system will play much more quickly and smoothly with greater experience. Despite my unfamiliarity with the rules I was able to set up and play a little over 3 turns in 3 hours. Half of that time was spent re-checking things in the rules to make sure I was doing them correctly, jotting down notes for this AAR, and taking some (poor -- I apologize) photos.