"Floor tiles" Topic
21 Posts
All members in good standing are free to post here. Opinions expressed here are solely those of the posters, and have not been cleared with nor are they endorsed by The Miniatures Page.
Please use the Complaint button (!) to report problems on the forums.
For more information, see the TMP FAQ.
Back to the WWII Painting Guides Message Board Back to the Micro Armour: The Game Message Board
Areas of InterestWorld War Two on the Land
Modern
Featured Hobby News Article
Featured Link
Top-Rated Ruleset
Featured Showcase Article Can you buy a 15mm pre-painted Sherman for $3 USD at your local store?
Featured Workbench Article miscmini  likes the look of the Soviet KV-1 tank, and plunges into a project to paint three of them - plus a spare KV-2 turret! likes the look of the Soviet KV-1 tank, and plunges into a project to paint three of them - plus a spare KV-2 turret!
Featured Profile Article
Featured Book Review
Featured Movie Review
|
| fullmetal2015 | 21 Jan 2017 7:32 p.m. PST |
Was looking today at Lowes, thought of a idea. Anyone every used 6" x 6" or 12" x 12" floor tiles an turned them into terrain for micro? I think there could be some possibility here. Just need some thoughts or links or pic if anyone has done this. I currently use GHQ hex material, an it turns out great, but it can get expensive quickly when you need a lot of them. Few other questions. 1.) How does paint hold up to tile tops?
2.) How does plaster or molding material hold up? of course that is if anyone has tried this process before, thanks all and thoughts an suggestions welcome. The tile I was looking at are 6" x 6" 8mm thick smooth surface. .48 cents a piece. fullmetal |
| zoneofcontrol | 21 Jan 2017 9:10 p.m. PST |
I have not done this myself. However, I am a property owner and manager. I have worked with flooring materials, but for their actual intended use. My experience is that they have a very smooth and glossy finish to them. Also, depending on the material they are made out of, they have some flexibility to them. Both of these may be a detriment when trying to glue or paint on their surface. They generally can be purchased piecemeal so maybe you could buy just a few to experiment on before investing time and effort into a full scale project. I would be happy if someone would be able to point to a successful project and wish you well. One other thought while we are in the "home building" department; have you looked at 12 x 12 ceiling tiles? They are a softer and more fragile product but are easily glued to and painted on. Also, they usually have an interlocking channel around them that would aid in holding your battlefield together. |
| D A THB | 21 Jan 2017 10:43 p.m. PST |
I made some rice paddies and rivers out of tiles using air drying clay as banks. The clay shrunk when drying which meant I had to PVA them back on. Other than that paint, Johnsons Wax and Varnish have held up very well to them. |
| Mako11 | 21 Jan 2017 11:38 p.m. PST |
I saw an article mentioning using them for tree bases, and using a hot glue gun to secure them into the vinyl material. Just drill a hole, insert the twisted wire, and glue into place. Since they're fairly heavy, they should make decent bases, even for single trees. The article also mentioned using acrylic house paint too. For adding hills and texturing, you probably want that flexible spackling material, if it is compatible with vinyl. Probably a good idea to score the surface with a razor knife/box cutter, if you wish to glue, or apply spackling to, so it is more likely to adhere properly. |
14Bore  | 22 Jan 2017 6:32 a.m. PST |
As a carpenter I see many types of floor tiles, have seen some that would be good for sea battles, floor tiles are vinyl so with proper priming should be able to paint. To cut heat up with torch but not so close to burn and a razor knofe will cut them like butter. Also they could be heated and bent and will hold that shape. |
| PrivateSnafu | 22 Jan 2017 12:08 p.m. PST |
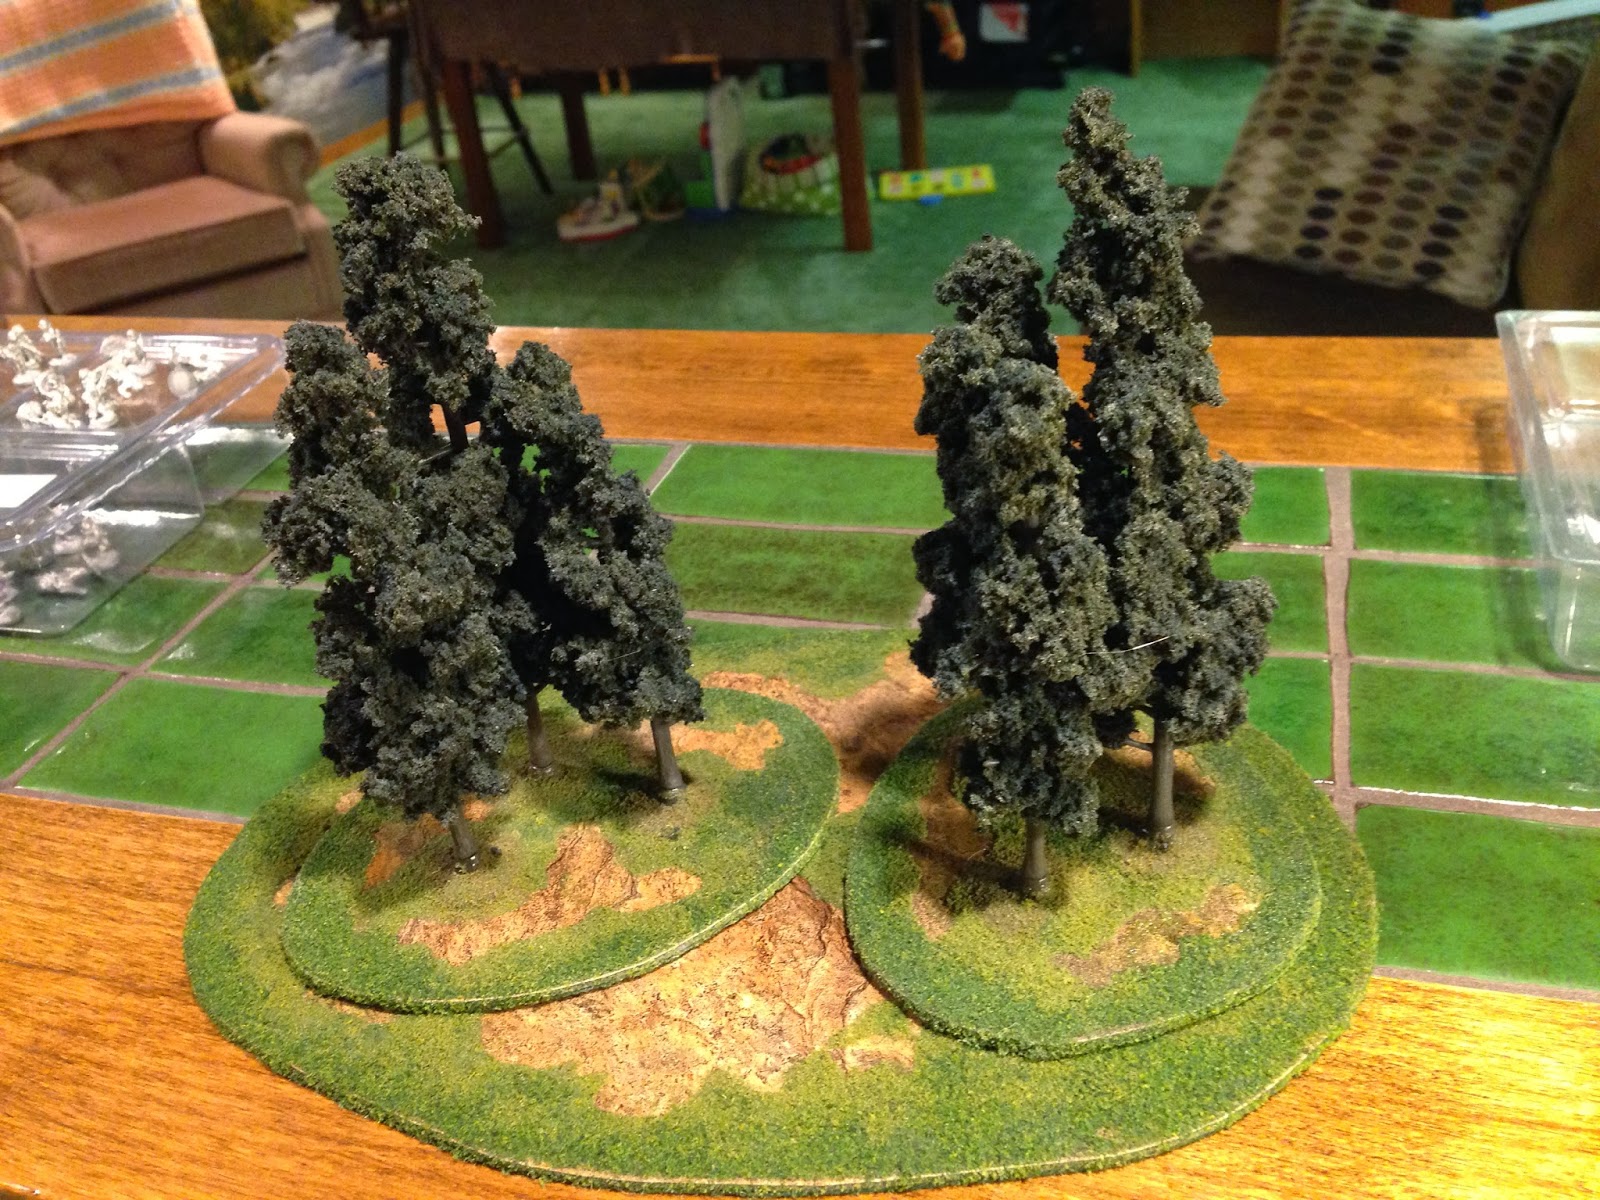
I use them for forests at 15mm scale.
There is a tutorial on my blog: link |
| Mako11 | 22 Jan 2017 11:43 p.m. PST |
One person suggested you can even cut the vinyl with scissors (probably heavy duty ones), to make the bases. |
| fullmetal2015 | 23 Jan 2017 11:28 a.m. PST |
Thanks guys, about the ceiling tiles? Are they rather rigid? I will just try an do some experimenting an will let you all know how it goes, pictures an the like. fullmetal |
| fullmetal2015 | 23 Jan 2017 11:30 a.m. PST |
I guess another question would be flocking, an the like if that would cause issues? fullmetal |
 Yellow Admiral Yellow Admiral | 23 Jan 2017 12:39 p.m. PST |
I have a collection of 12"x12"x1/8" vinyl floor tiles I made into naval gaming shorelines. Some observations: They're cheap! I bought them for $0.59 USD each, so for less than $10 USD I had a whole shoreline and some geomorphic islands. They're consistently sized, so they fit together really well, an excellent trait for geomorphic projects. They're durable. They're meant to be walked on for decades, after all. If they warp, you can just set them on a flat surface and wait, and they will re-flatten under their own weight. They re-flatten faster in hot air and direct sunlight, and I'm sure a heat gun would help too (as long as you're careful not to scorch off your terrain job…). They're very difficult to cut precisely, a bit of trouble to cut imprecisely. I cut most of mine by scoring with a carpet knife and then carefully bending them until they broke, but it's difficult to score them deeply (the vinyl is tough stuff), the vinyl tries to ignore the scoring lines when breaking, and breaks very raggedly. They're pretty easy to decorate. I painted mine with $2 USD cans of spray primer, then flocked them with white glue and ground foam, sand and ballast. I left some of the edges unflocked and just dry-brushed them into rocky shorelines. If I were to do this again, I might instead do the decoration entirely with latex paints and sand. They warp easily, and aren't stiff enough to store on edge or supported only by the edges. They have to be supported evenly across the entire width, and really need to be stored flat to avoid warping. If they bend too far (which really isn't very far at all), they crack, and are essentially irreparable. I store mine stacked in a box with a flat bottom. They are heavy. I made only enough pieces to half-fill a 12"x12" box, and I've had to replace that box a couple times now because the weight strains the handles, the latches, and the lids to the point of breaking. I thought 12"x12" boxes would be up to the task since a ream of paper sufficient to fill one is pretty weighty, but apparently the vinyl is denser still. The weight of the tiles also means the bottom ones are being crushed by the stack on top, so any 3D stuff glued to them (bushes, rocks, etc.) will be flattened and rubbed during storage and transport. It might be possible to glue the flat surfaces together in a way that is permanent, I haven't tried. I haven't found a way to glue vertical surfaces together. Uncut tile edges just aren't thick enough to provide enough surface area for glue. A cracked tile can't really be glued back together because the rough edges along the crack don't match up again I think the vinyl along the seams has probably stretched and distended too far out of shape, because cracked seams don't really fit together again. - Ix |
| zoneofcontrol | 23 Jan 2017 7:29 p.m. PST |
fullmetal-
"Thanks guys, about the ceiling tiles? Are they rather rigid?…" Yes, they are rigid. However, they are made from a pressed pulp so they can be cut or broken easily. I have cut many to fit around chimneys, corners and support beams. I glue them up in place in the ceiling with "Liquid Nails" and have painted them more times than my back and neck would prefer. As you mentioned, get a few and experiment. As a caution, they could chip or break if rough handled. |
| PrivateSnafu | 23 Jan 2017 9:39 p.m. PST |
The vinyl tiles are indeed very heavy and bend a bit. I do stack them flat in my Husky toolbox that is designed for heavy tools. If they bend a bit they do reform flat after a while. I cut them with tin snips then clean up any rough cuts with a utility knife. White glue sticks on them fine for flock. |
| Mako11 | 23 Jan 2017 11:46 p.m. PST |
I picked up a few samples tonight, and was able to cut them to shape with regular scissors. Hard to do internal curves, due to their thickness, but the outer curves are no problem, so easy to shave off sharp corners. This was on the thinner, 3mm thick tiles. I suspect the slightly thicker ones might be more difficult. I tried shaving an internal curve with a razor knife, without success, but was doing that in the air, and didn't try too hard, since I didn't want to injure myself. I suspect it might be possible to do that on top of a piece of wood, by applying a bit more force. We'll see. Haven't tried any painting, spackling, or flocking yet, since I just got them, but will try hot-gluing some trees in place. Hope that works as advertised. These were more rigid than I expected, for such thin vinyl, so the material is surprisingly tough. Anyone tried grinding them to shape with a Dremel, and a rough grinding bit? |
| Mako11 | 23 Jan 2017 11:54 p.m. PST |
Anyone figured out a way to cut these precisely? I'm thinking they might be good for modern roads, for use on flat tables, since they are so robust, and durable. Cutting accurate straight lines is mentioned above as being a challenge. I suspect smooth, curved lines would be even more so. Perhaps with a new blade, a decent backing to aid the cutting, and being patient and making multiple passes, it might be doable. Doesn't seem like it would be good material though, for creating roads over undulating terrain, due to its relative inflexibility. |
| Mako11 | 24 Jan 2017 3:30 a.m. PST |
Just got done gluing a few of these, and it works very well. I'm using a high-temp glue gun, since the low-temp one I'd used previously was okay, but didn't glue things quite as securely as I'd hoped. The first tree base I did wasn't to my liking, and used far too much glue. On that one, I inserted the tree trunks – twisted wire, into the vinyl base first, and then glued all the way around. Perhaps I didn't let the glue cool enough, before testing, but the 60mm trees seemed a bit too wobbly for my liking, so I kept adding more and more glue, and running it up the trunk a bit, and then around, to try to make for a more secure bond. That just ended up wasting far too much glue for a marginal bond. I may go back and remove it all, and reglue, though if painted, I guess the glue could look like a tree base, with some root structure to it. On my second try, I inserted the glue tip into the hole first, made a little ball of glue on top of the base, and then immediately inserted the tree trunk into the hole. That works very well, uses very little glue, and made a secure bond. I held the trees in place for a bit longer than I think was needed, just to be sure, and this is definitely the way to go. The hole for the trunks is slightly loose, which was a worry – probably only 1mm or so, but the glue fills that in nicely. When gluing, I kept a thick piece of scrap cardboard underneath the tree bases with the holes in them, to catch any dripping glue, and to keep from damaging the countertop underneath. That worked very well. TIP – after applying glue, touch the tip of the glue gun to the cardboard to break off/remove any thin strands of glue, before moving on to the next tree. Let all cool and harden, then go back and remove the spider webs by hand, or with an X-Acto knife, later. |
| fullmetal2015 | 24 Jan 2017 7:42 a.m. PST |
thanks all I think I will do some testing this weekend, using floor tiles an ceiling tiles both. Thoughts on terrain making ie.. plaster, using foam to make hills etc. then coming back with plaster to smooth them out. Will the material stick ok, or should there be other way to secure the added terrain? fullmetal |
| Lee494 | 24 Jan 2017 11:44 p.m. PST |
I use floor tiles all the time for both scenics and figure bases in 6-15 and even 28mm. Some random scenics thoughts. I've found scenics can be focused on pretty or functional. I prefer functional for gaming. Therefore I never "base" my trees. Rather I mount each tree on a "fender" washer found at lowes or Home Depot. These are essentially flat metal discs that come in various sizes at a few cents each. Glue tree into them and paint/flock washer and you're good to go. So useful I even put them on the bottom of plastic mini bases for more weigh. Back to trees. With each tree mounted I then buy colored cloth with a "forest or grass like" pattern. It's easy to cut to any shape and being cloth will confirm to terrain. I then place the trees on it. Allowing the trees to "move" on the base is great for allowing minus to fit between trees which always seemed to be an issue with glued trees. I vary the number per base to indicate light or dense forest. I like to buy 1 foot square pieces of felt and cut to with for roads. Check craft section Walmart or craft store. I use black, brown or gray for type of road. Sections bend for terrain and the felt has a "tacky" quality which holds them in place. I also buy the rock molds and plaster cast from woodland scenics. Layers flat they are rocky out croppings. Glued to a base upright they easily become walls or ruined buildings. Especially if you crumple some of the plaster into little piles. Placed flat and painted brown (and gray for some rocks) with clump foils he on top the become hedgerows. I also do my rivers from water "pattern" cloth with, you guessed it, plaster cast banks. I was able to make almost a full table of scenics from one $10 USD box of plaster and one $10 USD woodland scenics mold plus felt for roads etc. To see examples of the river banks and cloth water check out the Fall In pictures on my website home page skirmishaction.com and while this is 28mm I also use all the same techniques when I play 1/300. And oh yes, the trees you see next to the buildings all have Fender Washer bases! Cheers! Lee |
| fullmetal2015 | 25 Jan 2017 11:42 a.m. PST |
I guess I should of said early on, my boards will be used for micro scale. fullmetal |
| John Secker | 02 Feb 2017 11:08 a.m. PST |
I have used cork floor tiles with some success – 12" square. They are quite light, a bit of flex, and take paint well. But I have only used them as basic bottom layer terrain – green or brown paint with various flocks, and I put roads, buildings and woods on top. I have never tried building more elaborate permanent terrain on them. |
| Aggie21 | 19 Feb 2017 10:57 a.m. PST |
Hi everyone, I have never cut one of these vinyl tiles but reading the posts using a scissors being a challenge for the internal curves, how about a coping saw? A scroll saw with an appropriate blade should work well too and you could contour as you wish. I would recommend an inhalation mask to void inhaling any finely generated vinyl dust that is not healthy to inhale and wear eye protection too. |
| johnnytodd | 27 Feb 2017 7:02 p.m. PST |
I have installed them for their intended use (floors) and a heat gun will indeed make them soft enough to cut with a big scissors |
|