Well, after a huge amount of work getting my paper Napoleonic miniatures ready, we decided it was time to finally play a game with them! We've been using the great "Blucher" rules by Sam Mustafa. We decided to start small and so I put together a Quatre Bras scenario. The order of battle was no problem to figure out and I found a good map to work from, but I wasn't sure exactly how many turns to have or exactly how big to make the table. So this was a basically a trial run. We discovered a few problems, but overall it went really well.
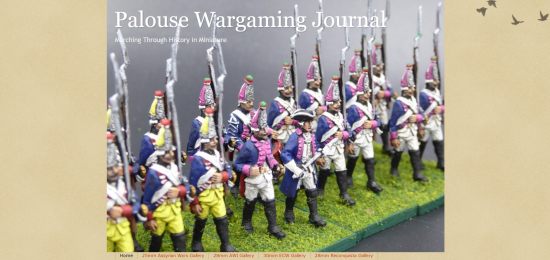
The battlefield. Quatre Bras is at the top of the photo. The two brigades of the 2nd Netherlands Division are defending behind a little stream. The French II Corps is entering at the bottom.
The one issue we ran into was that historically, the Dutch-Belgians were mostly spread out as skirmishers covering a wide front and occupying the big Bois de Bossu to the west of the road. The Blucher rules only deal with brigades, so we had no choice but to deploy them in the open to contest the French advance and hope help would arrive in time.
The French objective was to capture the crossroads at Quatre Bras. Initially they had a big numerical advantage but Allied reinforcements would come streaming in throughout the battle and shift the numbers dramatically. The French needed to attack hard and fast.
So, on turn 1 they advanced as quickly as they could. The three divisions of infantry on the table and the corps light cavalry moved up. The artillery fired and did some damage to Bernard's Brigade. In the Allied turn, the infantry fell back and their artillery hurt one of the French brigades. Due to the small size of the armies we were giving the French only two command dice. The Allies started out with one, but this would grow to two as the reinforcements arrived.
On the next French turn the remaining infantry division of the II Corps entered the table, along with the III Reserve Cavalry Corps and some horse artillery. Marshall Ney arrived in person along with General Kellerman. The first line of infantry pressed up to the stream and the light cavalry crossed over, seeking to turn the Allied flank. Again the artillery punished Bernard's Brigade. In their turn, the Allies continued falling backwhat else could they do?

The next turn saw a major foul up on the French side. The light cavalry had become separated from the corps and had to be moved separately, taking two motivation points. The 5th division had also become separated, but both brigades could still be activated as a corps move for two more points. The French commander thought that he could move both groups and then use Ney to activate everyone else (as they were all in a clump within 2BW of where he could place himself). So he gambled that he'd have at least 5 points on his two dice. Wrong! He only got three so the bulk of his force was stalled for a whole turn. This would haunt the French for the rest of the game.
The only bright spot was that the light cavalry got far enough forward to seriously impede the allied reinforcement's reserve move when they arrived.
During the Allied turn the first of their reinforcements arrived. Picton's division of three brigades and a Dutch Cavalry brigade and some more artillery, along with Wellington and Picton, himself. The French light cavalry did, indeed, severely restrict where these troops could go and as a result the British found themselves crammed into a pocket just south of the crossroads. (Afterwards we decided that it had been a mistake in the scenario to leave so little room at the north end of the map it really hampered the British deployment. The next time we play this scenario we will change that.)
The next turn the French got themselves sorted out and crossed the stream with their lead troops, but there was little firing. The Allies also straightened out their line in anticipation of a strong French attack.
At this point the French realized they had to get moving. The infantry opened fire all along the line and the light cavalry charged the Dutch cavalry brigade. The French shooting was very effective, the skirmisher' characteristic really helps out long range fire.
In the cavalry fight, the game replicated history exactly and the French shattered the Dutch cavalry and flung them back with only a single point left. The Allied player withdrew them in his turn.
The Allies were taking a pounding, but more reinforcements arrive, these being the Brunswick division with three more infantry brigades and a brigade of cavalry. The Allies extended their line.
But the Allied fire wasn't terribly effective and the French kept coming.
But the French were running out of time. They launched some assaults both with infantry and the heavy cavalry of Kellerman's corps, but as good as their shooting had been, their assaults were poor and were flung back. Still a few inroads were made and several Allied brigades were either destroyed or forced to withdraw.
But still more Allied troops were arriving, this time the 3rd British Division. There were an awful lot of troops between the French and the crossroads now and the day was drawing on.
The French could see that there was no hope of pushing through to the crossroads, so their only hope was to break the Allied army. Under the Blucher rules, that meant destroying a third of their infantry and cavalry brigades, which in this case meant five. They had hurt the Allies a lot with their accurate fire, driving three brigades off the table (withdrawn units are gone, but don't count as destroyed), and destroying two more. But they were out of time and threw everything into one final attack in hopes of destroying three more brigades.
They came close, destroying two, but they failed to get the third. On the last turn the British Guards arrived on the field and the French realized they had lost the day, despite not losing a single unit.
All in all, it was a really enjoyable game. With just a few tweaks to the scenario, I think this will be really good! We are really liking the Blucher rules!