"Miners from Sloppy Jalopy Painting Log" Topic
25 Posts
All members in good standing are free to post here. Opinions expressed here are solely those of the posters, and have not been cleared with nor are they endorsed by The Miniatures Page.
Please don't call someone a Nazi unless they really are a Nazi.
For more information, see the TMP FAQ.
Back to the VBCW Message Board
Areas of InterestWorld War Two on the Land
Featured Hobby News Article
Featured Recent Link
Top-Rated Ruleset
Featured Showcase Article
Featured Workbench Article When evolved Newts happen upon a WWII comic...
Featured Profile Article
Featured Movie Review
|
| Panzerkaput | 15 Dec 2015 1:17 p.m. PST |
I have never done one of these before so please bare with me on this as I am not totally sure how this will work out. Its might actually be a little boring but hopefully not and it will be of interest to someone. So without further to do the painting log for Sloppy Jalopy's new Very British Civil War miners.
The figures as I have said before in the previous post are very nicely done and sculpted by Mr Matt Bickley and Mr Bill Thornhill. The casting is very sharp and clean with few mold lines which can be easily files away. The actually figures are now that I have had a good old chance to look at them up close and personally are very nice, well detailed and have a very naturally posed.
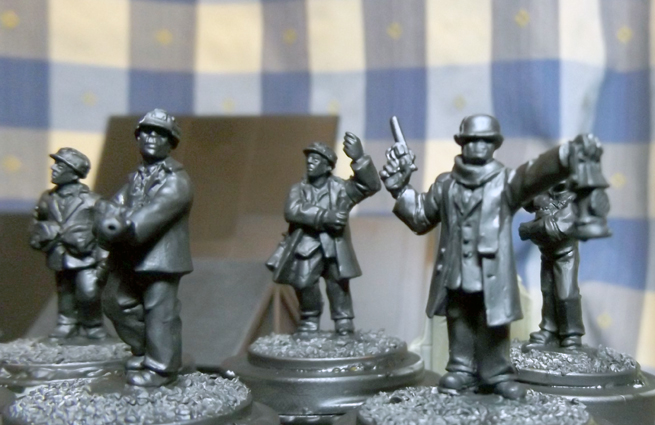
The nice thing about them, besides the look of them and there versatility is the fact that they have separate heads. Now I know that some of you will think that separate heads is a pain and figures look better with the heads sculpted with them on but these are actually very good and actually work very well. There is a nice range of different heads from Miners Hats, naturally, wouldn't be miners without Miners Hats, but also bowlers, bare heads and flat caps. I know that Sloppy Jalopy with be doing other heads including helmets, straw hats and other head wear which means that you can have a good number of variations with these and if Sloppy do other militia types, like urban wear and rural wear militias, you could have a wonderful range.

All I have done with these chaps is to pose the heads and place them on the bodies, cleaned up the old mold line or two and then glues that to bases, in my case 2 pence pieces, I love them as they have the right height and add a little weight, especially to plastic miniatures. Then I added the mixed gravelly sand mix and undercoated them in matt black spray paint, I used Wilko's BBQ and Woodstove spray paint, which is quite cheap but it does give a good finish if when you first spray it it looks to thick and all the detail has been covered and lost but once it is dried in looks rather neat. Well thats enough of me rambling and hopefully I will have the next step, painting the skin shortly. Have a nice day. PK |
| Panzerkaput | 20 Dec 2015 9:57 a.m. PST |
Well what with work, lucky enough to be temporary promoted to team leader, Mrs PK trying her best to fill every second of the day with going here and there I have managed to progress these Miners along a wee bit. What we are going to see is the stages on how I painted the fresh tones. Now I am no expert painter, no matter how I kid myself, but I have found, possibly the longer way to paint skin ever and you will see what I mean.
Now as I have said I am no expert when it comes to painting and I paint figures rather like I paint my illustrations which means you can see the brush strokes of the paint that I have laid down. Also I do water/thin down my paints a fair bit which allows me to layer paint on top of other to try and give it a more natural feel, not really sure that it is worth the enough though.
First off I applied a thin coat of Vallejo's Model Colour, Hull Red as the base for the skin as I want the feel of tough, hard working men with that weathered, ruddy look to the skin. I have found this to be a great colour as it keeps the luminosity of the layer that are laid down on top of it within making the other paints fight and jar against it.
Next a mixed Vallejo Game Colour, Tan, I use this colour as I cannot find a suitable colour close to tan in the Model Colour range, with the Hull Red that I used previously, and painted that over most of the skin leaving the recesses between the fingers, the eras, around the nose, the mouth in the darker base colour so to forum shadows. After this I painted the next layer using the Tan colour again on the top must areas so building the skin tone up.
The next layer I painted using Vallejo's Model Colour, Sunny Skin, mixed with a little tan and applied this to the nose, chin, cheek bones, the eye brows, ears, basically all the areas where light would hit it and then I washed the whole skin area down using Vallejo's Model Colour, Burnt Cadmium Red, to basically use the skin that glow that skin has.I have to admit I love the Burnt Cadmium Red colour as it is great for this as it gives a slight glaze to the figure.
After this I paint another layer of Sunny Skin mixed with a little Tan on top of this along the nose, cheek bones, eye brows, ears, all the areas where light hits the skin and then I highlight where pure Sunny Skin on all the above again but it lesser amounts. Once this is all done I simply paint the lips in Tan to finish off the figure.
I am not totally sure it is worth all the effort to paint the skin this way but I think that is gives a good naturally feel to the skin and in my opinion it is the part of the model that you should work the hardest on as it is the part most people look at first. Well I hope you like that next with the painting of the clothes before I go onto the weapons and all the other bits and pieces. Have a nice day. PK |
| Panzerkaput | 01 Jan 2016 11:01 a.m. PST |
Firstly, Happy New Year to everyone and I hope that this year is going to bring you happiness and joy.
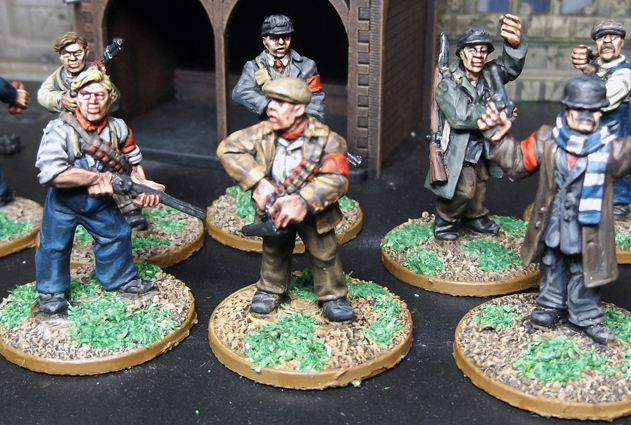
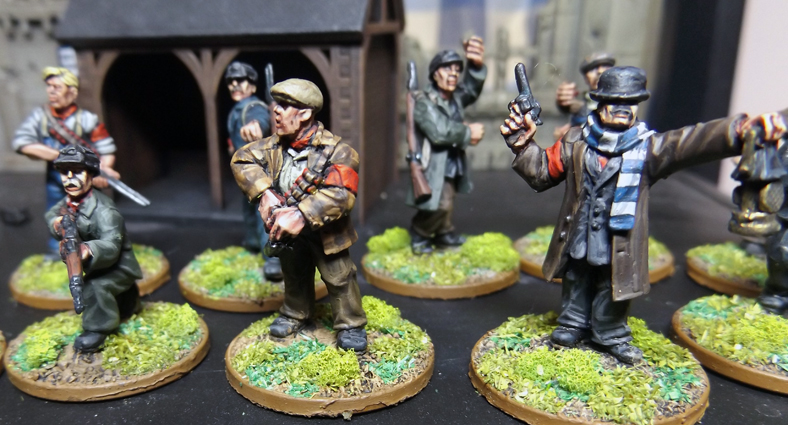
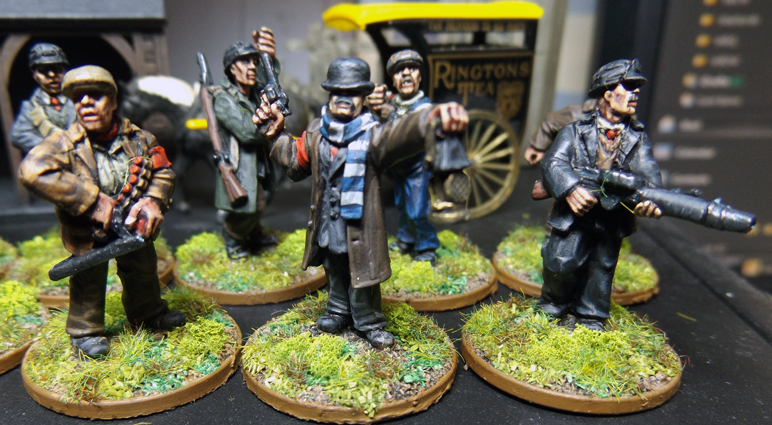
I have been working of Sloppy Jalopy's Miners over the Christmas period as much as I can, which is been not a lot, but I have managed to progress a couple of the figures to a point where they are nearly finished. I started working of the unit leader/commander/ foreman first, thinking that it makes sense to me to start with him. Now these are 1930s miners for the Snibston Miners Section and I wanted to get that working class feel for them so I have gone for the mutes tones of greys, blacks and browns. I was thinking of having the suit as a Prince of Wales check but thought that as these chaps as Socialists I thought it wouldnt suit their ethics.

So to give him some colour I have gone with a red armband and a red tie, making him or rather them out as a socialist section and I think that it works well. I decided that I was not goig to give his a red scarf too as I thought this would be too much red so I when for a Leicester City football scarf or a couple of reasons, one, it adds more colour to the figure and two being working class I couldnt imagine him following the Leicester Tigers Rugby club. Now I could of gone for a couple of other clubs, Notts County, Nottingham Forest or even Derby as they are all local to Snibston but decided on Leicester as these chaps fight for the Socialist Corporation of Leicester.
I still have the metalwork on the lamp and the gun to do but I am waiting to I have finished all the chaps before doing that.
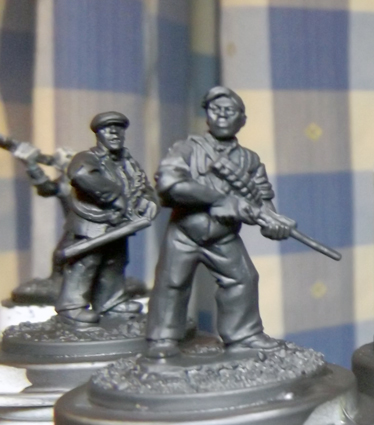
Next up is one of the banner bearers as you get two in the pack. This might seem a little strange but actually it makes as colliery banners usually require two or more men to carrier as they are big. This chap is in what I would call your average coal-workers clothing being dressed in overalls and with what was very common for the time a flat cap. I have gone for the standard blue for the overalls, doing my best not to make them look like denim material as they would be a heavy cotton trill, God I have gone all technical, which I painted using Vallejo's Model Colour Dark Prussian Blue and Prussian Blue with a little bit of Blue Grey mixed into the Prussian for the highlights.

The shirt I wanted to be an off white colour, the colour of an old, well used shirt with I used Russian Uniform for the base and lighted it with Blue Grey and top highlights of Off White, all again by Vallejo Model Colour range. Again I did the armband red to add some colour and the flat cap I painted grey and checked with Tan Earth and Iraqi Sand. Again the metalwork on the buckets and the gun, which is stuffed into the front pocket of the overalls is still to be done.

Next up is the other banner bearer who is a work in progress as I have only done the trousers, jacket and the miners helmet and just put the base colour down on the overcoat. I am hoping on having him finished soon as I can them work on the colliery banner, once I have found some reference for it. Again I am going with the muted colours and didnt want to do this as a suit but rather a jacket of trouser combination, which I think has worked well. I am in two minds on whether or not to have a checked pattern on the overall, which was quite common during the 1930s.
The overall is bases in Vallejo's German Extra Dark Green, which I think is a wonderful dark green base colour while the trousers where painted using German Black Brown, German Medium Brown and Tan Earth by Vallejo. I have you are enjoy this and more will be coming soon. Have a nice day |
| Jemima Fawr | 06 Jan 2016 8:28 a.m. PST |
You utter rotter, Sir! Now I have to spend more money so soon after Christmas! |
| Panzerkaput | 10 Jan 2016 2:22 a.m. PST |
I am glad that you like them Jemima |
| Panzerkaput | 10 Jan 2016 2:22 a.m. PST |
I have to admit that the work on these miners is painfully slow, mainly due to the fact that I am knackered when I get home from work and all I want to do is veg out, which is a pity as I want these fellas painted.
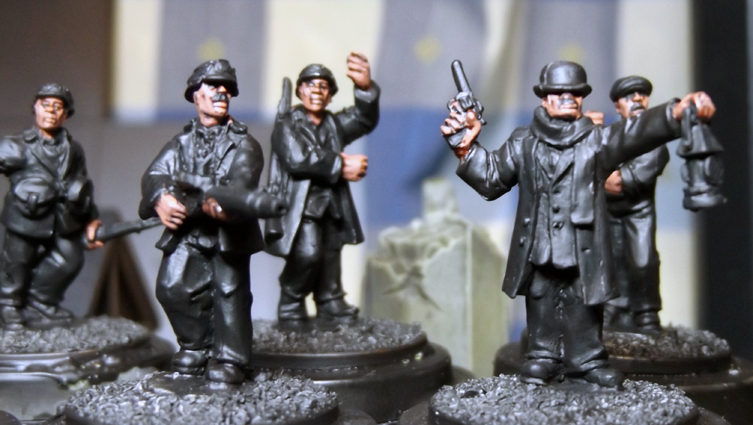
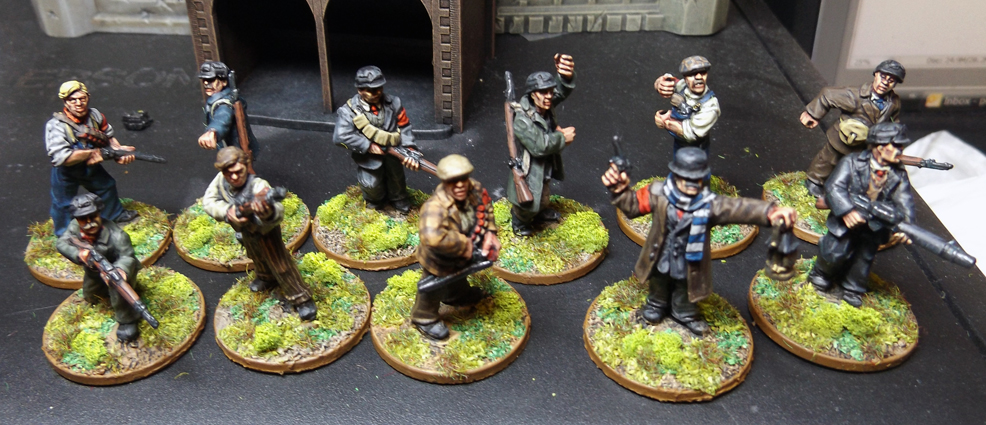
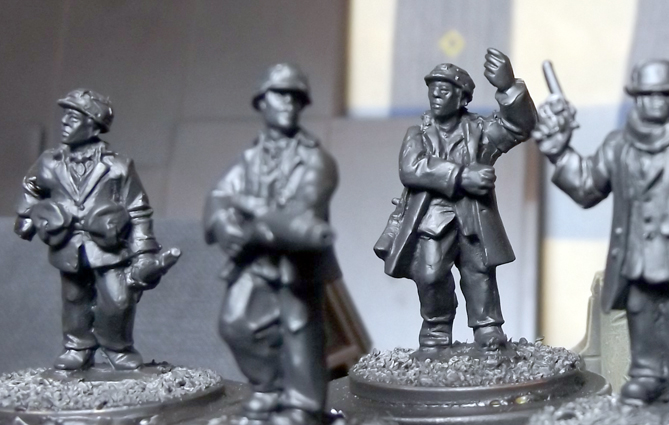
As you can see I have now finished well also finished, the metal work needs to be done, the lewis gunner and loader, which means that the command pack for the miners is finished, almost, and I can start work on the other chaps and the Colliery Flag.
As with the other figures in the command pack these chaps are lovely posed and have great character. I have aimed still for the muted tones and colours adding some blacks and browns this time. I have gone for the working class look still with these, no fanciness with these chaps, though the suits and the fellas themselves are rather clean, most of washed before fighting.
I am enjoying painting these chaps and each one is different and a little gem which is helping to build up the character for the unit. The mutes palette is working and the hint of bright colour is stopping them from being dull. More to come soon. Have a nice day. |
| Panzerkaput | 14 Jan 2016 4:23 p.m. PST |
This is just a quick update on the progress of the miners by Sloppy Jalopy that I am slowly working on.
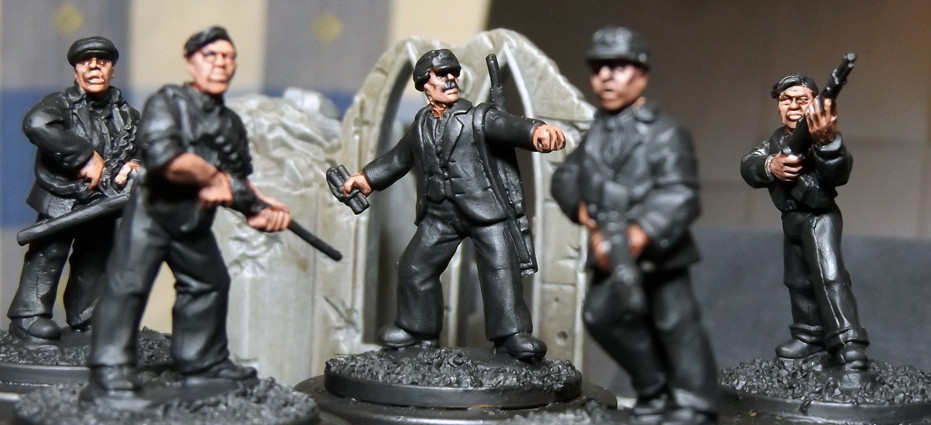
I have finished another two of the miners leaving just four to go and I am still loving painting these figures as they have bags of character and a real pleasure to paint. I am still keeping with the muted tones but this time I thought I would add a little variation in the mix by giving one of them pin strips trousers.
I have to admit that painting the pin strips, the first time I have done it in a very long time, with a right pain, but these sculpts have lovely flat areas which helped to make it easier and I think that it has come out rather nicely. I was thinking of painting his tank top in a fair isle pattern but I thought that would be a little too much but I might come back to it later.
The other chap I have painted I have gone for the muted, sober tones of a plain green suit but I have added a bit of colour with a red, poker doted, neck scarf. Again this was a dream to paint and very nicely sculpted.
Thats all for this time, so have a nice day. PK |
| Jemima Fawr | 15 Jan 2016 3:46 a.m. PST |
Lovely! Well pay-day is here, so I thought I'd buy them, but nothing happens when I press the Paypal button on their website! :,( |
| Panzerkaput | 16 Jan 2016 1:16 p.m. PST |
Really? have you emailed Sloppy about that? |
| Tricks | 16 Jan 2016 4:05 p.m. PST |
Hi Jemima. Not sure what the issue is with the paypal button but if you email me at "richard dot tyndall at live dot co dot uk" I will send a paypal invoice for the miners. cheers Richard |
| Jemima Fawr | 17 Jan 2016 9:19 a.m. PST |
|
| Panzerkaput | 17 Jan 2016 3:39 p.m. PST |
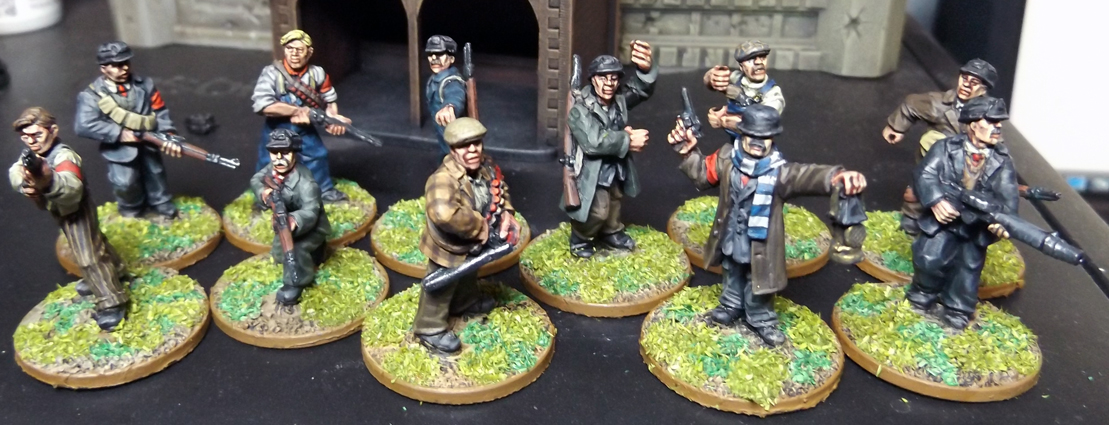
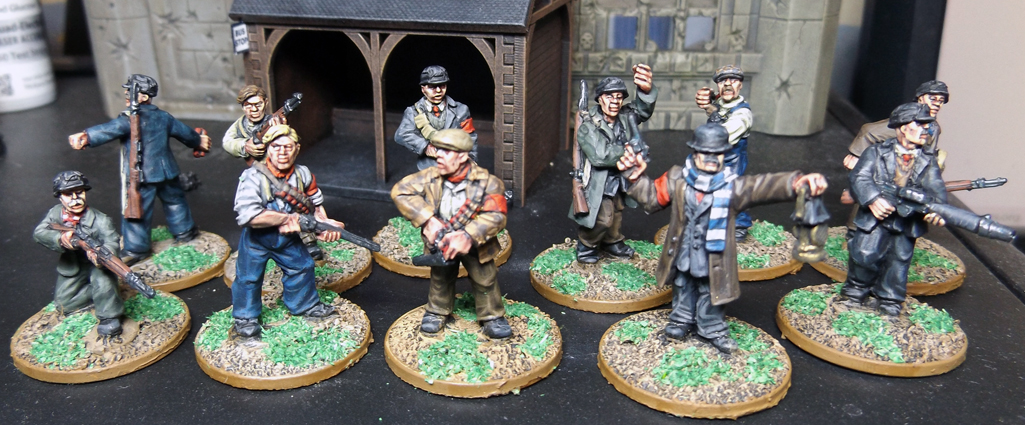
Yes indeed I am nearly at the end of painting my miners I have got from Sloppy Jalopy, with now only one left to paint and then its the metalwork and bases to do.
The more I have painted these boys the more I have enjoyed it and now I have been working on there characters and personalities in my head as I have painted them. Please tell me that someone does this too because if not then I am a right nutter.
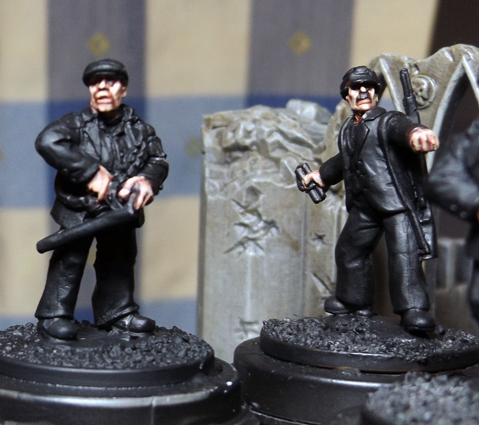
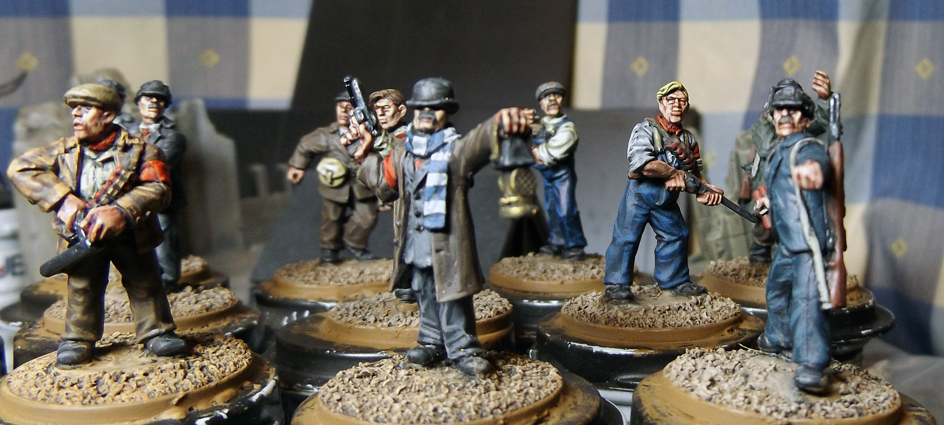
So first up is the "Old Man". Actually when I first this the sculpt I thought that this was the weakest of all them as it didnt shout out to me as the others did but once a suit was done it popped, strange when that happens isnt it? I again went for the sober suit colour with this dark prussian blue colour. I was thinking of having a simple check patterning to it but decided against it as it would taken away from the figure. The accents of colour with the strap for the rifle and the sticks of dynamite set the figure off.
Next is the "young chap" who is the youngest member of the mining team and is wearing a hand me down suit. I really like the pose of this figure and besides having the bandoleers, which I like as I like that would be the most common bit of webbing, is the fact that he has a jumper on under the suit. I have painted him is a sober bluish grey colour, like it is his best.
Lastly here is the "Pretty Boy", in his working coveralls, bandoleer of shotgun shell and armed with a shotgun. I really like this figure as it ouses character. In my mind he is a more political member of the militia, having missed out on fighting in the Spanish Civil War for the Republicans, took up the trade union banner and joined the local Independent Labour Party. Always fighting for his Brothers rights and the rights of the working man, he is always the first into a fight.
Even though these figures are for Very British Civil War I can see these being used for other periods like a workers militia for the SCW or the German Civil War, 1919 to 1921. I can being used in a Peaky Blinders, 1920s style game to be being used in a Spy Fi game like James Bond. Anyway enough of my ramblings and hav a nice day. PK |
| Henry Martini | 19 Jan 2016 6:41 p.m. PST |
Very nice painting… but I do wonder why, if they're primarily intended for VBCW, they appear to be mainly armed with Mausers rather than Lee Enfields. This seems to me like a missed opportunity. |
| Panzerkaput | 20 Jan 2016 4:27 p.m. PST |
I think they are P17 Rifles, what the Home Guard used |
| Panzerkaput | 20 Jan 2016 4:27 p.m. PST |
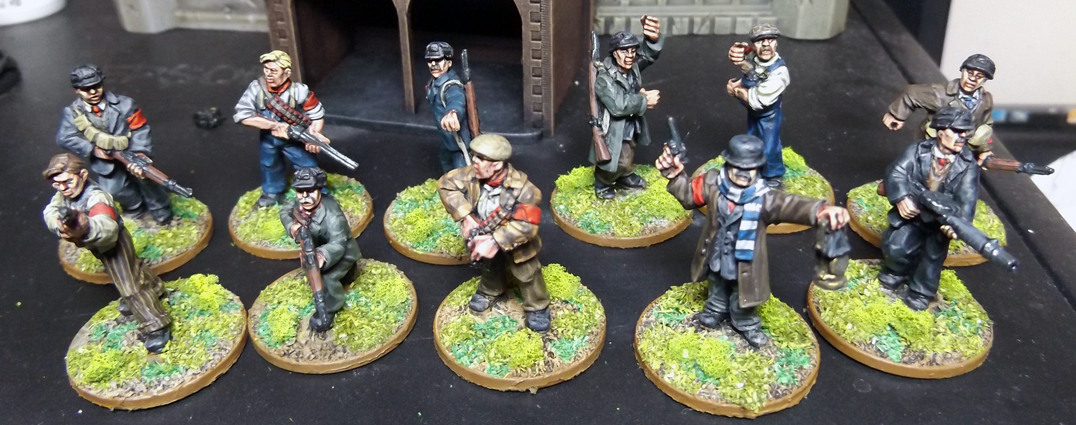
I am not totally sure if this is Work in Progress or finished as i still have the bases to do but I guess until the bases are finished it is still a WIP.
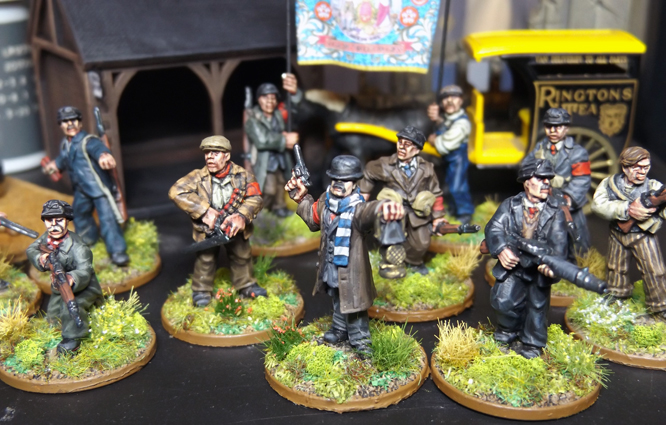
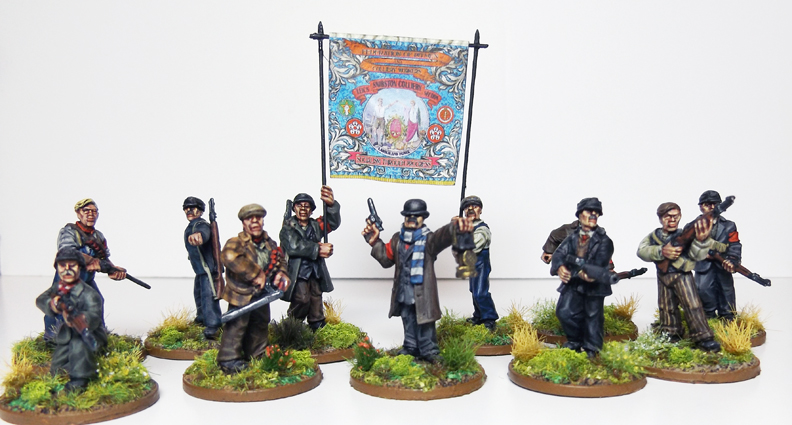
Well I have actually finished all the painting on the miners and I have to say it has been a very enjoyable project to do. Now this does mean that the Snibston Miners Militia is finished, no not at all. I still have the banner to do and mount and the bases to finish but in general they are finished.
I have kept with the muted, natural tones throughout the unit with just the hint of colour to make the unit stand out and I really think that the unit works well together. I think I have managed to capture that 1930s working men look and because of the limited(ish) palette it has unified the whole unit together.
I think the sculpts have helped and added some of the character to the unit and I have to say it have been one of my most enjoyable units to paint for a long time.
Now you can see the bare bases before I add my things to it and they are simply a 2 pence piece with some fine and mid coarse sand glued to it. After that it is primed black and then base coated Vallejo's Model Colour Flat Earth. Then a light drybrush of Vallejo's Model Colour Tan Earth is applied and then Vallejo's Model Colour Iraqi Sand is light dusted on top as a final highlight. Next up with be the bases, so until then have a nice day. PK |
| Jemima Fawr | 20 Jan 2016 11:52 p.m. PST |
Received mine yesterday and they are bloody lovely! I liked your pics so much that I bought two packs. :) |
| Henry Martini | 20 Jan 2016 11:59 p.m. PST |
Certainly there's some physical resemblance between Enfield 'P' series rifles and the Mauser, from which they were adapted, and it would be perfectly reasonable to expect stored stocks of P14s to be plundered by militias desperate for rifles, but the US P17 re-chambered version of the P14 is unlikely as it only ended up being supplied to Britain because of the demand for weapons generated by the outbreak of WW2, and the first stocks didn't arrive until 1940. Anyway, the rifles on these figures have features peculiar to the Mauser not found on the P14 or P17. |
| Jemima Fawr | 21 Jan 2016 7:45 a.m. PST |
The South Hook Colliery Soviet received their Mausers from stocks captured by commerce raiders… It's my VBCW… ;) |
| Panzerkaput | 23 Jan 2016 7:56 a.m. PST |
I have to admit they could be Mausers, thy do look like mausers and I have used mausers for reference when painting them. I think that they are generic enough rifle or rather a lot of countries used and manufactured Mausers for them to be imported to the UK. I actually like the look of them and the rifles and being mausers means that these could be used many different periods between and after the war as well as possibly during the war too |
| Panzerkaput | 23 Jan 2016 5:42 p.m. PST |
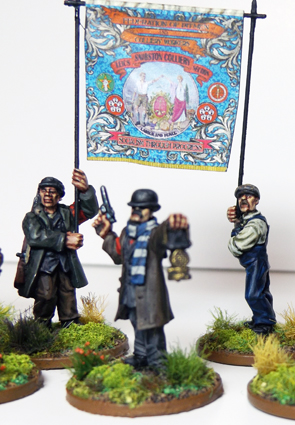
Well I am close and I mean very close to the end on this and really all I have to do is to finish the basing and add the banner for the Colliery workers and bingo they are finished. So this post is going to be mainly on how I do my basing and I hope it is going to be of use to some of you.
Firstly I think that the base is just as important element as the figure as a well painted figure can be ruined by a poor base and a good base can help raise an average painted figure. Now this is different to the basing tutorial I did a couple of years back as I have refined it a bit and actually produced a more natural look to the base. Please remember that these bases are rural bases for British countryside as I play Very British Civil War but they should work for any green and pleasure land around the world.
So the actual bases and what I use. I actually use 2 pence pieces for the base for a number of reasons but mainly I like the weight the 2 pence adds to the figure, which can be very useful with plastic miniatures. Then a simple PVA glue sand, one medium coarse and one fine coarse which I mixed together to give a good, nice ground mix and I set to dry for 24 hours. After this I undercoat the figure and base black and then I drybrush, actually it is more a wetbrush, like a drybrush but not all the paint is wiped off the base using Vallejo Model Colour, Flat Earth. After this I drybrush Vallejo Model Colour US Tan Earth to give it that more earthy colour and a final dusting of Vallejo Model Colour Iraqi Sand for the highest highlights. I finish the base by painting the outer edge of the base with Vallejo's Flat Earth to tidy up the base.
Now once the base has dried fully, I usually wait two hours or more before I start on the next stage of adding the basing materials. I now that I could probably get away with doing less stages than what I use but I think that since you have spent the time and enough paint the figure nicely you should do the same with the base.
So the first stage I do is quite simple and that is to build up the feel of the base and I do this by using Army Painter's Battlefields Moss Green flock. I dab PVA glue randomly on the base to form large areas of dark green flock to give the impression of different colours and patterning.
Once this has dried I apply another level of flocking but this time I use Army Painter's Battlefield Grass Green flock. Again I dab PVA glue on the base randomly but this time I aim to cover most but not all of the bare area and also go over the darker green flock that has been already applied. I am aiming for that two tone grassy effect that you see in nature. Now you can leave the base there and it will be serviceable but if you want to take you base to the next level read on.
Now remember I said it about levels and you have created a good grassy, mossy base and now it is time to add to this. So the first level I add is not really needed but I like the look to the base with this added and it uses the base a bit of height and texture.
I add clump foliage to the base is a couple of areas to break on the flatness of the base. Now only do this is one or two areas as it can overpower the base, which you do not want and remember that this is only the first level. So I superglue to glue down these tiny bits of clump foliage as the make then hard which is needed and once the superglue has completely dried I drybrush the foliage with Vallejo Model Colour Yellow Green to highlight it and make it more natural.
After this the next thing I add is some static grass. The first colour I add is Army Painters Battlefields Steppe Grass, static grass to give that feel of grass. I again dab PVA glue in small little blobs between six and eight of them and then I apply the dark green grass to the base. This should give the feeling of a grass field and actually you could stop now as the base looks natural and effective but I add more levels to it.
I add another level of static grass this time a light colour, Army Painters Battlefield Field Grass, static grass to give that real feel of grass as grass is never uniformly one colour. I dab PVA glue around the base in the same way as the dark green grass but this time I only have between four and six blobs. The gives a very natural effect and you could leave the base as finished here but there is a couple of more things that I add to the bases.
The final stages I add to the bases are things that give height and colour to it. The first thing that I add is some tall grass and I usually only one clump of it. Now I use one of two colours for it either Noch Rough Grass Beige or Noch Rough Grass Dark Green and I only use the one type and clump as I usually add something else to the base to even things out, but I am not adding anything else then I would consider adding two clumps of either the same colour or one of each.
I apply these grass clumps using PVA glue and once they are dried I gently drybrush them to highlight them and to make then more natural. If I have using the Noch Rough Grass Beige I usually highlight this with Vallejo Model Colour Sand Yellow and if it is Noch Rough Grass Dark Green I highlight this using Vallejo Model Colour Yellow Green. I aim to highlight more towards the top of the grass leaving the bottom in the dark colour.
The other piece I add to the base is flowers. Now you can get them for all other the place now but I tend to use either Army Painters Battlefield Meadow Flowers or Mininatur flower range. I find that adding flowers to the base just lifts the base and adds some colour to it without it feel unnatural and false. I other add a single clump of flowers to balance the tall grass clump and finish of the base.
I hope that you find this very helpful and useful and breaks away the mystery on how I do my basing. As you can see that it is not very difficult, it is simply just adding levels to achieve that natural look and feel. Have a great day. PK |
| Jemima Fawr | 24 Jan 2016 5:01 a.m. PST |
Brilliant! I normally paint my flags and banners, but I'm balking at the thought of painting a typical colliery/union banner! I might have to see what's out there to print off… |
| Panzerkaput | 24 Jan 2016 5:02 a.m. PST |
|
 Bobgnar Bobgnar  | 30 Jan 2016 2:18 p.m. PST |
Excellent original figures, and terrific paint job. Anyone know how these compare with the nice Ironclad Miniatures miners? The note about the figures on the SJ site is very welcome news. Hope soon "pit helmets, bare heads, flat caps and bowler. We will be adding more heads to the range shortly and these will also be available as a separate head pack for conversions. " I hope they make these in packs of similar types, not a mixture. |
| Bobgnar | 23 Apr 2016 1:22 p.m. PST |
My miners from sloppy jalopy arrived.generally very good figures, they fit well with the ironclad miners so I can make a fairly large unit. I don't understand why the one figure is carrying a lantern. I'm assuming these are outdoor fighters not fighting in the mines. I will convert him to holding another pistol or just been the arm down to his side after taking off the lantern. The figure with the spare drums on his waist has his right arm that is very strange angle. I will give him ammunition crate to fill in the space. It is good however to have an ammunition carrier for the light machine gun. Most companies do not provide that. I always enjoy having extra heads, I have dozens from Empress miniatures and Woodbine. The sloppy Jalopy heads seem a bit small but that's OK. They come on a long neck sprue but there is no hole in the figure. Therefore it must be drilled out. I have no problem with this but just a word of warning if anyone has trouble with drills. There are 11 figures in the set, and five miner helmets , a couple of Bare heads and flat caps, and a nice derby. I look forward to a pack of assorted heads that are advertised. |
|