| TigerJon | 17 Sep 2015 5:35 a.m. PST |
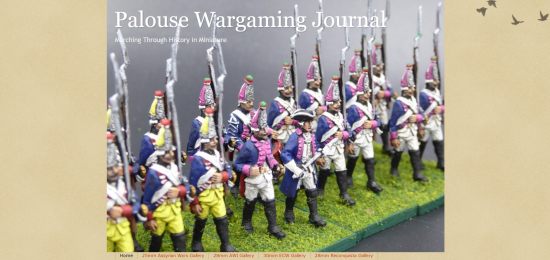
I've been painting 25/28mm ACW for 4 years. I feel I have become a decent painter, but only when I put some real time into it. I believe a seasoned painter, if watching me, would tell me even with rank and file troops I could maintain a nice tabletop look by doing some things differently. I'm all over the place when it comes to how I paint. Within the current batch of Rebel troops I'm working on I have done everything from some guys getting a base coat and a wash to some getting a drybrush right over a black primer to some guys getting a nice 3-color buildup. I like to prime black because I give the my models a nice dyrbrush of a medium gray thus not needing to paint much of the leather. However, this method requires me to be detailed when I block/base so I don't get paint all over the black leather. I have heard of methods of painted slopping the base color on very quickly and going back and cleaning up later. Can anyone recommend any tips or links that would give me some ideas? Thanks! |
| JimDuncanUK | 17 Sep 2015 6:17 a.m. PST |
If you can't see it across the table don't paint it. Also things like boots and shoes and horses hooves. If you flock or tuft your bases you'll probably cover them up anyway. |
| Denouement | 17 Sep 2015 6:23 a.m. PST |
Try undercoating, using the predominate uniform colour. i.e. Conferderate = Dark Grey, Union = Dark Blue. Black wash, add skin tones, paint metal parts belts ect, and then highlight the uniform. Stuart. |
| Sysiphus | 17 Sep 2015 6:25 a.m. PST |
Try blocking in the colors, in a lighter shade. Then brushing in MinWax Polyshades English Tudor Gloss stain (available at most True Value hardware stores)
Be sure to daub off any excess puddling and blow on them, like birthday candles, to remove bubbles. Let this set up for a day, (the shading effect improves as it dries), then if you want a dull finish hit them with some Dullcote, on a dryish day.
Voila.
Because this is an oil based product, not likely to wear off with oily human mits, your painting will be orotected for the long haul. |
| Lucius | 17 Sep 2015 6:42 a.m. PST |
Army Painter Spray Primer – blue for union, brown or gray for Confederates. I think that you might be surprised at how much it speeds things up, to cover 1/2 of your miniature in the right base color. |
 Saber6 Saber6   | 17 Sep 2015 7:39 a.m. PST |
3 foot rule and Assembly line. Block in Colors, pick out a few details and "Dip" (actually brush on the MinWax Stain). |
| Oh Bugger | 17 Sep 2015 8:47 a.m. PST |
Brown or white undercoat I find black obscures the detail. Block in the colours. Others use dip but I prefer brown ink painted over the figure. Leave over night to dry. Highlight and ten varnish. Also small batches of eight to 16 figures a go tends to help. |
| GoonerFrog | 17 Sep 2015 9:32 a.m. PST |
These are all effective methods. Every painter has their own approach that works best for them so you must be comfortable with what works for you. I have found a method that I find very effective for me. (Note it depends on the type of army and figures as well) Below is what I did for 28mm ACW. In my opinion their are three key elements – dedicated and consistent painting time, repetition, and grouping of figures. I paint 30 – 60 minutes every evening (when I can). Focus on getting something done. Even if you only do 20 minutes you will be surprised at how much you can accomplish in a couple of weeks. Paint specific items, e.g., all left hands, then all right hands, etc. If you do this, the repetition will speed you up. This approach really has made it possible for me to paint much more. I can do a full regiment of 24 – 36 figures in a week when I paint every night. 1) Groups of 4-6 figures mounted on a popsicle stick with a thread spool glued to the bottom. Helps you spin them around. I usually do 4 stands worth (24 figs)
2) Black Primer (spray)
3) No dry brush
4) Block Paint
5) Quick highlight of blocked areas (where desired)
6) Focused highlighing on faces and any specific items that make a figure standout. (Bed rolls with patterns and canteens are where I put my efforts)
7) Drybrush brown over boots and legs below the knees.
8) 3 foot rule is important |
| ArkieGamer | 17 Sep 2015 9:33 a.m. PST |
From your description, I think the main way you could save time would be by using the same method, regardless of what that method is, for an entire batch of troops. Changing methodology runs counter to the assembly-line method you need to be using to crank out regiments/brigades, and is sure to add time to the process. |
| Winston Smith | 17 Sep 2015 9:48 a.m. PST |
"If it's Tuesday night, I am painting dark blue….."
Don't completely paint 6 figures in a night and expect quick results. Assembly line works.
Black prime or white prime is irrelevant Unless you can guarantee to stay within the lines, I find undercoating in a base color irrelevant. You will have to go back over andctouchbup the blue anyway which takes up just as much time. |
| Frederick | 17 Sep 2015 10:48 a.m. PST |
I have found for 25/28mm rank and file the washes are magic for speeding up painting |
| wrgmr1 | 17 Sep 2015 4:16 p.m. PST |
My particular method is similar to what others have posted.
Usually 36 infantry or 12 cavalry on assembly line.
Base coat with 2 or 3 high lights, depending on the area. Coats, faces 3 color, everything else 2 color or 1.
Works out time wise to approximately 26 to 30 mins per figure. |
| Sundance | 17 Sep 2015 5:54 p.m. PST |
My biggest bugbear is faces – I tend to want to detail them. How you paint them quickly? Base color tan, skin tone drybrush then highlight? |
| Black Cavalier | 17 Sep 2015 8:48 p.m. PST |
Another technique that helped me speed my painting up is to try to immediately clean up any oops spots or over-painting. I keep a medium quality brush with a good point & somewhat stiff bristles at hand. Any time I accidently get paint where I don't want it, I immediately stop, drip the extra brush in clean water, blot most of the water off, & then use the brush to wet the offending paint. This will keep the paint from drying. & then rinse the brush again, & get all the water out, & use the wicking action of the brush to wick the paint off the figure. Do that once or twice, & the paint will mostly gone & you won't have to repaint it later. I found that before doing this, I was spending almost a good amount of time touching up & fixing these oops spots after I had done the base coat. So with this process, it only takes a few seconds, & cuts the touch ups way down. |
| TigerJon | 18 Sep 2015 5:32 a.m. PST |
Thanks for the great advice everyone. I think my biggest problem is I'm too much of a perfectionist when painting the detailed area like the flesh base coat. Instead of just slopping it on and cleaning up later, I make sure to just hit the areas that need it, and that takes more time. I will always spend more time on command stands, but I need to try being more loosey goosey with rank n file troops. Sundance, I find flesh to be the easy: for me taupe base, medium to light flesh highlights on fingers, metacarpals, cheeks, chin, lips, brow, nose, and ears. Lastly I bring the two together with Citadel Gryphonne Sepia wash (I have AP light, strong, and dark washes too which all give good effects but I like the Citadel the most). I may try a glaze for this step sometime. |
Ligniere  | 18 Sep 2015 9:38 a.m. PST |
This is probably very basic advise and might be aimed at others, but I think something that might go unsaid sometimes, but which I believe is really basic and important, is that the painting process should go from back to front. What I mean by that is that you shouldn't paint the belts before the coat, and you shouldn't paint the belt plate before the belt. Paint the coat first [you can paint over the belts and plates at this stage], then paint the belts [with more care, but paint over the plate area], and finally paint the plate onto the belt [with the most care]. If you accidentally paint over the coat, it's pretty easy to go back and touch up the offending portion.
Hope this is useful |
| jeffreyw3 | 18 Sep 2015 5:15 p.m. PST |
One thing I've done to help speed things up (by saving on cleaning up adjacent areas) is to base coat each area, moving from the inside out (flesh, coat, pants, greatcoat, straps). This way, I cover overpaint on the primer as I go, and if I slop a little white on my green coat, then the first green highlight is an easy cover. Took a little getting used to, as I always used to paint each area from base to final highlight, but the new method does speed things along for me. |
| Martin Rapier | 21 Sep 2015 6:54 a.m. PST |
As above, the single biggest thing which will help is moving to a production line (just painting one colour on all the figures at a time) with moderate batch sizes so you feel you are achieving something (and learning from any errors) without being overwhelmed. Deciding on an acceptable quality level helps too – 2' rule and all that. |
| uglyfatbloke | 29 Sep 2015 4:46 a.m. PST |
Two foot rule for sure, but since I hate painting (with a passion) I've found that by far the quickest way to deal with it is to buy second-hand ready-painted figures. They can often be had for mush the same price as new castings and if you re-base everything to a common formula that will -largely – diminish the differences between the painting styles (and abilities) of the previous owners. A bit of a 'wash' can help in that regard too. |
| GROSSMAN | 07 Aug 2017 7:40 a.m. PST |
Another trick I use on metals is to by silver and gold craft pens to paint details like buttons belts bayonets etc. No having to go back to dip in paint really speeds it up and makes them pop. |