| davbenbak | 07 Sep 2014 7:28 a.m. PST |
I just got a pack of shield decals from Little Big Man Studios for my Hat 1/72 Hypaspists. They come with instructions but I thought I would ask if there were any best practices that someone could share. I don't usually spend a whole lot of time on these figures since they get handled a lot but I thought this unit should stand out so I ordered the shield decals with Alexander's face. |
 ochoin ochoin  | 07 Sep 2014 12:32 p.m. PST |
Yeah, there's all sorts of decal products at the LHS & I was wondering if any of them were necessary. I'm looking to make decals & use them. |
| Cerdic | 07 Sep 2014 1:01 p.m. PST |
I found the trickiest part was cutting out the design from the sheet. The actual application was easier than I was expecting! |
| phil bagnall | 09 Sep 2014 7:17 a.m. PST |
The advice to apply it to a white background is more important than I thought it would be (learned the hard way!) as the colours of the decals work much better that way. I don't usually use gloss over the white before the LBMS decals (though always do for waterslide), but sealing after is a must if they are going to be handled quite a bit Phil |
| ochoin | 10 Sep 2014 2:40 a.m. PST |
|
| Royston Papworth | 10 Sep 2014 3:49 a.m. PST |
I used a lot on my Early Saxons, worked a charm. When I came to put some on my Late Romans (a month later) I had a run of them that failed to peel off from the plastic layer. I ended up cutting the transfers out with a tail, peeling the tail (it seemed easier to peel with a point) half way up into the transfer, then letting it flop back, trimming off the tail and then lifting the plastic off again. Seemed to work better that way… To me the real problem is getting them to fit to the outer edge of the shield and matching up the colour to the edge of a shield… |
| Pauls Bods | 10 Sep 2014 7:04 a.m. PST |
I used the same Transfers (the ones with Alexanders face) and they were hell to attach.
link
The curved surface of the shield, even with making an "overlap cut" in the Transfer, meant Little ridges in the Transfer. |
| davbenbak | 13 Sep 2014 7:35 a.m. PST |
Paul, great pics! I'm currently working on my fourth (and last ever) phalanx of Zvezda figures. I really wish I had gone with Hat. The detail is great but they are a pain to put together and some of the pikes have a connector that makes me think I should have just used brush bristles instead. Do the wires that you used make your figures top heavy? I have been thinking about using florist wire which I can get for free. |
| WillieB | 17 Sep 2014 4:46 p.m. PST |
I 've had the same problem as Bindon Blood but he just gave me a marvelous idea. Ruined a few really nice Celtic designs since I simply couldn't get the plastic peeled off.
Reordered them from LBM and will have another go with the BB method now.
It will always take a bit of touching up to get the best effects, but the decals are very much worth it.
Easiest way- for me anyhow- is to use fairly thick oilpaint to cover up the seams on the edges. Hoever since oilpaint doesn't really 'take' on varnished surfaces I'm now trying to get only the very front varnished so the edges are still 'regular' white paint. |
| Pauls Bods | 18 Sep 2014 4:21 a.m. PST |
@David. Thanks. It took Ages to get those three finished, let alone a supporting greek allies Phalanx. Two more, a macedonian and a greek allies, are still (years later) "in Progress"..but this time with home made printed shield designs.
The wire does make them top heavy but when they are based they don´t tip over. Best to get the packs of straight Florist wire. Cheap and you get about forty 20cm Long "rods" in a pack which provides loads of sarrissas. Most Hobby / Art Shops will have it. I started to make a Phalanx using zvezda figs but gave up, so well done on getting three finished already. |
| Marc the plastics fan | 18 Sep 2014 6:21 a.m. PST |
So how happy is everyone getting these to sit flat on curved shields (re comment above about overlap and ridges)? Would a decal softener be advised to help it "bend" a bit more? |
| Pauls Bods | 18 Sep 2014 11:50 a.m. PST |
Treid decal softener..didn´t help either. The homemade ones worked way better, maybe becuase they are paper which, when pushed onto the glue, molded to the shape of the shield. |
| WillieB | 18 Sep 2014 2:14 p.m. PST |
Since I usually do Late Roman/Arthurian figures most of my shields are relatively flat.
Some of the Gripping Beast figures however have domed shields and I absolutely needed to make a few cuts (6 to 8)with a REALLY sharp scalpel to make them lie flat.
Depends a bit on the design if the overlaps will show. |
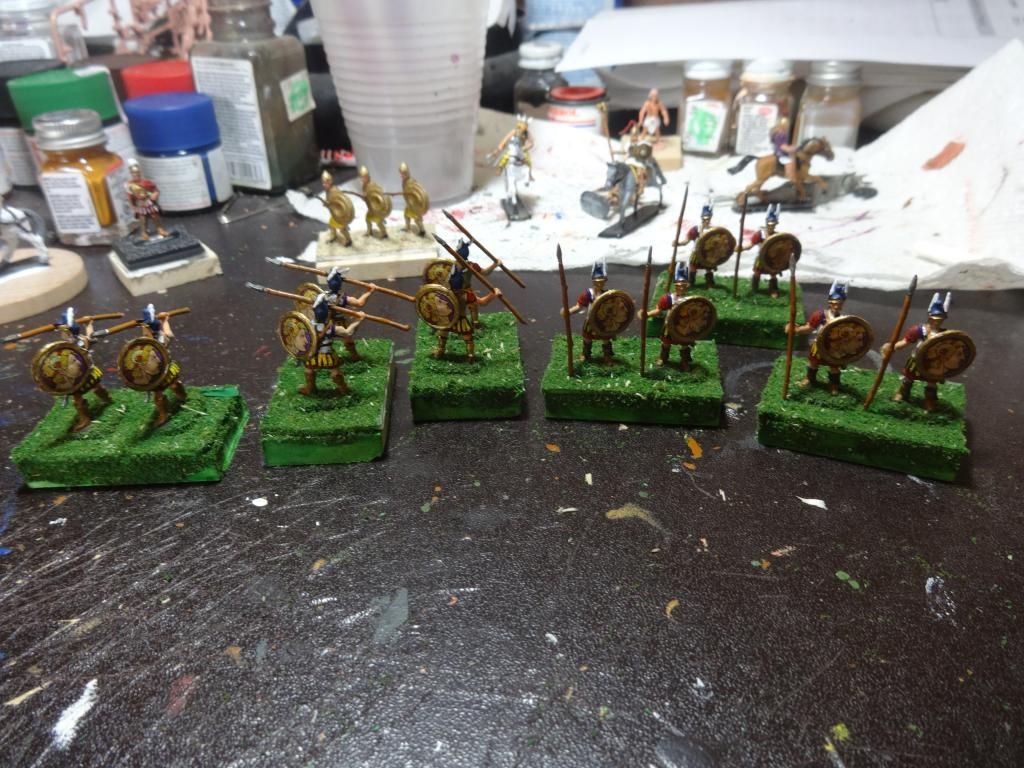
| davbenbak | 28 Sep 2014 10:53 a.m. PST |
Ok here's how they turned out. Only had to re-do two. I will definitely try them again for 100 years war and WOTR heraldry. [URL=http://s1371.photobucket.com/user/davbenbak/media/hypaspists_zpsa09185b2.jpg.html]
[/URL] |
| sgt Dutch | 28 Sep 2014 3:39 p.m. PST |
The decals are great. But you need to follow the instructions very close. I had gotten the decals to wet. This caused the adhesive to wash off. As mentioned earlier in this thread you must trim close. The Republican shield with the large boss in the middle of the shield I found it was better to apply one side at a time. Don't rush. Good luck.
|
| VVV reply | 04 May 2017 3:14 p.m. PST |
From the VVV website:
To apply transfers, separate the ones you want to use from the rest of the sheet. Soak them in a shallow dish of water for about a minute. They should then slide easily off the backing paper onto the model – you can use a finger or modelling knife to do this. Move transfer to the position required, smooth it out and soak up excess water with a tissue. Leave to dry (overnight is best) and then varnish over the top of the transfer to protect it. Don't worry if you crease or otherwise wreck the first transfers you apply; practice makes perfect. Avoid the transfers floating off in the water – they are hard to catch! If this happens reduce time in water. If you have difficulty sliding the transfers into position, wet the surface of the model a bit. Transfers are also easier to apply to figures which are already varnished. Once a transfer is dry on the model, but before the final varnish, you can paint over it to create your own designs. There is a problem called 'silvering', this when the carrier film of the transfer appears to be a silvery background. The reason for this is a layer of air being trapped between the transfer and the surface it is on. Putting the transfer onto a model which has already been varnished will reduce the chances of this happening greatly – paint is rough in microscopic terms and a varnished surface is a lot smoother. On a well applied transfer the carrier film should be almost invisible. |