| Murvihill | 28 Feb 2014 3:41 p.m. PST |
For those of us who are cost-conscious wargamers the Airfix line of tanks represents a chance to get some tanks for a good price. Although they have their issues with consistent scale and details, they represent the tanks they model well and make it easy to load a table up with armor. One of the models available is the Churchill Tank. A 1/76 scale tank, this model has one big issue: It's the second-hardest model tank to build in the scale range of 20mm/1:76/1:72/HO/OO (hardest is the Mirage T-26, but that's another story). Having built about half a company's worth of these kits, I'm here to tell you that they are a major PITA. It's not necessarily the huge number of parts in the suspension (41 each) that make this difficult, it's the fit and finish of the parts as well. So here's my advice on building the suspension for this graceless behemoth: 1. First, remember that this model hates you. Whether it is angry that you've disturbed it's peaceful slumber in a warm, dark box and started hacking on it with a knife, whether the molds spent some time in Vendredi's Antique Shop, or whether Satan himself works at Airfix as a packer, this kit wants nothing less than for you to sweep it into the trash with a shriek of frustration. Don't give it the pleasure; once you've frozen all the parts eternally with some Testor's Glue the tank will give you docile service for years to come, its anger hidden under a layer of spray paint. I can tell you from experience your die rolls will not be affected. 2. First things first, as you examine the parts you'll notice a bunch of flash. This is the model's first line of defense, designed to demoralize and frustrate you but it doesn't expect you to quit so easily. A sharp knife will work fine, so just be patient and thorough. You can try to do it with the parts still on the trees, but don't be surprised if many of them fall off; one of the nice things about this kit is that you don't need a chainsaw to cut off the parts. 3. Take the side frames (the ones with a bunch of holes in them) for the suspension and examine them closely. You'll find a bunch of round plastic studs maybe 1/8" to 3/16" in diameter sticking up 1/32". These little  s are designed to give you fits after you've committed to assembling the parts with glue by blocking all the parts they're anywhere close to. They have to come off, especially those in the wells where the springs go. There's a big one right next to one of the drive sprockets as well. s are designed to give you fits after you've committed to assembling the parts with glue by blocking all the parts they're anywhere close to. They have to come off, especially those in the wells where the springs go. There's a big one right next to one of the drive sprockets as well.
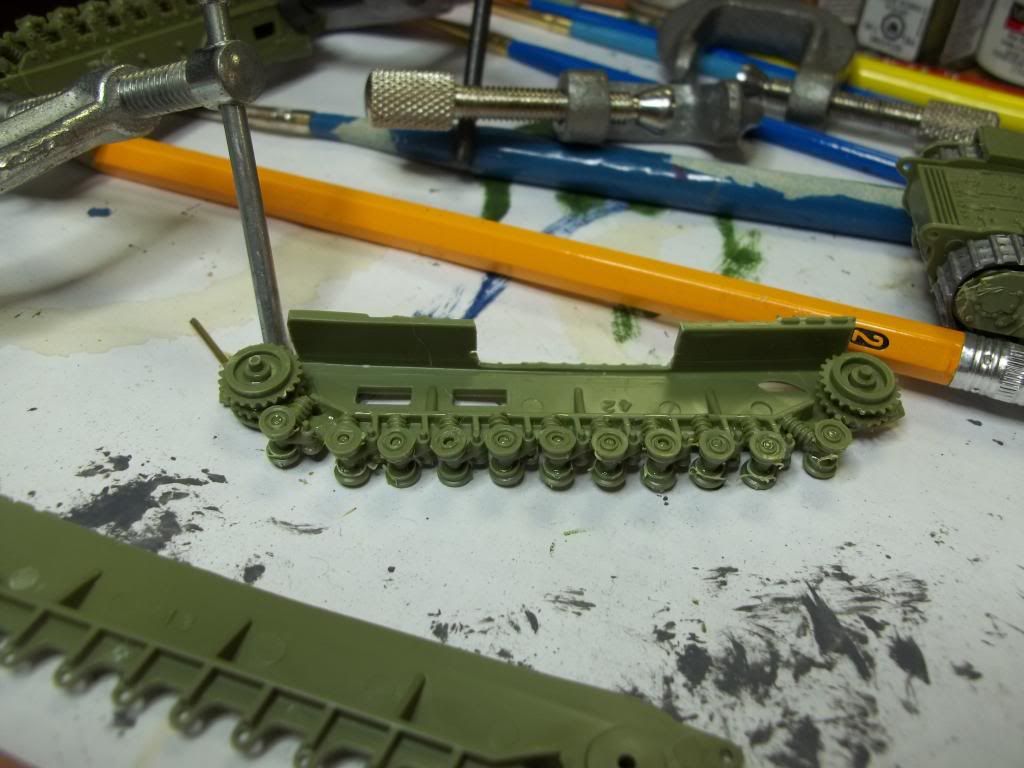
4. Examine the pins on the springs and drive sprockets. There's at least one of each that is actually a larger diameter than the hole it's supposed to fit. You should be able to figure out which one just by looking for it, otherwise you'll find it when you're test-fitting the parts. In either case, mark the parts with the oversized pins and ream out one of the holes it can go in to fit it. The one on the spring is especially important. Also, two of the drive sprocket pins are too long and need to be shortened or the sides won't fit together. 5. Assemble the drive sprockets. Once each piece has been glued, check to make sure the teeth are aligned, either by eyeballing it or by (gently) putting a knife in the grooves across the sprocket and rotating it until it's parallel to the axle. 6. After the drive sprockets' glue has set, test fit the sprockets to the two side frames. One of the major failings of this tank is that there is no alignment between the two sides of the suspensions, the drive sprockets and springs are what hold the pieces together and they do a very poor job of aligning them. I hold the sides upside down and twist the pieces until the spring pin holes and wells line up right. If you can't do it while dry fitting, try a different sprocket on one side or another. Then glue the sprockets to the outside frame and hold the pieces aligned properly a few minutes while the glue sets. 7. Now for the hardest part. If you want to test-fit the pins on the springs to individual holes (other than the one oversized pin I don't try as the springs won't stay in on their own). Then glom some glue in the pin holes and in the wells where the springs go on the outside frame and place the springs in their holes and wells, they should have glue in two places. Next, without gluing line the inside frame on one drive sprocket pin or the other. Working your way down the line of spring pins, line each one up on its hole and push it in just enough to hold. You'll find that in some cases the pin missed the frame entirely and you'll have to spread the frame to align it, then back up a pin or two before continuing. Just be patient and work from one end to the other. Once all the spring pins are in on both sides line up the other drive sprocket and pinch the two frames together. The inside frames have holes that go all the way through on the drive sprockets that make them a little easier to align. Then take a pair of pliers or tweezers and pinch the frames together over each of the spring pins, making sure that the springs are completely seated at the same time. Last, make sure the two frame pieces are properly aligned. Tape, clamp or rubberband the two frames together and set them aside for a few hours or overnight to dry. 8. Take the two frame pieces apart. If they don't want to come apart, gently push a knife in between the frame and drive sprocket to encourage them. All the drive sprockets and springs should be glued solid to the outside frame. Then glue all the road wheels to the springs.
[URL=http://s275.photobucket.com/user/murvihill/media/003_zps75408a0e.jpg.html]
[/URL] 9. How to best assemble treads is a subject of much discussion. The way recommended in the instructions (with a hot knife blade) has to have ruined more treads than it assembled, probably because the same guy packing the boxes wrote it… Anyway, I've had success with string or staples and I prefer staples the most, either using a stapler or just taking a staple and pushing it through the holes then bending it over with a knife. Because the Churchill has skirts it's no problem hiding the staples and they have the additional advantage of allowing you to adjust the length of the tread, needed with the Churchills because they're probably going to be too short and are too inflexible to stretch to fit (a mixed curse, the old rubber treads would stick to stuff and break). Anyway, test fit a tread with the gap on the bottom then take it off, strap it together however you prefer then slip it over the wheels with the staple under the skirts. Don't be surprised if you need to "encourage" it to go over the drive sprockets, there isn't much clearance in there. 10. Slather a bunch of glue on the drive sprockets, spring wells and spring pins and refit the inside frame to the outside frame like last time. It should go more smoothly this time but be patient. Hold it together with clamps or whatever and when the glue dries you're done! If you can get the suspension together the rest of the tank is relatively easy. |
| Khusrau | 28 Feb 2014 4:27 p.m. PST |
Or you could just get the PSC box… Actually I recently built the ESCI Churchill, and I approached it with some trepidation, thanks to my experience years ago with the Airfix one. It went together beautifully, and is a very handsome beast…
Assembly here: link |
| goragrad | 28 Feb 2014 4:52 p.m. PST |
Interesting. Must say it has been 40 years ago that I last dealt with this. My brothers and I put together a squadron back in the early 70s. Don't remember it as being quite so nasty, but time does blur details, although that oversized pin rings a bell.
Nice write up.
|
 Mserafin Mserafin  | 28 Feb 2014 5:17 p.m. PST |
Must say it has been 40 years ago that I last dealt with this. My brothers and I put together a squadron back in the early 70s.
I also did some about that time. Murvihill's description is giving me horrible flashbacks.
|
| panzerCDR | 28 Feb 2014 5:42 p.m. PST |
OMG! The horror of that model! I recall from ~40 years ago that it really did hate me. I NEVER built another Airfix one, though I have several 15mm ones. All with solid metal treads. I won't risk that one again. Thanks for the memories! |
| D A THB | 28 Feb 2014 5:46 p.m. PST |
I feel your pain,
I have been putting together a few of the old halftracks and jeeps which I have had in a box for nearly ten years. I find that due to the amount of clean up required it takes an afternoon to assemble, as opposed to the 1 hour a modern kit takes.
I have a few more to make before I start on buying more. |
| Sparker | 28 Feb 2014 6:24 p.m. PST |
Yes I still remember the horrors of the Airfix kit bogies – shudder! Very amusing post but one suspects you're a masochist at heart anyway to pass over the lovely (and 1/72nd) PSC one…. |
| Murvihill | 28 Feb 2014 6:59 p.m. PST |
There are many options for Churchill nowadays that don't involve the Airfix suspension, but when I started buying WW2 there were far fewer, and without the internet you couldn't find half of them. Now I've got a bunch of Churchill kits (bought in bulk when the price was cheap) so the choice is already made. I've converted 3 to mk III, 3 to IVNA and one to a 95mm support tank, the rest will work for now. "But why would you not assemble road wheels onto the springs, first?" It's easier to both see and reach the pins on the springs if the wheels aren't in the way. "It just seems a bit different to get the spring pins all lined up and then have to take them apart again?" Trying to work with the treads in place is just about impossible. The current batch of treads are vinyl instead of rubber and they don't stretch or flex, so trying to get the pins lined up at the same time your're fighting the tread tension almost guarantees failure. |
| taskforce58 | 28 Feb 2014 8:03 p.m. PST |
I once built the Heller one, which is a reboxed version of the Airfix kit. I put up a good fight, but the tank won. |
 Silurian Silurian | 28 Feb 2014 8:08 p.m. PST |
Ha! Funny. Just finished making one of these with my nine year old. It nearly put him off the idea of making model kits for life. I had to keep telling him "this is one of the hardest you'll ever come across", "if you can do this you can do anything", etc.
We got it finished, although the carpet monster ate one of wheels. We also had to cut the tracks and feed them into the skirts.
Something PSC or Armorfast for him next I think! |
| Gaz0045 | 01 Mar 2014 5:07 a.m. PST |
I picked up some ready built ones for the rest of my unit……couldn't face another one like that! |
| Cerdic | 01 Mar 2014 8:45 a.m. PST |
Hahahahahaha…I've just read the title of this post……hahahahaha……sob….. |
| Skeptic | 01 Mar 2014 3:29 p.m. PST |
Just cut the treads and hide the seam under the upper cover. |
| goragrad | 02 Mar 2014 12:56 a.m. PST |
Thinking about due to this post, I believe I still have a few that haven't been assembled. Something to look forward to… |
| shaun from s and s models | 02 Mar 2014 3:41 a.m. PST |
well if anyone has any unmade or part made airfix churchills i will take them off your hands, i do not mind siting gluing the wheels and suspension all day!
thanks
shaun |
| Gaz0045 | 02 Mar 2014 7:25 a.m. PST |
Less said about your bogie addiction the better………! |
| Ivan DBA | 02 Mar 2014 2:02 p.m. PST |
What is your time worth? Sell or give these away, and buy some better kits. |
| CCollins | 02 Mar 2014 11:36 p.m. PST |
I had success drilling out the locating holes with a pin vice first (doesn't hurt to make them bigger than originally intended), these are often malformed and flash ridden, I also use plumber PVC primer applied with a paintbrush and as long as you let them set (should only be a few minutes with MEK)and they're all alighned properly it should all fit together pretty nicely. the tracks are often too short but they're hidden by the covers any way so just staple them together with a bit of a gap to give enough slack. With a little effort they make pretty reasonable Mk7 churchills. Now a kit that did give me nightmares was the Esci Matilda (argh!) |
| mysteron | 05 Mar 2014 4:50 a.m. PST |
Well I am the proud owner of 6 Airfix Crocodiles. 3 Churchill Bridgelayers , 3 Mk7s and a MK8 . No trouble in building them at all. In fact they were a breeze………………………………………………………………………………….. Just passed them onto my gaming buddy to build them for me :) |
| 4th Cuirassier | 09 Sep 2015 10:29 a.m. PST |
I know this is a bit of a zombie thread but I came across it while searching for stuff about the Airfix Churchill. A fact little known about this tank is that you can assemble the wheels to the bogies without removing any of these parts from the sprue. With every wheel and every bogie still attached to their sprue, you just offer the wheels up to the bogies and they align perfectly. You therefore glue them all together in one pass with the glue, and then cut each completed assembly off the sprue when dry. HTH… |
| old tommie | 09 Sep 2015 2:12 p.m. PST |
Thanks for the heads up on that I haven't built one of these kits for over 30 years and like buses I've now got three to do😀. |
| Jefthing | 12 Sep 2015 2:23 p.m. PST |
Lightweight. I made two when I was twelve and had no problems. Mind you, the mould was only only about fifteen years old, which may have helped. Would I do one today? Only if paid! |
| Murvihill | 15 Sep 2015 2:10 p.m. PST |
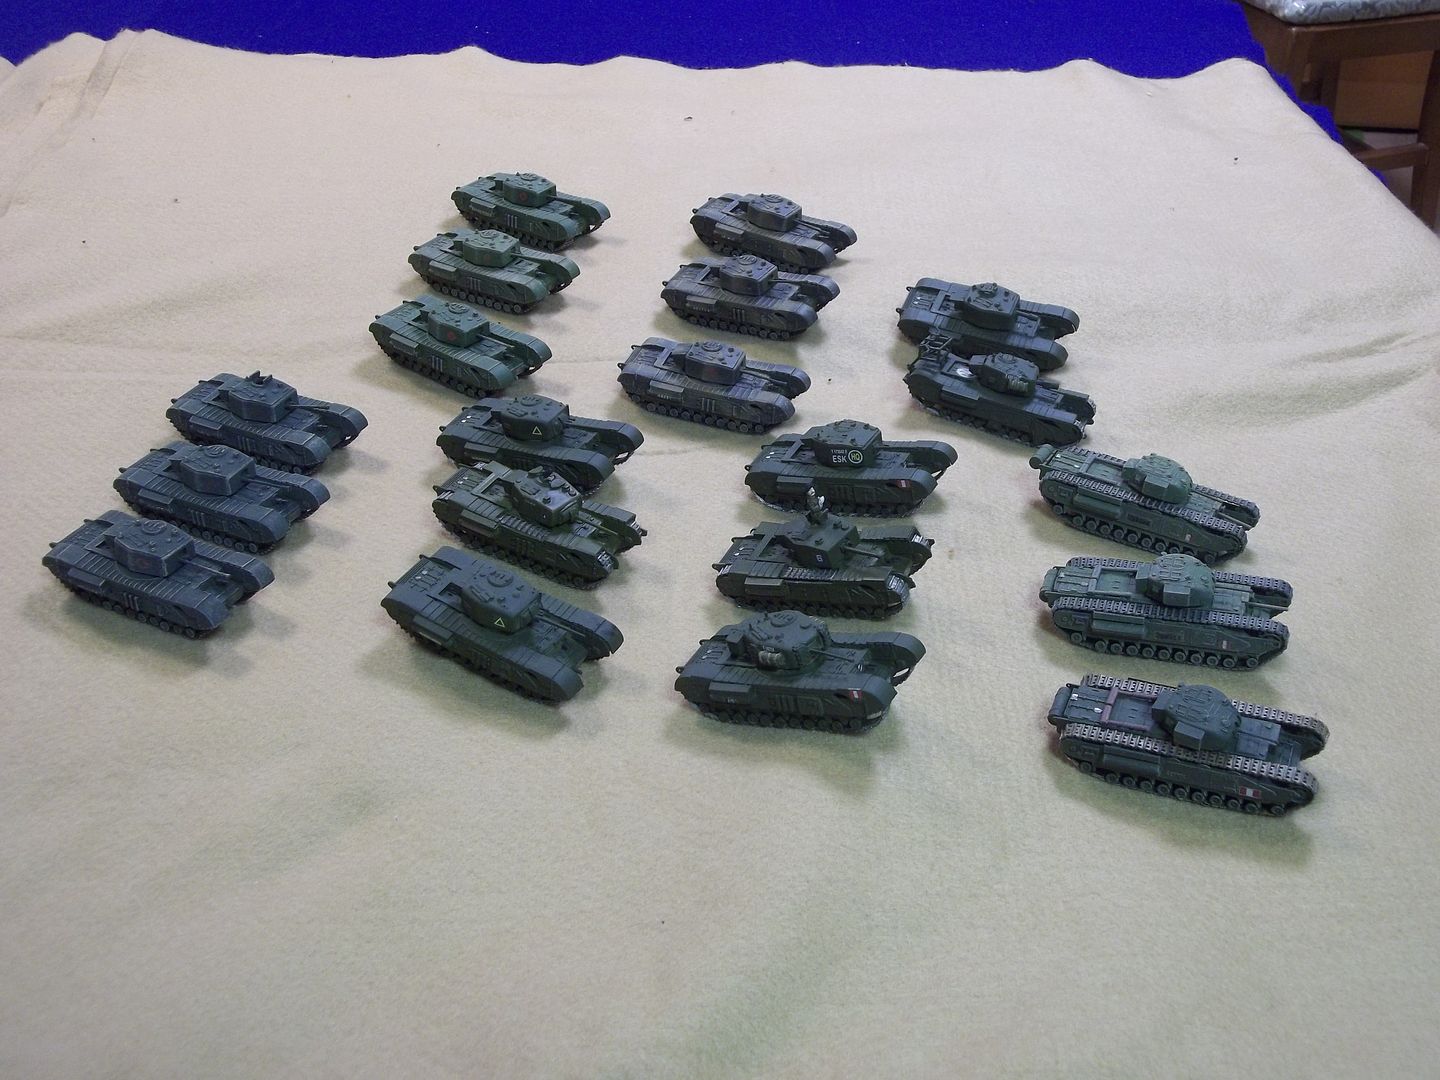
Wow, I'm surprised this came up again. Good news is I finished my company and don't have to build one ever again (I think). Here's the troops:
[URL=http://s275.photobucket.com/user/murvihill/media/100_1319_zps3bhl9sqh.jpg.html]
[/URL] Right to left in front are Mk 1/2(Hasegawa) Mk 3, Mk IV NA, Mk 7. The two on the right in the back are a 95mm and an AVRE (Matchbox), the rest Mk 7. I need to dust a bunch but otherwise I'm happy with them. I built all but 6. |
| Jefthing | 25 Sep 2015 2:27 p.m. PST |
A fine sight – it was worth the pain! |