| creativeguy | 30 Oct 2013 12:15 p.m. PST |
I have been trying to pull some information together about what some scenarios might look like for 3rd Shock Army vs. BAORsomewhere around the 1984-85 timeframe. I am working on using the board game Dawn's Early Light and using them for my 3mm miniatures. The basic element in DEL is the battalion. So potential battles could be fairly broad. I know some of you were there and staring down the barrel and others probably have a lot more knowledge on the subject than I. What would the conflict look like as far as forces involved? Would BAOR have the support of West German forces? I seem to recall that there were Belgian forces and Netherland forces flanking them (if I have that right). And would the Soviets have support from East German divisions (or anyone else for that matter)? Any help would be appreciated. If you can point me to a good map that would be great too! |
| nickinsomerset | 30 Oct 2013 12:30 p.m. PST |
Ton of stuff here, Andy was a Plt Commander with 1 QLR and I was the G2 JNCO with HQ 33 (UK) Armd Bde both in Allanbrook Barracks in 86, but we did not know until we met at a meeting in Larkhill about 22 years later. coldwargamer.blogspot.co.uk 33 (UK) Armd Bde was a fairly new Bde and one possible role would be to support the Belgians to our South. As far as I remember the Germans would be heading to Moscow, but we did have an M-48 equipped reservist unit support on one exercise. The theory was that the NVA would support 3SA but another interesting thread from a couple of days ago is worth reading (The authors father commanded an NVA Division!) It is a busy and interesting period worth looking at previous threads here and: link Tally Ho! |
| BattlerBritain | 30 Oct 2013 1:28 p.m. PST |
I put up a Campaign for the Hannover area in 1985 up at Comsimworld for use with the boardgame 'Air+Armor' (link here link ). I put a version of this up at the FFOT3 Yahoo Group for use in creating and linking some battles with miniatures. Some people have been playing it and it seems to be fairly OK. Both give lists of which units were where and a listing for likely WP units. Hope this helps, B |
| creativeguy | 30 Oct 2013 1:57 p.m. PST |
BattlerBritain, What is it listed under in Comsimworld? It takes me to the main link and I tried a basic search but couldn't find it on a cursory search. |
| BattlerBritain | 30 Oct 2013 2:05 p.m. PST |
Sorry link got messed up copying: Try this one: link
Direct link to the pdf is: link
|
| creativeguy | 30 Oct 2013 2:30 p.m. PST |
|
| Geoffrey Sponge | 30 Oct 2013 3:39 p.m. PST |
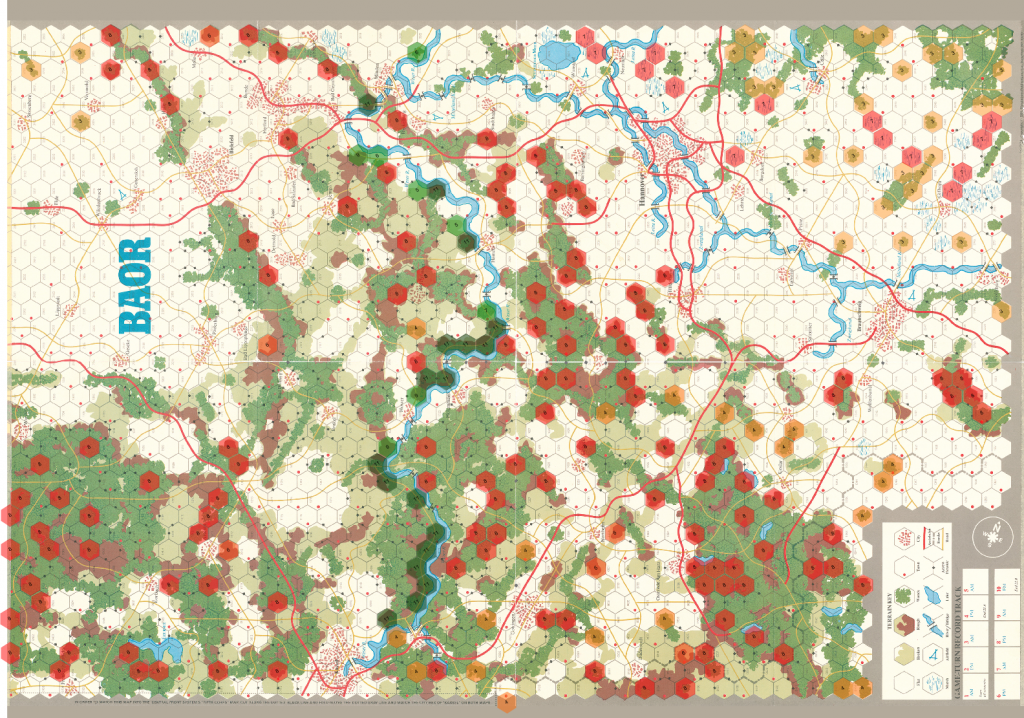
Nick will probably know more about this than me, having been there, but this is what I've gleaned over the years. I(BR)Corps had two armoured divisions forward with one in reserve and an infantry division (2nd Div) providing security in the rear area. 1st Armoured Div was to the North, 4th Armoured Div to the South and 3rd Armoured Div as the Corps reserve. The plan was to initially fight a Covering Force battle then the Main Defensive battle. Isby's Armies of NATO's Central Front shows NORTHAG's various areas but it's a bit vague. The Covering Force area seems to be between the IGB and the River Leine and the Main Defensive Battle area between the Leine & the River Weser. The Covering Force consisted of a Screen (the two Corps reconnaissance Regts) and a Delay Force & Reserve (a brigade from each of the two forward Divs – once the Covering Force had withdrawn they, or what was left, would form the Div reserve). The Covering Force was supposed to disrupt & delay 3rd Shock Army's advance & identify the main thrust(s). The Main Defensive Battle was designed to destroy the 1st Echelon army (3rd Shock)and any breakthroughs would be blocked by the Corps' reserve (3rd Armoured Div). The next move (assuming no buckets of sunshine and the remnants glowing in the dark) was a NORTHAG counter offensive by 7th Panzer Div & 3rd Armoured Div (if able) to regain the lost territory & then hopefully hold off the 2nd Echelon (20th Guards Tank Army)which should have been weakened by air attacks as it moved forward. Faringdon in "Confrontation – the strategic geography of NATO and the Warsaw Pact", provides an idea of where defensive positions might have been. Forward positions might have been the Elm, the built up area between Braunschweig & Wolfenbuttel, the Salzgitter branch canal &, to the south, the northern parts of the Harz Mountains. The main defensive positions could have been along the Hildesheim branch canal & the River Leine then the ridges & valleys east of Hameln & the Weser (which channeled any thrusts towards the Weser) and the Weser River itself. After that (and if they got that far we were in deep trouble) the Teutoburger Wald, Lippischer Wald & the Egge would be the last barrier before the Ruhr. The best map, if you can find it, is the one in Faringdon's book as it covers from the IGB to Bielfeld & Hannover south to Gottingen & shows the main terrain features. It may be somewhere on the internet but I was unable to find it again. Hope this helps & if anyone knows more I'd be interested to find out. John. |
| Andy Rix | 30 Oct 2013 3:51 p.m. PST |
I am working on some Brit scenarios now based on 1 Ge Front comprising 5 NVA CAA Army North, 20 Gds TA ( as a CAA) south and 3 Shock Army echeloned. North of them goes 1 polish Front (Northern Group of Forces) hitting 1NL Corps and Land Jut and South go 2 GE Front and 1 Cz Front with 2 Fronts from western Soviet Union in the second echelon. North of 1 Br Corps is 1 GE Corps, South is 1 Be Corps 1 Br Corps lay down is I believe 1 Div North 4 Div South 3 Div reserve There are some good maps here link My Soviet Front organisation is based on a bunch of assumptions laid out by Victor Suverov in inside the Soviet Army with some twists of my own Some of it laid out here link And some I am still writing Geoffrey's outline above looks good although I am not convinced the Soviets would lead with a tank army, more likly a range of forward detachments and air assault units for each front followed by the CAAs with the Tank army echeloned, personal opinion rather than any facts based on the Soviet plan. If they managed to achieve strategic surprise and unhinge the MDP without it forming they may have lead with the Tank Army. |
| CAG 19 | 30 Oct 2013 4:18 p.m. PST |
Andy has posted at the same time so didn't see his comments, but I think my comments are still valid…… A lot of misconception still exists about GSFG intentions. Suvurov's books and some othe discussions around indicate that GSFG would possibly have broken into two frontal structures. One against NORTHAG, the other further down south against CENTAG with supporting air armies restructured accordingly. 3 Shock Army was an incorrect designation, the correct one apparently missed by NATO for a long time. If you assume some of the military writings at the time the role of 3SA was probably that of the OMG for the Northern Front once the breach in NATO lines had been made. The recent posts regarding NVA seem to back up previous statements, and other discussions about integration from a peacetime administrative structure to the operational grouping needed for ops. So it would be more likely to face a combined arms army early in the conflict. However, I do remember at least one exercise when the whole of 4 Armd Div was used as a CPEN force against the flank of an OMG which hd penetrated the MLR but can't remember if that was a div sized formation we were attacking or an army level piece. link May be of use/interest, it was very much work in progress IIRC the MLR was expected along the lines of Springe, Einbeck and Bockenem at least in the 1Br Corps area. With the Germans commited to forward defence it would have left a large exposed flanks if we had sat back on the Weser then again also remembering spending a lot of time around Blomberg and Hameln but can't remember why So many memories, need to dig out the photos and get them digitized |
| Sparker | 30 Oct 2013 6:28 p.m. PST |
Fantastic info, thanks guys, keep it coming! |
| pigbear | 30 Oct 2013 6:33 p.m. PST |
I wonder if the old SPI game BAOR might be a useful reference. It was part of the Central Front series in S&T. |
| creativeguy | 30 Oct 2013 7:11 p.m. PST |
Thanks for the gold mine of information guys! Fantastic. As I look at some of the maps that you post it leads me to a question on frontage. As I am looking at my basic unit being a battalion, approximately how much real estate does an individual battalion take up (in the mid 80s)? Or brigade? I would like to try to take some of these resources and try scaling them out. I am trying to remember some of the board games I had on the subject and how they scaled out. I seem to recall in the SPI The Next War the hexes were 14km and you could have something in the order of a division in that spacebut can't recall that for sure. |
| creativeguy | 30 Oct 2013 7:17 p.m. PST |
Ah, I may have answered my own question. At first I didn't think the Dawn's Early Light would have a scale because it was a fictional map (why, I don't know) but I see where each hex is three milesand you can stack two units. |
| Fonthill Hoser | 30 Oct 2013 7:50 p.m. PST |
What Pigbear said. The BAOR game by SPI is just what you're looking for. It comes up on eBay fairly regularly. |
| CAG 19 | 31 Oct 2013 2:31 a.m. PST |
The BAOR game is good for mapping idea and uses the IDAHEX idea quite well. My link above uses the BAOR as a base. It is quite good for bundeswehr PTL but assumes a no notice attack by the Soviets. It also allows brigades and corps to be freely intermixed. The 1 Br corps orbat and structures is from 1978 which is why it shows 4 Armoured divisions. The 1978 formations only had 5 armoured/mech in units in each so were quite weak. When we went back to brigade structures that saw the change I role for both 2 div which returned to the UK and also the role of 3 Armd Div. Essentially 2 combat capable divisions (1 and 4) with 3 div covering the corps rear area by 1986 |
| pigbear | 31 Oct 2013 3:11 a.m. PST |
For frontages check out field manuals in the FM series such as FM100-2-1, The Soviet Army PDF link. For example, an MRR will have an attack frontage of 3-8 km depending on mission (most typically 4-5 km) and 10-15 km on defense. For battalions cut the numbers in half. You'll find info depth too (distance between echelons) which is important too in terms of scenario design. |
| CAG 19 | 31 Oct 2013 6:11 a.m. PST |
40km for a "typical" divisional frontage. In this period we were concerned about nuclear effects taking out multiple formations so we had to take into account the dispersal plan which saw battalions not being closer than 3-4km. Someone kindly provide the link in this post to some info on west Germans for the same period. TMP link Oops appears that the preview is no longer available. Will have to see if I can find something else |
| creativeguy | 31 Oct 2013 6:32 a.m. PST |
This is really all great stuff. I definitely need to get painting like a madman. But this gives me a good start on where I need to go. |
| nickinsomerset | 31 Oct 2013 7:49 a.m. PST |
"Essentially 2 combat capable divisions (1 and 4) with 3 div covering the corps rear area by 1986" Within 3 (UK) Armd Div, 6 Bde was an airmobile brigade and in 33 (UK) Armd Bde we were prepared to reinforce either 1 and 4 or more than likely to the South with the Belgians. Small scenarios could be forcing bridgeheads or attacking KPs (More of an Airborne task) Most defence was based on funneling the Sovs into killing grounds based on their tactic of finding an easy route to by pass well defended areas. Gladly it never happened and we spent lots of time on exercise and drinking Herfy!! Tally Ho! |
| BattlerBritain | 31 Oct 2013 2:34 p.m. PST |
I see some people mentioned SPI's BAOR for the Central Front Series. I did the Vassal Module for all 5 games that made up the Central Front Series and you can find it on the Vassal downloads section. It comprises Fifth Corps, Hof Gap, BAOR, North German Plain and Donau Front. The last 2 had rules that changed from the first 3 games, but the scale was the same (all 5 maps fitted together). I put all 5 maps together for the Vassal module. From all the SPI games and 'Armies of NATO's Central Front' by Kamps and Isby they had Brit 1st and 3rd Armd Divs up front with 4th Armd in reserve. As most Brit units worked in Brigades not sure if it really mattered? |
| CAG 19 | 01 Nov 2013 5:35 a.m. PST |
I have been doing a spot of housekeeping and have moved all the 1985 info I had been developing to my blog rather than have it scattered over a couple of places. link |
| (Jake Collins of NZ 2) | 01 Nov 2013 2:24 p.m. PST |
If you're interested in what the WarPac themselves planned and prepared through exercises and staff drills (and you've got time on your hands) then the CIA FOIA archive "CIA analysis of the Warsaw Pact forces" is a goldmine. For example, if you wanted to know about Warpac plans for Denmark and the operations of the Coastal Front through North Germany you'd start with
PDF link And maybe follow-up with
PDF link Sadly for all those who want the standup fight between BAOR and the best of the Soviets it doesn't seem the plan was to take BAOR head-on. Rather, the Soviets looked to flank it and encircle. This approach, of striking through the weaker NATO forces and wrapping up the tougher nuts was famously used by Afghan defector Col. Wardak to great effect in the UK during staff exercises. Wardak had trained at the Soviet academies, and used his training to execute the type of operation against AFCENT the Soviets envisaged. Regarding the reliability of NSWP forces, gamers might find
PDF link
and
PDF link
to be of interest. If you're interested in Soviet OMGs then you'll find
PDF link
of interest. |
| nickinsomerset | 02 Nov 2013 1:52 a.m. PST |
One of the reasons 33 (UK) Armd Bde looked at a possible move to reinforce North or South of BAOR or reinforce 1 BE Corps to the South or fil the void left by 1 GE Corps to the North as they headed to Moscow!! Tally Ho! |
| CAG 19 | 02 Nov 2013 2:54 p.m. PST |
33 (UK) Armd Bde was a fairly new Bde Nah…..they had been part of 4 Armd Div for ages before swapping to 3 Div in April 1986. New to 3 div and their role perhaps. The idea that both 1 Br Corps and I Ge Corps would have been left to their own devices while the NL and BE formations were hammered needs a bit of thought. This would have still tied down one of the armies in quasi holding actions. Enough combat power to keep the NATO Fmns in place but not too much spread thinly which would have made the army non effective. While digging through I also found some of the 6mm terrain photos I thought I had lost link |
| nickinsomerset | 02 Nov 2013 4:45 p.m. PST |
Indeed my fumble, new to 3 Div as I moved from Soest to Paderborn with the change! Nice 6mm terrain, one thing to remember no hedges, the fields tend to be open, usually with a ditch to bog the panzers in!
[/URL] Tally Ho! |
| 11th ACR | 02 Nov 2013 10:33 p.m. PST |
And Piss-off the Rad's!!! |
| CAG 19 | 03 Nov 2013 2:12 a.m. PST |
Too much time in Paderborn…….up around celle and Wesendorf and even out around the Elm lots of hedge lines. Open farm land around hildesheim though. The West German study of firing positions in the IGB region report the majority of ranges under 500m, so my terrain is a lot more dense. My terrain has the fields etc in 300m scale increments (for MSH). Most have at least one side open giving somewhere between 600 – 900 visibility when placed adjacent. So enjoyed this rekindling of interest. My 1 Br Corps units were based for 1st Armd Div/22nd Armd Bde but I have enough spares for a 4th Armd Div Bde. Probably 20th Armd as that was my Bde in 1996 in Barker Bks |
| Flecktarn | 03 Nov 2013 2:24 a.m. PST |
CAG 19, Can you give me some more details about the railway track planning items mentioned in the commentary on your photographs? Jurgen |
| nickinsomerset | 03 Nov 2013 2:44 a.m. PST |
mmm, I only know one "Si" but spelt Taylor! 1:300 is my next scale for the period, I have the Sovs from a little "instructing" project. Now H & R have moved just up the road must pop in and get my 33 (UK) Armd Bde stuff done, Tally Ho! |
| CAG 19 | 03 Nov 2013 5:47 a.m. PST |
@Flecktarn Hornby produce something called the "quarter scale set track templates" the product code is R619. This is a set of red and black soft plastic templates of the hornby railway to allow you to work out what components you need before buying full size components. Comes in at about £13.00 GBP or probably around 20 Euro. I reckoned that quarter scale would be (halving down) 1/72 – 1/144 – 1/288. Or close enough for 6mm In stock here (never bought mine from here so no idea about servicevetc)
link
Regards |
| BattlerBritain | 03 Nov 2013 8:45 a.m. PST |
I've got the 'quarter-scale track planner' and it's perfect. |
| Flecktarn | 03 Nov 2013 8:52 a.m. PST |
Many thanks CAG 19 and BattlerBritain, I have now ordered some from that site. Jurgen |
| CAG 19 | 03 Nov 2013 11:23 a.m. PST |
I have a few bits left over as I couldn't cut a base with the right radii for the smaller curves. MDF custom services didnt exist as such so tried to do it by hand. Wouldn't mind adding a bit more. You need to wash it well and prime it properly as it has all the adherent qualities of an airfix figure |
| (Jake Collins of NZ 2) | 03 Nov 2013 12:01 p.m. PST |
Another +1 for the Hornby track planner. God's gift to 6mm wargamers. |
| CAG 19 | 03 Nov 2013 12:17 p.m. PST |
Part of the campaign idea that I was toying with was also the relocation of the WG units which were based in the 1 Br Corps operational area that would have to compete for road space as they moved North to the I Ge Corps area at the same time that 1st Armd Div would have been moving down southwards. West German forces piccies from a long time ago that were used, but as the OP was looking at scenarios you have the option of the WP offensive attacking between the seam of the Brit and WG Corps so possible that both nationalities would be on the table. link |
| Formerly 298TYR | 04 Nov 2013 12:47 p.m. PST |
Interesting to see 33 Armd Bde mentioned – I was in 202 Sig Sqn (33 Armd Bde) myself from 1979-1982 – we were originally part of 3 Div (as the old Task Force Echo Sig Troop) then later moved to 4 Div. Later still the Brigade moved back to 3 Div. |
| nickinsomerset | 05 Nov 2013 1:01 a.m. PST |
Yes the track planner is superb, originally for my 6mm FPW but now I have moved to WWII and Cold War. A good bar the 202 Sqn Bar, I always use 33 Armd Bde as that was where the best part of my BAOR time was spent 86-88, prior to heading to Hong Kong! Tally Ho! |
| Ben Waterhouse | 05 Nov 2013 9:29 a.m. PST |
and you would have 2 Div stuck on the Channel ferries…. I did a bit of Stay Behind OP bits and pieces back then. Happy days. |
| creativeguy | 05 Nov 2013 12:54 p.m. PST |
Speaking of 2 Div, when were they expected to arrive on the battlefield? |
| daddyslittlemen | 05 Nov 2013 7:44 p.m. PST |
Based on the SPI Boardgame and some guessing some friends and I assumed that the Soviets would want to seize the Minden airfield to land additional troops there. We played it in 6mm on three boards. The first board was representational of the front line which is a good distance from Minden. Those Soviet forces that made it through here served as later reinforcements to the Soviet Paratroops at Minden. Board two was the airfield, Board three the River Wesser and a good bit of the town. I'll post pictures later. Incidentally, this book was a big help. link |
| tuscaloosa | 05 Nov 2013 7:57 p.m. PST |
collins355, those documents are indeed a goldmine, thanks. |
| CAG 19 | 06 Nov 2013 3:33 a.m. PST |
Speaking of 2 Div, when were they expected to arrive on the battlefield?
Corps Rear area tasking plus some Counter Penetration responsibility. While the troops could have been flown forward their vehicles had to come via sea and then drive across Holland to reach the commital area. 5 – 7 Days from warning to actually being on the ground in place. |
| Ben Waterhouse | 06 Nov 2013 3:57 a.m. PST |
Did they not move to more prepositioned kit for UK based BAOR troops after Crusader 80 showed some link up problems? I remember being able to take my personal weapon with me through RAF Lyneham for Lionheart 84 and not for Crusader 80 – they worked out it was not a good idea to have troops arriving without their personal weapon on hand in WW3… Here's an interesting linko link |
| Ben Waterhouse | 06 Nov 2013 5:14 a.m. PST |
And some more flavour link |
| Martin Rapier | 06 Nov 2013 5:19 a.m. PST |
My WW3 (1981 as I'm interested in a Task Forced organised BAOR) is also based on SPIs BAOR. As mentioned above, the Race the Weser & Thin Red Line scenarios are both postulated on a standing start Sov offensive. I allowed a longer period of tension to allow NATO to be get their immediate reinforcements into place and a slightly more forward defence, so the morning of the attack had 4th AD doing its 'aggressive delay' thing. I'm following the BAOR scheme of operations outlined by David Isby for the four div TF organised 1st Corps, so 4th AD out front, the other three in line with a 15-25km frontage each and 5th FF providing rear security. All reinforced with varying numbers of TA Bns, esp 5th FF. Many thanks to contributions from ARRSE for various peoples half remembered recollections of the makup of the various 1st Corps Task Forces. For campaign purposes it seemed easiest to have 3rd Shock Army just pile down the Autobahn from Magdeburg given the starting position. Some other WW3 scenarios which start with NATO neatly echeloned back from the border might require a more deliberate approach. |
| CAG 19 | 06 Nov 2013 6:21 a.m. PST |
I only joined in 1981 so remember seeing the change over from TF to Bdes. The make up of the TF were simplistic as you only had effective 5 manouver units split between the two TF in each Div. The BAOR ORBAT is quite good for unit dates in the TFs I think I have the PDF version of it before it became a book so will have a check this week when I get back to see if there is anything of use for you. TF A & B were 1st Armd Div
TF C & D were 2nd Armd Div
TF E & F were 3rd Armd Div
TF G & H were 4th Armd Div 1981 with Type 78 Chieftan Regiments. Plus LRATGW in the hands of the RA what isn't there to like :) |
| CAG 19 | 06 Nov 2013 11:47 a.m. PST |
My BAOR Orbat starts in 1983 so no help on 1981
I did some terrain analysis for the BAOR game itself a long time ago which might be of some interest.
[BAOR IPB]
[/URL] Or try the Blog for a better picture link |
| CAG 19 | 06 Nov 2013 12:30 p.m. PST |
Based on the SPI Boardgame and some guessing some friends and I assumed that the Soviets would want to seize the Minden airfield to land additional troops there.
That is actually buckeburg AB in our game we threw an air assault brigade onto it with the job of then interdicting the autobahn preventing NATO reinforcements moving up. I have the scenario somewhere. WG vs WP rather than 1Br Corps Cannot find the AB assault scenario so will have to keep digging in the backups. Did find this one which wouldn't take too much to change to a Br vs WP rather than WG vs WP link |
| Formerly 298TYR | 06 Nov 2013 3:12 p.m. PST |
In some respects I think the Task Force concept mirrored the American Pentomic Division in that 2 Task Force HQ's were formed by each Div without any formal or fixed allocation of units. Later I think it was realised that in practice that was pretty much what happened anyway, and with another round of Defence Cuts (disguised as a Defence Review)the larger armoured Regiments (78 tanks) were unsustainale and the British Army reverted to the Brigade organisation. That's how I've understood it anyway. Signal Troop I was a part of (Task Force Echo) became a Squadron and then 202 (33 Armoured Bde) Signal Squadron without much change in equipment or manpower IIRC. |