


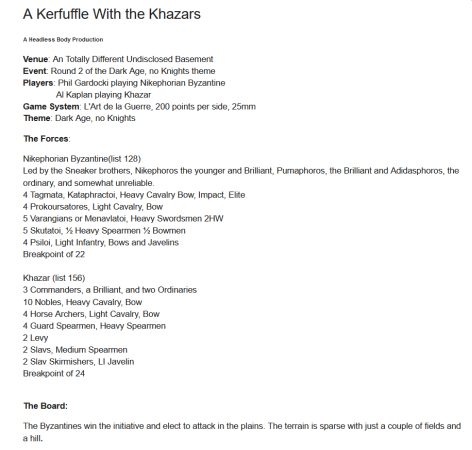


Many moons ago, ![]() Editor in Chief Bill
Editor in Chief Bill ![]()
![]() sent me some cheetah figures made by Black Orc Games for their 100 Kingdoms game. There were eight figures in the package, which represent four packages' worth of animals. Sculpted by the legendary (and prolific) Sandra Garrity, there is only a single pose. I suppose that this works given that, in the game, they are largely "grunt-level" troops, but other manufacturers such as Mega Miniatures, Reaper and Crocodile Games (to name a few) have at least two different poses in each pack.
sent me some cheetah figures made by Black Orc Games for their 100 Kingdoms game. There were eight figures in the package, which represent four packages' worth of animals. Sculpted by the legendary (and prolific) Sandra Garrity, there is only a single pose. I suppose that this works given that, in the game, they are largely "grunt-level" troops, but other manufacturers such as Mega Miniatures, Reaper and Crocodile Games (to name a few) have at least two different poses in each pack.
Historically, cheetahs were semi-domesticated since ancient times. From Egypt through the Middle East and into India, cheetahs were kept as hunting animals and protectors for royalty. They are depicted in artwork throughout the region - including numerous tombs in the land of the pharaohs, with some of the animals even being mummified.

My initial reaction was that I was not fond of the sculpted-in spots. Looking at the miniatures straight out of the package, they looked like they'd been machine-gunned.
The cheetah is atypical in the feline family in that it is built purely for speed, with non-retractable claws and limited climbing ability. It has a thick neck to support the head at high speeds, which results in a sort of "scruff" that continues down the spine to about the same point where the ribcage ends. The sculpt captures this feature, and successfully portrays the lankiness of the feline. It depicts the cat in full sprint ready to take out an enemy or prey with a swipe of its forepaws. The musculature and fur are well depicted on this miniature, adding a lot of essential detail to a relatively simple piece.
Some of the miniatures had a mold line running along the spine, and there were sprues allowing the metal to flow into the limbs and tail without any pockets. A couple of figures had some flash between either the forepaws or the rear legs at the tail, but this was easily removed.
Cutting the sprues off meant some cleaning of the rear, upturned paw. Ironically, that paw had the clearest pad and claw detail and, while it was annoying to clean up the resulting flash, it wasn't that difficult. A few of the miniatures had additional flash in places, but it cleaned up relatively easily - as did the mold lines (when present).

As I mentioned before, there's only one pose. While this is good when portraying a team of horses in Egyptian artwork, it is a bit of a drag on the gaming table as the eye is naturally attracted to patterns. I was able to alter the poses only slightly. Short of cutting into the metal, I couldn't change the direction of the head, so I had to limit myself to changing positions on the forepaws, repositioning the tail, and altering the angle of the animal itself. This last bit wasn't necessarily entirely a good thing, as the entire miniature is supported on the one rear leg, and I can see this becoming a problem over a few years of use. In the end, the physical alteration was minimal, and most of the visual differences will be made up in the painting.

The coloration of a cheetah is generally a tawny beige, but when viewing photos online, it seems to be a matter of location and lighting as to how much "orange" is in the animal's pelt and how light or dark the animal's coat is. I primed the figures with Tamiya TS-3 Dark Yellow. I had this spraycan lying around after determining that it made a rather poor "panzergelb," but it works well as a base color for certain animals. My basic plan of action was to essentially drybrush the mini. Given that, I could've used black as a primer base, but I felt that it would be too hard to cover up the black with the lighter colors that make up the animal's pelt.

I started blocking in the swatches of color. The white of the belly was created using Adiken Judgement White in a 60-40 mix with Sulfur Yellow. I brushed this onto the belly, throat, jaw and the inside of the legs. This was applied with a larger brush - a "0" - and applied in a few drybrush layers in order to not fill in the details. I also started applying some ochre on the upper surfaces, but stopped after two animals, after deciding that it would be better to apply that last.

The flanks of the animal were painted with the same underbelly mix of Adiken Judgement White and Sulfur Yellow, darkened with Reaper Master Series Stained Ivory. This gave me a color that I was pretty happy with, as it matched my reference photo. Again, this was drybrushed onto each figure in several layers. The Tamiya paint showed through in places (as intended), which gave more depth to the coat. After that, I added Adiken Ochre to the mix to create the tawny orange for the animals' head and shoulders.

This wasn't completely mixed on purpose, as I was blending it with the previous colors on the flanks.

After applying the upper coat of paint, I spray-sealed all of the miniatures with a clear gloss. After that, I washed the cats with some vintage Citadel brown ink (the first iteration of the product). I generally do this on all of my models and minis, in order to allow the ink to flow more evenly, and to not create odd-looking stains on the primary paintjob. It also makes it easier to remove something if it doesn't go as planned. Think of it as a "save point" when painting miniatures.
As planned, this filled the spots, and made me appreciate the fact that they did sculpt those in. While the ink also brought out the other details I was after as well as smoothing the blend, it also muted the colors too much. At this point, I pulled out the bottle of rubbing alcohol and a cotton swab. I used the moistened swab to remove the excess. The camera flash "fills in" a lot of the detail on the figures in the picture, but as you can see in the upper cat, it cleans things up considerably.

After the ink wash and clean-up, I applied the distinctive "tears" on the cheeks, the black marks on the ears, and the distinctive tail stripes. The claws were picked out with Reaper Stained Ivory, and the paw pads were painted with a mix of that paint and black to make a dark beige-gray. The eyes were done with dark yellow and, lastly, the upper and flank portions were given a wash with GW orange ink. The final step was several coats of Krylon matte clearcoat for protection and to get rid of the gloss.
I'll work on the bases later after I figure out how I want to finish those. I'm thinking of making a static grass applicator, and I'm debating about whether to mount these on plastic bases. For now, these cats are ready to run free!
