


Last time, we 3Dprinted some 28mm fantasy Lizardmen. The models included bases, but my fantasy armies are based on square slottabases.
I also have an Orc Hydra that came with a 2" by 2" base, but I think it would look a lot better on a 3" x 2" base.
Can we 3Dprint all of these bases?
Starting With Software
First, we need to make 3D models of the bases we want. Since bases are simple boxy structures, I'm going to use Sketch Up – this is software which you can download for free. I have a love/hate relationship with Sketch Up. I find it easy to use for simple things, but easy to get 'stuck' on problems, and difficult to progress to advanced models.

This is what Sketch Up looks like when you start it up. The figure is there for size reference.

First, I've used the Rectangle Tool to draw a rectangle. (For a more detailed explanation of Sketch Up, see this previous article.

It doesn't matter what size I drew the rectangle, because I've just resized it to 3" by 2". See the tiny rectangle, to the left of the figure?

Now I've zoomed in on the rectangle (and made the figure go away).

Using the Push/Pull Tool, I "pull" on the top of the rectangle to create a box. Again, it doesn't matter how far I "pull" because I can retroactively specify a height – let's say 3mm. (Yes, you can mix inches and millimeters.)
That's all we need for a 3D model of a simple base, right? But in my case, I want the base to have beveled edges…

So I use something called the Offset Tool…

…which allows me to draw smaller rectangle on top, at a certain distance (offset) to the original rectangle. Again, it doesn't matter what I draw, because I can retroactively put in the value I want – 1mm seems good, it will give a steep slope.

Now I can erase a few lines…

…which gives me the top and bottom faces, and then I draw four connecting lines…

And that's our beveled base!

Transformations
First, let's save this model as a Sketch Up file (extension .skp).
My printer software won't accept a Sketch Up file, so we need to convert this file to .stl format, which is a common format for 3D models.
Unfortunately, Sketch Up will not save models in stl format.
But fortunately, there is a free app for Sketch Up which you can install (available through the Sketch Up program itself) which will save models in stl format.
Unfortunately, the app has not been updated for the current version of Sketch Up. But it mostly seems to work.
So using the app, I save the model in stl format.

Now, using the 3Dprinter's software, I can load the 3D model and print it out.
One interesting question is which way to orient the bases when you print them. If you print them bottom-down, they can be a little hard to pry off the print bed. If you print them bottom-up, then you can grab the edges of the base to remove them from the printer.
I find that if I add a brim to the models, they are easier to pry off the print bed. But then you have to remove the brim from the model, which is a little more clean-up work (scissors are useful).

The other question is how many bases to print at once, which partly depends on the size of your printer. As I mentioned in a previous article, with my printer, causing the nozzle to move between multiple parts means a little more clean-up of the final models.
I printed these at 10% infill, which seemed to work fine. You can increase the infill if you want a heavier, denser base.
Printed Bases
So here's a base, printed in black plastic, fresh on the bed of the printer:

I printed this one right-side-up, with a brim, at 'slow' speed and 100 micron levels.

As you can see, even at 100 microns, the top surface is not completely smooth. Fortunately, that gives a better grip for paint and other materials.

And above, here's another base I printed upside-down. Notice that the top of the base (the bottom when printing) takes on the texture of whatever you print it on – in this case, the masking tape on the printer bed.

In this close-up, you can see the striations in the slopes on the sides of the base, like stacked pancakes of plastic.

And here are some 1½" square bases, printed in neon green filament. I printed nine at once. There is a little black mixed in, because I had just changed from black to green filament.
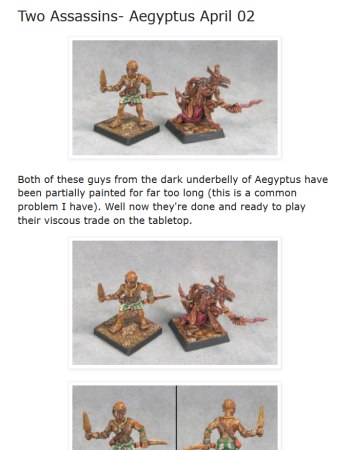
Lizardmen on Bases
I started with the Lizardmen I painted previously, and the only prep work I did to the bases was to use a sharp blade to cut off any excess plastic. Then I glued the figures down with superglue.

(Did you notice the honeycomb? That's the infill pattern I used – more on that another time…)
I've been told that this plastic does not need primer, so I went straight to a basecoat of green on the base sides with the first few models. This did not go well. The paint I was using did not cover the translucent plastic well, so needed multiple coats, and the thick paint tended to gather on the striations and look bumpy when dry. Afterward, I switched to a dark gray as a basecoat, then applied the green afterwards.
To the top of the base, I used spackle to smooth the figure into the base, painted brown, then applied glue and flocking.

The Lizardman on the left was in the first batch, and his base needs another coat of green.
Orc Hydras on Bases
The Orc Hydra is a 15mm model in the Mighty Armies range, though it is no longer listed on Rebel Minis website. The models (I had two Hydras) were painted and assembled for TMP by our friends at Fernando Enterprises in Sri Lanka.
This time, I decided to see if I could smooth out the striations on the sides of the bases.
First I tried sanding and filing, but the plastic did not respond well. It seemed to take a lot of work to get any result, and filing left a rough-looking surface.
Second, I tried a power bench sander. That was too much power. Even at the lowest speed, the plastic melted rather than sanding away.
Finally, I tried a Dremel with a sanding drum. Still too much power. One or two quick, light passes will grind away all the striations, but the surface is left rough, uneven, and with sanding marks.
I painted the base edges green (the paint adhered excellently to the rough surface), then glued the Hydra and handler down:

You can see how rough the base edges are.

And, using the same technique as for the Lizardmen, here is the final Hydra:

Final Thoughts
The bases are fairly quick to print. You might even want to print them at faster speeds, though the striations would be larger.
The striations on the base sides make the sides difficult to paint well. The Dremel removed the striations, but the bases were left very rough. I will continue to experiment with techniques to remove the striations.
I have no idea how well these bases will respond to extreme conditions, such as being left in the back window of your car on the hottest day of the year.
I was glad to see that the use of masking tape on the print bed kept the printed bases from warping.
Whether these bases are suitable for your wargaming, I leave up to you.
A Final Note
A funny thing happened. I wanted to print another Lizardman, and I thought I would print the base at the same time. But as I loaded the models into the 3Dprinting software, I wondered: instead of printing two objects, what if I just stacked them on top of each other? So I positioned the Lizardman on top of the base – in fact, I submerged him slightly into the base model.

It worked! The software combined the two models, and printed out one combined figure-with-base. That's a useful trick to know…