


After the 15mm Halfling article, ![]() Editor in Chief Bill
Editor in Chief Bill ![]()
![]() posted an invitation for people who could paint small-scale miniatures to write Workbench articles. The bulk of my painting work for the last 8-10 years has been 10mm and 15mm miniatures. I decided it would be fun to try my hand at an article. After some discussion,
posted an invitation for people who could paint small-scale miniatures to write Workbench articles. The bulk of my painting work for the last 8-10 years has been 10mm and 15mm miniatures. I decided it would be fun to try my hand at an article. After some discussion, ![]() Editor in Chief Bill
Editor in Chief Bill ![]()
![]() sent me a small Russian force of N-scale Minifigs WWII figures.
sent me a small Russian force of N-scale Minifigs WWII figures.
What do I know?
I've been collecting and painting miniatures for 27 years; not as long as some of you, but a fair amount of experience. During that time, I've tried many paints and techniques - from Testors enamels on bare metal through some advanced wet-on-wet, pinpoint washes, free-hand design and non-metal-metals. I started art school in 1984, and was trying these out as a hobby application of what I was learning in my painting classes. My gaming was mostly role-playing, so I only needed a few figures done at a time, and these techniques worked well for that.
As I became exposed to the wealth of miniatures and different game systems, my gaming interests turned toward mass battles; fantasy and science fiction at first, then historical. I had also started painting professionally, for friends who wanted bigger and bigger orders completed. Bigger orders meant more beer, pizza and miniatures for me. My painting techniques had to change if I was to keep up. The following text outlines a streamlined, distilled painting technique that I have been using for a bit over 10 years to complete mass armies of smaller scale miniatures quickly.
The Tao of Painting Smaller Scales
My personal philosophy of painting and sculpting small-scale figures is: less is more. With smaller figures, people tend to collect larger armies, and play more massed-battle-style games. The detail on the individual figure becomes less important than the overall impression of the massed units. This does not mean that one should be sloppy about their work, but rather, one should pick and choose the details that will contribute the most to the overall effect. I also want my armies to be believable and fairly realistic in appearance. I tend to use muted colors, with some limited weathering effects.
A First Look at the Figures

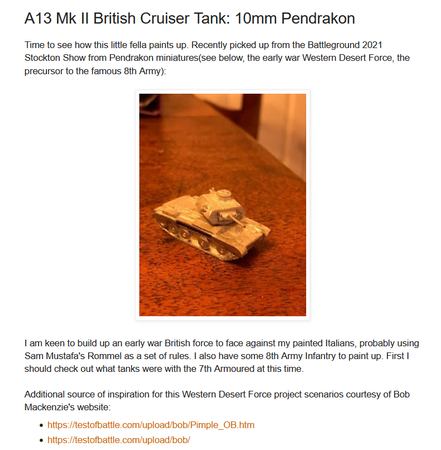
When I receive a painting commission, the first thing I do is count the figures and parts to make sure none are missing. Then I take a closer look at them, to check for flaws and start planning the work. Thirty-six infantry, two T-34s and one SU-100 were present and counted. These figures are right around 12mm from the sole to the top of the head - which is not exactly the same as, but compatible with, other manufacturers' 10mm, N-scale or 1/144 scale miniatures.
I've painted several hundred of the Minifigs N-scale WWII infantry. This particular batch of minis had a bit more flash than usual, and a slight offset on the mold line on several soldiers. A bit more work than usual, but nothing unreasonable. The figures from this company are a bit less detailed than other manufacturers, but they fit in well with my "less is more" philosophy. They get the point across, without a huge amount of fiddly crap. I also like Minifigs because the proportions are good, and you get a decent selection of poses.
Having never assembled their vehicles, I was surprised that I would be required to glue the external tanks to the hull, and the gun barrels to the T-34 turrets. These are parts that other companies cast as one piece. The castings had a good bit of flash around the mold lines, and several fenders had to be bent back into place. Again, this was a bit more work than I've had to do with other companies' products, but not unreasonable. The details are generally clean, and the tanks seem to be well-proportioned.
My examination of the figures revealed that one LMG and one SMG barrel on the infantry either didn't fill completely or broke off at the tip. There was still enough left that they didn't look silly. One tread of the SU-100 did not fill completely. The rim around part of three bogies was incomplete. These were very minor defects that would not affect the overall impression.
Prep Work
To start, the flash was trimmed from the figures and the tanks assembled. The tank parts were secured with Zap-a-Gap CA. For ease and speed of painting, all of the infantry were tacked to craft sticks using Aleene's Tacky Glue. (Any white glue or rubber cement would work.) The idea is simply to tack the figures in place for painting. They can be popped off with an Xacto knife later, to be mounted on permanent bases. The turrets of the tanks were left separate, and the infantry will be left on the painting sticks for shipping. At ![]() Editor in Chief Bill
Editor in Chief Bill ![]()
![]() 's request, I am not putting these guys on permanent bases.
's request, I am not putting these guys on permanent bases.
Time spent: 1 hour
Priming
The figures were primed with several light coats of a spray automotive-sanding primer, and allowed to dry thoroughly between coats.

I've tried many brush-on and spray primers through the years. I prefer the automotive spray primers because they provide a thinner, more even coat, superior paint adhesion, and great time savings.

For figures of 20mm scale or less, I prime with black. (I'll explain why in the next step.)
Time spent: 15 minutes (hands on, not drying time)