![]()
|
|||||||||||||
| Knight of the Balance | |
| Product # | 11416 |
| Manufacturer | |
| Suggested Retail Price | £3.50 GBP |
Back to LAST PAINTER STANDING - ROUND 2
Back to Workbench
| Revision Log | |
| 16 December 2003 | page first published |

Rating: ![]()
![]()
![]()
![]()
![]()
![]()
![]()
![]()
![]()
![]()
6,440 hits since 16 Dec 2003
©1994-2026 Bill Armintrout
Comments or corrections?


Please sign in to your membership account, or, if you are not yet a member, please sign up for your free membership account.
Dread Pirate Garness ![]() writes:
writes:
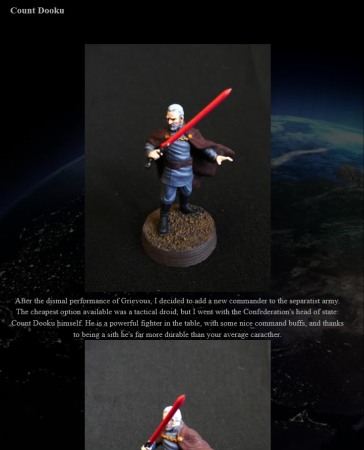
Hello all. This is report is for the second figure of the Last Painter Standing competition. The figure to be painted is the VOID Knight of Balance. The Knight of Balance is supposed to be a sort of super spy/assassin. They are to infiltrate any area and gather critical information or assassinate key targets.
I had at first thought that I would do some sort of elaborate costume that would be very bright and shiny. However, I thought that really didn't stay true to the background and character of the figure. I instead opted to try to do a full 3D type of camouflage, along the lines of the "predator" from the same movie. (More on how I did it, later.)
I began by cleaning the figure and removing some of the minor mold lines. I then primed the figure in grey.

I decided I would use a traditional black color for the material of his body suit.

Now, as for how to do the 3D effect. The trick is to get some perspective lines as a reference, so you can keep the same line for getting everything to match up when it is all done. What I did was to mark some lines of perspective on the front and back of the figure. I then painted a "X" across the top of the base so I could give my eyes a direction to look. When I was determining the lines of perspective, I paid careful attention to the folds of the cloak/coat. I lined up the figure and picked my centerlines so that when viewed from certain angles, the folds would "disappear."
I then began the painting of the 3D cloak. What I am trying to do, much like the Predator from the movies, is to project to the viewer what is directly behind the figure. In some cases, dependant upon the position of the figure, what is "projected" may be the ground, or the sky, but since what is being projected appears on the surface opposite the actual feature, certain things like the ground would appear on the surface facing up whereas the sky would appear on surfaces facing down. It all gets a little confusing, but if you just keep in mind what is projected will appear on the surface opposite it, it helps to make sense. I will go into more detail with each section. I looked online for a few jungle and rainforest pictures to use as a guide.
I started using Aleene's Kohl Green. It is a very dark, almost black, green color and would serve as a base to build up from. I painted the entire coat in this color. Then, using my reference lines, I began to paint in a tree on the figure's right side. Using Americana Traditional Raw Umber, I painted a simple vertical line. First to note about the model, is part way through where the lower part of the tree stump is, is a large fold in the cloak. This is where the perspective lines come into play. By maintaining the same viewpoint, I was able to paint the tree by looking at the figure from exactly the same position. It could be described as making the surface like a flat canvas, only with the canvas having 2 or 3 steps into the surface. I tried to think of it as painting a picture on steps or stairs - if you look down on it, it looks like a flat surface, but if you move a little to left or right, the depth becomes apparent. I then began to use a variety of other browns and greys, some light and some dark and paint zig-zags and squiggly lies all over the surface of the tree.

Next, I added a few vines and plants to the surface. I started by painting the plant and vine outline in black. I then painted in with Americana Plantation Pine to give a flat, drab color. I then added a little Ceramcoat Pineapple to the Plantation Pine, and painted in where the highlights would be if this were an actual vine. Now, in order to make the plants and vine stand out from the rest of the cloak, I used GW Snot Green. It is a very bright green color, and it helped the plant material stand out from the rest of the background. I then used Pineapple on the surfaces of the plants and tree to represent sunlight shining through the jungle canopy.

Using the perspective lines, and the slot for the base, I was able to get the transition to work completely all the way around the figure. In other words, as the figure was rotated from side to side, the transition of the plants and trees appeared to move with the figure, such that it looked as if it was the viewer who was moving and not the figure. Again, it goes back to using the perspective lines in order to keep everything in line.
The transition was fairly easy, in that most of the figure was already painted and it was a small area to be painted. I painted the topside of the arms to show the dirt on the ground, or in this case, a fallen tree, as I wanted to mount the figure on a fallen tree. The underside of the arms was painted with Ceramcoat Blue Heaven for the sky, and black for the shadow side of leaves near the treetops.
For the remainder of the cloak, I used a mix of Polly S Olive Drab, Americana Slate Grey, Ceramcoat Autumn Brown and Americana Celery. I applied the colors haphazardly all over the remaining base, and the gray was mixed in so that the colors appear hazy. Thin lines of black were painted along the edge of the vines, plants and tree. The some thin curved lines, much like one would use to draw the foliage of a tree, were applied in a few areas to give the depth needed so the cloak would appear to have depth.