


The Contractual Obligation Workbench Report
by Scurvy AKA Low Key Lyesmith
(Disclaimer No gun-toting Mormons forced me to do this)
Overview of Project
Convert and paint 8 Reaper Neanderthals into a Cyberpunk/Sci-Fi gang of future 'hop heads.' I plan on achieving this with 'average' materials available to the common or garden gamer, to show it can be done (and done well) without resorting to spending a fortune on the best-of-the-best gear.
(Not that there is anything wrong with the best gear money can buy. It's just many of us don't have it or use it...)
Due to the fact it's a Bartella project, it's all bum backwards. We will start with the painting, then retro back to the figure conversions. (Did a test one to make sure the idea would work. This is the one we will do the painting tutorial on. After that, I will take onboard what people want to see more of, and do that on the following figs.)
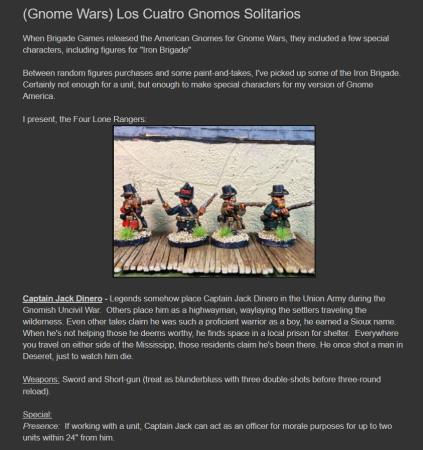
Should also add a big up here to Reaper for sculpting such fine figs for me to work with. Give the starving sculptor a pay rise, 'cus he earned it, ye heathens!
To undercoat, I used 5 Star Grey Primer. Do not use this pudding product! It jammed up 3 times, sprayed a bit globby, and was generally a pain in the rear quarter to use. The previous spray I used was Australian Export Grey Primer. This was a little ripper, and is the one I recommend. To be sure though, lads n lasses, anything that is not rock-bottom quality (i.e. $2.00 AUD dollar store) will do the job just fine. You don't need something that comes out in a finer cloud than a bee's fart to get a good primer coat on the fig, mmmkay...

A good tip for spraying is to spray left-to-right, then right-to-left. (Yes, you can go from right to left n back again if you wish.) Start spraying before you get to the fig, and continue past it before stopping. This avoids a concentrated blast covering the fig and drowning out detail.
")
Stick it out in the sun to dry. In about 25° C (somewhere around the 80° F mark), it will take about 10 to 15 mins to be ready for painting. (If you live in Siberia or The Simpson Desert, then it will take longer or shorter than this. So adjust your drying time accordingly.)
Then go over the fig with a file, and remove any mould lines you can see. (Your girlfriend's emery thingy for her nails will do it just fine.) Then drill out the barrel, if that is your bag, too. To do the barrel on the flame carbine, I used a tiny drill bit, then used this one to make a nice even hole.

Finish up by removing any ragged bits with your scalpel.
Woo Hoo - now we are ready for slapping some paint on!
Grab your 'Flesh' colour. I really don't mind if you have 17 different colours of flesh, just grab one that is a mid-range flesh colour and roberts ya muvvers bruvver. Due to the method, we will use one flesh colour - it will do the job just fine, mmmmkay.
I used a tiny pot of 'flesh' that came with my LOTR mag. It's on its last legs, and has been partially contaminated by me double dipping. (Yes, I'm a lazy scud that does not wash his brush every time.) Still, it will do the job just fine. So whatever you have is better n what I have, and will do the job a treat.
Mix a little water with some Flesh on a bit of plastic. (The plastic bits on fig boxes are ace for this.) Then go to work. If it's too watery, add a little more paint - and vice versa, if too thick. If you start out far too thick and slap some on, then say "Oh my golly what have I done!" as you obscure detail...Don't panic! Just clean the brush and keep it wet, then gently brush the thick bit of paint and it will water down. Then dry the brush until it's just dampish, and use it as a sponge to soak up the excess water, n start again with thinner paint once that area has dried out.
I used a cheap-as-pudding taclon brush for this (no. 1 size, to be exact). Use something around that size and you will be fine n dandy.
Anyways, paint away, covering the flesh areas of the fig. Don't panic if some areas are a bit light on Flesh pigment, as we will fix that up just fine with the inking and highlighting. The reason we are starting on the flesh is it covers about 70% of this fig, so it's the easy thing to knock off first. Also painting 'out' is the easiest way to go - i.e., start at the deepest point of the fig, and work your way up to the raised sections.
Don't panic if you slop a bit onto non-flesh areas, as we can cover this up later.
You will now have something that looks like this:

")
OK, looking pretty plain and uninspired so far. Time to bring out all the detail...
The Bartella Way
(As a side note, this is more work than I ever did with some school project they bunged on me for homework. That Armintrout fella sure knows how to make ye work!)
OK, OK, I will fill you in on the inking (then, as the garden bloke says on telly, "that's yer bloomin lot fer today.") Tommorow we will continue with the flesh and how to highlight it. As well as adding infected flesh colour to all the drug injectors, etc., that festoon this fig.
The Bartella way of detailing is ink. Yep, just ink.
Now, if yer going to buy ink, then buy brown. Brown is the god-king of inks, as it will do a fine job on pretty much every colour.
The trick with inks is to water the bleeders down. Don't go slapping it on undiluted, as it will be a vast pain in the jaxie and look crap.
Instead of saying "add x parts of ink to x water," I will give you a visual clue to what consistency you want to be getting. (My guesstimate is about 1-ink-to-5-to-8-water, but possibly even more water to ink than that.) For this first coat, we want it more on the thin side than thick.

Now as you can see, we have undiluted ink on the left, and the mix with water on the right. How I mix is put one drop of ink down. Then dip your brush in the water, and let the drops form a separate pool near it. (5 or 6 drops will cover a fig just fine.) Finally, dip the point of your brush in the ink, and transfer it to the water and mix it through. (I said the point of your brush, Smithers! Not up to the metal! A poofteenth of ink goes along way.) Repeat until you get a good consistency. Don't panic if it's too thick or thin - just add water or ink as needed, until it's 'right'. I call this the use the force method. We will be using this a lot, so pay attention.
Now the fun bit. Slap that ink on. (I used a Number 1 brush for this.) No, no, don't be shy now. I said slap it on that flesh. Cover that begger with it, mmmmkay. Don't panic if you get a bit on other stuff (we will cope with that later). I want to see that ink flow. (See now why we want the ink more watery than thick right now?) Don't forget between fingers and toes - and give under the arms, the 6-pack, the loincloth line, and other transition areas a good workout. If it is coming on too thick, then use water to thin it on the fig, and all will still be apples.
You should end up with something like this:

Sit the begger out to dry now. Looking not so bad already, eh?
")
Now if you need to add more darkness to bits (and you will), then add one or two more brushpoints of ink to the water mix and thicken it up. In my case, it was the six-pack that really needed it. With this stage, brush directly into the depressions instead of all over, and once again let it dry. (Brushing paint onto wet ink is a disaster - don't go there.)
Anyways, that's enough blather for one night. Tomorrow we will use just plain Flesh colour to smooth over the harshness of the ink, and start the highlighting.
I expect everyone to read chapters 1 to 4 tonight, and hand in their figures no later than Tuesday 3pm for assessment...