
These miniatures rules cover not just World War Two, but focus on a particular theater within that conflict -- the Russian Front.
The rules have been specifically designed for tactical combat at platoon and company level, particularly to bring out the essential features of the war in the East such as:
...The biggest factor...was how to reflect the tactical and organisational differences between the opposing armies. We feel we have achieved this and Soviet troops can no longer go haring off around the battlefield like radio controlled robots! It is often difficult to do anything other than a frontal assault with Soviet troops, but then this is a fair representation of Soviet tactics, even at the end of the war...In contrast the German player usually has to rely on his better tactical skill and flexibility to break up and destroy Soviet units...The difference in the quality of the armies has also been stressed... The system of armour initiative was designed to reflect what really happened on the Eastern Front. Every other set of miniatures rules I have come across have treated the armoured vehicles of each side identically, taking little or no account of tactics, training or command and control. In Grey Storm, Red Steel this is not the case. ...Rather than simply giving a set of rules which say 'do this...' we have included a lot of background detail and explanation so that the rules say, in effect, 'do this because this is why you do it...' - Grey Storm, Red Steel, Design Notes, pg. 124 |
Under these rules, each model soldier or vehicle represents one actual soldier or vehicle. The individual soldiers, however, are placed on bases in groups of 2-4 figures. The number of figures per base, and the size of the base, depend upon the nature of the infantry group (i.e., rifle, machinegun, mortar, and so forth). Leaders are individually based. The "groups" (stands) of infantry are then organized according to actual historical organizations.
EXAMPLE: A Russian Rifle Group consists of four rifle-armed figures, on a 1.5" wide x 1" deep base. A Rifle With Light Machine Gun Group has four rifle-armed figures plus a figure with a light machine gun, on the same-sized base. A Heavy Machine Gun Group is made of three to four figures with a heavy machinegun, rifles, and grenades on a 1" square base. An infantry squad consists of one Rifle Group plus a Rifle With Light Machine Gun Group. An infantry platoon consists of three squads, plus a platoon commander. A machine gun platoon has three Heavy Machine Gun Groups. An infantry company is composed of three rifle platoons and a machine gun platoon, plus a Company Headquarters. |
EXAMPLE: A German Rifle Group consists of three to four rifle-armed figures (with hand grenades) on a 1.5" wide x 1" deep base. A Light Machine Gun Group is made up of two to three figures with one light machinegun, plus rifles and hand grenades, on a 1" square base. A 5 cm. Mortar Group consists of two to three figures with rifles and hand grenades, plus a mortar, on a 1" square base. A Signals Group is made of two to three figures on a 1" square base, equipped with small arms and radios. An infantry squad consists of one or two Rifle Groups plus a Light Machine Gun Group. An infantry platoon consists of three squads plus a Platoon Headquarters. A Platoon Headquarters is made of a platoon commander, a sergeant, a runner, and (optional) a 5 cm. Mortar Group. An infantry company is made up of three platoons, and a company headquarters. The Company Headquarters consists of a company commander, a second-in-command, a Sergeant-Major (optional), two Light Machine Gun Groups, and a Signals Group. |
Prior to play, all troops must be given a classification, reflecting their battle effectiveness. The rankings are:
| Elite | Rare units, such as 1st SS Panzer Division (1941 to mid 44) and the Soviet 45th Infantry Division (1943-45). |
|---|---|
| Veteran | Most German panzer units up to mid 1944, and most Soviet Guards as of 1943. |
| Experienced | Most German infantry units up to mid 1944, and most Soviets as of 1943. |
| Inexperienced | All German units from mid 1944 to 1945, and all Soviet units from 1941 to mid 1942. |
| Poor | Hitler Youth units and Soviet Workers Militias, for instance. |
Before play begins, all leaders must also be assigned a Leadership Value (LV).
Scenarios may be umpire-designed, or constructing using a points system. (No pre-designed scenarios come with the rulebook.)
Most wargames rules use a points system to ensure that the players can have a balanced game with, in theory at least, both sides having an equal chance of winning. In Grey Storm, Red Steel we intend that the points system is used to produce an unbalanced game, whereby the players will have to deal with circumstances where the forces are completely inequal, but such was the nature of war on the Eastern Front. - Grey Storm, Red Steel, pg. 20 |
When using the points system, first the players must agree on the scenario type:
Players then agree on the year, the general geography (i.e., Open Steppe, etc.), and the basic point value for each side. Each player then rolls on the table for that scenario type, to determine the modifier to multiply against his basic point value. Modifiers apply due to weather, nationality, and game year.
To make life really interesting the dice throw should be kept secret from the opponent (ideally under the supervision of an umpire). Thus both players may be unaware of how many points their opponent has, introducing some of the fog of war and producing deliberately unequal sides. - Grey Storm, Red Steel, pg. 20 |
Each troop type has a basic cost, which varies by nationality. Modifiers apply to this price, due to experience, special training, and special morale considerations. The cost for AFVs depends on the type (tank vs. assault gun) and armour, with weaponry purchased independently. Points can also buy pre-game bombardments (by artillery or airpower), field defenses, random air patrols (Soviet only), and fighter cover.
Once forces have been purchased, the players randomly determine the weather and start time of the battle. Deployment rules vary by scenario type. Players are encouraged to determine for themselves, based on the scenario type, clearly defined objectives (and to compare notes after the battle).
Unlike Generals and Commanders of Armies, the soldiers who fight their battles feel that they have won a victory of sorts if they can simply survive. This was most definitely the case on the Eastern Front. - Grey Storm, Red Steel, pg. 123 |
Unless a scenario type dictates particular victory conditions, the rules propose that players determine victory based on the objectives they assigned themselves prior to the battle. Alternately, for balanced-points games only, victory may be determined according to points awarded for units destroyed, casualties, captured equipment, etc.
The game is played in turns, each of which is shared by both players. The turn is made up of these steps:
| Leader Activity Phase | Leaders may move and take actions. |
|---|---|
| Soviet leaders secretly issue orders to their units. | |
| Initiative | Players roll dice to determine who chooses which player is the First Player this turn, and which is the Second Player. No die roll modifiers. |
| First Player chooses which of his units to give Watch and Shoot orders this turn. (Units on Watch and Shoot may make fire attacks now, if they desire.) Support-fire requests and communications attempts are also made at this time. When the First Player is done, the Second Player performs these actions. | |
| Activity Phase | The First Player may conduct Activities with his units, after which the Second Player's units conduct Activities. |
| Other Firing Phase | Support fire and demolitions occur. Units ineligible to fire during the Activity Phase due to low morale can fire now. When the First Player is finished, the Second Player can conduct support fire, demolitions, and low-morale fire. Well-trained units can fire heavy weapons that were deployed during the Activity Phase. |
| Close Combat Phase | The First Player resolves close assaults, followed by the Second Player. |
| Morale Phase | Units may need to make Morale Tests and retreats. |
| End Phase | Check for changing weather or spreading fires. |
During the Activity Phase, units perform actions known as Activities. These include:
| Advance | Unit can fire and move towards the enemy. |
|---|---|
| Stealthy Advance | Allows half movement and a bonus against being seen. Dismounted troops only. |
| Manoeuvre | Unit can move, but cannot fire. |
| Fire | Allows unit to halt and fire. AFVs and anti-tank guns only. |
| Hold | Unit defends current location, including ability to counter-attack to retake a lost position. Unit can fire as if on Watch and Shoot, but without all the bonuses. Soviets only. |
| Deploy Heavy Weapon | Allows the unit to set up its heavy weapon (after moving to a new location), or preparing a set-up weapon for moving. |
| Fall Back | Allows units to move away from the enemy while firing. Well-trained units can fire before moving; poorly-trained units may fire after moving, in the Other Fire Phase. |
| Close Assault | Unit moves towards an enemy unit, with the intent of making a close assault. |
| Reorganise | Following Close Combat, units must reorganise before they can function normally. |
| Rally | Units perform this Activity on the turn on which they are rallied. They cannot move, and fire only in the Other Fire Phase. |
| Watch and Shoot | Unit can't move, but it can fire, communicate, or request support fire. The firing either takes place during the Watch and Shoot phase, or as opportunity fire in response to enemy activity. (Unlike other Activities, this one is assigned during the Watch And Shoot Phase rather than the Activity Phase.) |
Activities are assigned by units, and one unit performs its Activity before another unit can take its turn. The definition of a "unit" varies by nationality and troop type:
| nationality | troop type | basic unit |
| Soviet | Infantry | squad |
|---|---|---|
| Armor | platoon | |
| German | Infantry | squad |
| Armor | individual vehicle |
Normally, a unit can perform only one Activity per turn. However, tanks and anti-tank guns are special cases. The player has the option of making an Armour Initiative dieroll for each such unit per turn. The roll is modified by year and nationality, training levels, the Command and Control rating of the AFV, bad morale, immobilisation, and communications. As a result of the dieroll, the unit might gain up to two bonus Activities for the turn, or it might lose all activity for the turn. If a unit chooses to Watch and Shoot, it may hold its remaining actions for later.
German units are assigned Activities freely during the Activity Phase, one at a time. Soviet units, however, are assigned their Activities during the Soviet Orders Phase. If the Soviet Player is the Second Player, during the Activity Phase he may attempt to change his orders. A dieroll is made per attempt, modified by presence of leaders, training levels, troop type and morale. The Soviet player may also make a dieroll for leaderless units, to see if they will take action on their own.
If a unit is Out of Communications, it can only be given Activities that allow it to restore communications. For the Germans, all stands within an infantry squad must remain within 25 meters of each other. German tanks and heavy weapons can operate individually. For the Soviets, each group in an infantry squad must remain within 10 meters of another group, and each squad must be within 25 meters of another squad in its platoon. Soviet vehicles must keep within 30 meters of another vehicle in its unit, and each platoon must be within 50 meters of another platoon in its company. Soviet heavy weapons can operate individually, or be attached to another unit.
The Hold Order does allow the Soviet Player a slight reprieve from an otherwise dismal command-and-control situation. An officer can issue a Hold order to entire units or to individual squads. Once a unit has a Hold order, it can remain in place without regard to communications distances.
Movement is fairly straightforward. The basic movement rate is determined by a unit's Activity, modified by weather (rasputitsa/mud, frost, snow), terrain, and troop type (infantry, mounted troops, man-portable or man-handled heavy weapons, tracked vehicles, wheeled vehicles, and horse-drawn vehicles). For movement purposes, tracked vehicles are classified as either "fast" or "average."
Terrain comes in two flavors: bad and good. Bad terrain includes woods, forest, marsh/swamp, and built-up areas. Depending on unit type, bad terrain may restrict movement by half or prohibit movement entirely. Roads and tracks allow wheeled vehicles to move at double rate, but provide no movement bonus to other troop types.
Optional rules allow vehicles or heavy weapons to become bogged down in mud, and for bogged vehicles to be pulled free by other vehicles.
One of the problems with representing modern warfare in miniature is that of accurately depicting the effects of camouflage and concealment on the miniature battlefield. - Grey Storm, Red Steel, pg. 18 |
Players may choose between three systems for handling concealment and hidden troops:
If the counters option is being used, the attacker has the chance to obtain limited information about the unit represented by the counter. A dieroll - modified by terrain, distance, and type of unit spotting - determines whether the player receives a "suitably vague" description (the target's unit class, such as "infantry" or "heavy weapon") or no information at all.
It should not be assumed that units could always see their enemies. Fear, battlefield activity (such as communicating or operating equipment), fatigue, weather and visibility, and a whole host of other factors, all tended to induce a battlefield tunnel vision. - Grey Storm, Red Steel, pg. 56 |
Even when a unit is revealed on the tabletop, an enemy cannot fire upon that target until the first unit has "spotted" the target. Range to the target and the target's troop type determine the Spotting Score, which the spotting units must roll equal to or less than on a d10. The dieroll is modified by:
Once a unit is spotted, it remains detected until it moves out of sight.
According to the designer, "Soviet camouflage was often of a higher standard than the German camouflage." Therefore, Soviets receive a higher bonus when concealed.
Rules allow for units to listen for the enemy, which can reveal approximate direction and distance of enemy forces. Also covered are target location at night and battlefield illumination (burning objects, flares, rockets, and support fire).
Fire combat comes in three forms in these rules: direct fire (small-arms fire), anti-tank fire, and support fire (artillery and mortars).
A stand can fire at a target if the target is within range and within the arc of fire of the firer. (Exception: Units on Watch and Shoot can pivot to fire at spotted targets outside of their arc of fire.) Turrets may face different directions than the hulls of their vehicles, in which case the vehicle has two arcs of fire.
When a small-arms attack is made, it affects a beaten zone centered around the target. The size of this zone depends upon the combined fire factors of all stands participating in the attack. However, if the target is so close that the zone includes any of the firing units, the zone is adjusted further away.

One die roll is now made for the entire attack, modified by training levels, current Activity, morale state, weapon type, casualty levels, range, target type and movement, visibility, and the degree to which the target has already received accurate fire. The modified die roll, correlated against total fire factors, determines the fire result:
Unless the result was "no effect," a die is then rolled for each stand even partially within the beaten zone. The roll is modified due to cover, and for stands at the edges of the beaten zone. The result depends upon the troop type and the original fire result:
| Infantry | Might be Destroyed or receive a Casualty |
|---|---|
| Might be Destroyed | |
| Armored Vehicles | Might receive a Hit, which is then resolved according to anti-tank combat (see below) |
| Buildings | Might receive a Hit, in which case building damage is resolved. |
Since separate rolls are made for weapons crews (infantry) and their heavy weapons (equipment), it is possible to destroy an anti-tank gun without injuring its crew.
Also depending upon the original firing result as well as the target's training level, the target may receive a morale penalty.
EXAMPLE: As a Russian squad [1 Rifle Group, 1 Rifle With Light Machine Gun Group] advances across a farm field, a German machinegun group wishes to open fire. First, the target must be spotted. At a range of 150 meters, the base chance to spot the Russians (due to their troop type: infantry) is "5." This dieroll is modified by: +1 (Germans are Veteran), +2 (Watch and Shoot orders), +1 (leader attached to machinegun group), +1 (for being a heavy weapon crew), +2 (target is moving rapidly, Activity is Manoeuver), -2 (target just came into view this turn), for a final modifier of +5. Rolling a ten-sided die, the German player scores a "1," modified (+5) to a "6." Since this is at least equal to the target score of 5, the Russians are spotted. The German player now totals his fire factors. A heavy machinegun has 18 fire factors. The attached leader cannot fire, as the target is out of his range. The total fire factors determines that the inner (smallest) template ring is used on the Beaten Zone template. The center of the Beaten Zone template is placed at the central point of the Russian squad (between the two Russian infantry groups that compose the squad). As it turns out, the fire catches no other stands. Now the Fire Effect dieroll is made. Modifiers which apply are -1 (range), +1 (Germans are Veteran), +1 (Germans on Watch and Shoot orders), +1 (machinegun is in field defenses), -1 (target moving on foot), for a total modifier of "+1." The dieroll of "3", modified to a "4," is compared on the Fire Effect Chart against the total Fire Factor of 18. The result is Desultory Fire. Now a Casualty dieroll must be made for each Russian group. There are no modifiers. Since this is Desultory Fire, there is no chance of destroying the troops, but a roll of 9 or 10 will score a Casualty. The German player rolls a 9 and 10, scoring one Casualty against each Russian group. Since these Soviets are Experienced, Desultory Fire does not cause a morale penalty. |
Attacks versus armoured vehicles are treated in a different fashion. Weapons ordinarily capable of successfully attacking tanks are other tanks, anti-tank guns, light anti-tank weapons, heavy weapons, and artillery. Special rules allow any infantry to attack with "improvised anti-tank weapons" (grenades, mines, and Molotov cocktails).
Once the target has been spotted, a dieroll is made to see if it can be hit. The base chance depends upon range and the firing weapon's type. This is modified due to training level, morale state, firer's situation (i.e., moving, on Watch and Shoot, under fire from a significant threat, etc.), visibility, target motion and cover, and whether this is a first shot at a newly spotted target.
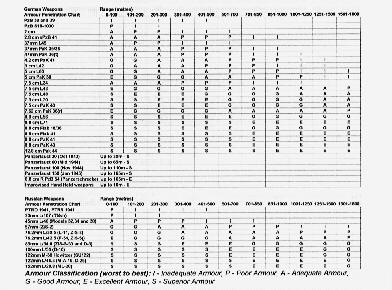
If a hit is scored, a chart is consulted to compare the shot's penetration power versus the vehicle's armor. All armored vehicles have armor ratings for their front and flank, ranging from Inadequate to Superior. The Armour Penetration Chart lists individual weapons and their penetration ability at different ranges.
A dieroll is then made to determine the final result of the hit. A bonus or penalty applies, depending on the penetration power of the shot versus the vehicle's armor. Special modifiers apply for hand-held weapons and certain German troop types. As a result of the roll, the target is either destroyed, immobilised, or suffers no damage.
Knocked-out tanks might catch fire. Tank crews may abandon their immobilised vehicles.
EXAMPLE: A Soviet D-10 anti-tank gun fires upon a German Panther A tank during a confused firefight in a village. The tank has been previously spotted. First, a To Hit dieroll must be made. At a range of 40 meters, a gun of this size (88mm or greater) has a base score of "2." The modifiers which will apply to the dieroll are +2 (gun was on Watch and Shoot), -1 (anti-tank gun has been under fire), -3 (target is moving), -2 (target is partially hidden by rubble), for a final modifier of -4. Rolling a ten-sided die, the Soviet Player obtains a 9, which is modified (-4) to a 5. Since the result is greater than the base score of 2, the shot hits the target. At this range, the D-10 will penetrate everything up to Superior armor. The Panther A has been struck in the front, which is only rated as Excellent armor (one grade less than Superior). The final result dieroll is now made. The only modifier is +2 (Superior penetration vs. Excellent armor). The Soviet Player rolls a "1," which is modified to a "3" - no effect! (A "4" would have been enough to immobilise the Panther, while an "8" or higher would have knocked it out.) |
A tank may also be successfully attacked by non-anti-tank weapons, due to a Hit result from Direct Fire combat (see above). In this case, a dieroll is made, modified by the original firing result, weapon type, vehicle type, and direction of fire. The result is compared against the vehicle's armor rating to determine whether the vehicle is Immobilised or Destroyed.
EXAMPLE: In the same village, a Soviet submachinegun squad scores a Hit from the rear on the same German Panther A tank using Direct Fire. An anti-armour dieroll is now made, modified by +2 (Heavy Fire) and +1 (fire from the rear), for a total modifier of "+3." Due to the Panther's rear armour rating of Adequate, a final modified result of 8 or better will immobilise the tank, while a result of 10 or better will destroy it. The Soviet Player rolls a "2," modified to a "5" -- not enough to damage the German tank... |
Any fire coming from off-table sources, such as artillery, mortars, or rockets, is termed Support Fire. The German and Russian armies differ significantly in their methods of controlling support fire.
The German army entered the Russian campaign with an efficient and highly flexible artillery system, using a series of reliable and effective guns (later supplemented by rockets) combined with flexible and adaptable communications and doctrine. As a result the integral artillery located within each German division provided the main striking and killing power of the German army. The efficient communications and effective tactics meant that, on the whole, the artillery was available when needed, and could intervene to telling effect even at the lowest level on the battlefield. - Grey Storm, Red Steel, pg. 82 |
The German player can take advantage of two types of support fire:
Response Fire can be requested by any German troops, though an artillery observation post (OP) is likely to receive a swifter response (if the mission is approved).
The Russian, and later the Soviet, army has always believed strongly in the power of artillery, the Red Army's "God of War." It has certainly always had more guns than its opponents, and it has had a reputation for producing fine, reliable and effective guns. However, due to very limited communications, and limitations in training tactics and doctrine the Soviet Army was able to provide only a very rigid method of support fire. ...most Soviet support fire on the battlefield at the company and battalion level was therefore provided by artillery pieces, mortars or self-propelled guns firing over open sights (in the best tradition of Russian artillery, dating back to the Napoleonic Wars), while the fire from the massed supporting artillery was used to fire on regimental, divisional or army fire missions. - Grey Storm, Red Steel, pg. 85 |
The Russian player can take advantage of two types of support fire:
Response Fire Procedures. All armies use the same methods for calling in response fire, though the tables and modifiers vary.
First, communications must be established with the firing battery - via runner, radio, telephone, or pre-arranged flares. Then, a dieroll determines if the mission is approved, and if so, the delay before it is implemented (from no delay to 4 turns). This dieroll is modified due to troop experience, nationality, and game year. Defenders in prepared positions receive a bonus when requesting fire against pre-designated Final Defensive Fire (FDF) targets.
Resolving Support Fire. The area of effect is determined by the type of mission being fired (pre-planned vs. response), the guns involved (larger area for heavier guns or rockets), and the direction of fire. Pre-planned and Final Defensive Fire missions are always on target, but for other missions a dieroll determines the actual aiming point. Accuracy penalties apply to targets that lack an identifiable feature ("...a bare spot on the steppe is not an identifiable feature"). The type of guns firing and the game year determine the Fire Factor.
A roll is made on the Fire Effects Table for every target within the artillery area of effect. The normal Fire Effects Table modifiers do not apply; instead, there are modifiers due to climate (winter, mud) and for pre-planned bombardments.
Continuing Fire. On subsequent turns, the response fire may continue if communications can be maintained with the firing battery. Bonuses to the accuracy dieroll help off-target missions find their mark; fire can also be adjusted 100 metres per turn.
However, reflecting crew fatigue and ammo limits, cumulative penalties apply to the Fire Effect of continuing artillery missions.
On-Table Indirect Fire. A simplified version of these rules applies to on-table units capable of indirect fire.
EXAMPLE: During a defense of a prepared position, a Russian platoon commander desires artillery fire in front of his positions (due to the expected advance of German tanks). Unfortunately, this target was not designated as a Final Defensive Fire point previously (probably due to it being out of sight from the regimental artillery post). First, the platoon commander must establish communications with the regimental OP. This occurs automatically, since in this case there is an un-cut telephone line between the OP entrenchment and the commander's dug-out. Next, the OP must establish communications with its battery. In this case, the telephone line has been cut by enemy artillery fire, forcing the OP to attempt radio communications. A result of 6 or more is required, but the OP receives a +1 bonus due to being in a prepared position. On a roll of "9," modified +1 to "10," the communications are a definite success. Now, a dieroll is made to determine the response to the request. Modifiers are +1 (the OP party is Veteran) and +1 (year is 1945). The dieroll is "5," modified +2 to "7" - this means fire support is approved in two turns. Two turns later, a nervous platoon commander finally gets his artillery mission. An accuracy dieroll is made - "1" means the fire is adjusted to the right. To determine the distance, two 10-sided die are rolled - "6" + "2" = "8." The result, multiplied by 10, with a +50 penalty due to fire on an unidentifiable feature (middle of a field), results in a deviation to the right of 8 x 10 + 50 = 130 metres. Since the support fire is from Katyushas (rockets), the Russian player receives a d10 x 10 metre bonus to the dimensions of the area of effect. Rolling a "6," his template is 100 + 6 x 10 = 160 metres across by 150 + 6 x 10 = 210 metres deep. The Fire Effect Value is 75 (standard), modified +25 (rockets) and +20 (1945), for a final value of 75 + 25 + 20 = 120. The deviated area of effect, despite missing most of the targets the Russian platoon commander was interested in, still nets some targets: a Heavy Machinegun Group at the edge of a woods, and two Panzer IVs. The Russian player rolls 1d10 to determine how many dierolls he gets on the Fire Effects Chart - "6." There is a -1 modifier to each roll, due to muddy conditions. His (modified) rolls are:
The machinegun team is destroyed. One tank has one hit; one tank has three hits. A dieroll is made to resolve the artillery hits on the tanks. Modifiers which apply are +2 (rockets), +1 (Heavy Fire hits only), and +2 (Intense Fire hits only). Therefore, the first tank has one (2 + 2 = +4) attack; the third tank has a (2 + 2 = +4) attack, a +2 attack, and a (2 + 1 = +3) attack. Against a late-model Panzer IV ("Good" armor), a result of "9" or better is needed to immobilize; "11" or higher to destroy. Against the first tank, the Russian rolls "1" (modified to "5") against the first tank - no result. Against the second tank, the rolls are "5" (modified to "9"), "1" (modified to "3"), and another "1" (modified to "4"). The "9" is good enough to immobilize the tank. A roll is needed to see if the crew abandon the immobilized tank. No modifiers happen to apply. The German player rolls "1" - not good enough. The crew abandon the vehicle. |
The air war over the Eastern Front was fought almost entirely in support of the ground forces....Air operations on the Eastern Front were designed to support the ground forces, either by attacking in support or by airlifting supplies, men and equipment, or were aimed at interrupting the enemy air operations... In Grey Storm, Red Steel the tactical use of airpower is represented by a fairly abstract system, which is designed to produce the effects of an air attack in a fast, but realistic manner. - Grey Storm, Red Steel, pg. 113 |
For the Germans, air support works in a similar manner to artillery support. A Luftwaffe Air Liaison Officer or Battalion HQ may request an air support mission. Communications must be established, and modifiers to the dieroll apply due to nationality and game year, nature of the target, requesting formation, and presence of Luftwaffe liaison officers. If the request is successful, the planes will arrive in 4-24 turns, and will linger for 1-4 turns.
When the mission is requested, the target and nature of the air support must be stated. Level bombing, dive bombing, "tank buster" and fighter (strafing) attacks are allowed.
Soviet air support was rigidly controlled at Divisional level and higher, and was very rarely controlled by the units in contact with the enemy. They would simply report the situation to their headquarters who might request air support from the Division HQ, who would allocate priorities and may, or may not, decide to allocate air support depending on the circumstances. - Grey Storm, Red Steel, pg. 117 |
The Russian player may receive pre-game air support (delivered after set-up, but before the first turn commences), or must depend on "random" support by aircraft on patrol, seeking targets of opportunity. Random support may consist of "tank busters" or fighters.
Players obtain air missions by paying points during scenario creation. In addition, either side may purchase Fighter Cover, which allows a saving roll to prevent enemy air support from occurring. The roll is modified by nationality and game year.
Anti-aircraft weaponry has been designed, built and deployed with the express aim of shooting down enemy aircraft. Despite this, results have shown that it requires a huge expenditure of ammunition in order to destroy even a single enemy aircraft... The main effect of anti-aircraft fire however was to reduce the morale and determination of the enemy aircrew, and to reduce the overall effectiveness of the attack by forcing the enemy aircraft to take evasive action. - Grey Storm, Red Steel, pg. 120 |
When air support missions occur, the planes must track their flight path across the tabletop. Anti-aircraft weapons may fire against all aircraft; small arms may fire (with reduced effectiveness) against low-level attacks. All weapons must be within range, have good morale (that is, not busy taking cover!), and qualified to fire (i.e., on Watch and Shoot orders, or not having moved or fired this turn, etc.).
Depending on the result of the anti-aircraft fire, a penalty may apply to the aircraft's attack dieroll.
Research into the combat on the Eastern Front at first indicated that close combat was a fairly frequent occurrence. However the author believes that the occasions when opponents fought at arms length with bayonet and entrenching tool were less common than were indicated and that most battles at close quarters were decided by a number of other factors such as morale, close range shooting and hand grenades. ...we felt that close combat was, by its very nature, unpredictable and have therefore adopted a simple, fast approach, rather than tie the players down to a slower and more complicated system. - Grey Storm, Red Steel, pg. 89 |
Close combat is the combat system that allows units to fight while in base-to-base contact. There is a "standard" close combat system, as well as a variant system for street fighting.
Entering Close Combat. A unit attempts to enter close combat by taking a Close Assault action, enabling it to move into base-to-base contact with an enemy (if enemy Watch and Shoot fire doesn't drive it off). If the defender occupies a structure, the attacker need only gain contact with the structure.
If the action is successful, the defender must now roll dice to determine if he stands or flees. The dieroll is modified by troop experience, leaders, morale, and terrain. A unit that fails its roll will either Fall Back or Rout, and might surrender.
Resolving Close Combat. If any units remain in base-to-base contact during the Close Combat phase, then close combats can be resolved. Each combat consists of a contest between a single group and a single enemy group. Any friendly unit that is nearby but not itself involved in a close combat may provide support for a close combat engagement, but by doing so becomes subject to the results of that combat. A unit may support multiple close combats in the same turn.
The attacker and defender each determine their close combat score, which consists of the number of non-casualty figures on their stand (supporting units don't count), plus a dieroll, plus modifiers due to experience, morale, support, equipment, tactical situation, and results of any previous round of close combat.
The scores are then compared, with the higher score winning the round (ties are legal). Both sides then roll for casualties, with the losing side (if any) also susceptible to destruction on a bad roll. The losing side must also make a dieroll in order to avoid Routing, Falling Back, and possibly surrendering.
Leaving Close Combat. During the Activity Phase of the turn, a player can make a dieroll to attempt breaking a unit out of close combat. Troop experience and leadership modify the roll. A unit that successfully breaks out can fall back from the action.
Close Combat is an extremely disorganizing activity, requiring good command and control if it is to succeed. Following a period of close combat troops need to re-establish command and control, check ammunition and casualty states and so on. - Grey Storm, Red Steel, pg. 92 |
Troops become Hesitant after close combat, until they successfully perform a Reorganise action.
EXAMPLE: A German squad [2 Rifle groups, 1 Light Machinegun group] declares a Close Assault action against an entrenched Russian infantry platoon [3 Rifle squads, each of 2 Rifle groups] plus attached mortar crew group. Watch and Shoot fire is ineffective, allowing the Germans to successfully move into contact with two of the entrenched Russian rifle groups. The Russian player dices to see if his defenders "stay put." This is 1941 and his troops are Inexperienced, so he'll need a "6" for them to stand and fight. There is a +2 modifier due to the entrenchments, and a +1 due to the platoon commander's leadership. The Russian player rolls once for each of his two Rifle groups in contact, scoring "3" and "2" (modified to "6" and "5") - the first rifle group stays, while the second rifle group must make a surrender test. To not surrender, the group must roll "5" or less. There is a +1 modifier due to game year (Russians in 1941). On a roll of "4," modified to "5," the Rifle group avoids surrendering and instead Falls Back 25 metres. The adjacent German Rifle group moves into the Russian entrenchments. In the following Close Combat phase, two German rifle groups are in contact with one Russian rifle group, and the German light machinegun group is in contact with another Russian rifle group. The Germans have initiative, and elect to begin by resolving the combat involving the two German rifle groups. Each German rifle group must attack separately, and neither can support the other (since each is in base-to-base contact with an enemy). The German player decides to attack first with the unit in the Russian trenches, since it is flanking the enemy. The combat value is 4 (number of figures in the group) plus 1d10, plus these modifiers: +2 Veteran, +5 for flanking the enemy. Rolling a "4," the German's total is 4 + 4 + 2 + 5 = 15. The Russian rifle group has no support available. The combat value is 4 (number of figures in the group) plus 1d10, with a -1 modifier for being Inexperienced. Also rolling a "4," the Russian's total is 4 + 4 - 1 = 7. The Germans win by a margin of (15 - 7 = ) 8 points, Overwhelming the Enemy. The German player is immune to casualties with this result. The Russian player must roll a "6" or less, and does so with a "2." The Russian must also dice to stay and fight, needing to roll "8" or more (the same number as the margin between the combat values). He rolls a "6," must test for surrender, rolls an "8" and surrenders! Now the German player chooses to resolve his Light Machinegun group's attack on the other Russian Rifle group. This time, the German rifle group that didn't attack is available for support (the surrender of the Russian Rifle group means it now qualifies, not being in contact with any enemy). However, the LMG group will be penalized for making a frontal attack on the Soviet trenches. The German combat value is 3 (figures) + 1d10 + 2 (Veteran) - 4 (attacking trenches) + 2 (one unit in support). Rolling an "8," his total is 4 + 8 + 2 - 4 + 2 = 12. The Russian combat value is 4 (figures) + 1d10 - 1 (Inexperienced) + 2 (it too has a unit in support). A roll of "5" means a total value of 4 + 5 - 1 + 2 = 10. A margin of (12 - 10 = ) 2 points means that the Germans Gain the Upper Hand. The winning Germans only take a casualty on a roll of "9" or higher - but rolling a "10," they take one hit. The losing Russians take a casualty on an "8" or higher, but roll a "6" and avoid trouble. The Russians roll a "4" and succeed at not running away. At the cost of one casualty, the Veteran Germans have caused one Russian squad to flee, and have taken half of another squad prisoner. Unfortunately, the Russians have a fresh squad to bring into the fight next turn, if they so choose... |
Street Fighting. A variant close combat system is used when fighting takes place among large buildings of brick or concrete construction, with large areas of rubble. Buildings are 4" square, or made up of sections which are each 4" square. Each building or building section can contain 8 groups, though only half can fire from the same building side.
Troops attack a building by moving into contact with it using a Close Assault action, just as entering a standard close combat. The defender must test to stand and fight as usual.
During the Close Combat phase, one close combat is resolved for all fighting in the building or building section. The combat value is 1d10 plus modifiers, plus the larger side receives a bonus equal to its margin over the smaller side (counted in total groups, not figures). The modifiers are similar to the modifiers for standard close combat, but give less benefit to experienced troops, and recognize Soviet superiority in tactics during certain time frames.
The casualties table is also subtly different from the standard table. Indecisive Melees are more common, and casualties are more likely for the losing side.
Attackers that win a round of close combat may "break in" and enter the building. Once both sides are intermingled within the building, a roll is required at the start of each Close Combat phase to see if a lull occurs. No combat occurs during a lulled phase.
Players will soon find out that the effective use of leaders is crucial to enable poor or inexperienced troops to perform with any degree of success on the battlefield. The better quality troops will generally perform adequately with minimal leadership. With good leadership however they may perform miracles! - Grey Storm, Red Steel, pg. 104 |
During the Morale Phase, units may be called upon to check Morale.
The Morale Chart takes into effect troop experience and circumstances. Points are given for favourable circumstances and deducted for unfavourable circumstances, with the total determining if you roll on the favourable, neutral, or unfavourable column of the chart. Modifiers apply due to leadership, morale, and especially unfavourable circumstances.
The degree to which a unit fails to make its target number determines the morale penalty:
| Hesitate | Unit gains movement penalties and targeting limitations, cannot perform Close Assaults. |
|---|---|
| Halt | Unit goes to ground, and may only fire in the Other Fire phase. |
| Unit retreats, and may abandon heavy equipment. Infantry near the enemy must test for surrender. | |
| Rout | Unit breaks and runs, abandoning equipment and possibly vehicles. Any unit near enemy might surrender. |
Units recover from a morale penalty by Rallying. A leader can attempt to rally attached troops during the Leader Activity phase, or any unit may attempt to rally during the Morale phase. The rally procedure is identical to a normal Morale test, except that the unit ignores any result worse than its current status. Leaders may apply modifiers due to leadership, entrenchments, and for not being under fire or in sight of the enemy.
Units that successfully rally must take a Rally action in the next Activity phase. While rallying, they are considered Halted, and only fire during the Other Fire phase.
Tank Panic applies to Poor or Inexperienced troops who fail a morale test in the presence of tanks, and adds a penalty to all morale rolls until the unit rallies. (Troops experienced with tanks are immune from this result.)
In scenario play, units may start the game with one of several Special Morale Considerations:
Many German observers commented on the unpredictability of the Soviet soldier, in that on one day he would fight fiercely against overwhelming odds, and the next he would break and run at the slightest setback. - Grey Storm, Red Steel, pg. 104 |
If half or more of the Russian player's forces have been destroyed or are suffering from an adverse morale result, a Fight or Flight test must be made. The difficulty of the dieroll varies by game year. The roll determines whether remaining Russian units become Determined or Demoralised. The Fight or Flight roll is only made once per game.
Most wargamers, and wargames rules, blithely assume that the flanking table edges are safe, in that there is no danger from that direction. This leads to situations where players unrealistically manoeuvre their troops along the edge of the table to take advantage of the safe flank (most of us have seen the player who always attacks with his models so close to the table edge they are practically falling off!). Real warfare however is not like this, and troops in modern warfare may come under fire from their flanks at any time. - Grey Storm, Red Steel, pg. 41 |
Units operating on the edges of the tabletop - other than a side's home edge - are subject to random fire "from the flanks." This applies even to reinforcements entering the battle from other than the home edge.
The provision of ammunition in the correct place at the correct time was of crucial importance at every level. There are many accounts where the lack of ammunition, or the sudden arrival of fresh supplies, changed the course of the battle. Such battlefield dramas are well documented, particularly when German assault guns were in action for long periods, or when the Soviets were desperately short of ammunition at Stalingrad. - Grey Storm, Red Steel, pg. 79 |
"Heavy fire" units -- chiefly tanks, self-propelled guns, artillery, mortars, and heavy machineguns -- may run out of ammunition during the course of the game. Whenever such a unit rolls an unmodified "10" in combat, an ammunition check must be made. Modifiers apply due to nationality and game year, prepared positions, type of scenario, and previous replenishment. The result determines if the unit runs out of ammo immediately, has sufficient ammo for two more turns, or has no shortage. Ammunition parties or vehicles may replenish ammunition.
Certain units start the game with a limited amount of ammunition, or a limited amount of special-purpose ammunition. These include limitations on high explosive rounds for tank and anti-tank guns, smoke and illumination rounds for mortars and artillery, hand-held infantry anti-tank weapons, flamethrowers, demolitions, and Nebelwerfer and Katyusha rocket launchers.
The rules of Grey Storm, Red Steel also cover:
| Last Updates | |
|---|---|
| 23 April 1998 | first published |
| Comments or corrections? | |