
Warhammer Ancient Battles
- Description
- Detailed Description
- Supplements
- Reviews
- Links
Back to ANCIENTS RULES
| "The final point I'd like to make is that although I find ancient history
fascinating, and while these rules are based on a lot of careful reading, when
all is said and done they have been written because I like playing games
with model soldiers and they reflect that fact. Put simply, there's nothing
I like better than seeing a few hundred well-painted miniatures laid out on
nicely made terrain. Or at least, I like nothing better than this except
winning a hard fought battle with said miniatures (rare though such victories
are!). This is the reason I started wargaming and why I still do today."
- Foreward Warhammer Ancient Battles, pg. 2 |
Building Ancient Armies
Armies for Warhammer Ancient Battles are built by spending points, aided by an army list. The main rulebook provides only two army lists - Romans (100 B.C. to 250 A.D.) and Barbarians (500 B.C. to 500 A.D., representing Celts, Britons, and Germans) - though other lists are available in supplements or over the Internet.
Army lists generally restrict a player's ability to spend points, either by requiring a minimum amount spent on a particular type of force, or by preventing a player from spending more than a maximum amount on some element.
Example: The Roman army list from the main rulebook places
these limits on would-be Roman commanders:
|
Within the army lists, forces are usually categorized into three types: Characters (individuals), Units (bodies of ordinary troops), and War Machines (cumbersome military devices). The Units category is often broken down even further - into infantry and cavalry, or regulars and reserves, etc.
Then comes the listing of available forces, rated with a point cost. Characters and War Machines are generally purchased singly, while infantry and cavalry must be formed into units of at least 5 similar models. In some cases, extra points may be spent to upgrade a troop type's base equipment, or to convert it into a special-purpose troop for its unit - a leader (extra die in combat), standardbearer (bonus in close combat) or musician (close combat bonus, march bonus).
| Example: Let's say that I have 8 Celtic chariots that I want to
come up with Warhammer Ancient Battles stats for. Looking up
"Chariots" in the main rulebook's Barbarian Army List, I find that chariots cost
36 points each.
In addition, for 5 extra points I can turn one chariot per unit into a leader or a standardbearer. Or extra points can be spent for a shield or spear (in addition to the default weapon - javelins). So if I decided to pay for an 8-chariot warband, including one leader and one standardbearer, but no extra equipment, it would cost: Standard Chariots 6 x 36 = 216 points Chariot Leader 1 x (36 + 5) = 41 points Chariot Standardbearer 1 x (36 + 5) = 41 points |
The individual entries also list the ratings for each troop type, as well as any special rules which apply to them. The nine Characteristics which form a figure's Profile are:
- Movement Allowance (M)
- Weapon Skill (WS) [melee weapons]
- Ballistic Skill (BS) [ranged weapons]
- Strength (S)
- Toughness (T)
- Wounds (W) [hit points - most warriors have 1 Wound]
- Initiative (I) [determines striking order in close combat]
- Attacks (A) [number of strikes a figure can make per turn, usually 1]
- Leadership (Ld)
Example: Here is the main rulebook's entry for Roman Legion Light
Infantry:
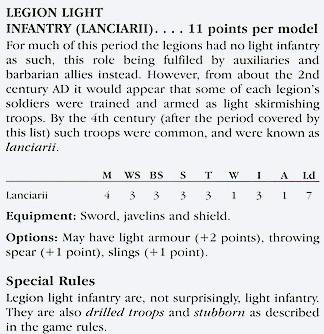 |
And finally, the army lists try to inspire players by providing a brief history and background of a particular army from antiquity.
Going to War
The designers provide multiple means by which players can take their armies to war. First, there are a variety of scenarios provided (which may be mutually agreed upon by the players, or randomly selected by a dieroll):
- Pitched Battle
- Meeting Engagement
- Surprise Attack
- Flank Attack
- Breakthrough
- Ambush
- Last Stand
- Skirmish
Each scenario provides special rules for deployment, limits to army size (using the points-value system), and victory conditions.
To give further variation, a Scenery Generation Table allows players to determine terrain set-up options through dice rolling.
After giving tantalising suggestions as to how to run a historical campaign, the main rulebook provides actual rules for an ahistorical campaign. This mapless system lets players roll dice to determine their three initial territories. The fourteen territory types provide special bonuses, such as adding characters or units to an army, or expanding the allowed point total.
All of the players in the campaign may play each other freely, without use of any schedule. When players meet, each stakes one of their territories on the coming battle. In addition, a new territory is generated by dieroll. The winner has his choice of taking the new territory (and letting his opponent keep his staked territory), or taking his opponent's staked territory (in which case, his opponent gets the new territory).
When rolling for new territories, it is also possible to create Spies or cause Random Events. The actions of a Spy are randomly determined prior to play, and may result in enemy units becoming unavailable or a change in the territory at stake. There are eleven random events, such as Volcanic Eruption or Revolt, which result in the loss of territories or territorial bonuses.
As a way of concluding a campaign, the designers suggest allowing the first two twelve-territory-empire players to fight one final battle for ultimate mastery.
Rules are also provided to grant benefits to veteran units and characters. A unit which captures an enemy standard receives an "elite" bonus, allowing it to re-roll all of its attack dice once per game. Elite status is lost once the unit is broken or destroyed. Characters gain veteran bonuses for heroic feats, but the benefits are lost if the character is slain. Victorious generals receive a one-time bonus, determined randomly, which they may use in their next battle.
Sequence of Play
The game is played in a series of Turns, each of which consists of one player-turn for each player. A player-turn consists of the following steps:
- Start of the Turn Phase
- Movement Phase
- declare charges
- rally
- compulsory moves
- charge movement
- remaining movement
- Shooting Phase
- Close Combat Phase
- engage in combat
- determine results
- break tests
- panic tests
- fleeing
- pursuit
- redress ranks
Certain units may be required, as a result of the course of battle, to make various rolls "at the start of the turn." This is what the Start of the Turn Phase is for.
Movement
A troop type's Profile indicates its movement speed, though this may be modified if extra armour has been purchased for the unit. With restrictions, units can move at march rate (double speed) and fast march rate (triple speed). Terrain penalizes movement rates.
Figures travel in formations of one or more ranks, moving straight ahead unless taking advantage of the allowed manoeuvres:
- wheel (pivoting around a front corner)
- turn (figures turning in place)
- change formation (grow or shrink number of ranks)
- reform (unit sacrifices movement in order to change direction and/or formation)
Compulsory Moves are those moves which the player has limited control over, such as when a unit is fleeing due to a bad morale result. This movement occurs before charges are resolved.
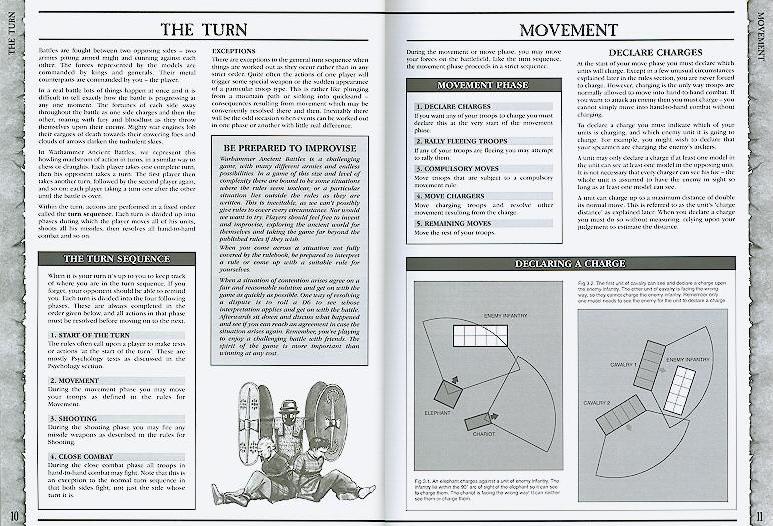
Charging is how units enter hand-to-hand combat, and must be declared at the start of the Movement Phase. The actual charge occurs several sub-phases later, after units have attempted to rally and have made any "fleeing" movement. First, the target unit's player must select a response: Stand & Shoot, Hold, Flee, or Fire & Flee. If movement or firing occurs, they are resolved immediately. If the charging unit succeeds at any required morale checks (due to casualties), charge movement occurs (double the normal rate of movement). Since no pre-measurement is allowed, it is possible that a unit might fail to make contact with its target - in which case, the charging unit is moved back to where it would have moved under normal movement.
Ranged Combat
During the Shooting Phase, the player whose player-turn it is selects his ranged-weapon units and conducts "shooting" type attacks. A figure can attack if it can see its target, and if the target is in range of the weapon being used. (Exception: "rear rank" archers can fire over the heads of soldiers in front of them, but only at half effect and only if the unit does not move.) Units generally mass their fire against a single target.
| "You will have gathered by now that it is necessary to roll quite a few dice
to resolve shooting - whole handfuls at once in fact! This doesn't take as long as you
might imagine because all the dice are rolled together."
Fast Dice Rolling, Warhammer Ancient Battles, pg. 27 |
To resolve ranged combat, one die is rolled for every shooter. Modifiers apply to the dieroll, due to range, target size, movement, formation and cover. The modified result is compared against the troop type's Ballistic Skill (BS) to see if the shot hit. Rolls of "1" always miss, and a "6" always hits.
Next, a roll is made to see if the hit succeeds in wounding the target. The weapon's Strength rating is compared to the target's Toughness to determine a score. Then one die is rolled per hit, and compared against the score to see if a Wound occurs. (A penalty to the dieroll may apply, if the original hit was scored by an automatic hit despite severe modifiers.)
The defender then gets a chance to see if armour negates the damage. One die is rolled per Wound. The score needed is determined by the troop type (infantry or cavalry) and armour. Modifiers may apply due to the Strength of the weapon (reflecting armour penetrating ability). Each successful armour saving throw negates one Wound. (An infantry figure without armour or shield does not receive an armour saving roll.)
Generally, one figure is removed for each Wound scored. Casualties are taken from the rear ranks, reflecting new soldiers stepping forward to take the place of losses.
Example: Let's say that a unit of 10 Celtic slingers opens fire on
a unit of 5 Roman auxiliary cavalrymen. All slingers are in range (18"), but only the
front rank (5 slingers) can see their target.
|
Melee Combat
During the first sub-phase of Close Combat, hand-to-hand combat is worked out between units in physical contact. Sometimes this involves one friendly and one enemy unit, but it can include multiple units. During the Close Combat phase - unlike the Shooting phase - both players will have the chance to make attacks.
Within each close combat, models fight in Initiative (I) order - so that higher Initiative figures attack first (and casualties are removed) before lower Initiative figures may attack. Models which charged may attack before anyone else. Only models in contact with the enemy may fight. In some cases, both a rider and his mount may attack.
The melee procedure is nearly identical to the shooting system. The differences are that Weapon Skill (WS) is used instead of Ballistic Skill (BS) when making the "to hit" roll, and that the attacker's Strength (and not the weapon's Strength) is used when figuring the "to wound" result. Casualties are noted, but are not immediately removed from the table.
| Example: We'll say that our unit of 4 Roman auxiliary cavalry now
has managed to charge a unit of 10 Celtic light cavalry from the flank. Close combat ensues. Both
players may attack. However, since the Romans charged, their attacks are made
first.
The Roman rolls one die for each of his 4 cavalry. Comparing their Weapon Skill (WS) of 3 vs. the Celts' WS of 3, the player discovers he need to roll a "4" or better. He rolls 1, 2, 4, 4 - 2 hits. Now he rolls for Wounds. Comparing his cavalry's Strength of 3 vs. the Celts' Toughness of 3, he finds he needs a "4" or better. Rolling 2 and 5, he inflicts one Wound. Since the Celtic light cavalry are unarmoured except for a buckler, they need a "5" to save. The Celtic player rolls...and gets a 6. No Wounds are inflicted. Now, the Celts may strike back. One roll may be made for each of the 2 light cavalrymen in contact with the Romans. Like the Roman player, he needs a "4" or better to hit. He rolls 4, 5 - 2 hits. Rolling for Wounds, he finds he also needs a "4" or better. (Most troops have Strength and Toughness of 3.) He rolls 2 and 5 - one Wound. The Romans are better armoured (light armour and shield), so they need a "4" or better to save. Rolling a "6," the Romans avoid taking damage. |
After all combats have been resolved, the players use the next sub-phase to determine which side "won" each individual fight. Each side scores 1 point per Wound inflicted (this is why casualties must be left on the table until now), plus bonus points for having a standard, being on high ground, making a flank or rear attack, destroying chariots, and for number of ranks in the unit. In the case of a tie, the side with musicians wins (if both sides have musicians, competing dierolls are made to see who wins).
Units on the "losing" side of close combat must take a Break Test. Two dice are rolled, with the margin by which they lost the fight acting as a modifier to the result. The modified score is compared against the unit's Leadership (Ld) to determine if it breaks. A broken unit is marked by turning its figures to face the rear. (A unit of fewer than 5 figures always breaks if it loses a close combat.)
Next, Panic Tests are taken. A Panic Test is similar to a Break Test, although different modifiers apply. A unit is required to take a Panic Test if "bad things" have happened to it (i.e., heavy losses) or near it (friendly units have broken or been destroyed, general is slain, etc.) [Panic Tests may also be called for during the Start of the Turn phase, if a unit is close to a friendly fleeing unit.]
(If a General is present, his Leadership value may be substituted for the unit's value when taking Break and Panic Tests. If the army's battle standard is present, the unit may re-roll any failed Break Tests.)
After Break and Panic Tests have been resolved, fleeing occurs. Unlike normal movement, the movement rate of a fleeing unit is determined by dieroll. Next, victorious units may choose to pursue their fleeing opponents. Pursuit movement is also determined randomly. If a pursuing unit succeeds in catching its fleeing opponent, the fleeing unit is destroyed.
| Example: Continuing our combat example, the players must now determine
who "won" the combat. Since neither the Romans nor the Celts scored any Wounds, only
bonus points will determine this victor. With only 4 models in their unit, the Roman
auxiliary cavalry unit is too small to get the bonus points for a flank attack.
On the other hand, the Celts receive a +1 bonus for having a standard bearer.
So the Celts win, 1 point vs. 0 points.
Since the Romans have lost, they must take a Break Test. Their Leadership (Ld) is 7. The Romans roll 3 and 4, which totals 7, but must add +1 (the amount they lost the combat by) for a final result of "8." Since this is greater than the unit's Ld, the Romans break. Rolling 3 dice, the roll is 2, 4, 5 - so the Romans flee 11" away. The Celts pursue, and roll 1, 3, 6 - 10" of movement, not enough to catch the fleeing Romans! The Romans have narrowly avoided complete destruction. |
Units engaged in close combat are not allowed to move during the Movement phase. Therefore, the "redress ranks" sub-phase (at the end of the Close Combat phase) is a player's chance to move figures around within a unit. Units can expand their frontage or, if victorious in this turn's close combat, can "lap around" with its figures to engage an enemy's flank or rear.
A unit which feels it is in a bad spot may attempt to disengage from close combat. Disengagement is declared during the "declare charges" sub-phase, and resolved during "compulsory movement." A roll vs. Leadership (Ld) is required - if successful, the unit may move up to double its normal movement rate away from the combat; if unsuccessful, the unit breaks (and its opponent may pursue). (In some circumstances, cavalry may disengage without a Leadership roll.)
A Character involved in a close combat has the option of issuing a Challenge before combat is resolved, if the enemy has a Character involved in the same fight. If the challenge is declined, then an enemy character must be removed to the rear ranks for the current turn. Otherwise, the two characters engage in a "private" fight within the greater melee, which continues over several turns until one of them flees or dies.
Special Rules
The core rules for the game are given in less than 40 pages, including examples, illustrations, and historical anecdotes. An additional 27 pages add supplemental rules, covering:
- specific weapons (daggers, two-handed weapons, figures with two melee weapons, polearms, slings)
- armour and shield types
- psychology (fear, terror, frenzy, hatred, stubborn, warbands)
- light troops, including skirmishers
- chariots
- elephants
- war machines
- buildings and fortifications
Additional rules are given in the various army lists, both in the main rulebook and in the supplements.