When we originally became interested in the naval side of the War Between the States we found that, while there were several good figure suppliers, there were no sets of rules that suited our purpose. They were either too simplistic, too complex, or simply too inaccurate in their results.
|
The designers kept three factors in mind when creating these rules:
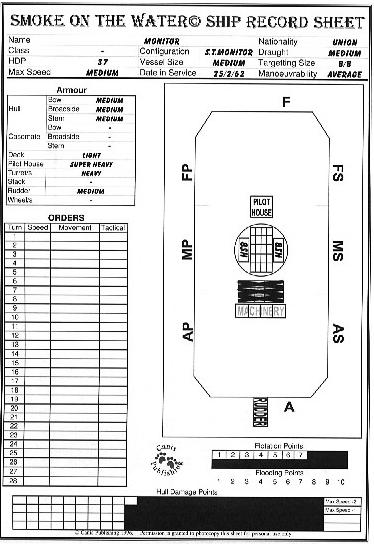
Each ship is represented by a record sheet. The rulebook provides a blank sample sheet, as well as two filled-out examples (for the Monitor and Virginia).

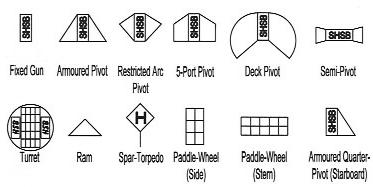
The record sheet serves as a convenient place to note vital statistics about the ship, a means of recording damage, and a location where each turn's maneuvering orders can be written down. Using a set of pre-defined symbols, certain items of equipment - chiefly guns and their mounts, but also rams, paddle-wheels, and spar-torpedoes - are indicated graphically on the ship's plan.
Each ship is rated for:
| Configuration | Conventional, Casemate, Sidewheel, Sidewheel Double Ender, Sternwheel, Monitor (Single, Double, or Triple Turret), Special | Determines hit location table when resolving combat |
|---|---|---|
| Hull Damage Points (HDP) | 2 (lowest on chart) 82 (highest on chart) |
Measure of structural damage and crew state. HDP's are indicated on the sheet as a total, and also as a series of damage boxes designed to graphically indicate the condition of the ship. |
| Max Speed | Slow, Medium, Fast or Very Fast | Determines maximum movement rate |
| Vessel Size | Very Small, Small, Medium, Large, Very Large | Affects damage due to collisions |
| Draught | Very Shallow, Shallow, Medium, Deep | Determines likelihood of grounding in shallow water |
| Targeting Size | Rated A (smallest) through F (largest) | Ships have two ratings, depending on whether they are being fired at from the ends or the sides. |
| Manoeuvrability | Poor, Average, Good, Very Good | Manoeuvrability (and current speed) determine a vessel's turning radius |
| Flotation Points | Based on total HDP | Flotation Points are lost due to Flooding |
| Flooding Points | Received due to combat damage | Measure of how many Flotation Points are lost per repair phase |
Armour is noted for up to twelve different areas (deck, pilot house, turrets, stack, rudder, paddlewheels, hull, and casemate). For hull and casemate, there are separate notations for bow, broadside, and stern armour. Armour consists of four possible types: ironclad, tinclad, cottonclad, and unarmoured. Ironclad armour has five levels (light, medium, heavy, partial heavy, and super heavy).
Guns comprise five major types: rifles, smoothbores, columbiads, mortars, and howitzers. By weight of shot, most guns are available in five sizes - Very Light, Light, Medium, Heavy and Super Heavy.
Individual guns differ in their placement and mounting. Guns can be fixed, pivot, or turret; pivoting guns are further broken down into pivot, quarter-pivot, semi-pivot, restricted-arc pivot, and 5 port-pivot. Lastly, guns can be deck-mounted or behind gunports.
EXAMPLE: Below is the completed record sheet for the Union Monitor. The ship list at the back of the rulebook provides the information needed for this form. The ship plan has been customized by deleting the stack, and adding the turret (with two HSB's - Heavy Smoothbore guns). Excess Flotation and Hull Damage points have been marked out.
|
Games can be based on historical engagements, or players can create their own fictional battles. There is no points system, so players must use their best judgment to determine if a scenario is balanced or not.
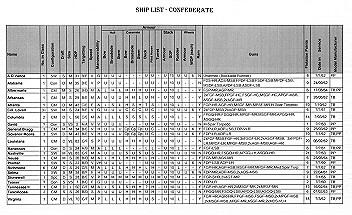
Statistics are provided for 25 classes of Union vessels and 22 Confederate vessel classes. In addition, a complete vessel design system allows players to come up with statistics for additional ships, if basic information is available (configuration, length, beam, draught, and so forth). The appendix lists all 1/600 scale models available from Thoroughbred Figures and Peter Pig at the time of publication (with game stats).
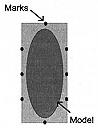
The rules recommend the use of rectangular bases 10mm longer and wider than the models, with marks on the base to aid in judging firing arcs and target aspect.
Any terrain features - river banks, islands, shallows - can be indicated by cloth, card, or sculpted terrain pieces. Once the terrain is set out, the players deploy their ships at opposite ends of the tabletop, placing their models one at a time alternately.
The game takes place as a series of turns, each of which comprises the following phases:
| Orders Phase | Players write orders for their ships. After all orders are written, speed counters are placed near each ship. |
|---|---|
| Movement Phase | Ships move, as dictated by their orders and speed. Ships may run aground (or break free), anchor, and collide. |
| Gunnery Phase | Guns may conduct direct and indirect fire. All attacks are considered simultaneous (except for forts). |
| Boarding Phase | Crew-to-crew combat is resolved. |
| Morale Phase | Morale checks are required due to damage, loss of leaders, tactical situation, and adverse events to friendly ships. |
| Fire Test Phase | Under certain circumstances, a ship might catch fire (or put out a fire). |
| Repair Phase | Crew may conduct limited repairs. Flooding occurs. |
Unless a specific scenario dictates otherwise, the game continues until one side is sunk, captured, surrendered, or fled.
Written orders consist of three parts - the speed for the coming turn, manoeuvers, and tactical instructions.
There are five levels of Speed: Immobile, Slow, Medium, Fast, and Very Fast. Ships may change their speed by one level per turn. Reverse movement is allowed. The ship's stats list its maximum speed. Speed determines the distance which a ship will travel.
Manoeuvers allocate movement distance for this turn into a combination of straight movement or turns to port or starboard.
Tactical Instructions cover attempts to board, scuttling, anchoring, repairs, and deliberately attempting to run aground.
At the end of the Orders Phase, all orders are revealed. Speed markers are placed next to each ship.
EXAMPLE: For instance, the orders
would indicate that the ship was at Medium speed (25" of movement). It plans to use those 25" by moving forward 5", making a starboard turn for 5", then continuing forward for 15". The tactical instructions indicate the crew is prepared to board (BD) any enemy ship they might end up alongside. |
Ships are moved simultaneously, exactly as recorded in their orders. Turns are measured using a template, with the specific template being determined by the ship's current speed and its manoeuvrability (from its stats). Side wheel paddle steamers have the option of turning in place.

Ships which pass over shallows, mud banks, sand bars, or wrecks must take a grounding test. The base chance of grounding is determined by depth of water and terrain, with modifiers applying due to speed, flotation damage, having a local pilot, and the player's orders (i.e., did he intend to ground the ship?). If a ship does run aground, it becomes Immobile and takes damage. The damage roll is modified by original speed, size of vessel, and terrain.
Grounded ships may attempt to break free in following turns. Modifiers apply due to draught of the ship, speed, damage, and number of previous attempts to break free. An unlucky ship may find itself permanently grounded.
Ships which collide may take damage. Collision Speed is determined by the actual speeds of the vessels involved, as well as the type of collision. If the collision speed is significant, then a damage roll is made (modified by collision speed, armour, vessel size, collision aspect, and use of ram). If damage occurs, there is a chance that the vessel will begin to flood. Special rules apply to collisions with stern- and sidewheelers.
Collisions may result in ships becoming locked together. If the ships do not lock, then the vessels' final speed and direction are determined, and any remaining movement is resolved.
All gunfire in the same turn is considered to be simultaneous. Ships which collided or ran aground this turn may not be eligible to fire.
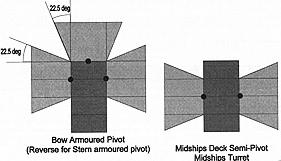
In order to shoot, a gun must be able to trace a clear line of fire to its target, unobscured by other vessels or blocking terrain. Depending on the gun's type of mounting, it may have a limited arc of fire. Arc of fire can be determined based on location and mounting, using the marks on each ship's base and the firing template.
EXAMPLES:
The illustration above shows how firing arcs can be determined, using the recommended base marks and the firing template. On the left is a Bow Armoured Pivot, showing the restricted arc of fire due to gunport placement. On the right is the firing arc for Midships Deck Semi-Pivot and Midships Turret mountings, reflecting limits commonly due to rigging. |
Each gun type is rated for five range bands - Pointblank, Short, Medium, Long, and Extreme. Gunport-mounted guns cannot fire at Extreme range, due to being unable to elevate sufficiently. Attacks are announced before ranges are measured, with guns counting as automatically missing if their target is subsequently determined to be out of range.
There are two types of gunnery: direct and indirect fire.
All guns except for mortars are capable of direct fire (flat trajectory shooting). Howitzers can only use direct fire within a minimum range.
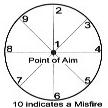
The default base chance to hit any target is "5" (a d10 dieroll must be equal to or less than this target number). The base chance is modified due to range, speed of firer and target, target size, and whether the target is obscured by another vessel. A dieroll of "1" is an automatic hit, while a roll of "10" is always a misfire.
If a gun misfires, a die is rolled to determine if the gun jams or bursts. Confederate guns have a greater chance of jamming.
EXAMPLE: Let's say that the Monitor fires at the Virginia at a range of 18 cm. The Monitor has two turret-mounted heavy smoothbores (HSB's), and 18 cm is Short range for them. The base chance is 5. This is modified by +2 (Short range) and +2 (target size - Virginia from the side), bringing the target number to (5 + 2 + 2 =) "9." Rolling for each gun, the Union player rolls "8" and "10." The first roll is less than the target number and hits. The second roll is a misfire. Rolling for the misfire, the Union player scores a "9" and the gun jams. |
Only mortars, and howitzers firing beyond a certain range, can perform indirect fire (shells fired at high angles of trajectory).
To resolve indirect fire, a deviation template is placed over the center of the target, and a firing roll is made. A result of "1" indicates the shot hits its intended target; a roll of "10" is a misfire. Any other result indicates that the shot deviates in a direction shown on the template. To determine the direction of the deviation, another roll is made, with the number of dice depending on the weapon type and range. If the deviated point of fire happens to intersect the base of another vessel or fort, the shot hits that target (whether friendly or enemy).
EXAMPLE: A Confederate fort is equipped with a Heavy Howitzer (HH), which we'll say it chooses to fire at the USS Osage. The deviation template is placed over the center of the ship, and the dieroll is made - the Confederate player scores a "2," which means the shot deviates away from the firer. Now a roll is made to determine how far the shot deviates. The target point was 45 cm away, which is Short range for a Heavy Howitzer. At Short range, a d5 is used to determine deviation. The Confederate player rolls "1," which means the shot only deviates 1 cm. Since the ship's base remains beneath the new target point, the shot still hits! |
When a shot hits, the next step is to determine where the target vessel was struck. The choice of Hit Location Table depends on the target vessel's configuration, and the column used depends on the direction of the incoming fire (from bow, stern, side, or above). A dieroll, compared against the appropriate column of the appropriate table, indicates the hit location. The possible locations are:
A "10" results in a Critical Hit, which leads to at least one more roll to determine hit location. The possible results are:
There is a possibility that armour will deflect the shot. The type of gun is cross-indexed against the armour at the hit location to determine a target number. If a dieroll is less than or equal to the target number, the shot is deflected by the armour. Modifiers apply due to range. A "1" always deflects the shot, while a "10" is an automatic failure. In certain combinations of armour and gun type, no roll is necessary - the shot is always successful, or always deflected.
If the round fired was shell (as opposed to solid shot) and it was not deflected, a dieroll is required to see if the shell detonates. Due to poor fusing, Confederate shells are less likely to detonate. (Detonation rolls are required for shell hits against unarmoured or cottonclad armour, regardless of penetration.)
Damage inflicted depends on the size of gun and type of shot. The damage done by solid shot depends on whether or not the shot was deflected by the armour (deflected shots do no damage except at close range). Damage from shells depends on the size of gun, and whether detonation occured.
EXAMPLE: Continuing our combat example from above, it was the Monitor which hit the Virginia with one shot. Since the Virginia is of casemate configuration, the "Conventional/Casemate Vessel" table is used. The shot came from the side, so the "Broadside" column is used. The Union player rolls a "3," which means a Casemate hit. Looking at the Virginia's record sheet, it is determined that the target has broadside casemate armour of Heavy. A Heavy Smoothbore gun firing on Heavy Armour has a target number of "10." Due to the range of Short, however, the target number is reduced to "9." Rolling to deflect the hit, the Confederate player scores a "10" and automatically fails to deflect the shot. According to the Hit Effects Table, a Heavy gun firing at Short range with solid shot does 6 points of damage. |
EXAMPLE: Continuing our other combat example, the Osage has been struck by a shell from a Confederate battery. Since the Osage is a Single Turret Monitor, the "Single Turret Monitor" hit table is used. The shot was indirect fire, so the "Plunging Fire" column is used (that is, the shell came in from above). The Confederate player rolls a "10," which means a Critical Hit. Rolling again, a "6" indicates a Special hit - a further roll of "2" indicates a Gun Port result. In this special case, the shell has entered through an open gunport, and no deflection roll is possible. Rolling for detonation, the Confederate player gets an "5" - the shell detonates. A Heavy shell which detonates does 10 damage points. |
How damage is resolved depends on the hit location. In many cases, the damage points are subtracted from Hull Damage Points (HDP). As HDP's are lost, maximum speed is reduced. When all HDP's are gone, the crew abandon ship. (A boiler explosion will also cause a crew to abandon ship.)
Damage below the waterline may result in the vessel receiving Flooding Points. The ship then loses a number of Flotation Points per turn equal to the Flooding Points score. When the ship has no remaining Flotation Points, it sinks.
Damage to the stack results in a loss of Stack Damage Points. When no Stack Damage Points remain, the vessel receives a permanent reduction to maximum speed due to loss of updraught to the boilers. Machinery hits also result in reduction of maximum speed, and may result in a boiler explosion for certain types of ships.
Turrets cease to function once their damage exceeds their original Turret Damage Points.
Damage to guns knocks them out of action. A jammed port will also put a gun out of action until it can be repaired. A jammed turret effectively turns those guns into fixed-position guns, and cannot be repaired.
A rudder hit may result in a ship that is forced to turn, or not allowed to turn at all.
A pilot house hit may kill the captain, the pilot, or both. Loss of a captain results in a morale penalty. Loss of a pilot means the ship moves straight for a random period of time. If the pilot house is destroyed, the ship may become unsteerable.
A magazine explosion destroys the target ship, and may cause damage to neighboring vessels.
EXAMPLE: The Monitor previously scored 5 points of damage against a hit location of Casemate. This results in the Virginia losing 5 points of hull damage. |
EXAMPLE: The Osage was hit through an open gunport by a shell which detonated. According to the open gunport damage rules, one random gun (capable of firing on the fort) is destroyed - in this case, one of the turret guns. Because the shell detonated, the other turret gun is also destroyed. The 10 damage points are subtracted from the turret damage points, bringing the total down from 20 to 10. |
Boarding - the attack of one ship's crew against another ship's crew - must be resolved if orders were given for Boarding, and if the ship ends its move immobile and in contact with a hostile immobile ship. Multiple attackers can combine boarding attacks against a single enemy vessel.
To resolve a boarding action, the attacker rolls two six-sided dice. Modifiers apply due to the ratio between the attacker's and defender's current Hull Damage Points (a measure of crew size), the presence of large deck guns on the defending ship, specially equipped boarding parties, and if the defending ship is an ironclad.
As a consequence of the dieroll, either or both ships may lose HDP's. A successful attacker will capture the ship, but the defender may receive a chance to scuttle his vessel. Extreme die rolls may cause the death of either side's captain.
EXAMPLE: Let's suppose that the Virginia manages to ram the Monitor, and then makes a boarding attack. The Virginia has a current HDP of 58, while the Monitor has been reduced to 23 HDP. Modifiers to the dieroll are +2 (Virginia's crew outnumbers the Monitor's crew by 2:1), and -3 (defender is an ironclad). The final modifier is -1. The Confederate player rolls "11" on two dice, which is modified to "10." This results in a stalemate, with the battle continued next turn (unless the Virginia chooses to withdraw). Both sides roll for losses - the Virginia loses 6 HDP, while the Monitor loses 3 HDP. |
A morale roll is called for if a ship:
Two dice are rolled. The result is modified due to the cause(s) of the morale roll, loss of captain, per vessel seen sinking or surrendering, the ship's damage state, and whether torpedoes detonated this turn.
A modified result of "12" or higher causes the ship to surge forward and attempt to attack the nearest enemy (ramming, if possible).
A result of "2" or less is a morale failure. The specific results depend on whether the ship is on fire or flooding, range from the enemy, and its ability to move or fight. Ships will either retreat, surrender, or be abandoned by their crews (and possibly scuttled).
EXAMPLE: Imagine that the boarding action between the Monitor and Virginia has continued until the Monitor's HDP is below half, forcing a check in the Morale Phase. The modifiers to the dieroll are -1 (half HSP lost) and -1 (we'll say a friendly vessel was seen to sink this turn). The final modifier is -2. The Union player rolls "4" on two dice, which is modified to "2" - a morale failure! Since the Monitor has an enemy at close range, and is unable to move (due to being locked with the Virginia), the result is that the Monitor surrenders. |
During the course of the game, a Fire Test Marker is placed on a ship if:
During the Fire Test Phase, a Fire Test must be made for every ship which has a Fire Test marker, and for every ship already on fire. Two dice are rolled. Modifiers apply due to damage, reason for the fire test, if the ship is abandoned, the number of Fire Test markers, and the number of turns on fire.
As a result of the roll, a fire might start (or continue), be extinguished, or burn out of control. A ship on fire makes a roll to determine damage. If a ship is burning out of control, the crew abandons ship, damage accrues, and there is a chance per turn that the magazine will blow. An out of control fire cannot be extinguished - the ship will eventually blow up or sink.
EXAMPLE: In our previous example, the Osage was struck by a lucky shell through an open gunport. Since the shell detonated, the Union player must make a Fire Test during the Fire Test Phase. A +1 modifier applies to the roll, due to the single Fire Test marker placed earlier. The Union player rolls two dice, gets a total of "2," which is modified to "3." This results in an extinguished fire (the only good news for the Osage this turn!). The Fire Test marker is now removed. |
The first action in the Repair Phase is to resolve Flooding. Each ship loses a number of Flotation Points equal to its current number of Flooding Points. Ships may sink.
Afterwards, repairs are conducted (if they were part of the written orders for the turn, and only if the ship is not on fire). Four types of damage results can be repaired - jammed guns, jammed gunports, rudders, and machinery. A die is rolled, and the damage will be fixed, not fixed, or determined to be unrepairable.
Another potential repair allows a chance to reduce flooding. This may be conducted only if the ship is moving slowly, and if no other repair attempts are made. With the appropriate dieroll, total Flooding Points may be reduced. Once Flooding Points are reduced to zero, a ship will begin to regain Flotation Points.
The rules contain provisions for torpedoes (in the modern sense, these were more like what we now call mines) - spar torpedoes, fixed torpedoes, and drifting torpedoes. There are also rules covering forts and batteries. Land structures use hit locations and damage points in combat as do ships, but always take their firing opportunities last, and are subject to suppression (when gunfire causes the troops to cease manning the guns).
Optional rules add river currents and drifting, variable rate of fire (so that larger guns cannot fire every turn), and towing.
| Last Updates | |
|---|---|
| 8 June 1998 | page first published |
| Comments or corrections? | |