To create rivers/streams with realistic texture for
use in wargaming, get a couple of transparent rulers similar to the ones shown below
(mine cost 40 cents each at the local supermarket). They will be coated with auto body
putty to simulate banks of the river. The transparent ruler becomes the water in the
river/stream, and also provides the strength and durability for the river section. Paint
and flock complete the look. I use transparent rulers, but blue- or green-tinted rulers
look good too.
 Original ruler
Scraping away printing
 |
Turn the ruler over and use a sharp rounded knife to scrape off the lettering and
printing on the back of the ruler. This technique can't be used with rulers with printing
on the top of the ruler, since the scraping off of the printing would damage the finish of
the "water." Don't worry about the bottom plastic looking scratched, since a later coat
of paint will remove this white appearance. You don't need to scrape off the index marks,
since they will be covered up by the putty. Although I have not tried it, I would expect
sandpaper to work instead of using a sharp curved knife. |
Cutting shape of riverbank
 |
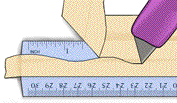
Turn the ruler over so it is the right way up. Put a strip of masking tape on the
top surface, then use a sharp knife to hand cut a line on the ruler that will delineate
the bank of the river/stream. Peel away the masking tape so that the centre of the river/stream
remains, and leave a tag of masking tape at the end of the ruler so that the tape can
be grasped later on. Don't forget that masking tape is really hard to remove from any
surface if left on for more than two days, so put the tape on just before doing the putty
and not weeks ahead. |
Removal of tape while the putty is soft
 Cross-section of Original Ruler
 Partial Cross-section with Putty
 |
Mix up a small amount of two-part epoxy auto body filler. You don't need much, since
you only have about ten minutes to work with this filler before it is too hard to work with.
This will allow you to do about 2-3 sides of rulers. Using a spatula, smear a thin layer
on the ruler, making sure that the putty is thicker towards the centre of the ruler. There
is no need to put much on the top of masking tape, since this will be wasted. The height
of the river bank here depends on the depth of the body putty. The putty should be very
thin at the edge, so as to make it a smooth transition to the table on the finished river
section. If you run out of time and the putty starts to get stiff, get that tape off the
ruler quickly, then fix up any mistakes later.
Once you are happy with the thickness and finish of the putty, strip off the tape from
the ruler at an angle of 90 degrees to the surface (i.e straight up). Don't wait too long,
as the difference between workable and non-workable can happen in less than a minute.
You must remove the tape while the putty is still soft, or you will never remove it.
Place the ruler aside for the putty to cure for about half an hour.
Cut or knock off any excess putty at the ends and sides of the ruler while the putty is
still relatively soft. |
Puttying up the second side
 |
Once one side has fully cured, put some more masking tape down and do the other side
with epoxy body putty.
Try to make the river or stream banks reasonably parallel unless you are building some
particular feature, such as a pond or a ford.
Try to make the river/stream match up with other sections done on other rulers.
The reason that you don't putty up both sides at once is that you can't hold the ruler
adequately to do the smoothing out of the body putty and also rip off the tape without
messing it all up. So just do one side at a time and that works quite well.
You may want to fill any holes that you still have. Be careful with the surface of the
river, since the epoxy putty will mark and adhere to your nice shiny surface and ruin it.
Finally, paint the riverbanks and the underside of the river, and flock if desired.
When you paint the bottom, the white colour where you scraped off the printing will
disappear. I use a combination of enamels for the underside of the river, together with
two layers of latex house paint for the river banks, and flock the banks after applying
the second coat of paint. |
Sections for creating curves

 |
Curved Sections are made from pieces of ruler, with the ends cut at angles, and
puttied up as above, but with a curve to the river at that section. |
|
