


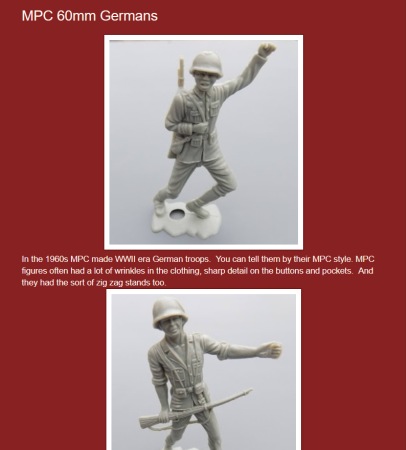


"Machine-cutters" are all the rage now in the paper modeling scene, so I decided to acquire one for TMP and see how it works.

The basic idea is that you can buy a paper model from one of the many companies making wargaming products, print out the pages, then insert them into the Craft ROBO to cut the parts out for you and score the fold lines.
The machine that is most relevant to wargamers is the Craft ROBO CC330-20L from Graphtec, which is also marketed in the U.S. under the Silhouette II brand name. According to my internet search, prices range from $300 USD to $159 USD, so do some shopping before you buy... and don't confuse it with the lesser CC300-20L or Craft ROBO II.
I ordered the Craft ROBO version, and it arrived on my doorstep a week later.
What's in the Box?
The box includes the machine itself (which is about the size of a small printer), power supply and cord, USB cable, blade, carrier sheets, CD, and manuals.
One of the bits of paper is the Setup Instruction Sheet, written in awkward but comprehensible English. After step 1 (checking the contents of the box) comes step 2 (installing the software) - and for some mysterious reason, the first sub-step to installing the software is to attach the power cable to the machine. The instructions even specify the order in which to plug things in (but since the machine isn't turned on yet, does it matter?).
In the next sub-step, you insert the CD into your computer and begin installing software. (The Craft ROBO is computer-driven, similar to a printer.) You install ROBO Master (the program which reads the cutting instructions provided for your model) and Craft ROBO Controller (the software that controls the machine when it is cutting).
When the software is installed, you connect the machine to the computer using the USB cable. The computer should then recognize the machine, and ask for the driver (which is on the CD).
During the driver install, I got a prompt telling me that I could ignore any warning about it being non-compliant with Microsoft. And then I got the prompt from Microsoft, warning that the driver had not been tested or approved by them. I ignored the warning, and everything worked fine.
(An important point not mentioned in the guide: Remove the tape from the machine. There are two pieces holding the lid closed, and one holding the cutting unit in place.)
At this point, everything should be ready to go.
Getting It to Work
To try out my new machine, Mel Ebbles of Ebbles Miniatures was kind enough to provide me with his Modular Hills paper model. The model consists of various PDFs, plus the GSD files that Craft ROBO will need to know how to cut out the parts.
So I printed out the parts using my inkjet printer. But how to cut them out?
The machine comes with a Quick Application Guide, designed to get a newbie started through three consecutive exercises: cutting letters, cutting vinyl stickers, and then cutting out a greeting card. However, I didn't want to do any of those things (and I didn't have any vinyl!). So I puzzled through the manual for some time...

As it turns out, the place to start is to run the ROBO Master program, and load in the appropriate GSD file for the item you want to cut out. This program is also intended to allow you to make your own cutting patterns, but in this case, all I needed to do was click the Output Settings button (the one with the wrench in the icon).
This should pop up a box just as if you were going to print something, listing both your printer and your cutting machine. Click "Output to Craft ROBO."
This was my first headache. The cutting machine listing was blank! When I tried to click the output button, I got an error message about needing to install the driver... but reinstalling the driver (and rebooting) did no good.
I eventually found the problem: ROBO Master was assuming I had a different model of the cutting machine, which was why it couldn't find the driver. Going to File > Preferences allowed me to set it for the CC330-20L, and then everything worked.
You then get another pop-up box with mysterious settings, to which the best response is checking the OK button.

Now, you are turned over to the Craft ROBO Controller software. This gives you a control panel with lots of confusing options. At the top right should be a big button reading "Show the operation guide" - click it, this is the guide for newbies, and opens up a new area at the bottom of the panel.
This new area gives you the steps to prepare for cutting. First, select your media - for cardstock, it seems that "Card without Craft Paper Backing" is the right choice.
Next, if you haven't done so already, is time to put the blade in the machine. A separate plastic baggy holds the blade (a plastic cylinder) and three different colored caps - the caps control how deep the blade will cut. The cap you want for cardstock is apparently the yellow one (medium depth), which comes pre-installed on the blade. You then slide the blade into the blade holder on the machine, apparently with the tag pointing to the front (the diagram is hard to decipher), then turn the green tab to lock it in place.

Then you specify if the cutting pattern is landscape or portrait (portrait is the default).
Now comes the step where you load the paper into the machine... which meant I had to go back to the manual and figure out carrier sheets...
Here's the basic idea: To keep the paper steady during cutting, and to protect the cutting surface of the machine, you attach the paper you want to cut to a carrier sheet before inserting it into the machine.
My machine came with two sheets: a "regular" sheet, and a translucent green sheet for heavy materials. I used the regular sheet for my cardstock project.
The carrier sheet is sticky, so that the paper will adhere to it. First, you peel off the cover (which is pre-scored into three pieces, I suppose to make it easier to find an edge to start peeling from). Then you place the paper on the carrier sheet.
OK, this was another part that took some trial and error to figure out. The carrier sheet has several alignment marks, plus a large arrow showing which end goes into the machine. Imagine that the carrier sheet is in front of you, with the arrow pointing away from you. Place your sheet of paper printed-side-up, upside down, placing the paper to fit into the top alignment marks (especially the righthand one). In other words, the paper feeds into the machine bottom-first.
Now you take the carrier sheet (with paper stuck on it) and place it into the machine. Or, rather, you lift the lid, and place the sheet into contact with the white roller wheels. The left edge of the carrier sheet should align with the rightmost alignment mark on the machine. Then you press the Enter button on the machine, and it cranks the sheet forward.
A word of advice here: the carrier sheet is sticky, and will pick up any dust, hair, or other garbage in your working environment.
The next step is to make sure the "Search Registration Marks" box is checked on your software. If a model is made for machine cutting, then each page will have four black registration marks at the outside corners of the cutting area. The Craft ROBO will look for those marks when it begins to cut the paper.
And then it's time to click the Cut button...
The machine should then scan the page, find the registration marks, the software will confirm that you want to cut, and then the cutting operation begins.
The first problem I ran into was that my printer didn't want to print the bottom registration marks... so I had to go into the advanced setting and ask for "extended bottom margin". All printers are different, so you may not have this problem...
The second problem I had is that the machine couldn't find the registration marks. If this happens, try again - but this time leave the lid up, and watch the light to see where the machine is looking for the registration mark. You'll probably just need to remove the sheet, shift it right or left, and insert it again - but don't shift it so far that both white wheels can't grab it. Alternately, check your printer settings: on my printer, I need to use the "auto centering" option or the registration marks are printed too far to the left.
So What Does It Do?
When you press the Cut button, the machine scans for the bottom registration marks, then advances the page to scan for one of the top registration marks. If that goes well, the software will then ask if you want to proceed to cut.
During both the registration mark search and the actual cutting, the machine will feed the carrier sheet in and out - meaning that the Craft ROBO needs room in front and directly behind it in order to operate. Furthermore, this needs to be a clean environment, or you'll get dust and hair on the sticky part of the carrier sheet - placing the machine on the dusty floor is not a good idea!
After you press cut, the machine zooms the carrier sheet back and forth several times for no apparent reason, then begins the cutting operation. The cutting is relatively quiet until the machine does a fold line, which instead of a solid cut, gets a perforated line (and the machine makes a sound like a sewing machine).
When the machine stops, the display on the machine will say "Remove media" - pressing Enter will cause the carrier sheet to be ejected.
Now, just peel the paper off the sheet, and start modeling!

On the first few uses, the carrier sheet can be very sticky - pull slowly to separate the paper from the sheet. This may cause the paper to have a slight curl.

One minor complaint: The unused blade caps are designed to store inside the machine lid, but they can come loose and rattle around when you move the machine.