


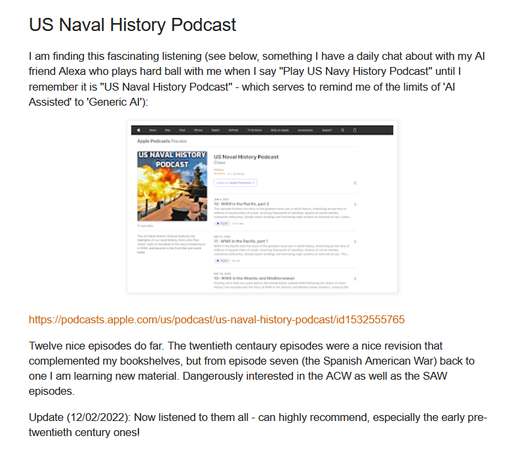


As I said before, sometimes it makes sense to cast an eye on what's going on in the counter-and-gameboard world, to see if something can be adapted for miniature wargaming or just inspire something new on our tabletops.
I often find inspiration for my miniature wargaming projects from tactical-level board wargames. One series that caught my eye was the Platoon Commander system from Tiny Battle Publishing, which has been used both for modern historical (Korean War, Indo-Pakistan War) and World War IV what-if Sticks and Stones subjects.

The game that I picked up – the digital version available online, rather than the printed version – was Platoon Commander: Poland Strikes!, which is about fighting among Warsaw Pact allies in the early days of a hypothetical World War IV. It's almost what we used to call a microgame: 88 counters and an 11" x 17" playing map, with common rules for the game series plus specific rules for this game set. Three sequential scenarios are provided, but there isn't a campaign system (success or failure in one game does not affect the next in the series).

Here's what the game looks like, as printed out on an HP Officejet. The map is two sheets on cardstock, and for some unknown reason, not everything printed so that there a small mis-match where the pages meet. This is the game after the end of the first turn of the first scenario: Polish mechanized troops (right) are advancing on a Hungarian river town.

The counters are double-sided. I printed both sides on sticker paper. I had some trouble finding thick cardstock for sale anywhere, so what I eventually did was buy a pad of art paper from the dollar store and steal the backing board! I carefully lined everything up, and when I cut the counters out with scissors, the two sides mostly lined up.
The digital version is identical to the printed version, which means the counters were optimized for a limited number of counters. What that means is that the designer got double use out of markers by making a counter serve two purposes: one side might be a Fired marker, and the other side a Moved marker. But when you're printing your own copy, there's no benefit in making most of these markers two-sided, because you can print as many as you need.
One error in the rule booklet is that the main rules claim the add-on rules will tell you which counters are for which side – actually, they left that out! The three-color counters are the Hungarians; the two-color counters with the eagles are the Poles.

The first scenario challenges the Poles to take Zelin, a Hungarian river town – the only place the Poles can cross the river – and then seize two more towns. The Poles have five OT-64 platoons, three BMP-1 platoons, six infantry platoons, and two Sagger anti-tank missile teams. They enter from the road (in these photos, from the right).
The Hungarians are divided into two forces initially. In or around Zelin, they have one T-55 platoon, three infantry platoons, and a Sagger anti-tank missile platoon. In Ralocsa, a town near the center of the map, they have two more T-55 platoons, two platoons of BTR-60s, and two platoons of infantry. Scenario rules prevent the Hungarians from doing anything until the Poles attack (with one exception I'll get to later).
Critically, the Poles have a morale of 3, while the Hungarians only have a 2. Morale is used when making 'saving rolls' against hits, or to recover from disruption.

The first scenario only lasts six turns, which keeps the pressure on the Poles to achieve their objectives. The map includes a turn track and a spot to track which side has initiative for the current turn.

The rules are interesting, and definitely not Old School – here's a summary from the publisher:
Each turn is gamed through several phases. First off the players determine initiative with a unique dice-off system in which ties award the initiative to whomever lacked it the previous turn and applying the Commander's Focus to the roll might tilt the odds in your favor. Next, players will draw a scenario-designated number (usually just one) of Action Cards that may be used for anything from artillery strikes, through rally assists, to negating the opponent's just-played card. Then it is time to rally disrupted units with a simple 1d6 roll against a nationality or scenario-designated morale. Action Cards, in addition to the special Aid chit, may be used to improve a unit's chances of preparing for combat.
And then all hell breaks lose…
It's the Fire Phase and players alternate firing with individual units or stacks of units against in-range and in-sight enemy units. When firing on the enemy tanks, the target's Armor Factor is subtracted from the firing unit's Armor Piercing Factor, two dice are rolled, and the results checked on the appropriate column on the Fire Results Table, yielding a number of potential hits. The target rolls a die for each potential hit and compares it to his or her morale. Pass the morale check, that hit is negated. Of course all these columns and die rolls can be modified by the target's terrain, flanking fire, the Focus marker (represents the commander's presence), and most importantly Action Cards, which can call for supporting fire (artillery, airstrike), grant column shifts or even allow the same unit to fire again, adding a delicious uncertainty that makes the game thrilling to play. Players continue to alternate attacks until neither wishes to attack.
Next comes the Movement Phase. Unlike the preceding Fire Phase, one player moves ALL his eligible units before the opposition gets to move. Certain units can move and fire or vice versa (with a penalty), unfired opposing units can opportunity fire on enemies moving within their line of sight. As in many other facets of the game, the insightful play of Action Cards during the movement phase is critical, allowing additional movement or opportunity fire conducted by units that have already fired. No PanzerBush tactics here, you never know when a unit will be able to fire on you. Exciting stuff.
Finally we reach the Aid and Focus Phase. Platoon Commander eschews the use of HQs that can be unrealistically targeted. Instead both players have Aid and Focus markers, representing where the commander intends to place emphasis or send additional assets (ammunition, weapons, etc) or first aid. The placement of these markers provides combat and morale bonuses to the units underneath them. Additionally, if the player chooses, the Focus marker can be used to influence the initiative roll.
And that's a turn of Platoon Commander.
The rules are on version 1.5. The only mistakes I noted were that the rules say to roll 1D6 for close-combat, while the chart is labeled for 2D6; and the close-assault rules fail to state how to handle hits scored against attackers.

Here are some of the cards. The top half applies to the Hungarian player; the bottom half for the Polish player. I thought at first that these were just a gimmick, but I see now that the cards provide a valuable mechanic for artillery and air power without cluttering the map with more counters. On the other hand, it seems odd that a commander needs to rely on good luck with the cards to get artillery support when he needs it.
Again, the cards have not been optimized for the digital version. There's no reason not to give each player their own card deck for the print-it-yourself version.

Seen above are the Focus and Aid markers (each player has one of each). With careful placement of these markers, a player can re-roll an attack roll or a morale roll. (The marker says 'moral only' – should be 'morale only'.) There's a bit of a game-within-the-game regarding placing these markers, incrementing them, decrementing them when used, and moving them to the sidelines if the troops they are stacked with are eliminated.

At the end of movement on turn two, the Poles (as seen above) have surrounded the Hungarians, have disembarked their infantry, and are ready to close-assault. A special scenario rules gives the Hungarians the option, starting with turn two, to preemptively attack the Poles, but at the cost of losing most or all of their cards – for this play-through, the Hungarians chose not to.
This close assault should be a slam-dunk, as the Poles have more than six times the combat strength of the Hungarians to the right of the river… until cards are played!

The Hungarians play two Fire Support cards, dramatically changing the odds. Meanwhile, the Poles play Za Polske! (which doubles all hits from close combat).

Nevertheless, the Polish assault is just too strong – the Hungarians take too many hits, fail too many saving rolls, and are eliminated in the target hex. The Poles suffer some disruptions, and advance into the hex.
Advancing into the hex is probably a bad move – stacking limits apply at all times, so the crucial hex next to the bridge is now blocked to traffic until those units move out of there!

The next turn sees a flurry of close-range fire combat, with it being essential to fire the powerful anti-tank units against any armor targets. Being in a town provides some benefit (especially for leg units), but short-range fire gets a bonus, too. The Hungarians won initiative for turn three and got off the first shot, but luck was with the Poles, and the Hungarians on the river were eliminated for little loss.
At this point, the Hungarians have a tough choice. For a decisive victory, the Poles would like to take the towns of Batka and Sonok. Getting to Sonok is easy along the road, but there is no convenient road to Batka. Do the Hungarians split their forces?

In this playthrough, the Hungarians sent half their remaining forces into Sonok – a big gamble, as entering the rightmost hex of the town triggers opportunity fire from an anti-tank missile team! The Hungarians play a morale-boosting card, and with an incredible series of saving rolls, suffer nothing more than disruption. Which is bad enough, since it means they cannot move, shoot, or even disembark from the troop carriers.

The other Hungarian force moves crosscountry to defend Batka. The Poles get their infantry embarked and ready for the next turn.
On turn four, the Hungarians in Sonok failed to rally, leaving them defenseless. So I called the game as a Polish decisive victory.
This game was played solitaire as I was still figuring out the rules. I did make some mistakes – two embarked infantry units fit in one hex, but when they disembark, you have to split them up due to stacking limits. Also, the Hungarians might have rallied on turn four if I had remembered to redeploy their Aid marker.
Is the scenario balanced, were the Poles just lucky, or is there a better way to play the Hungarians? Should the Poles have risked the initial close-assault instead of waiting one more turn to use their superior firepower? Only a few replays will tell.
On re-reading the scenario-specific rules, it seems I screwed the Hungarians over. I had assumed they were prohibited from moving and firing until the Poles opened fire; it actually says they are only prohibited from moving! That's a big change in favor of the Hungarians! (But does it make sense?)
The rules are not lengthy, but they have a depth to them that will require experience to master. One criticism is that the scenario-specific rules really should award the initiative to the Poles for the first turn.
What did I like? The Fire phase gets dramatic when you have a lot of units firing at close range! The combat system is easily learned and quick to resolve.
What did I not like? Crowded stacks of counters, markers for firing and moving, making sure unit counters were flipped to their correct side (full strength or damaged), stacking limits. (That's why I prefer miniature wargaming, not boardgames!) Also, why can't the Hungarians win simply by blowing the crucial river bridge?
However, my point in playing the game was not to criticize a boardgame, but to look for inspiration for my own gaming. This scenario could easily be adapted for miniature gaming, either at one model = one vehicle or one model = one vehicle platoon, and similarly with infantry stands being platoons or individual figures. The playing area looks like it might usefully fit lengthwise on a single gaming table, and the terrain is chiefly plains and farmland, with a river and a few towns.
Note that there are two more scenarios. The second is a Hungarian counterattack to retake the river towns, marred by a typo in the victory conditions, and references to directions (the map has no direction compass!). The third scenario is the final Polish assault, unleashing lots of armor, but calling for more units than are in the counter mix!