"Game project - map overlay WIP" Topic
25 Posts
All members in good standing are free to post here. Opinions expressed here are solely those of the posters, and have not been cleared with nor are they endorsed by The Miniatures Page.
Please don't make fun of others' membernames.
For more information, see the TMP FAQ.
Back to the WWII Rules Message Board Back to the WWII Land Gallery Message Board
Areas of InterestWorld War Two on the Land
Featured Hobby News Article
Featured Recent Link
Featured Ruleset
Featured Showcase Article You've seen them painted, now see them based...
|
Please sign in to your membership account, or, if you are not yet a member, please sign up for your free membership account.
| FlyXwire | 19 Oct 2022 7:07 a.m. PST |
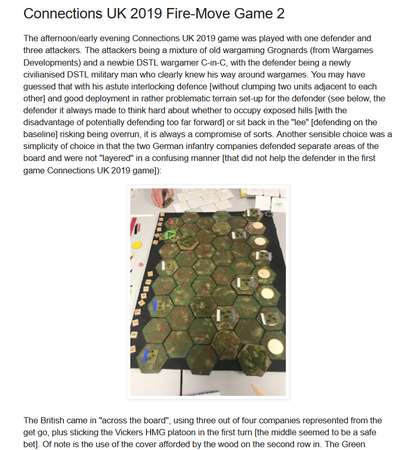
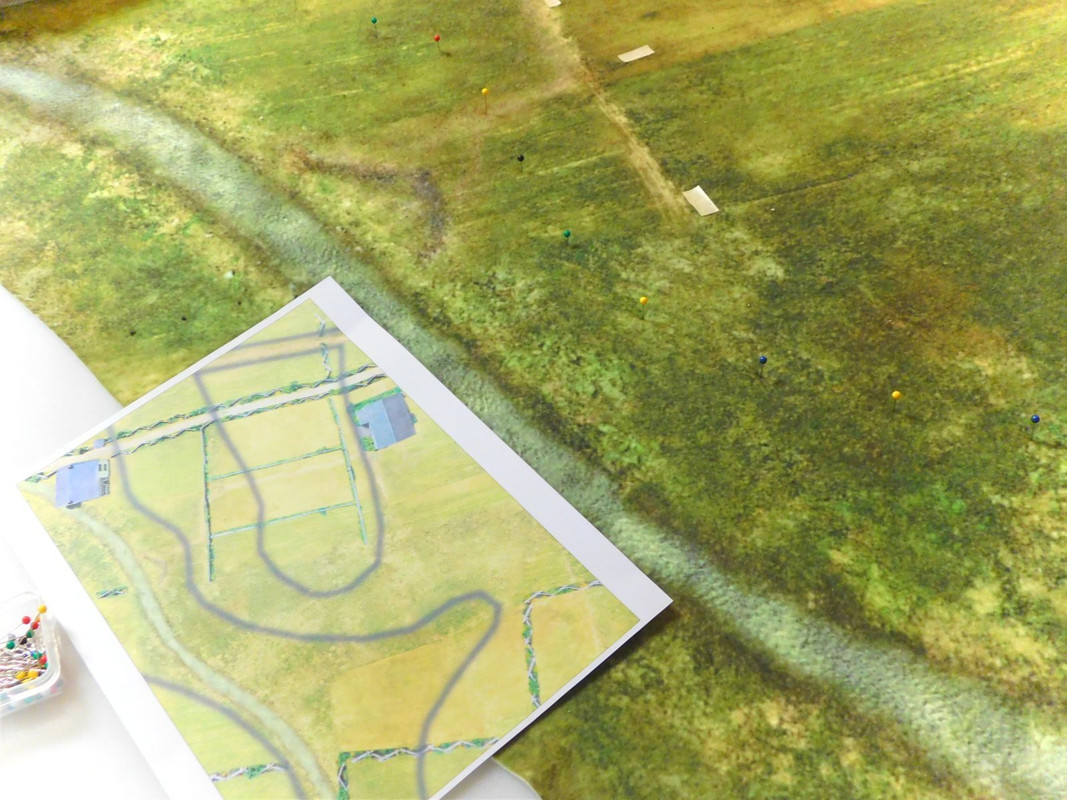
Hi All, I've got a 3mm Arracourt, France project in the works, and thought it may interest some of you with the approach I'm taking to create my map set up. For these 3mm scenarios, I've used area mats segmented up into many irregular-shaped zones (a zone area translating into roughly a 500 meter area each), and these areas interface directly with the task force-level rules I use with the 1/600 scale gaming. Base game mat -
Here's the game area to be featured, with a rough "overlay" of the areas mat superimposed on the scale topo mat -
Finding the primary terrain features on the scaled 5.5 X 4 km game space, will enable me to build hill elevations to be place under the base (fleece) mat surface, with the town buildings located in the mat areas to mimic those on the topo map. Very much WIP at the moment, but a view of the ground up approach to the scenario's map design…… |
| Lieutenant Lockwood | 19 Oct 2022 8:48 a.m. PST |
That is SO cool! I'd love to see more of your process! |
| FlyXwire | 19 Oct 2022 9:55 a.m. PST |
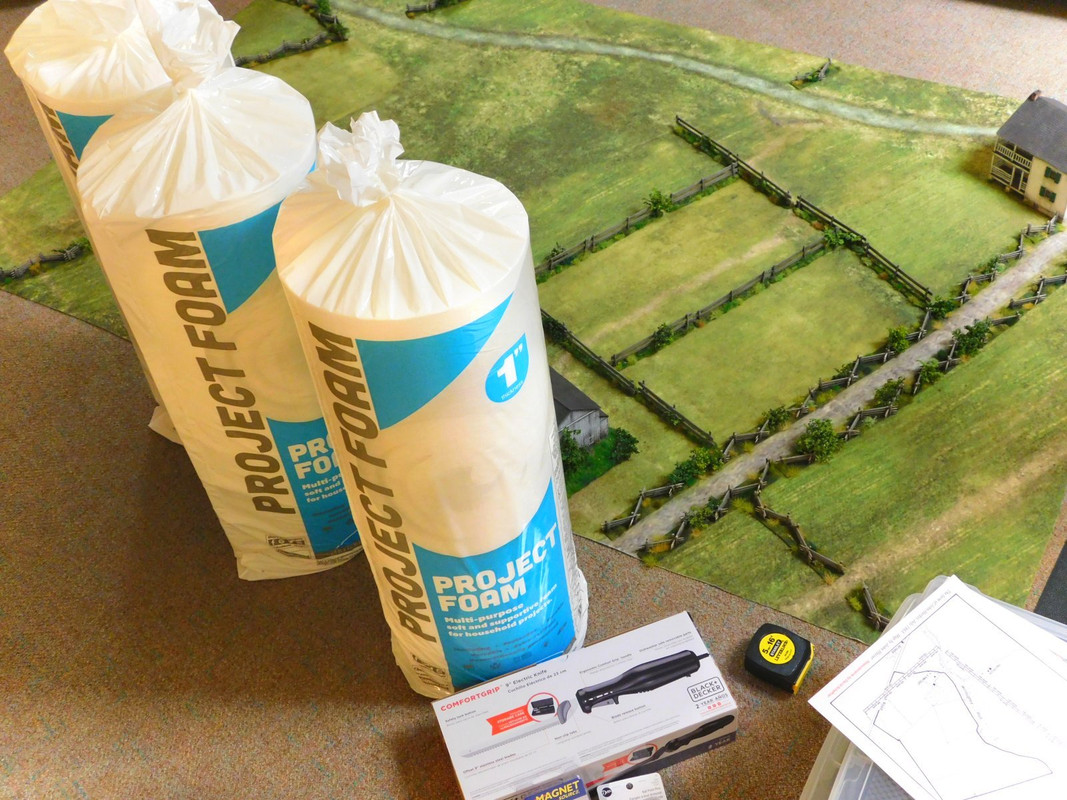
Thanks LT!!! I've got to buy another foam roll yet (like the ones for an ACW project here)-
(and since a game's hill contours can go underneath the mat, the flexible foam material works really well and it's durable stuff for storage stacking, and transporting too) |
| emckinney | 19 Oct 2022 10:10 a.m. PST |
That's 1" thick foam? Where did you get it and how much did it cost? |
| emckinney | 19 Oct 2022 10:18 a.m. PST |
Quick overview of Brien Miller's approach to creating meaningful areas using terrain analysis: link |
| FlyXwire | 19 Oct 2022 10:56 a.m. PST |
EMC, thanks for the link! I bought these foam rolls at Joann Fabrics here in the USA. They sell foam in rolls (as long sheets) and in blocks, in thicknesses of 1/2", 1", 2", and I think even 4"s. The thick stuff for seat cushion inserts, etc. The 24 inch X 72 inch rolls seen above, are on sale now for $22.50 USD apiece. I cut them with an electric kitchen carving knife, and use a cardboard template to trace along the hill's edges, so all I have to be concerned with while making my slope cut, is maintaining the desired angle of my knife (as the outside cut rests/rides along the template's edge).
|
Stew art  | 19 Oct 2022 12:48 p.m. PST |
Hey Flywire, thats a very interesting method of making hills for under a mat for the ACW (or anywhere really) and strikes me as being quite smart. never would of thought to use foam rolls like that carved to the shape of hills of the battlefields but it strikes me a really workable for my 18mm ACW stuff. thanks for the idea. if you have the inclination I'd love a walk through / step by step on the technique. -Stew |
| FlyXwire | 19 Oct 2022 1:55 p.m. PST |
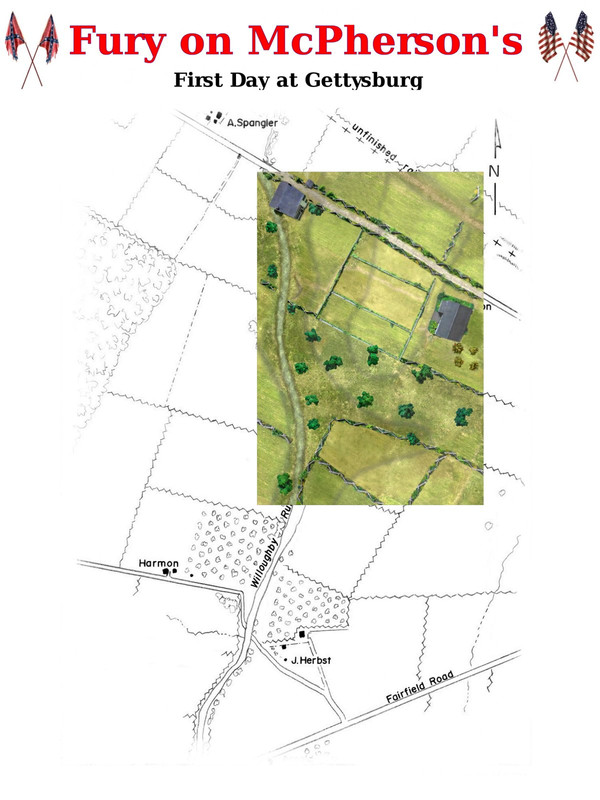
Hiya Stew! Well, my contour cutting needed to conform to the fleece mat I have textured for the upcoming 28mm ACW game a friend and me have partnered on to present.
Since my printed mat covers a 6X4 ft. board area, I laid out side by side, three 2 ft. X 4 ft. "panels" of foam, then spread my fleece mat on top of this. The map's contours needed to correspond to the fabric covering, so I used pins to trace along the hill edges, and then pulled back the fabric, marking the pin pathways onto the foam to show the cutting lines.
If you're not working to match a mat overlay with your hill lines (say for instance, by using a more generic mat covering), then it would be a matter of tracing the desired contour lines directly onto your laid out foam sheets……cutting out along the marked edges, and then do the slope angles perhaps. Easier still, would be to ignore the slope cutting (or to do the original cutting at an angle if possible), and leave the mat's fabric to create the smooth taper between the hill levels. One could also make cardboard patterns of the wanted game hills, and use those as templates to guide the foam cutting, like that example shown a couple pictures above. Stew, would love to see your effort with this, if you care to do so with your 18mm gaming. |
| emckinney | 19 Oct 2022 3:04 p.m. PST |
"EMC, thanks for the link!" Hope it's useful. I'm trying to find his detailed explanation. |
| emckinney | 19 Oct 2022 3:14 p.m. PST |
Austerlitz map in progress. Unit facing is constrained because the counter has to physically fit in the area. If you look at the very left-most gray unit, with its back to the stream, you'll see that it doesn't have space to turn 90 degrees. With hills, this is important for preventing unrealistic situations where a unit marches along the spine of a hill, with the line drooping down both slopes like a wet noodle. In reality, that unit would quickly become disorganized. |
| Big Red | 19 Oct 2022 3:21 p.m. PST |
You guys are doing amazing things with rubber. I've used cut and trimmed foam rubber from Joann Fabrics and it works great. |
| hayesncsu | 19 Oct 2022 7:22 p.m. PST |
Lovely work! I have only used the rigid foam board. Will have to give this a try! How are you doing the custom printed mats? Thank you! |
| FlyXwire | 20 Oct 2022 5:09 a.m. PST |
Thanks Bill and Haynes! The maps are cobbled up in a photoshop program. Doing map 'studies' has been a fun hobby diversion, but don't mention that to my wife, as she's way past yet another mat order arriving on our porch unannounced….and when seeing the "diversion" appearing on our monthly CC bill. :))) The old Jasc brand Paint Shop Pro 7 program I use has soldiered on for over 20 years now, and it's survived the life span of at least 3 of my computers, but still continues to install and work in newer versions of Windows. Bought it at Best Buy, and it was. |
| BattlerBritain | 20 Oct 2022 5:34 a.m. PST |
I use PSP7 all the time as well.
It's great. Can you give details on how you used it to make the map?
Was it a manual process or did you script it? Also where do you get the map printed? |
| FlyXwire | 20 Oct 2022 6:06 a.m. PST |
Battler, it's all manual…..tools to textures, back and forth, layers on layers, etc. I get my fleece mats printed in England by a company called Bags Of Love. They have a US ordering portal, and when I went searching for a printer who did digital fleece printing, came across them I had no idea I was ordering offshore until the confirmation invoice arrived. Still, they do fast service, and use FedEx shipping, and I usually get a mat within 3-4 business days so I've stayed with them. Interestingly, with their North American portal, and therefore transacting my orders in dollars, I've seen no drop in my purchase prices, as if I were instead paying in exchange via the devalued pound to $(s) lately. Glad to give a GB company my biz though. Previous game mats I had printing here in the US on vinyl. The rendered resolution on vinyl is much higher (richer and sharper), because of the material properties. Vinyl is still a great choice for naval, air, or space gaming mats, and especially when wanting a sliding surface for the primarily, stand-mounted pieces (planes & ships). Fleece is the way to go for battle mats, because of the ability to place hills underneath the material. A friend who had me work up a fleece mat for him recently, when he used it, put his hills sitting right on top (instead of underneath)……..lol. |
| BattlerBritain | 20 Oct 2022 8:39 a.m. PST |
|
| FlyXwire | 20 Oct 2022 9:34 a.m. PST |
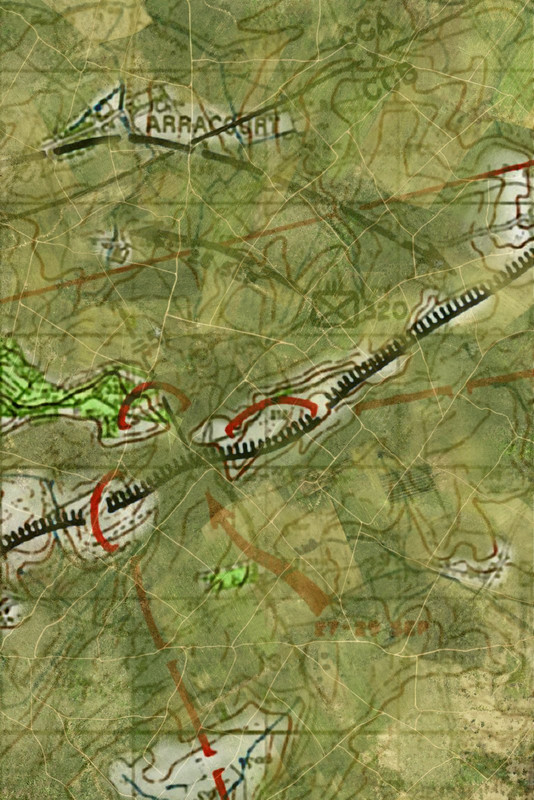
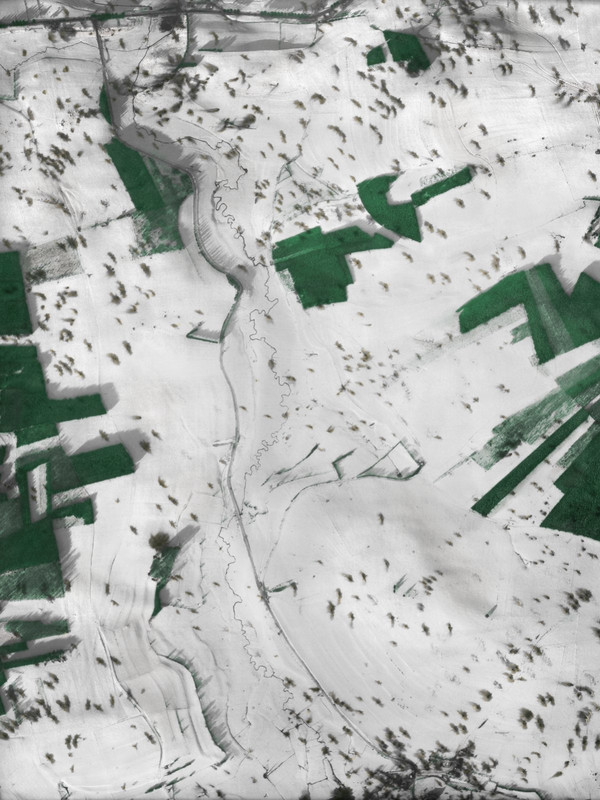
Battler, maybe this is a PSP7 map project you might want to dabble at basically colorizing a B&W digital map photo? The image here starting as an authentic aerial photo of a WW2 battle area that I've considered having printed out on fleece to play a miniatures game on.
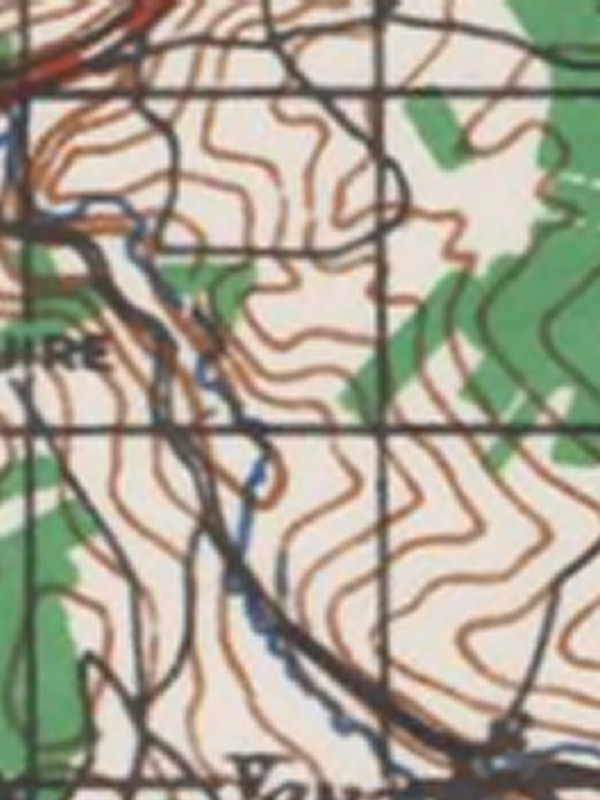
Using digital images, the one above from the National Collection of Aerial Photographs archived in Scotland (NCAP), and available online by subscription, is a way I studied the counterattacks of the US 11th Armored Division in mid-Jan. 1945, during the Battle of the Bulge, with an idea of maybe featuring these battles in a miniatures game or two. The area I eventually zoned in on for the potential mapping project, was between Vaux and Mabampre, Belgium, and an area east of Compogne (all directions that the 11th Armored attacked from in a sector NE of Bastogne, towards Houffalize). Having found a good resolution recon photo of this area in the NCAP archives, I screen-captured a series of closeup scans of this photo on my computer, and pasted each of these snippets onto a master layer in my photoshop program basically reassembling each of the hi-res snippets off the digital aerial photo, and importing these onto a digital background (like arranging and aligning a precise collage of the individual map portions onto a master background in the photoshop program). A little tedious at times, and as I recall the working map image I made up for the project started out as maybe 16 individual screenshots put back into alignment within my program (and then merged together into one master image). The simple artfulness came in colorizing the B&W imagery (by setting a colorizing level I liked to render the image first as 'forest green', and then one for 'shell-hole brown'), and using a colorized layer as the underlying [first] background image, and then aligning the original B&W image back on top of this, so I could remove the B&W forested areas through 'erasing', and thus revealing the green colorized duplicated layer below. This is one of the simplest photoshopping techniques…..manipulating an image (colorizing it, smoothing it, applying a pattern to it, etc.), and then passing the original image layer on top of the altered layer, and removing areas of the top layer to reveal portions of the manipulated bottom layer below then "merging" the two layers together back into one layer again. For this 11th Armored battlescape image, my next step was to take my new merged map image, and place that on top of a different, duplicated layer I colorized this one 'shell-hole brown' then went through the same removal process on all those little shell holes and their earth/powder splash marks to reveal their browned color below, and then merging the work into one master map again, but now as a 3-color version of the original B&W aerial photo. Battler, this tutorial may be below your current skill level with PSP7, but it still can render a neat result that is a viable technique for making maps for our miniatures gaming. Btw, here's the topo map area of the equivalent image above where the elevation info can be drawn from to craft the 3D contouring out of foam from, for placing under a printed mat covering which would result in one heck of a realistic wargame tabletop I think!
Another example of the same colorizing/layering process a 1944 aerial view of Escoville, Normandie, where the British 6th Ariborne fought a sharp probing action against 21st Panzer's KG Luck, in mid-June, and was a bordering area for Op Goodwood.
You know it's a real combat zone, when you see the telltale signs of the war below on the imagery. A btw there's KOed tanks discernable on the original Mabampre/Bulge photo….. |
| BattlerBritain | 20 Oct 2022 11:06 a.m. PST |
Yeah I can use layers in PSP7.
I can also use transparencies, eg with png files, but haven't done much with colorizing.
Will look at that. But I think I can see what you're doing with multiple layers on top of each other. Also I've used screenshots of Google maps to get a reasonable hi-res image but will look at the aerial photos you've used. Cheers, Battler 😊 |
| FlyXwire | 20 Oct 2022 1:41 p.m. PST |
Battler, Cheers too! (with your current PSP7 skills, you're on your way) |
| FlyXwire | 22 Oct 2022 6:44 a.m. PST |
I've been getting the lay of the land driving around Arracourt in GoogleE, and was wondering what crops these yellow fields are planted in (these aren't common here in the Midwest US….and they're gorgeous!)?
|
| BattlerBritain | 22 Oct 2022 7:56 a.m. PST |
I think it's called rape seed. They use it to make cooking oil. |
| Stew art | 22 Oct 2022 8:30 a.m. PST |
FlyXwire, Thanks for the walk through with pictures even. I've been using towels/blankets under my fleece mats which has worked well enough but it's hard to get certain shapes and is fussy, as it takes awhile. Not sure if the couch foam is better than blue insulation foam other than probably being more durable, but I'm definitely in need of something shaped to the hill I want that I can just place on the table. I'm sure if the couch foam can support your 28mm troops it'll support my tiny 18mm stuff. I'll get around to trying it eventually; I'm ass deep in dark ages right now preparing for a convention in these parts and then the holidays so probably not for awhile yet. I appreciate your technique though and you taking the time to write it out. I'll let you know when I try it. 😀
-Stew |
| Cement Head | 22 Oct 2022 9:53 a.m. PST |
Fly X where in the midwest are you? |
| FlyXwire | 22 Oct 2022 11:09 a.m. PST |
Battler, thanks for this crop info (much appreciated)! Stew, glad you think the foam might be useful for you. After I get that ACW scenario up and running above, I'm thinking it'll be possible to roll the 3 panel layers together, and bind them up like a round 'gabion' (well, at least into a more compact package to store away than the piles of flat styro hills that end up populating the basement). ;))) Cement Head, I'm here in the St. Louis, MO area. |
| FlyXwire | 22 Oct 2022 1:33 p.m. PST |
Just a little more progress to show on the 3mm 1/600th scale minis, Arracourt scenario preparation oh gosh, more hill spam. ;) Well, it's only a foot long, but the mat draped nicely over its slopes, so pretty good result for such a small piece. Here's the cut foam with the template pattern shown, the template made following the initial hill's outline cut this to get the 2nd slope cut accomplished (the flexible foam bends a bit too much to free-hand the angled slopes without a stiff backing guide).
And the grand edifice on display modeled actually on the Bois de Benamont and Hill 321 south of Arracourt (again, it's only 12" on the game map, but this half of the forested height spans three mat sectors, or around 1.5 km of important high ground).
|
|