"My Cruel Seas game mat" Topic
12 Posts
All members in good standing are free to post here. Opinions expressed here are solely those of the posters, and have not been cleared with nor are they endorsed by The Miniatures Page.
Remember that you can Stifle members so that you don't have to read their posts.
For more information, see the TMP FAQ.
Back to the WWII Naval Gallery Message Board
Areas of InterestWorld War Two at Sea
Featured Link
Featured Showcase Article Can a WWII blockgame find happiness as a miniatures campaign system?
|
| FlyXwire | 19 Dec 2018 6:53 a.m. PST |
Hi All, Here's the game mat I'll be using for my Cruel Seas battles (it's an enhanced version of a commercially available texture file). I added the more dramatic color variation and re-scaled the waves to look closer to 1/300th scale) -
Moving forward, full steam ahead. |
Joes Shop  | 19 Dec 2018 7:25 a.m. PST |
|
| daveshoe | 19 Dec 2018 8:53 a.m. PST |
The mat looks nice. What type of material is it printed on? |
| FlyXwire | 19 Dec 2018 9:26 a.m. PST |
Thanks JS and Dave! It's printed on 13oz. smooth-surface vinyl – a vinyl stock available for printed advertising banners – done by print shops who work from your uploaded texture file/image. |
| epturner | 19 Dec 2018 12:28 p.m. PST |
|
 Herkybird Herkybird | 19 Dec 2018 3:34 p.m. PST |
That looks an optimal piece of kit! |
| Schogun | 20 Dec 2018 6:09 a.m. PST |
That's beautiful! More info please -- what file source; what print shop (chain or local?). Thanks |
| FlyXwire | 20 Dec 2018 7:47 a.m. PST |
Schogun, the base texture file was bought from Wargame Print I used the "Sea Plain" 053 file for modifying (could of course we used as-is). The print shop I use is based in Indiana, USA, although I'm a few states over, but they've given me great service for 10+ years. On their website, you select the type of banner and vinyl material you desire, then input the dimensions you want it printed out to, and any finishing extras (none). Then after paying for via CC, you're prompted to upload the image to their storage server. I usually get my mats delivered a few days after my transaction, shipped in a strong cardboard tube, which I use to store them in between games, and for transporting them to events. This 4 foot X 6 foot sea mat ran me around $90 USD, and then shipping. Any reputable print shop that does advertising banners should be able to serve your needs. |
| Andrew Walters | 20 Dec 2018 1:51 p.m. PST |
Most excellent! I generally don't like busy, photorealistic cloths, I think they distract from the miniatures, sometimes even hide them. But this is really, neat. |
| FlyXwire | 20 Dec 2018 2:37 p.m. PST |
Andrew, I agree. In fact, if too photo-realistic a mini's camouflage pattern can tend to work as it should, and at our table viewing distances the models can get lost. I think I'll not do any significant camo patterns on my Cruel Seas ships, because with my game map here, I think they would "sink" into the sea-scape and actually diminish the visual aesthetics. |
| Schogun | 20 Dec 2018 8:28 p.m. PST |
May I also ask how you changed the colors but retained wave texture? |
| FlyXwire | 21 Dec 2018 7:16 a.m. PST |
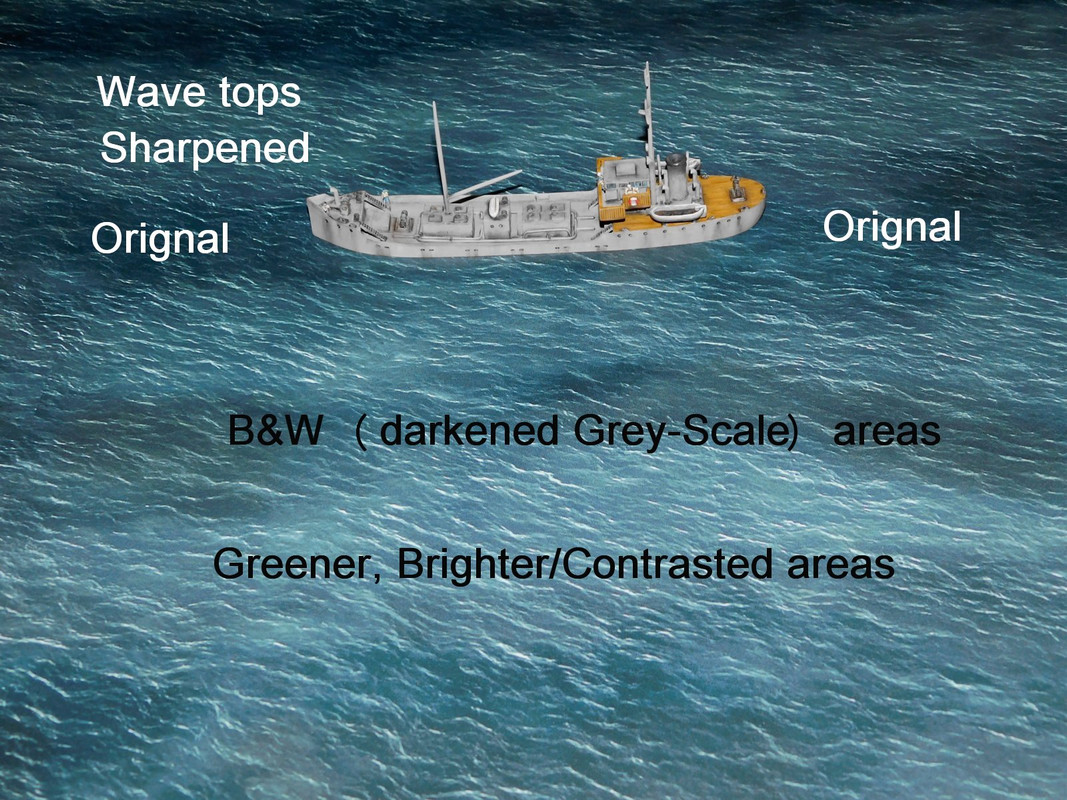
Schogun, that would be through settings in my photoshop program basically, you alter the Brightness and Contrast settings of your image (increasing both Brightness and Contrast simultaneously). This lightens the overall color, and the wave tops become "brighter"/contrasted too. Onto this altered image, you completely overlay the original [darker] image as a 2nd [top] layer, and then begin removing the darker top layer using the Erasing tool, to incrementally expose the lighter image layer below. Then Merge the layers into a single, altered image when satisfied with your progress. As final steps, I used a Wave tool setting to create a subtle [geometrically patterned] "warping" effect. Finally, I Sharpened the whole image, and then overlayed the previously altered image onto that, and went about Erasing away the top layer only along the "high" wave top areas, to expose the sharpened versions of them in the bottom layer. Then Merged these two layers into a final, single texture. There's many additional techniques that can be used too. For example, I also changed the overall coloring to a greener hue, and "overlayed", and Erased along the top wave areas to expose this different color variation. I also modified one layer to Grey Scale (removing all "color"), and then after overlaying my working image on top of that, went about strategically exposing (Erasing away) the "B&W" image below along some of the wave troughs. This basically created three color variations that weren't in the original texture image 1) the greener, brighter texture along the wave tops, 2) the brighter/Sharpened wave top/tips themselves, and 3) the "B&W"/dark wave troughs. It's all Photoshop layering/removal work that's Merged in between doing some particular alteration treatment. You make some type of change, expose it where you want it, and then do another change, exposing it where you want that, and continue, etc., etc. "a picture is a 'thousand' words" :)))
|
|