Help support TMP


"Short Flag Tutorial" Topic


14 Posts

All members in good standing are free to post here. Opinions expressed here are solely those of the posters, and have not been cleared with nor are they endorsed by The Miniatures Page.

For more information, see the TMP FAQ.


Back to the American Revolution Message Board


Areas of Interest

18th Century

Featured Hobby News Article


Featured Link


Featured Ruleset


Featured Showcase Article

28mm Acolyte Vampires - Based

The Acolyte Vampires return - based, now, and ready for the game table.


Featured Profile Article

Remembering Marx WOW Figures

If you were a kid in the 1960s who loved history and toy soldiers, you probably had a WOW figure!


Featured Book Review


834 hits since 28 May 2018
©1994-2024 Bill Armintrout
Comments or corrections?

nevinsrip28 May 2018 1:38 a.m. PST

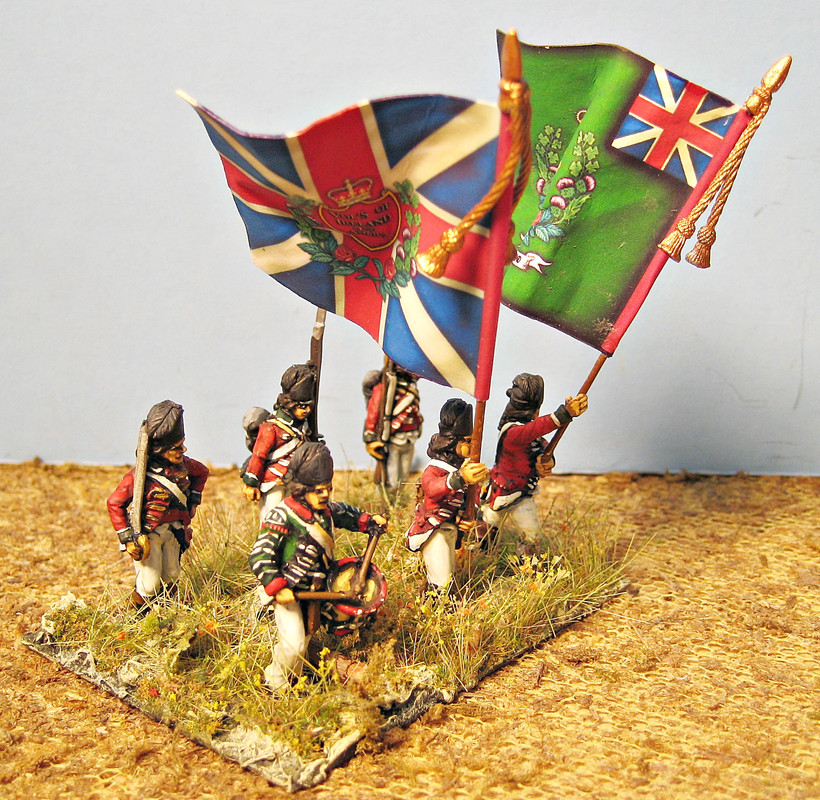
Several people, on various forums, have asked how I got these flags to look the way that they do.

url=https://postimg.cc/image/x1auqyr4b/]

So, I've written my method up and put it out there, for all to see.

I've tried dozens of different methods to get my flags to look just right. I like what the Flag Dude does, but at 6 bucks a pop, I would go broke! So, I've taken the best of all the methods that I've tried and and have come up with this.

First, cut the flags out as close as possible to the color. Now fold them in half and trim them again, so that no white shows along the edges. I use a cheap pair of scissors to do this. Two pair for a buck at the dollar store.  I only use these particular scissors to trim flags. Nothing else. They need to stay sharp.

Second, flip the flag over to the white side and paint along the edges with matching colors. I paint about 1/8 of an inch all around the whole flag, changing colors when necessary. Then I'll take a small, flat brush and glide it over the edges of the paper. Be careful not to get paint on the face of the flag.
I sometimes use Magic Markers here as they give you more control. You can just roll the marker over the edges slowly allowing the ink to absorb into the paper. You can use a slightly darker color here, in fact, I would recommend it.
The Union Jack and the Stars and Stripes are particular pain in the arses, because of all the small surfaces you have to cover neatly. Practice on a throwaway flag

Third, Buy a can of Pringles Snack Pack Potato chips and save the cover foil.

picture

Try to get the whole foil off without ripping it. Using the second pair of scissors from the dollar store set, trim all the edges of the foil where it was connected to the can
Now, measure the flag and cut out a piece of the foil that will fit inside the flag. Ideally, the foil should cover all the inside white portion of the flag. The edge of the foil should reach the color that you painted on previously.
Make sure that the foil can't be seen around the edges. Test fit a few times and make adjustments.

Four, Slather whatever glue you use (Aileens Tacky Glue is my choice) on one side of the flag and about 1/2 inch past the fold.
Okay, one key point here. If you manage to get glue on your fingers or hands……….STOP.
Stop what you're doing and wash your hands and dry them thoroughly. The slightest bit of glue on your fingers, will always find the face of the flag and ruin it. Wiping on you pants won't do. You need to completely rid yourself of any traces.
Just take my word for it, after all it's my tutorial!
Place the foil on the glue and make sure it sits right. Put your flagstaff on the crease of the fold.

Five,  OK, now spread glue on the foil and the remaining half of your flag.
Fold the halves together and work it around until you happy with it. Keep a small block of styrofoam handy to stick the flagpole in, while the glue dries. 

Six, Tacky glue will begin to set up at the five minute mark so that gives you some time to play around with the folds. Before the glue can fully set, start bending the flag into position. I use my fingers mostly, but you can use any round object to curl the flag around.
Quick Tip:
Instead of just throwing used up paint brushes away, I cut the metal ferule off and keep the wood.
I have about a half dozen, of various thicknesses, that I use to wrap the flag around. I keep them with the foil and the scissors.

The Pringles foil is thicker than tin foil and will hold the shape once set. But the trick is to position the flag furls BEFORE the glue sets up completely. Because, once the glue sets, it will crack when re-positioned. That's why you have to put your waves in before it sets.
You'll find that the Pringles foil is very easy to work with and that it holds it's shape forever.

That's about it. I hope that you'll find this little article helpful. There's nothing groundbreaking here, except for the use of the Pringles foil, but perhaps some will find it useful.
Questions cheerfully answered.

robert piepenbrink Supporting Member of TMP28 May 2018 4:06 a.m. PST

Thank you. Clear, simple and to the point.

HANS GRUBER28 May 2018 6:36 a.m. PST

We used to use tooth paste tubes in the old days, when they were metal. There must be some mass produced substitute.

Personal logo Extra Crispy Sponsoring Member of TMP28 May 2018 6:48 a.m. PST

Thank you for the tutorial. I was thinking of trying the same but with Yogurt lids. The daughter and I eat one every day and I save them for a multitude of uses.

Personal logo ColCampbell Supporting Member of TMP28 May 2018 7:14 a.m. PST

Thanks for the tutorial. Since I also tend to eat yogurt frequently, I'll have to try the foil "lids" on my next batch of flags. I guess one could also "liberate" some heavy duty foil from the wife's pantry. grin

Jim

dBerczerk28 May 2018 7:25 a.m. PST

Very helpful, particularly the tip on painting the "inside edges" of the flag "before" gluing the two halves together.

FlyXwire28 May 2018 8:51 a.m. PST

Great tip Bill! Like some of the others, our household enjoys yogurt too, but I've been looking for a good excuse to load up on the Pringles between our healthy menu.

When do you enjoy the spoils of your labor….suppose you recommend holding off on the chips until after you're done with the flag furlin'?

nevinsrip28 May 2018 12:06 p.m. PST

"When do you enjoy the spoils of your labor….suppose you recommend holding off on the chips until after you're done with the flag furlin'?"

Actually, my son is a diabetic and it's one of the few things he can snack on. So, they are always plentiful.

I've never tried yogurt lids. I am not sure that they would work as well. I tend to stick to what I know will work.

Hans, Yes, it was the old method of toothpaste tubes and wine bottle foil that gave me the idea to try this.

nevinsrip28 May 2018 12:41 p.m. PST

Mr. Editor can you crosspost this to the Flags and Banners board?

Stew art Supporting Member of TMP28 May 2018 4:35 p.m. PST

Nice tutorial! Appreciate it!

Personal logo Condotta Supporting Member of TMP28 May 2018 8:30 p.m. PST

Great tutorial, thanks. In response to the yogurt lids, here are GMB Baden flags using nevinsrip's techniques replacing Pringle with yogurt lids:

nevinsrip28 May 2018 11:24 p.m. PST

Excellent job!!

Did you just do those, or have you been using this method all along?

I'm not being a nit picker, but I can see a few spots where the glue rubbed off your fingers onto the flag face.

I HATE that. I only point out it here, because I emphasized it in the tutorial. I can't tell you how many beautiful flags I ruined because I was too lazy to clean my hands properly.

Again, excellent work. Beautiful edges!

Personal logo Condotta Supporting Member of TMP29 May 2018 8:05 a.m. PST

You are right, nevinsrip, glue from fingers on flags. I hate that, too. I am glad you pointed out the importance of keeping hands clean.

I have used this technique for some time; long enough to get careless. Fortunately, I always seal the flags with spray matt varnish and let dry before gluing. The glue mess can be remedied since water-solvable glue was used. I must take more care to avoid having to do this step, though. Perhaps you can add the step to seal the flags first in case others do what I did.
<[ : ^ )

Personal logo Condotta Supporting Member of TMP29 May 2018 1:18 p.m. PST

Soluble, that is. Ha

Sorry - only verified members can post on the forums.