Help support TMP


"Weathering" Topic


7 Posts

All members in good standing are free to post here. Opinions expressed here are solely those of the posters, and have not been cleared with nor are they endorsed by The Miniatures Page.

In order to respect possible copyright issues, when quoting from a book or article, please quote no more than three paragraphs.

For more information, see the TMP FAQ.


Back to the WWII Painting Guides Message Board


Areas of Interest

World War Two on the Land

Featured Hobby News Article


Featured Link


Top-Rated Ruleset

Crossfire


Rating: gold star gold star gold star gold star gold star gold star gold star gold star 


Featured Workbench Article

CombatPainter Does FoW Bases

combatpainter Fezian explains a simple, quick, and effective way to base troops for Flames of War.


Featured Book Review


Featured Movie Review


1,437 hits since 10 May 2018
©1994-2024 Bill Armintrout
Comments or corrections?

captaincold6910 May 2018 9:43 p.m. PST

Tried using oils to weather my 20mm armor and while a nice look it takes forever to dry. It was a nice technique for larger scale models but not warming toys.

So…..what do you use to do your Weathering? Acrylics? Enameled? Pigments?

McWong7311 May 2018 2:36 a.m. PST

The various enamel weathering kit from AK Interactive and Mig may be a better solution, but they're not super fast to dry either.

Marc33594 Supporting Member of TMP11 May 2018 4:36 a.m. PST

For washes you have several choices.

You can make your own. I use Speedball brand acrylic India inks mixed with a combination of Pledge (future) floor wax and distilled water with a touch of dish washing soap.

You can buy a similar product already made up called Didi's magic wash from The Warstore link

For fading, highlights and tonal differences I have no trouble with oil tube paints like those from Windsor & Newton. The key is to use a good dry brushing brush. I like these from micro-mark link

Another key is to use the oil sparingly. You need to put just a bit on the brush and then wipe the brush back and forth on an old cloth or piece of paper, like cardboard, until just a trace of the color remains. This makes for a very light coat which does very well to highlight raised areas especially and the thin coat dries fairly quickly.

One other technique for oils. Put a small dab from the tube on cardboard and let sit a bit. Some of the oil will get absorbed by the cardboard. The paint will still be very viable but drawing off some of the oil will speed drying times.

22ndFoot11 May 2018 6:12 a.m. PST

I make a paste of white wood glue and matt acrylic varnish, thinned with a bit of water with which I pick up the appropriate colour of MIG dust powder and stipple it on the model (I do 15mm and 28mm) in the right places. It can be graduated over the model; doesn't take an age to dry and can be sealed with more varnish. I do this after I've completed the model with dry brush and transfers.

link

It wouldn't win any prizes at a true model-makers' competition but it looks pretty good on the table.

wrgmr111 May 2018 9:57 a.m. PST

As with 22ndFoot, my vehicles will not win any awards like Piers or Leon, but good enough for the games table.

picture

Mig rust and dirt powders mixed with water and washed or streaked. Vallejo dark rust acrylic paint and Delta Ceramcoat Walnut for an overall wash. I used a pencil to create paint chips.

Lucius15 May 2018 3:58 a.m. PST

Having played with the Vallejo weathering kits and pigments, I finally came to the conclusion that most of this stuff works great at 1/48 and above.

For my 15mm and 1/144, I was better off drybrushing the highlights, washing with a brown/black ink, then dusting the lower surfaces with a tan from my airbrush.

It was faster, and looks better.

Mark 1 Supporting Member of TMP21 May 2018 5:24 p.m. PST

I work at a smaller scale (6mm), so these techniques may be a bit simplistic for larger vehicles. But here is how I approach things.

I do both wash and dry-brushing.

For wash, I use acrylics.

All of my detail work, and often the base-coats, are done with brush and acrylic paints. But some models get a spray enamel base coat. In all cases I use a white spray primer first.

For my wash I use a highly diluted acrylic of near-black color. I have used "oily black" in the past when I could find Polly-S. Now I use a near-black dark brown called baby-poop (I kid you not), which my local hobby shop recommended.

I dilute about 10-to-1. I touch the brush to dishsoap before I use it to stir up the wash -- just the smallest bit of dishsoap works well to break the surface tension and help the wash flow. I completely blot the tank in wash. Then I do a second tank. Then a third. Then I panic and go back to the first tank and say "What have I done??" and use a toughed-up brush to blot away the wash. I press the brush in tissue to dry it, and blot again. Even twirl or push it around a bit. Then on to the second and third tanks.

I learned this technique of washing and "beating up" the model with a dry brush from Troy Ritter, who occasions these boards.

Then I dry brush with a color that is a light shade of the dominant color of the tank (usually base coat). Not usually the actual base coat with white (or yellow) added, as some do. Rather, I just chose a light color of the same basic tone (a very light green or tan).

Then I do detailing. Although sometimes some of the detailing is done first (like national insignia, which I may want weathered). After painting tracks (flat black for rubber tracks, metallic gray for metal tracks) I do a wash of the tracks and running gear with a rust color.

Here are some results.


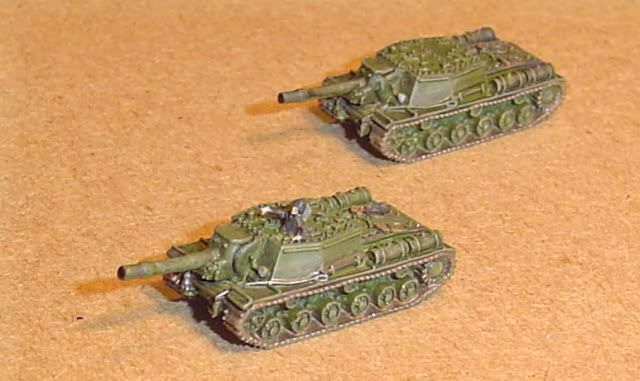
GHQ SU-152s show how the technique performs on a base-coat (no-camo) model.


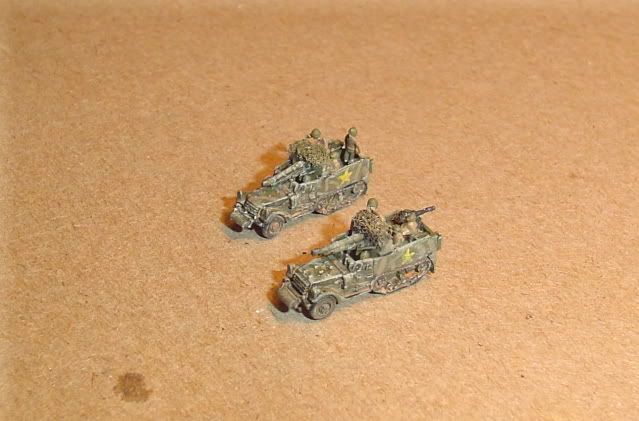
These GHQ M3 TDs were given a light camo pattern to simulate the mopped-on mud used by US forces as ad hoc camo in Tunisia. This, and the national insigna (yellow stars) were applied before the weathering.


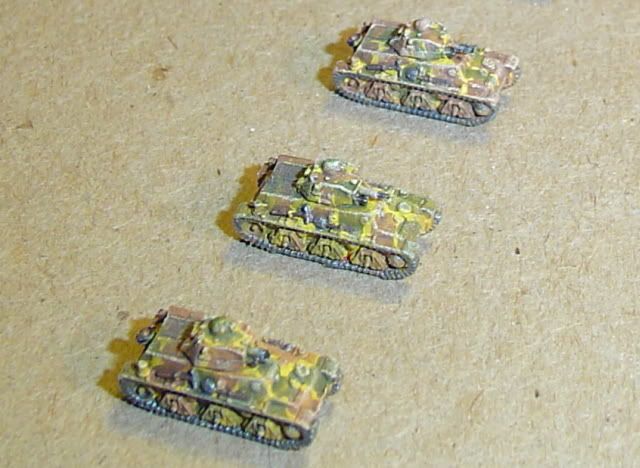
These GHQ H39s (more properly H35 modifié 39) show some experimentation in various washes and dry-brushing. The bottom one (closest to the camera) was done with the technique I described above.

Hope that helps.

-Mark
(aka: Mk 1)

Sorry - only verified members can post on the forums.