"Low Budget High res home 3D printing" Topic
11 Posts
All members in good standing are free to post here. Opinions expressed here are solely those of the posters, and have not been cleared with nor are they endorsed by The Miniatures Page.
Please be courteous toward your fellow TMP members.
For more information, see the TMP FAQ.
Back to the 3DPrinting Message Board
Areas of InterestGeneral
Featured Hobby News Article
Featured Link
Featured Showcase Article How to store and transport an army of giant apes?
Featured Workbench Article Can any of these products cure the dreaded "wedding cake" effect?
Current Poll
|
| Aidan Campbell | 16 Sep 2017 3:53 a.m. PST |
3D printing is dramatically impacting on the gaming miniatures and wider model making business, so as a professional model maker and miniature sculptor I felt I had to dip my toe in the water. Whilst for some this may mean first experimenting with using commercial services to print other people's digital models, and then perhaps moving onto making your own digital designs to have printed for you, perhaps eventually buying a FFF printer squirting molten plastic through nozzle; I threw myself in at the deep end and went straight to designing and building my own high-res DLP resin printer specifically for making tiny miniatures, what is more I did so having no prior experience of 3D printing or digital sculpting at all. I figured that for those like me that like the challenge, there's no better way to understand and learn any new process than to start from scratch doing/making everything for your self. Plus printers in my budget offer pathetically crude resolution I wouldn't have been happy with, and the only complex bit of a 3D printer is the software that drives it…. So for under £300.00 GBP (UK sterling) I bought in various component parts, downloaded free open source code off the inter-net and after a couple of months tinkering I came up with my own working design of high-res DLP 3D printer. (if you've not already got a digital projector one of those would add upwards of another £300.00 GBP to the budget). Having then got something up and running the first thing I did was CAD design and 3D print various upgraded parts to improve the printer I'd just built. So for those interested in the statistics; my printer has a build area of 96x60mm printing at up to 120mm tall and has been designed with a default "low-res" setting of 50micron XY precision and layer thickness of 50 micron. Print times obviously depend upon the volume/size of what you are printing and the cure times of the resin you use. That said the build plate should easily hold at least half a dozen typical 28mm figures and perhaps as many as two dozen if arranged efficiently. Assuming no problems or failures, the first resin I've decided to try should enable the printer to produce all those in well under two hours. The cost of this resin is sufficiently cheap as to be so negligible that most typical gaming miniatures would be no more than a few pennies per figure and even pushed to the largest models the printer could handle the price would still most likely be measured in pence rather than pounds. So… having got something working the next steps are to learn to sculpt digitally and to keep playing with the printer to find its limits, fine tuning the quality of output as I go. The layer thickness can be adjusted down to a nominal 5micron (200 layers per mm) but how accurately exposure times could be judged to suit the resin at this thickness would be an interesting challenge resulting in excessively slow prints. Though I've yet to test anything other than "default low-res" I have designed it to enable me to quickly swap the optics/lens to theoretically achieve infinitely fine XY resolution on ever smaller builds. In reality I suspect when I try it I'll be pushing my luck with XY at less than 25micron and/or layer thickness below 15micron.
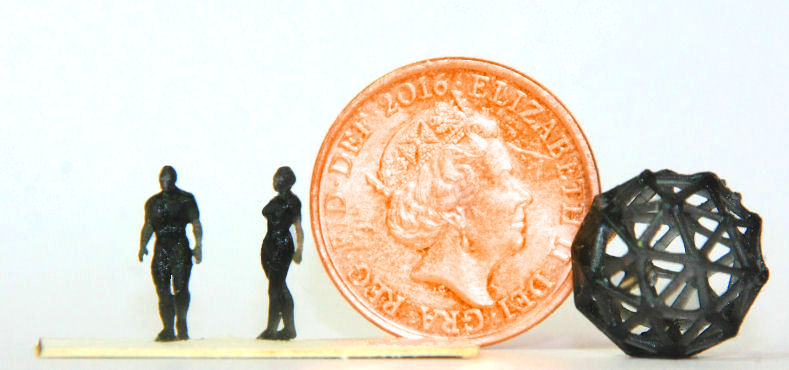
Shown are images of free downloaded models printed as quick little tests whilst first trying to calibrate the basic "low res" settings. There's nothing like a cruelly enlarged photo to highlight faults where with a bit of fine tuning I'd hope to get things perhaps a little sharper by improving the printer's focus and exposure settings. You can just about see the improvement in settings from top to bottom of the image as I keep tweaking each batch of tests. I think my favourite illustration so far of what this printer can do is the contrasting image of a typical stylised, large and chunky "nominally 15mm" elf archer (actually more like a 20mm figure) shown alongside a model/scan of a real human being printed at 20mm height to the top of the head. So for anybody with a practical "have-a-go" attitude I'd encourage you to design and make your own printer as you can have the satisfaction of having a machine that compares in terms of precision with top professional SLA machines printing details finer than most humans could ever paint, yet costing no more than a basic entry level hobbyists FFF printer. |
 chicklewis chicklewis  | 16 Sep 2017 4:38 a.m. PST |
SPECTACULAR !!! Could you post a photo of your prototype printer, please ? |
| peterx | 16 Sep 2017 5:43 a.m. PST |
Congrats, Aiden! Looks like you are on the cutting edge of wargaming and miniatures manufactoring! |
| JMcCarroll | 16 Sep 2017 6:36 a.m. PST |
Next step should be crowd funding so that us uneducated can follow your footsteps. |
 martinjpayne1964 martinjpayne1964 | 16 Sep 2017 6:41 a.m. PST |
Very nice work, Aiden! Come on then, how about a parts breakdown, a list of suppliers and some photos of the finished printer… |
| davbenbak | 16 Sep 2017 6:43 a.m. PST |
Fantastic! I'm hoping this is the near future for all of us 1/72 plastic fans. I generally only use about 60% of what comes in a box of 48 or so figures. I can't wait for a "print on demand" type order where I could specify which poses and how many of each. |
| Wargamer Dave | 16 Sep 2017 6:51 a.m. PST |
Like martinjpayne says. You could probably set up a little business providing kits and instructions for gamers. |
| Aidan Campbell | 16 Sep 2017 7:48 a.m. PST |
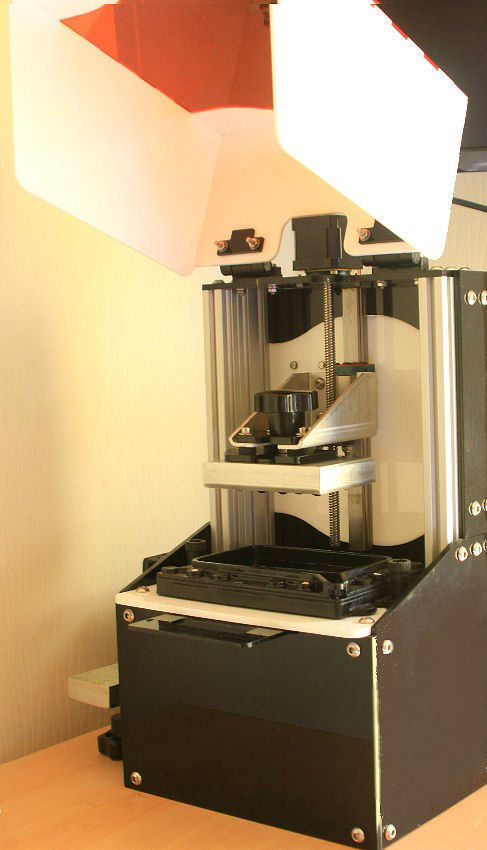
As requested an image of my prototype printer.
The picture doesn't show too much as all the "internals" are intentionally boxed off inside to protect them from splashed resin; black sticky gloop over glass optics or electronics isn't good!
In terms of components the casing I laser cut from Acrylic sheet, the framing is moulded aluminium straight from a CNC hobby suppliers, as are the stepper motor, linear rail and basic USB PCB for controlling them. Any old glass or plastic dish would do as a vat for the resin but I bought a moulded plastic frame from one of the many suppliers catering to the "geeks" building their own 3D printers. Aside from that there's various nuts, bolts, washers, screws, brackets and hinges to hold it all together and a few bits I fashioned from blocks of aluminium. The digital projector is plug and play and with the use of a couple of simple thumb screws, unfastens from the printer in less than 10seconds to take it to conference centres for lecturing, or into the garden for projecting DVD movies onto the side of the house at more than 12foot wide (what it was designed for) It's not really that revolutionary, if you Google home made DLP printers you'll find lots of variants of small desk top printers on this theme. (overall my whole printer including the projector occupies a space 300mm wide x 350mm deep x 400mm tall) perhaps the only clever twist is the addition of extra optics beyond those of the off the shelf projector to enable this to "go small" rather than do what it is supposed to by way of projecting at near cinema screen sizes. |
| chicklewis | 16 Sep 2017 10:16 p.m. PST |
Remarkably clean, sharp and professional looking ! |
| Aidan Campbell | 17 Sep 2017 1:25 a.m. PST |
Remarkably clean, sharp and professional looking ! Thanks, I always try to make a tidy job of what I do, and I didn't want to share my desk with an eye sore. Cheers |
| Aidan Campbell | 19 Sep 2017 1:09 a.m. PST |
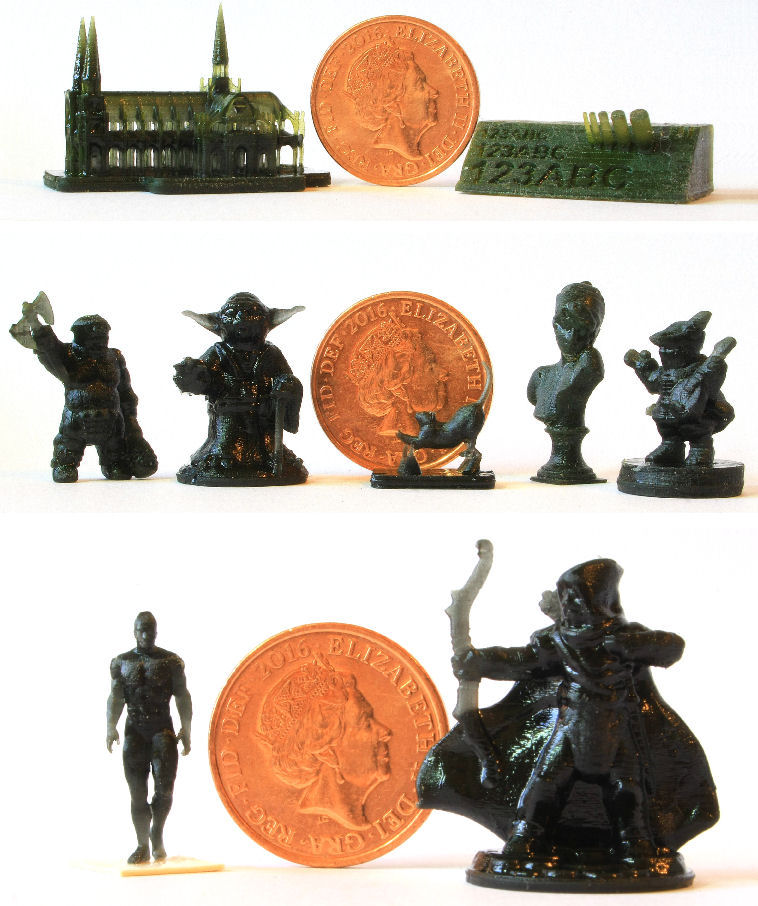
Just a quick picture of a few finer prints achieved with settings tweaked to 35micron XY precision and 30 micron layer thickness.
|
|