Yellow Admiral Yellow Admiral  | 20 Jul 2017 4:43 p.m. PST |
I have a big bunch of the Corsec telescoping rods with spherical magnets at the top. I'd like to keep using them.
I have a bunch of AIM 1/200 planes, and I'd like to have more (they're neato!). AIM planes come with a cast-in stalk with a steel screw embedded in it. This is the right basic idea (steel on plane, magnet on stick), except the steel screw is flat and doesn't hold the plane at an angle on the small spherical magnets of the Corsec sticks. Gravity rotates the planes into their natural "low" position (usually tail-down).
So I'm picking the collective brain: Can anyone suggest an easy way to make these two items stick together without modifying either one? - Ix |
| Yellow Admiral | 20 Jul 2017 4:46 p.m. PST |
Suggestions to buy new stuff or go with an entirely different system will be rejected out of hand. The entire point of this post is to find a way to keep what I have without starting over. I would also prefer to avoid the 1000-mile journey of modifying the models, unless someone knows a brain-dead easy technique. I already have a near-perfect steel fitting to stick to the Corsec magnets (the little cupped pegs sold by I-94), but it would be a lotta work to mount those on AIM planes, and risky. - Ix |
| Schogun | 20 Jul 2017 5:17 p.m. PST |
Remove screw. Cut off stalk until flush. Glue on a small washer or nut with a hole big enough to accommodate the sphere. Or just leave the stalk (and screw?) as is and glue on a washer. |
| Winston Smith | 20 Jul 2017 5:35 p.m. PST |
Get a nail and clip most of the pin off. Leave enough to fit into a hole you drill into the belly of the plane, as close to the center of gravity as you can estimate.
Use a steel or iron nail of course.
This eliminates that pesky lining up of magnetic poles. |
| Dave Schmid | 20 Jul 2017 6:08 p.m. PST |
Buy AIM stands that use flat magnets on the telescoping rod. If you want to rotate the plane during play purchase the stands with articulated head. |
 Virtualscratchbuilder Virtualscratchbuilder  | 20 Jul 2017 6:53 p.m. PST |
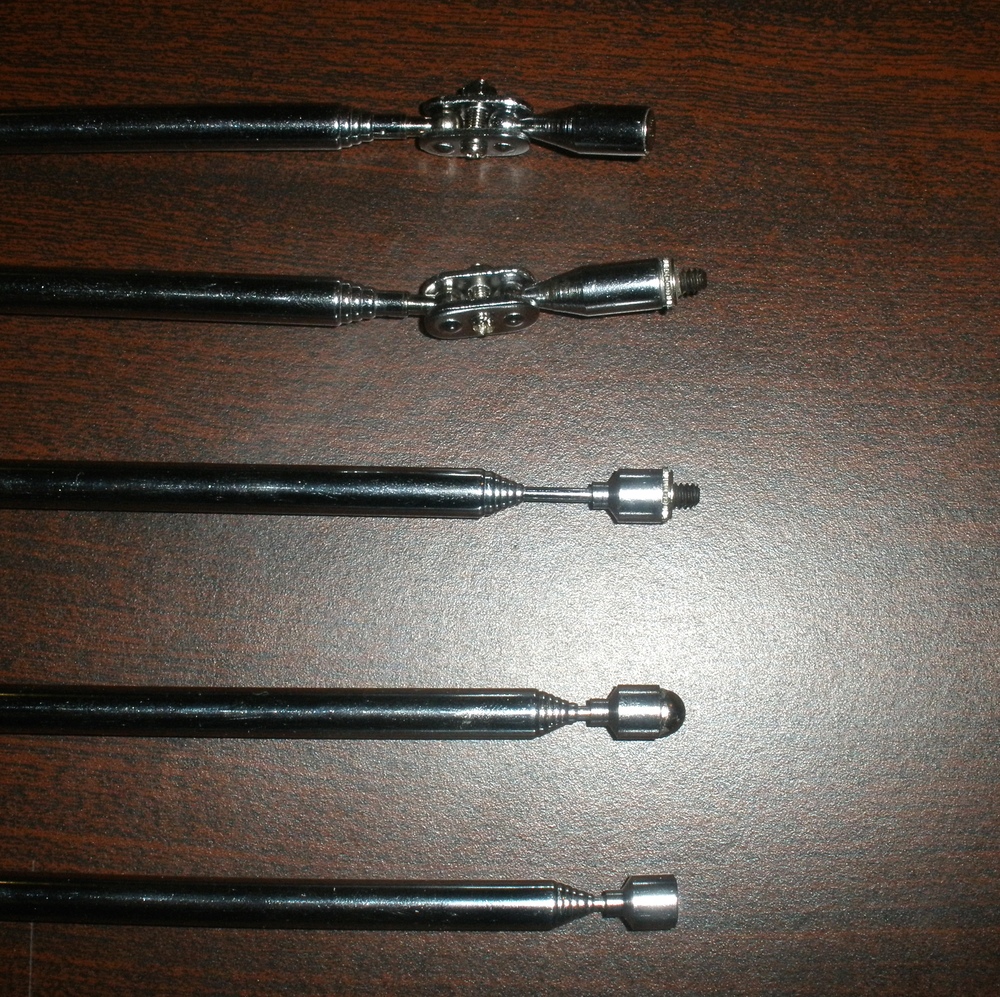
You cannot drill into the belly of the plane because of the peg and screw that are already cast there. YA, I am assuming you mean the third rod from the bottom of your pic. Getchy some rare earth magnets like this: auction Sand your round magnets enough to really scratch up the surface. Do the same to the side of the rare earth magnets that attract the round magnet, and super-glue them together so the RE magnet presents a flat surface to mate to the screw in the AIM plane. Use a very fine sand paper and sand a good bit of scratching in the surfaces because the superglue needs these imperfections to grab. I have had a lot of success gluing SE magnets to resin planes and starships, plastic models and metal posts using this method. |
| Bashytubits | 20 Jul 2017 11:09 p.m. PST |
Something like this might work if it is glued to the screw on the planes.
link Or these.
link |
| Wilf12358 | 21 Jul 2017 5:49 a.m. PST |
Would it be possible to countersink the head of the steel screw to create a concave cup to improve the contact area with the magnetic sphere?
Use a pin vice rather than a Dremel for accuracy with a hard tip drill bit? |
| Yellow Admiral | 21 Jul 2017 10:09 a.m. PST |
Would it be possible to countersink the head of the steel screw to create a concave cup to improve the contact area with the magnetic sphere? Maybe. I have some 1/4" radius spherical diamond grinding bits for exactly this purpose (from a previous project). The problem is that it's very difficult to aim a rotating grinding bit accurately without a drill press and a vise, but putting delicate resin planes in a vise (even a tiny Dremel-scale vise) is a non-starter. Without the stability of a vise and drill press, the grinder tends to wander all over the place, and the best result is usually a skewed oval rather than a neat circle. :-( That said, this is on my list of experiments to try. I was just hoping somebody had a smarter idea. - Ix |
| Yellow Admiral | 21 Jul 2017 10:10 a.m. PST |
You cannot drill into the belly of the plane because of the peg and screw that are already cast there. Exactly. I would also like to avoid filing off the entire stalk to replace it with a better bit of steel, because that ramps the effort of the project up to the level of "never get started". The AIM resin castings are pretty darned good right out of the box, they don't really need much prep work (if any) before painting, so I would hate to voluntarily add a massive preparatory step. YA, I am assuming you mean the third rod from the bottom of your pic. No, second from the bottom (fourth down), the one with the spherical magnet in it. - Ix |
| Yellow Admiral | 21 Jul 2017 10:54 a.m. PST |
Buy AIM stands that use flat magnets on the telescoping rod. If you want to rotate the plane during play purchase the stands with articulated head. I originally wanted to when I started this project long ago, but I've been unable to find 6-7 section telescoping rods with a gimbaling magnet at the top. That's how I wound up with Corsec spherical magnet rods instead. 5 section rods are not an option. - Ix |
| Yellow Admiral | 21 Jul 2017 12:18 p.m. PST |
Bashytubits: All those magnets are reasonable suggestions, but my experiments with attaching supermagnets to spherical magnets have varied between poor and hilarious. The effects of pole alignments on spherical magnets when attaching flat magnets is really weird. It's better to use steel on the plane side. The best use I've seen for those tube magnets is on telescoping rods with a hemispherical steel cap. It works beautifully, and I wish I'd known about this technique several hundred dollars ago, when I started all this. <grumble> - Ix |
| Bashytubits | 21 Jul 2017 12:36 p.m. PST |
If that is the case maybe you could get a beveled washer to glue to the screw and attach to the spherical magnet.
link |
| Virtualscratchbuilder | 21 Jul 2017 2:38 p.m. PST |
No, second from the bottom (fourth down), the one with the spherical magnet in it. That is what I meant. Really. |
| HMS Exeter | 21 Jul 2017 4:40 p.m. PST |
No magnet is going to hold anything reliably unless you have good contact with a ferrous surface. Using a round magnet with a flat steel screw means you only have the tip of the magnet in contact,…hence your problem. You could try using a sleeve glued to the screw, like a steel spacer or steel tubing, but this would only increase the contact to the tip, plus a narrow ring inside the tube. It might work, but it won't be ideal. The only perfect solution would be to find a half sphere steel ball joint the same diameter as the magnet. Sort of like a hip replacement where the magnet is the top of the leg bone. I've seen things like this in the world, but they are usually made of the wrong stuff. The covers to laser pointers come to mind, but they are all pot metal. And they'd never be the right size. The inside of a radio control airplane spinner comes to mind, but the taper is sure to be wrong. If the steel tubing doesn't work it may be time to head back to the drawing board. |
| Yellow Admiral | 22 Jul 2017 6:23 p.m. PST |
Thanks everybody for your suggestions., but I think I've settled on a solution, and one remarkably close to Kpinder's "perfect" solution. For previous projects, I bought a couple hundred threaded hex-head standoffs, the kind used on either side of old computer ports (monitor ports, printer ports, etc.):
I had to hunt, but I found them in magnetic steel (most of these are prodcued in non-magnetic alloy, probably for sound engineering reasons). These actually stick to the spherical magnet reasonably well right out of the box, but to improve magnetic adhesion, I bought a 1/4" radius hemispherical diamond grinding bit (actually intended for grinding glass, according to the marketing gibberish) and ground the flat hex surface into a concave cup. It's some work, but not hard, and I cupped the ends of 3 dozen standoffs today in under an hour. Today I discovered that if I'm very careful, I can usually break loose the screw embedded in the AIM planes without breaking off the resin stalk (1 failure in 7 attempts). This didn't used to work (I've tried it before), but it's possible the new AIM planes don't have the screws glued in and my previous batch did. Or maybe I was just more careful this time. Dunno. <shrug> With the screw out, the resin stalk can be re-tapped with a 4-40 thread, and a standoff screwed right into it. No glue even necessary, just finger-tight and it's in there for good. I think the resin flexes just a little bit and helps hold the threads. Originally, I had developed this whole system for 1/300 scale planes, but I soon discovered that lead planes have too much weight for the magnetic adhesion and friction of the tiny steel alloy standoffs on small spherical magnets, causing a lot of tail-down auto-rotations in play. The steel in the I-94 cupped fittings is far more magnetic and worked better, so I switched to using those. Now that I'm starting over with AIM 1/200 planes, the resin models are much lighter and the lesser magnetism of the standoffs is sufficient to hold them at any angle (at least up to dive-bomber sized planes I have my doubts about 2-4 engined bombers…). A secondary neato fact about the standoffs is that the surface facing down has a threaded hole, so theoretically the planes could be screwed onto a 4-40 threaded rod instead of being stuck to magnets. I have no reason to do this currently, but it might prove useful some day. - Ix |
| Yellow Admiral | 22 Jul 2017 6:28 p.m. PST |
As an aside, an experiment that will live in the Hall of Shame: I first tried using that hemispherical burr bit to grind a cupped depression right into the screw on an AIM plane. This worked brilliantly to make the screw stick to the spherical magnet much better, but grinding the screw produced a LOT of heat, so the resin stalk softened, partially melted, and split in several places. I salvaged the model by glomming superglue over the mess so that screw isn't coming out again, but the screw would clearly have to be removed before grinding it to be safe. Of course, once I have the screw out I can just use the standoffs instead, so…. nevermind all that. Back to the standoffs. - Ix |