Title: Cuba Libre Prelude Angola #1
It's 1045 on 4 May 1981. The members of 2nd Platoon, 1st Company, 33rd People's Revolutionary Battalion arrived in Luanda, Angola a week ago. They met with their outgoing counterparts, and were in turn introduced to their FAPLA (People's Armed Forces of Liberation of Angola, i.e., the Angolan Communists) brethren. They conducted several patrols in the local area, but then were given word of a UNITA (The National Union for the Total Independence of Angola, backed by the US and South Africa) offensives coming out of Southwest Africa (on the southern border of Angola, now known as Namibia). The UNITA forces broke through the FAPLA lines at the frontier; 1st Company was swiftly loaded up and trucked south to head off the enemy spearhead. As they arrived on scene, the Cuban/FAPLA counterattack was already occurring. 1st and 3rd Platoons pushed east and south, cutting off the enemy troops in the (fictional) village of Mutanga. 2nd Platoon followed in trace, then turned north to re-take the village. Here is the plan for the operation to retake Mutanga:
link
North is up. Here is my ConOps for the games; as in real life, this will get thrown off if (when) things go wrong.
1. 1st Squad assaults the tower and mortar position, taking the bridge over the Bulungtani River.
2. 2nd Squad crosses the foot bridge and assaults the bunker on Hill 29.
3. 3rd Squad begins crossing the open ground from the mortar position to the village, but is pinned by enemy fire from the palm grove. 1st Squad reorganizes and assaults the palm grove to clear it of enemy forces.
4. 3rd Squad continues its assault, securing the village of Mutanga.
5. UNITA forces to the northeast counterattack the village, defended by 3rd Squad.
6. 2nd Squad leaves Hill 29 to mop up the enemy counterattack.
Well, that's the plan for Operation Lionheart, the counteroffensive to cut off and destroy UNITA forces north of the Bulungtani River and liberate the village of Mutanga. Let's get to the first fight, where 1st Squad has crossed the line of departure and is closing in on the bridge/tower/mortar position.
[URL=http://s1276.photobucket.com/user/wolfhag/media/jack3_zpsqg2hjthq.jpg.html]
[/URL]
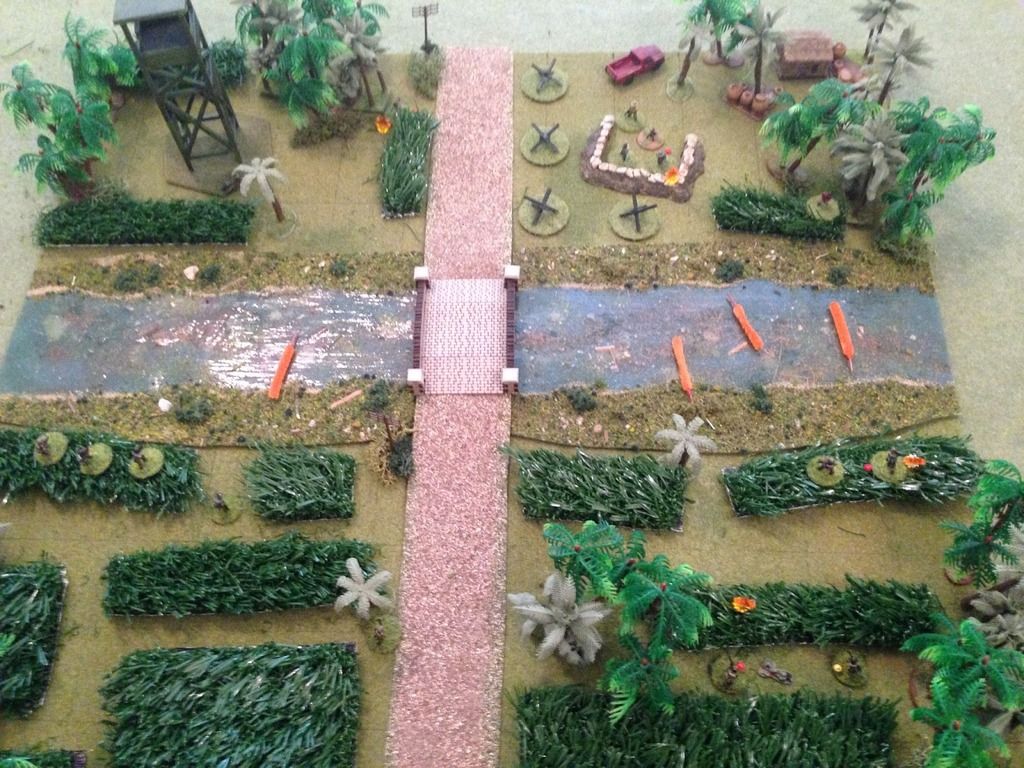
Overview of map, with north being to top left. The Cubans will enter from the southwest (bottom), moving up on either side of the road to the village of Mutanga (off camera to top). At center is the bridge over the Bulungtani River, with UNITA forces entrenched on the opposite bank, where they have a watch tower at top center left and a sandbagged mortar position at top center right. At top right is a civilian hut, one of several on the outskirts of the village. The countryside is relatively flat grasslands, with intermittent patches of dense forest and long elephant grass (which blocks line of sight and slows down movement), and the river is fordable by men on foot.
The game is being played out solo on a 2' x 2' board using Ivan's "Five Men at Kursk," modified to make it a bit more modern (more firing dice, each troop in good fighting condition can act AND react in each turn, missed shots on troops in good fighting condition draws 'free' reaction fire), and I'm trying out the new "keep'em pinned" concept Ivan and I were discussing.
[URL=http://s1276.photobucket.com/user/wolfhag/media/jack2_zpsipv8dell.jpg.html]
[/URL]
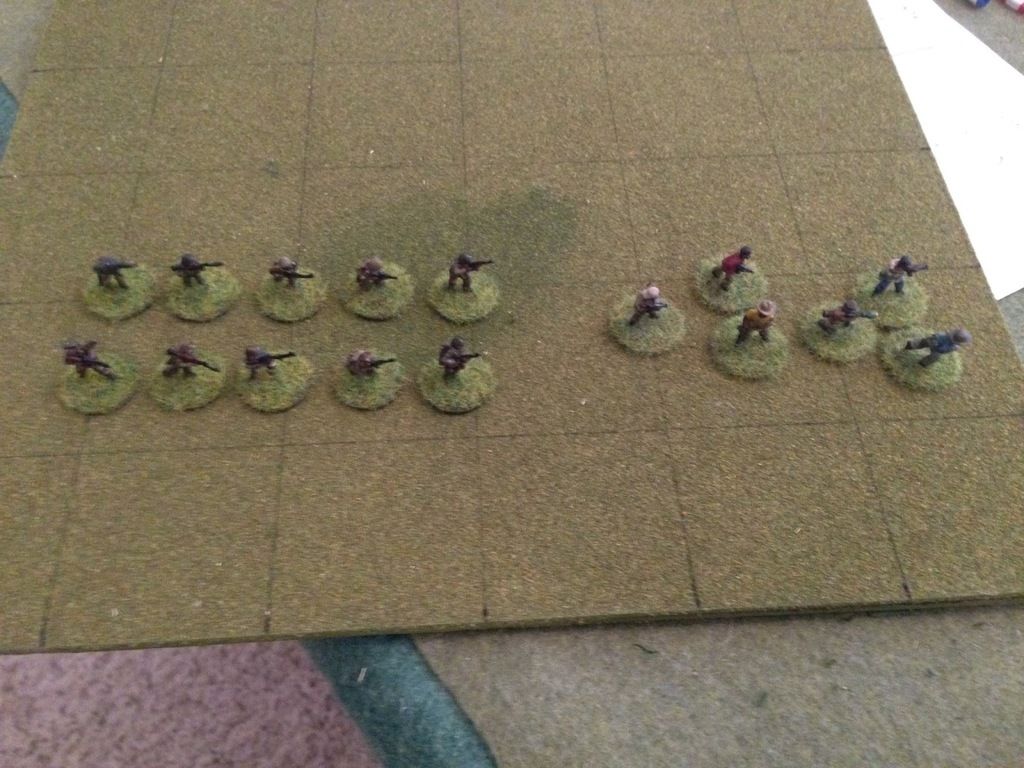
The opposing forces, with Cubans on the left and UNITA rebels on the right, ten verses six. I was going to say good guys and bad guys, but…
The Cuban forces consists of a single squad of ten men, broken down into a squad leader, an assistant squad leader, two RPG men, two light machine gunners (with RPKs), and four riflemen with AK-74s. The figures are Battlefront Team Yankee 15mm East German Mechanized Infantry.
The UNITA rebels, consisting of a boss (center, yellow shirt), an RPG gunner, and four rifleman with AKs of various type and manufacture. The figures are Rebel Minis' 15mm African Rebels.
[URL=http://s1276.photobucket.com/user/wolfhag/media/jack3_zpsqg2hjthq.jpg.html]
[/URL]
A quick look at what's going on from the perspective of the new mods: at left center I've got Cpl Lucastro marked to keep firing on the suppressed enemy RPG gunner at top center left. I've got one UNITA rifleman in the mortar position marked to keep firing to keep Cannastria suppressed and Rolando pinned (bottom center right). On the right I've got Sgt Colvasquez marked to keep firing to keep a UNITA rifleman in the mortar position suppressed, and I've got a UNITA rifleman in the trees (top right) marked to keep firing to keep Barnejesus suppressed. As with real life, the outnumbered defenders are quickly running out of people to maneuver, though they can keep up a deadly effective fire from their covered positions, and the Cuban attackers have their right tied down in the gunfight and their unengaged left able to maneuver. Pretty cool.
To see the whole fight, please check the blog at:
link
So, a pretty fun fight, relatively quick (though longer than my normal 5MAK fights), and very successful as a playtest. Everything worked out very well, and I was able to figure out some things I was previously unsure of, though I'm still not sure how to handle the 'man down' result. Another question would be, do you allow a suppressed individual to make a 'free' retreat move if he has a covered avenue of escape? I don't mind a compulsory retreat, even if it's an uncovered avenue of escape, so long as there is a very large perceived threat forcing it (something to overcome his fear of running out into enemy fire in order to get some distance between it and himself).
Next up we have 2nd Squad creeping across the foot bridge and assaulting the enemy bunker on Hill 29 so that 3rd Squad can assault the village, so stay tuned.