| historygamer | 04 Mar 2015 1:33 p.m. PST |
We will be doing a pick up game using BG rules at CW con this weekend. Look for at least one of the games to be registered on site with the con. |
| redbanner4145 | 04 Mar 2015 6:17 p.m. PST |
Always wanted to try the rules. Maybe I'll find you. |
| historygamer | 04 Mar 2015 6:32 p.m. PST |
Hope to run two or three games while there. |
| Supercilius Maximus | 04 Mar 2015 11:25 p.m. PST |
Good luck – great set of rules. |
| Brownbear | 06 Mar 2015 6:47 a.m. PST |
|
| historygamer | 06 Mar 2015 9:46 a.m. PST |
Of the game? Haven't run one yet. This evening will be the first. Not sure how to get pictures to this site though. |
| historygamer | 08 Mar 2015 12:53 p.m. PST |
Three games. Harlem Heights, Birmingham Hill, and Freeman's Farm. Hope to get pix up soon. |
| historygamer | 09 Mar 2015 8:50 a.m. PST |
Hope to get some pictures up this evening. The rules ran very well and, in my opinion, give a great feel for the period. The only modification we added was for the Freeman's Farm game where we allowed the rifles to hit on 5s and 6s (usually only 6s). This played well, did not skew the game, and made the rifles something to be accounted for. This battle was their big momment to shine during the war. |
| historygamer | 09 Mar 2015 8:53 a.m. PST |
Here is a shot of our game Saturday night: link |
| Supercilius Maximus | 09 Mar 2015 5:51 p.m. PST |
Looks a splendid effort. Any more pics/write ups to come? |
| historygamer | 09 Mar 2015 6:48 p.m. PST |
Still catching up, but working on it. :-) |
| historygamer | 09 Mar 2015 7:29 p.m. PST |
Just sent 8 more photos to be uploaded to photobucket (I hope). More soon. Our third game – Freeman's Farm, was started late. We got to the point where Learned's Brigade came on and we halted the game there due to sleepiness and time change. Conventions on time-change weekends should be forbidden under International Wargaming Laws. Friday night we did Harlem Heights (the Lights broke) and Saturday afternoon we did Brimingham Hill, though for some reason I placed the Meeting House too far forward. I would also put more room on the game table behind the American lines and less behind the attacking British. More pictures soon. |
| Virginia Tory | 10 Mar 2015 7:36 a.m. PST |
Yes, a subtle hint to me…I'm in the process of downloading and sorting the various pix and should have some stuff posted in a day or so. |
| Virginia Tory | 10 Mar 2015 7:50 a.m. PST |
OK…this first batch was the Harlem Heights Battle. The Lights got stuck in, but once they saw what was coming at them they "changed front" to the rear and began falling back. This was going OK until Leslie's horse was hit, and galloped into the Rebel lines with him, making him a guest of General Washington. His battalions didn't like this and fled, which pretty much ended the game.
|
| historygamer | 10 Mar 2015 8:20 a.m. PST |
We are getting a lot more comfortable with the rules. For a long time we were playing them without the brigade rules – which was a huge mistake. Now that we are playing with the brigade rules we see a lot more historic things happening in our games. |
| 4thsublegion | 10 Mar 2015 3:28 p.m. PST |
Great looking game! Well done! |
| Supercilius Maximus | 10 Mar 2015 5:04 p.m. PST |
How did you think the Haarlem scenario worked? I've played it twice and got a vaguely historical (ie back-and-forth, no real winner) result each time. |
| Virginia Tory | 11 Mar 2015 4:37 a.m. PST |
SM…I'd say it mostly worked, though I thought the initial fight developed maybe a bit too quickly with the Lights almost immediately realizing what they were getting into--it wasn't as hard to extricate them as I thought it should be, but we probably should have rolled to change form "Engage" to "Retreat" with the orders. As HG said, using the orders more rigorously makes a big difference. |
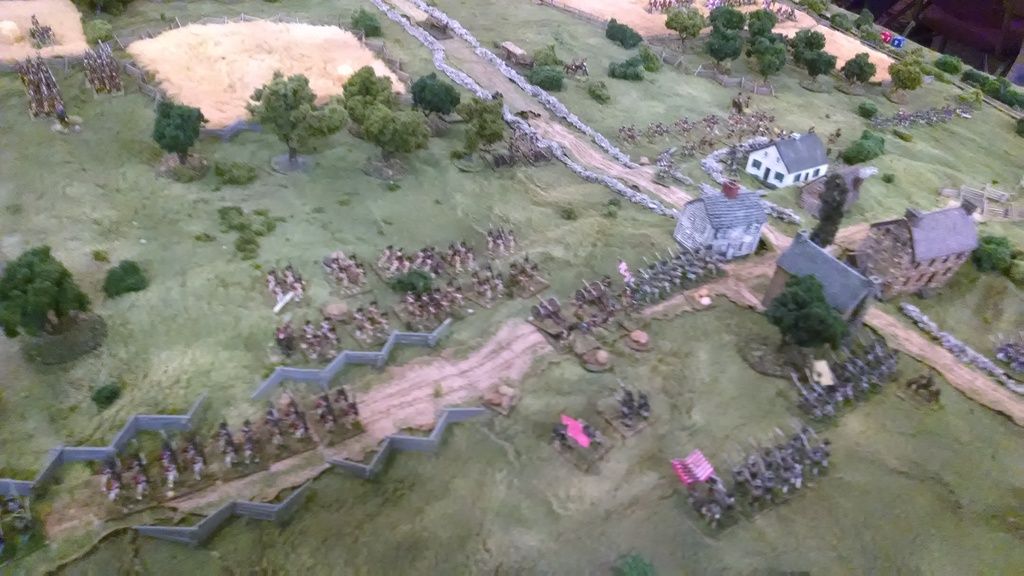
| Virginia Tory | 11 Mar 2015 4:46 a.m. PST |
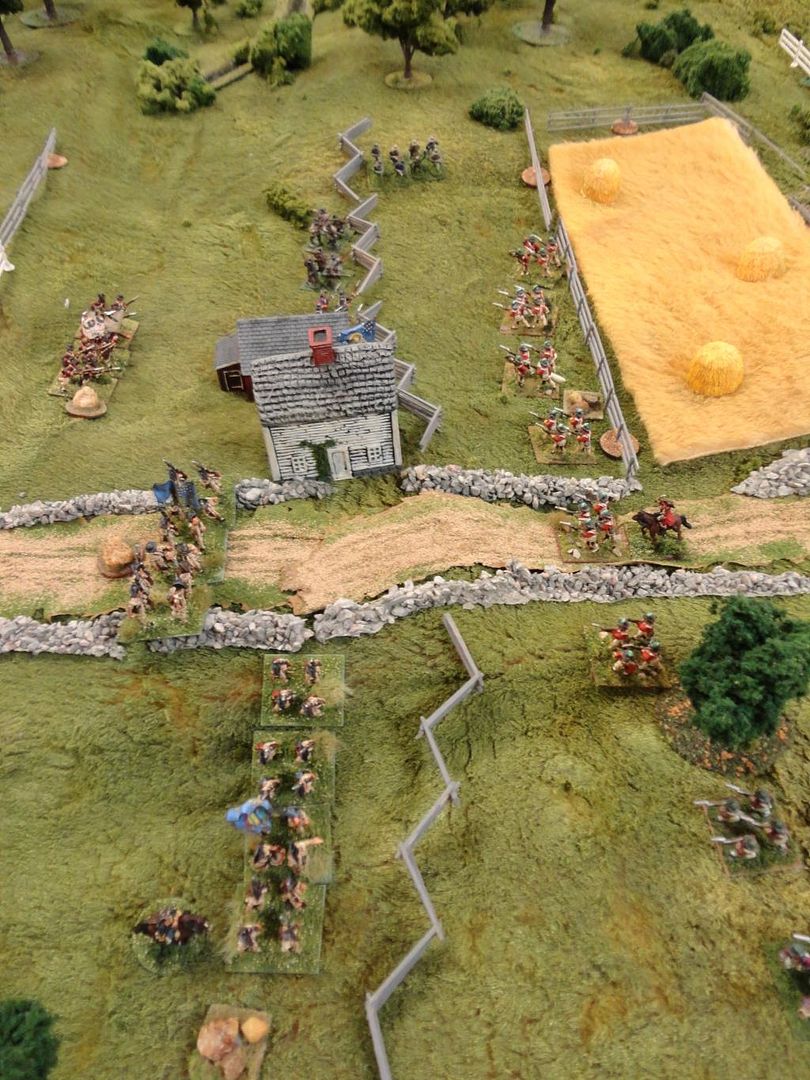
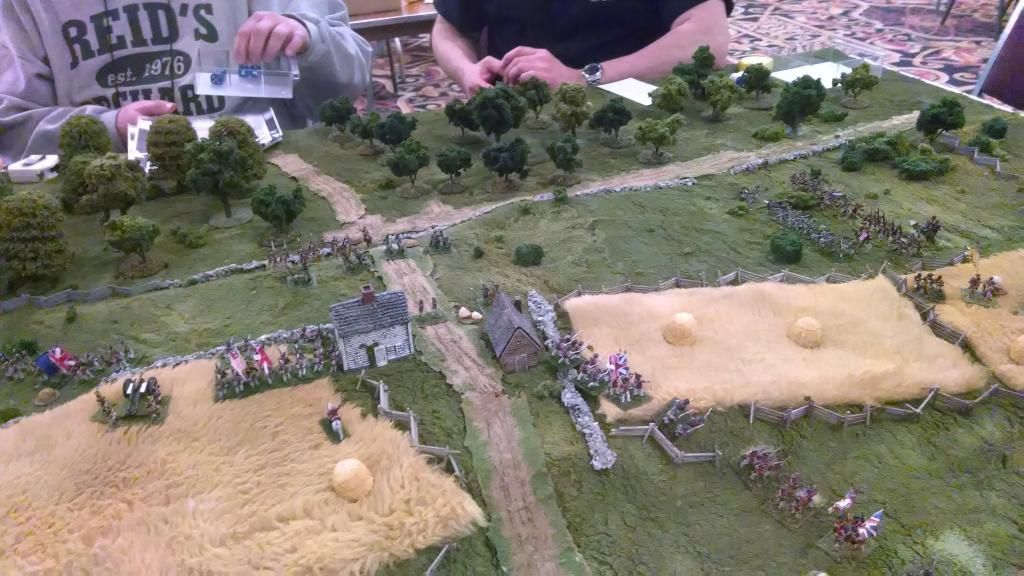
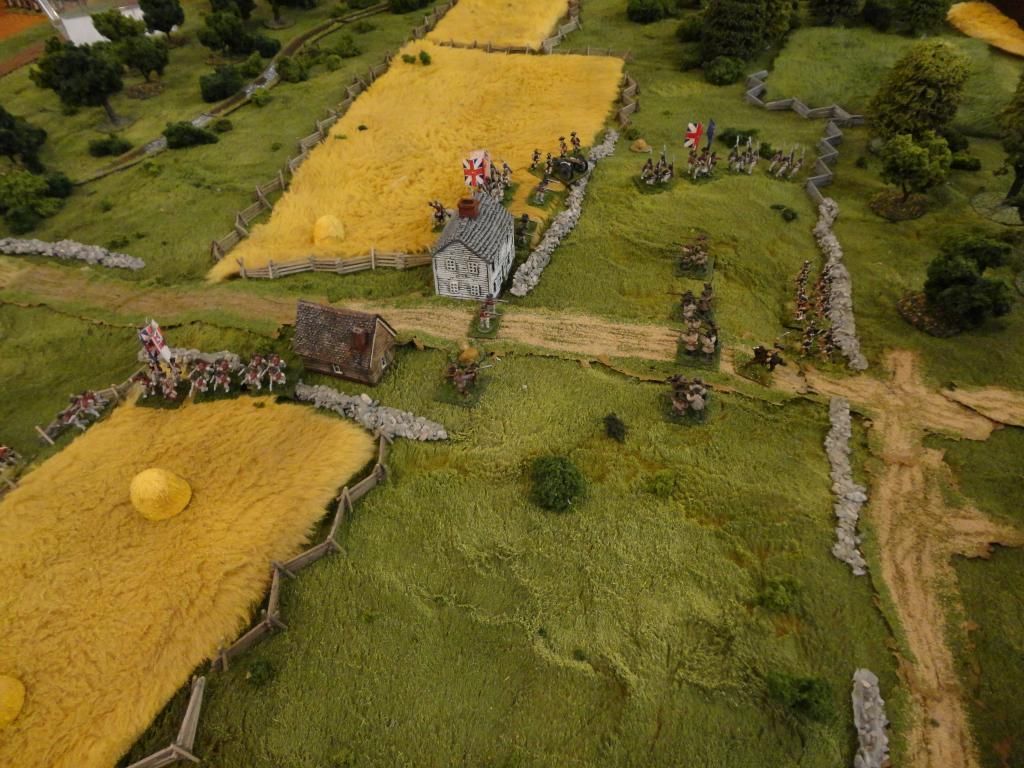
Now, Birmingham Hill. In this shot, the Grenadiers and Guards are about to assault the somewhat hapless de Borre; the Rebel player did a creditable job of trying to rearrange his lines and hold off the cream of the Crown forces.
Still downloading other photos from this engagement, so stand by. The commander of the British left had two light battalions, the Jaegers and the light company of the 42d Foot (and later an entire brigade of hatmen backing him up plus a 6 pounder battery). Yet, he was very cautious in his play style. the 2d Line skirmishers holding the Meeting House really managed to stay in position several turns later than they should have as he engaged them with the Jaegers and seemed content to wait out the Rebels, until Lord Cornwallis had a word with him… |
| historygamer | 11 Mar 2015 5:37 a.m. PST |
Some quick updates on this game. I had a brain cramp and placed the Meeting House too far forward on the other side of the road. This is where the second line skirmishers held up an entire brigade of Lights and Jagers (42nd skirmishers too). I eventually had to goad him into pushing the skirmishers out of the walled area around the Meeting House, which he did. The Grenadier battalions started with one behind the other, as they actually did in the real battle, but the player controlling them decided to keep them that way instead of deploying them into line beside each other, which paid off on his assault (bayonet charge) on De Borres troops (took over for Sullivan when assumed overall command of the wing). The grenadiers leaped frogged through each other, pressing their attack. As one battalion took on DPs, the other passed through (both remained in open order). Between the Guards and the Grenadiers, they forced back De Borres's division and were in position to roll up the rebel line from that side to the other. Looking at this game you can see why the Lights couldn't really press up the hill on their own. Too many troops in front of them. When I set this game u p again I will put less game board on the British side and more on/behind the Americans. |
| historygamer | 11 Mar 2015 5:41 a.m. PST |
Oh, you can also see why the 4th Brigade (Agnew) and the German Grenadiers didn't really get into this fight. There is an error in the BG scenario book as according to my reading/research, the rather useless 16th LD were by the Germans, and seemed to ride down the road along Brandywine Creek, moving with the German grenadier battalions (largely unengaged that day). Perhaps their mission was to clear that area to open up the fords and join Knyphausen). The 4th Brigade got into a fight with Greene at the end of the day, a game I have put on twice now. That is a very good scenario to play as the Brits are being pushed by the fading daylight to break through, while Greene covers the retreat of the army. |
| historygamer | 11 Mar 2015 5:42 a.m. PST |
SM; I thought Harlem Heights played very well. I read a book a while ago call George Washington, A Military Life. I seem to recall in it that George led some troops in one of the NY battles where he chased a Light battalion off the field. Was this the battle or another? |
| FlyXwire | 11 Mar 2015 6:34 a.m. PST |
George Washington certainly conceived the unfolding action at Harlem Heights for the possibility of bloodying the approaching British advance guard, however the coordination of his flank attack was sprung prematurely. I've not read anything that Washington directly led into battle any of the units at Harlem Heights though. |
| historygamer | 11 Mar 2015 7:02 a.m. PST |
Unfortunately it was a books on tape a friend leant to me. I'm not sure I ever saw a hard copy version of the book. I don't think GW is in the scenario. |
| Virginia Tory | 11 Mar 2015 11:20 a.m. PST |
GW is listed in the OOB, but there's nothing about when he arrives. I think we fudged that. And yes, Knowlton and Co. showed up in column right on the LI flank--they got the "got lost" result. This gave the LI just enough time to refuse the right and fall back. I liked the scenario and want to try it again. |
| Virginia Tory | 12 Mar 2015 4:07 a.m. PST |
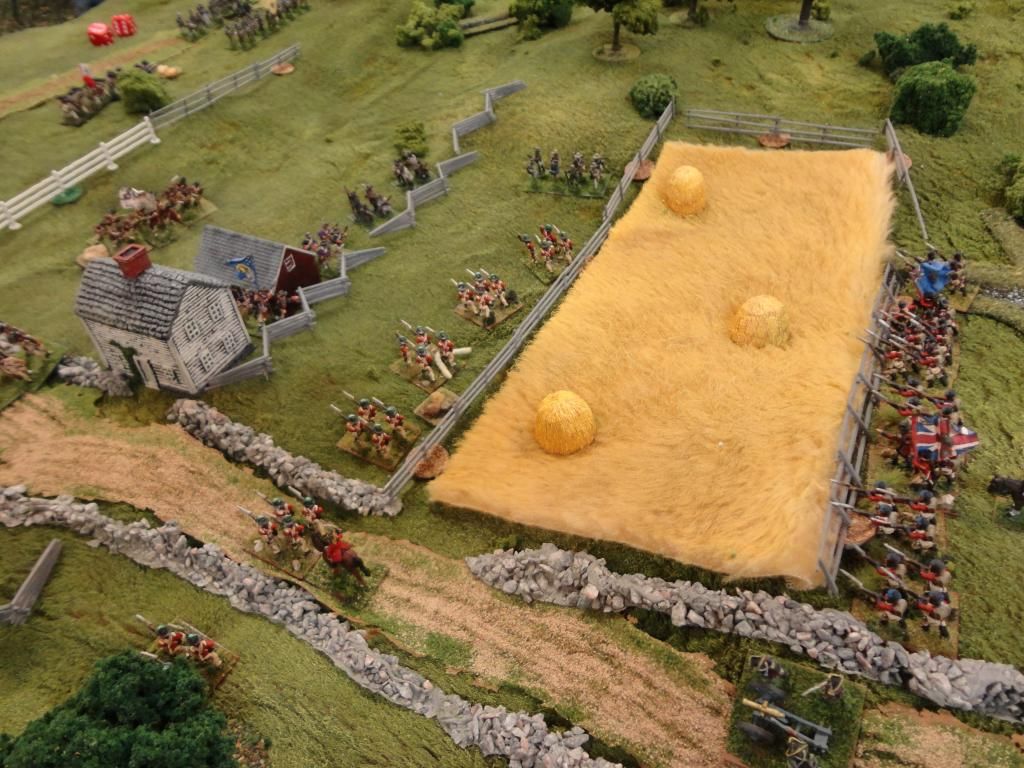
More Birmingham Hill: Here's Agnew's brigade, advancing majestically through the fields. But they didn't actually get into the fight.
And the American left front, after the Grenadiers were done.
|
| Virginia Tory | 12 Mar 2015 4:12 a.m. PST |
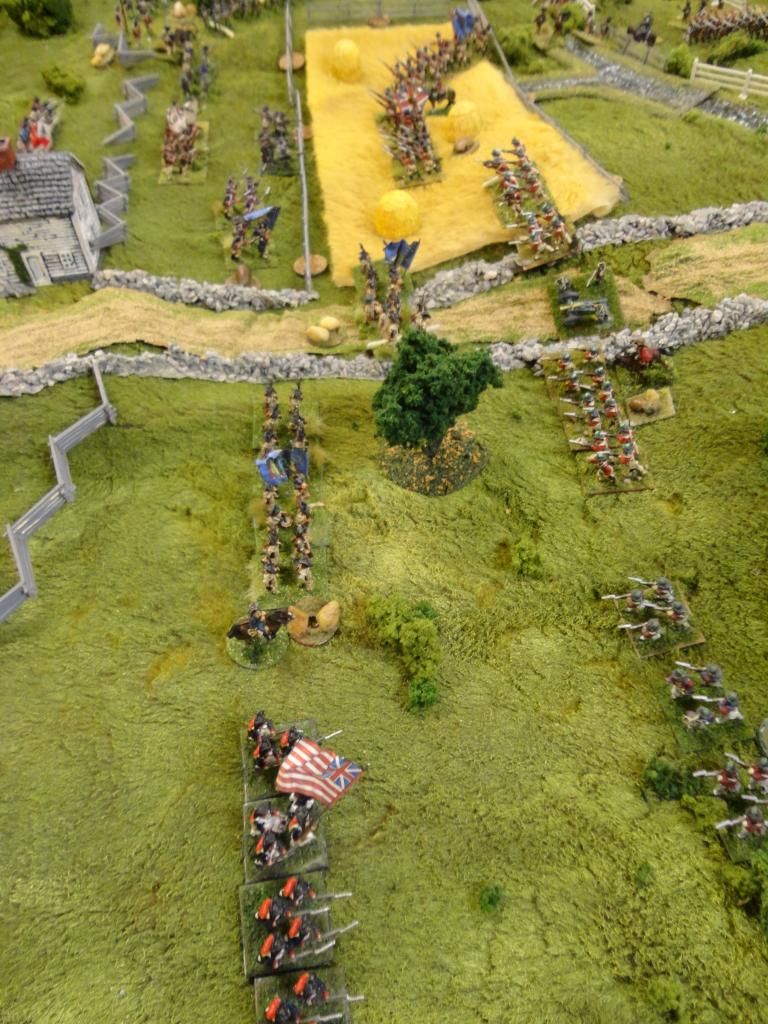
On to Freeman's Farm. In this shot, Hamilton's somewhat overextended brigade has refused it's left, but on the right, the 21st Foot has pushed forward and discommoded Morgan and Dearborn, who had just begun dueling with Major Forbes' Pickets. For some reason the scenario says to use Tory/Indian figures for the pickets, who were actually drawn from the hat companies of the brigade. I threw in one stand of Indians for variety, but otherwise used British skirmishers.
The view from the Rebel side. Poor's brigade is deploying while Hamilton holds the farm with the 9th Foot.
|
| Virginia Tory | 12 Mar 2015 4:17 a.m. PST |
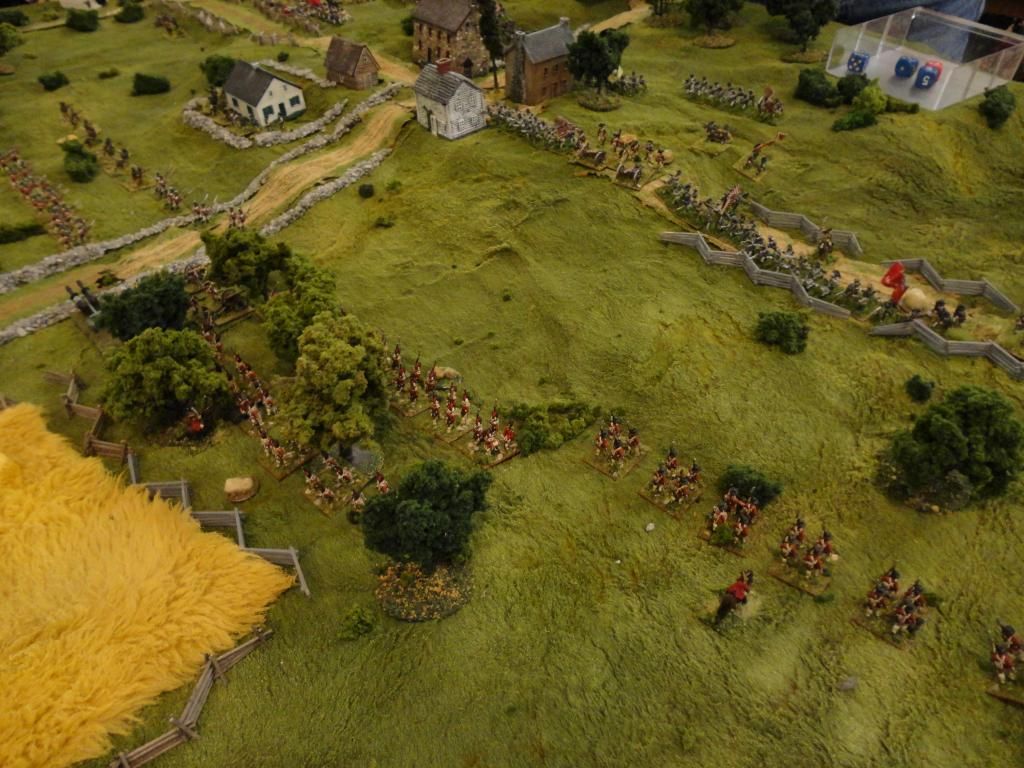
In this shot, the 21st in the distance can be seen flanking Morgan, much to his chagrin.
The gamer who handled Hamilton's troops did a great job of advancing/falling back when needed. This scenario really took on (IMO) the flavor of the September battle. There was a lot of back and forth, though the body count was not as high as historically (but we also ended a bit early). The climax came when some of Fraser's troops were released and began to distract Poor. Eventually Hamilton and Fraser counter-attacked and fractured the American left, which fell back onto Learned's brigade, who were just arriving. Most of the reverses were retreats, so I figure a few turns later the Rebels would have come surging back and the British would have been hard-pressed. It remains true to say that militia don't like being bayonet charged. |
| Supercilius Maximus | 13 Mar 2015 4:19 a.m. PST |
I'd say it mostly worked, though I thought the initial fight developed maybe a bit too quickly with the Lights almost immediately realizing what they were getting into--it wasn't as hard to extricate them as I thought it should be, but we probably should have rolled to change form "Engage" to "Retreat" with the orders. As HG said, using the orders more rigorously makes a big difference. Yes, it is vital to have the historical impetuosity of the two Light Battalions reflected by compulsory forward movement in the first few turns. Otherwise, as you say, it is too easy for them to "bug out" and leave the Rebels clutching at thin air. The same goes for the 42nd when it appears on the table. |
| historygamer | 13 Mar 2015 6:46 a.m. PST |
The 42nd, IIRC, was limited to the buckwheat field, and could go no further. The Lights were placed at right angles to each other, which made a rather odd start for units. I don't recall they had an aggressive move at first, and the rebels quickly outflanked them. It was a good game I am sure we'll play again. |
| Virginia Tory | 13 Mar 2015 10:49 a.m. PST |
The first thing I did was get the LI into a single line and then engaged the Rebels to their front. Then all those guys from Nixon's Brigade (IIRC) showed up and for a time they traded blows, until the Rebel flanking force showed up. Then it was retrograde time. The 42d charged and pushed some skirmishers out of the buckwheat field at one point. I think shortly thereafter we had the disaster with Leslie's capture and the LI basically breaking and falling back. |
| historygamer | 13 Mar 2015 11:57 a.m. PST |
Yes, losing your brigade commander will do that. I really like the double 6's charts for unexpected consequences. Nice touch. |
| historygamer | 13 Mar 2015 3:24 p.m. PST |
SM: Rules question for you regarding formation changes. From column to line it says takes one full move (two dice). The rules say that elite, line and 2nd line troops do not incur any DPs on rolls of 1s and 2s. My question is, if you don't incur any DPs, and it takes a full move, why throw the dice? What does that accomplish? |
| Supercilius Maximus | 14 Mar 2015 7:07 a.m. PST |
HG, Are you looking at the De Luxe edition? I only have the 1st edition rules to hand, and that version (pp. 32-33) doesn't have that contradiction. Does it only apply when changing from column to line, or other formation changes as well? If the former, perhaps it is an acknowledgement that that particular change is less hazardous for troops of those qualities. But my suspicion is that it is a mistake – certainly we always throw dice to see if there are DPs accumulated, regardless of the type of formation change undertaken. |
| historygamer | 14 Mar 2015 7:41 p.m. PST |
Yes, I am using the deeeee-luxe edition, which has a number of changes from the old. rules. I take it you have played both? Do you like one better than the other? Or are the differences too subtle to say? The deluxe one is quite specific that elite, line and 2nd line units pick up no DPs for all formation changes, but it says to roll. Can't reconcile that. Perhaps Mr. E can appear here and clarify. We will be pimping his rules at a lot of venues in the coming campaign season. :-) FYI, but my gaming friends back home really enjoy the rules as well. |
| Supercilius Maximus | 15 Mar 2015 4:41 a.m. PST |
I'm afraid Moses will have to come down from the mountain to clarify that one. Good that you and your buddies like the rules; best depiction of AWI combat I've come across in 30+ years. |
| B6GOBOS | 15 Mar 2015 5:57 a.m. PST |
Thank you for sharing these. Nice write up and excellent looking game. |
| Eclaireur | 17 Mar 2015 4:33 p.m. PST |
Lovely looking games guys! Yes the Deluxe version changes the rule on formation changes for Elite, Line and 2nd Line and notes that apart from wheeling you can 'save yourself the trouble' of a throw. That table of one or two D6 for specific formation changes still applies to Militia and Levy. Really this change was a response to player feedback along the lines of (a) it's not right to manoeuvre what are, after all, meant to be trained soldiers over game turns that are meant to represent quite a significant chunk of time without running the risk of DPs and (b) to save time. EC |
| Supercilius Maximus | 18 Mar 2015 3:22 a.m. PST |
I need to have a word at my club – they're still throwing for DPs with the DL edition. |
| historygamer | 18 Mar 2015 7:12 a.m. PST |
Thanks for the clarification. We enjoy the rules set and look forward to running more games. |
| Eclaireur | 18 Mar 2015 2:35 p.m. PST |
Hmm re-reading my clarification maybe it's a little unclear ;-) The point about ending formation change rolls for trained troops was that in a 10-ish minute game turn, even if they made a disorderly evolution they would have time to tidy it.
It's also intended, like the brigade move system mentioned approvingly above, to speed up larger games and make them a little less fussy.
EC |
| historygamer | 18 Mar 2015 5:36 p.m. PST |
My only thought on that would be the second line troops – which are often pre-1778 Americans. I thought one advantage the British had then (pre-Baron) was the greater ability to change formations with ease and less confusion. I believe that, in part, is what the Baron "fixed" in his drills at Valley Forge. Just a thought and easily played within-house rules. |
| Supercilius Maximus | 19 Mar 2015 2:52 a.m. PST |
Ditto it was the inclusion of 2nd Line troops that made me think it was an error. (That and being too slow/cheap to buy the new edition – yet.) |
| historygamer | 19 Mar 2015 5:23 a.m. PST |
I would agree. Also, since the Germans are considered fussy about maintaining their lines, I would think it might apply to them as well – thus giving the more flexible British troops the slight edge historians often write about, at least earlier in the war. I do like the "bayonet" charge rule that is only found in the Deluxe edition. Makes sense. We saw some of those work out and some not. Are you familiar with that new rule? |
| Eclaireur | 19 Mar 2015 8:45 a.m. PST |
@Supercilious and @historygamer I think your point about 2nd Line being subject to formation change dice rolls is very compelling! It makes sense to make 2nd Line, Conscript, and Levy throw for possible disruption on formation changes,
EC |
| historygamer | 19 Mar 2015 10:38 a.m. PST |
Easily played as a house rule. |
| historygamer | 19 Mar 2015 10:42 a.m. PST |
Some tend to focus on the manual excercise of arms von Steuben brought to the Continentals, but I always felt his biggest impact were the changes to battalion and brigade formation maneuvers. Since there was no standard prior, this seemed to be where the British had a clear advantage – especially given how Continental and militia units came and went throughout the war. |
| Virginia Tory | 19 Mar 2015 10:42 a.m. PST |
I think we did use it as an House Rule. Worked well, I thought. We also allowed rifle skirmishers (in some cases) to inflict hits on a 5 or a 6, but the "5" roll was only for DPs--sort of made the impact of rifles more historical in the impact they had on cohesion (shooting officers, NCOs, etc) but without piling up the bodies. |
| GROSSMAN | 02 Apr 2015 7:23 a.m. PST |
Great looking kit. What did you use for your ground cover? |
| historygamer | 02 Apr 2015 8:41 a.m. PST |
|