"Advice on 3mm Napoleonics, please!" Topic
29 Posts
All members in good standing are free to post here. Opinions expressed here are solely those of the posters, and have not been cleared with nor are they endorsed by The Miniatures Page.
In order to respect possible copyright issues, when quoting from a book or article, please quote no more than three paragraphs.
For more information, see the TMP FAQ.
Back to the Napoleonic Painting Guides Message Board Back to the Napoleonic Discussion Message Board
Areas of InterestNapoleonic
Featured Hobby News Article
Featured Link
Featured Ruleset
Featured Showcase Article
Featured Profile Article
Featured Book Review
|
| HistoryPhD | 28 Nov 2014 3:19 p.m. PST |
I am toying with the idea of trying 3mm for Napoleonics, because I need a new scale like I need a hole in the head. Prior to this, my Napoleonic have always been 6mm and I game Prussia 1806 and Peninsula 1808-9. So here's my question: I'd like to start off by making up some Prussian, as well as the Saxon, hussars, so mirlitons would normally be called for. The closest O8 makes is "with shako". I've yet to see any of the O8 figures in person, so will a painted-on wing be close enough? I figure at this tiny scale, no one will be able to tell shakos from mirlitons in any case. |
| Bashytubits | 28 Nov 2014 4:07 p.m. PST |
|
| 14Bore | 28 Nov 2014 4:40 p.m. PST |
As a collector of 15mm Napp's my suggestion is get a good set of magnifiers. |
| GROSSMAN | 28 Nov 2014 4:56 p.m. PST |
|
| HistoryPhD | 28 Nov 2014 5:05 p.m. PST |
|
| Steve W | 28 Nov 2014 5:53 p.m. PST |
If you search for 3mm blogs you will find some Napoleonics on those You could also join the 3mm yahoo group and ask any questions you have there link |
| coopman | 28 Nov 2014 6:25 p.m. PST |
I have some of the Pico 3mm Israeli and Soviet infantry and they are small. I know that they can probably be painted up with a fair amount of detail, but I'd have to question why anyone would want to spend very much of their time trying to do that since it would not be visible to the average gamer w/o a magnifying glass. I suggest that you buy a pack or two and check them out before making a big purchase. I will have to use my Opti-visor when I paint these guys up. |
79thPA  | 28 Nov 2014 6:53 p.m. PST |
I had some of their 3mm WWII and I don't see how anyone would be able to tell. |
| HistoryPhD | 28 Nov 2014 7:59 p.m. PST |
I do have some of O8's modern infantry, and I agree, but with Napoleonics, a small amount of detail makes a big difference in differentiating troops. I agree Coopman. I'll take the plunge for $4.25 USD and get one pack. |
| Ilodic | 28 Nov 2014 8:44 p.m. PST |
I have bunch of 3mm 08 miniatures I use for 1812+ Russians. I think the detail is great, and they are very easy to paint, you just need to know what works for what army. Here on some tips: 1) Use a very, very light color variant of what is normally called for, even for 6mm figures. If you have any doubts it is too dark, go lighter. 2) These can be painted quickly, the infantry that is, if you place them in rows or two or threes and paint only the front of the first row, and the back of the back row nicely, and do a poor job on the part you do not see. 3) These are a aluminum/zinc alloy, (as something this small cannot be cast in lead.) They can be brittle, but nice x-acto type wire cutters work fine (where some safety glasses though.) They file nicely, and will not clod files like lead or pewter. 4) Build small battalions. I use a 1 1/2" base by 1" base for battalions, so I can have six for V & B on a 3" x 3" base. In this small scale, I can get four rows of 18 figures, command, and a mounted battalion commander with skirmishers (although these are 20mm strips, I do a bit more work needed.) You will need to find out what stands out for a particular regiment and nation. With the Russians, I realize what stood out was the green coats (I use a light green), white trousers, the grey greatcoat, and last but not least, red cuffs. That is it! If you want mass effect, and really true mass effect, 3mm is the way to go. In answer to your question regarding shakos being used as mirlitons, this is not a problem. Painting makes the difference, and they will look how you paint them. Just like in 6mm, bold, bright colors and paint what stands out…just more of the same for 3mm and you have it! I caution you. After painting them for a few hours, you will look to your 6mm miniatures and think for a moment they might be 10/15mm figures. ilodic. |
| HistoryPhD | 28 Nov 2014 8:59 p.m. PST |
ilodic, how very useful. Thanks so much! Do you have any photos of your 3mm troops? |
| forwardmarchstudios | 28 Nov 2014 11:18 p.m. PST |
Wow, those are some great minis Bashytubits! And thanks for linking to my old project for Pico Armor. A blast from the past! At 3mm you can paint any detail you want right into the figures, don't worry about it. The trick is to find a way that you can do it FAST to MANY figures at the SAME TIME. Those are the three key rules to any 3mm painting technique. My 10:1 Wagram project has unfortunately slowed down a bit owing to some other things going on, but I really do need to get back to it one day. I think I was up to around 15,000 infantry when I stopped. I actually have almost all the figures I need, sitting around in boxes, so really just shear laziness (and a lack of Litko bases) is keeping me from getting it on and getting it done. Also, I got sidetracked by design theories for operational level games and most of my 3mm bases are out in the garage on my experimental 15 mile x 15 mile battle mat. One of these days I'll get back to it though. I still haven't come to a conclusion on the best way of basing 3mm figures though. There are so many variables to take into consideration. At the moment I'm using 20mm x 10mm for the infantry. This is good for my Wagram project as the figure ratio and small frontages will allow me to show the entire battle down to the battalion level with column, line and square included. As a general example to give you an idea for planning your games, if a French battalion is 60mm in frontage then you would need a 30 foot wide table to capture all of Wagram at its widest point. But really, I think 3mm have looked best in some of the big-base experiments I've done. They just do, and I wish there was a rule set out there that I could really jump behind in order to use them this way. I'm sort of tempted to put a bunch together for Sam's new game Blucher. I mean, full out 3" x 3" mega brigade bases with all the fixings, mounted officers, arty, skirmishers, cav, etc. I'd try to forget about the foot print demons that plague me just to see how it would look. Bushytubits figs look awesome, and that's another angle to take basing-wise. You can push out towards 1:1. The problems there I wrestled with for a long time and eventually came up with no good answers. The basic problem is this: as you get closer to 1:1 representation most rule sets break down due to ground scale and time considerations. A 1:1 French battalion of 600 men, in 3mm, is represented by 6 x 60mm frontage bases. In 28mm that would be a 36 figure battalion. Meaning the board is going to be tight and, at a maximum, only about 500 meters or so across. So your 3mm battalions will almost certainly start out the game in canister range. That's the best thing about 3mm though, and it's why I dumped all other scales for it. There's no best or standard way to do it, and every basing style is an experiment. |
| davesimpson | 29 Nov 2014 10:34 a.m. PST |
The Lead Doesn't Bleed links are actually to Thaddeus Blanchette's stuff. Here are some direct links to the 3mm Napoleonics material that he's already posted: link
link
link I follow Blanchette's painting protocol, which he mostly cribbed from Forwardmarchstudios, above. Ilodic has fairly well described it, so I won't redo it. There are some things that need to be added, however: 1) Again, as is the case with 3mm moderns, base against your paint scheme. Your Russians will be dark, even if you do what you should and use light paints. You should thus base them on light brown, light yellow (as Blanchette has done in those links above), or spring green. Also, do not make the flocking on your bases too involved: one solid color and maybe a few splotches of another. You may n ot even want to flock at all, actually, and just paint your bases. 2) Set up three popsicle sticks to do Ilodic's #2 suggestion above. The first stick will be front rank troops and you'll obviously pay great attention to their front side. The last stick will be the back rank and you'll worry about their backs. The other sides of these two sticks and the middle stick can be very basic. I only do the main colors, shakos, bedrolls and weapons/bayonets. Do not forget, however, to touch up the sides of the figure strips once you've got them glued down into formation. 3) Exagerate and be prepared to miss some details. For example, I'm not sure if it is a good thing to paint belts white/black or not. On the one hand, they can clearly be seen on the models. On the other, if you do it, you highlight the white and push the main uniform color into the background. At arm's length, all your troops come out looking black and white from the front. So if you MUST do belts, do them very thin. This is particularly a problem with the French line infantry and their white undercoats. 4) As a corrolary to #3 above, use not only lighter, but BRIGHTER colors. I know you don't like circus wagon neon-painted tanks. For Napoleonics, however, you probably should be using bright blues – almost turquoise – for your French infantry or nothing will show up at arm's length. Note the brilliant green shakos on Blanchette's Austrian hussars and the turquoise pants on his Hungarian infantry. A less intense color – say a mild green or a baby blue – simply wouldn't show up. So for the Russians, either a neon green or a spring green should be what you go with. 5) It is a royal pain in the ass to cut apart O8's stuff, even with the proper tools. Your basing scheme should thus be in multiples of 20mm, as much as possible. I base 20mm per company for Battalion-sized units. If I were to do V&B or the upcoming Blucher, I'd probably go 40mm and play at half scale. I'd do two lines or two columns of infantry per stand, with some mounted officers, separate drummers and a line of skirmishers in the front. 6) Finally, DON'T use the O8 flags. The command strips are useful for command units and brigade-sized dioramas (see #5), but the flags are too small. I use 4mm x 5mm flags, printed on paper and touched up with paint, then glued around a bayonet. They look much nicer, IMHO. FMS has a nice tutorial here, somewhere, on making caulk flags. 7) Finally, adding some non-historical touches might really help your visual impact. And here I suggest you cheat and do the pom-poms and shako badges ahistorically. All my French line, for example, have bright blue pom-poms instead of their historical company colors (elites have the appropriate red or gold). For the Russians, I'm thinking I will give them a green pom-pom instead of their historical black and white badge. Remember that you'll mostly be looking at these guys from the top down. As all shakos are mostly gray (DON'T use black as it is too dark), a little spot of ahistorical color can go a very long way to making your troops visually legible at a glance. OK, here's a tutorial on how to do Hussars, moving from the right to the left in 14 steps…
1) Paint the figure in a neutral base. Tan is what was chosen here. 2) Dark chesnut wash. 3) Tan drybrush. 4) Thin black wash on the rider alone. 5) Bright green shako. 6) Light blue highlights painted on rider's cloak, pants and tunic. 7) Sabertache painted red. 8) Yellow highlights on edge of sabertache and yellow pompom painted on the front-top of shako. 9) Touching up shadows with black wash to get any places that got slopped over in #5 and #6. Sword painted black. 10) Sword painted silver. 11) Base painted tan. 12) Hooves painted dark grey. 13) Scabard painted gold. 14) The finished figure. If you use FMS' dot-and-slash techniques, over wash and drybrush, you can finish 120 hussars in about the same time that it would take you to do two or three 28mm figures. |
| HistoryPhD | 29 Nov 2014 11:13 a.m. PST |
Hey! You've been reading my blog! link |
| 79thPA | 29 Nov 2014 3:21 p.m. PST |
If you want the colors to pop, why don't you prime white? |
| forwardmarchstudios | 29 Nov 2014 5:47 p.m. PST |
Priming them white was a nightmare the time I tried it. What I'd recommend, and which worked really well for me, is to use a medium grey. Then when you paint them leave everything gray that's supposed to be black. It'll make the entire model pop and cuts down exponentially on the inherent darkening effect of small figs. Try it out once and I bet you won't go back! In other news I absolutely cannot find my metal snips, the only tool I have to cut up the O8 strips. Arg!!! |
| HistoryPhD | 29 Nov 2014 7:38 p.m. PST |
Any specific colors that you favor, to save me lots of trial and error? I hate buying a bottle of paint and then saying "no, that doesn't look right", and then it never seeing the light of day again and having to try/buy yet another bottle. |
| HistoryPhD | 29 Nov 2014 9:26 p.m. PST |
Forwardmarch, I think your sabot base idea has merit. Let me play with that a bit and see if I can make use of it |
| davesimpson | 30 Nov 2014 9:56 a.m. PST |
Yes, history PhD. I've even said as much on another forum which cannont be named here. ;) I agree with FMS: white priming really doesn't work. A good neutral color is best. I use light gray for my infantry. For the Hussars, Blanchette used tan because when washed with chesnut ink, it takes care of the forse, which is more than 50% of the figure. Even after a light black wash on the rider, you can see the highlights peeking through. As the blue and green is dabbed on in small areas through "dot and slash", it really doesn't need a white base to pop, as long as the paint is thick enough. As for colors, well, trial and error is really the best way to go. Use what you have first. However, I have found that a good electric green, electric blue, bright red and rich yellow have served well for all my Napoleonic color needs. As you are going to do Saxons and Spanish, you'll only need white, grey and black. Maybe a very bright red for facing colors, here and there. |
| HistoryPhD | 30 Nov 2014 10:17 a.m. PST |
davesimpson, I'll never get used to the limelight |
| forwardmarchstudios | 30 Nov 2014 2:28 p.m. PST |
Aww man, I did up some very simple 60mm sabot bases today and they came out looking pretty awesome, plus they allow you to place the information right on the base. So, when Sam finally comes out with Blucher I came place the arty bases right onto the same sabot with the infantry battalions (a feature mentioned in his latest pod cast). You could also drop down command bases and skirmish bases as well, and mix and match cav if needed for mixed type units in FPGA or GA. This super-simplifies things for me at the moment. All I need to do is flock the bases and add some flags to the infantry bases I already have and I'll have some full big-base units for Blucher. I'll try to get some pics up later. |
| forwardmarchstudios | 30 Nov 2014 5:42 p.m. PST |
|
| HistoryPhD | 30 Nov 2014 6:56 p.m. PST |
I'm thinking company bases can have magnetic bottoms and be combined onto larger metal battalion bases or removed to form squares etc. |
| forwardmarchstudios | 30 Nov 2014 11:41 p.m. PST |
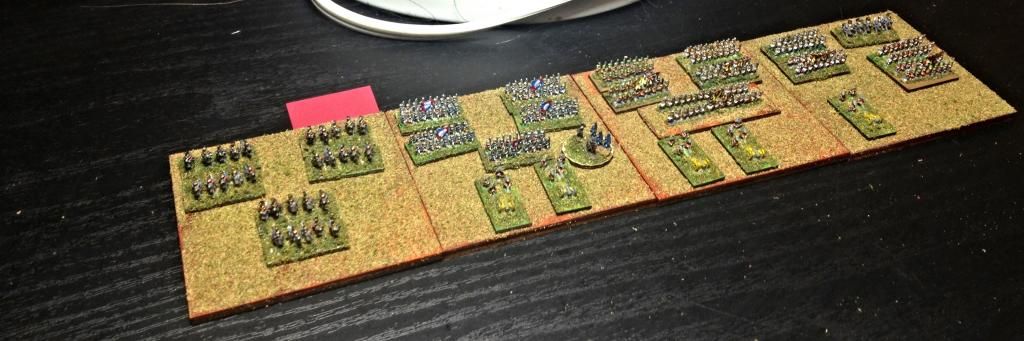
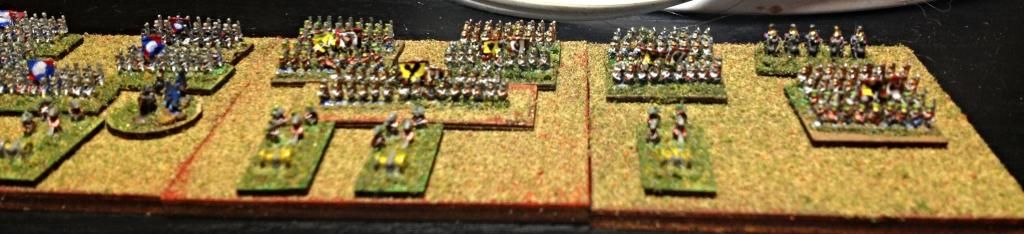
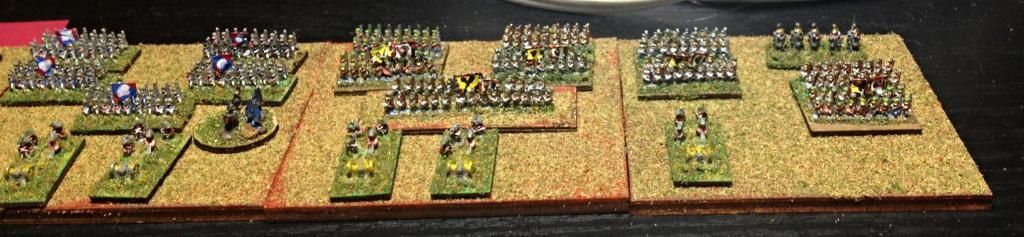
OK, some new pics of my ultra basic but serviceable sabot bases. They're 60mm squares, so some math would be involved to get them to work for some games, although probably not too much. You can zoom in somewhat on all of these pics to see more details. Here's one of my trays of figs. They're a lot tougher than you might imagine so I just throw them in. 20mm x 10mm thin litkos:
A bit fiddly, I admit. And thus the sabots. Here's some French and Austrian brigades with all battalions represented plus some extras on the bases:
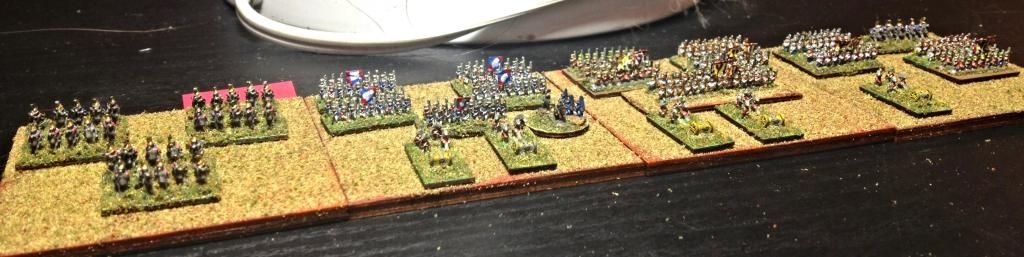
Low angle…
Here's a French brigade:
Here's a better shot of the Austrians:
Low angle Austrians:
Oh yeah, and this pick is cool because everything is actually in focus…
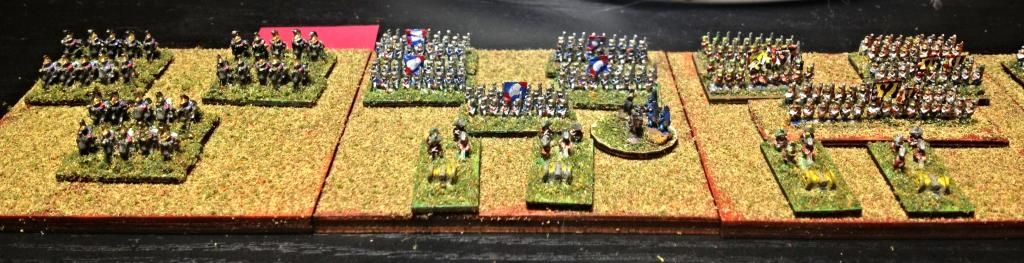
Notice that I was able to put 3 arty bases onto the brigade sabot and still have space for a circular "command" base with more room to spare (it's actually O8 ACW figs standing in, I just wanted to show how the round bases can fit in there.) . They could just as easily be skirmish figures. By having arty bases that are already pretty much at ground scale this allows you to have your cake and eat it to: it removes the age-old, and seemingly inherent space problems with arty batteries in games like VnB and GA/FPGA. Now you can have your arty amongst the brigades, between them, in front of them or totally independent. It'd be hard to do that even at 6mm. As you can see, these are really super simple sabot bases but they do what they need to. The lighter flock definitely seems to be the way to go, although I might mix in some green for contrast, possibly just a sprinkle. I tried that earlier, without gluing it down and the effect was alright. I'm glad I went ahead and tried this out. It's got me motivated to get back into the project. I already have enough bases done up to do almost any French/Austrian battle there was, all I need to do is get the flags done. (BTW, I switched to hand painted paper flags and stopped with the latex and the pre-printed ones. This was is just easier when trying to knock out a lot of the at once. Otherwise the poster above who mentioned gluing them to the bayonets is 100% correct in my experience. Don't bother with the metal flags. They're too small. |
| HistoryPhD | 01 Dec 2014 6:48 a.m. PST |
Forwardmarch, what ratio are the bases in your photos? 10:1? |
| forwardmarchstudios | 01 Dec 2014 8:19 a.m. PST |
|
| Old Contemptibles | 01 Dec 2014 9:37 a.m. PST |
I suggest a couple cans of spray paint or just switch to board games. Same effect, less trouble. |
| 79thPA | 01 Dec 2014 2:09 p.m. PST |
Nothing like telling other people how to enjoy their games. |
| 1905Adventure | 13 Dec 2014 7:06 p.m. PST |
I really like how much 3mm ends up looking like real massed troops on a battlefield. I haven't seen any board game pieces with that effect. I'm really having a hard time choosing between 3mm and 54mm for my horse & musket gaming. I already do 6mm scifi and 54mm/1:32 for colonials/VSF and 15mm for WW2. |
|