"3mm Project Update- Finally there" Topic
34 Posts
All members in good standing are free to post here. Opinions expressed here are solely those of the posters, and have not been cleared with nor are they endorsed by The Miniatures Page.
In order to respect possible copyright issues, when quoting from a book or article, please quote no more than three paragraphs.
For more information, see the TMP FAQ.
Back to the Napoleonic Discussion Message Board Back to the ACW Discussion Message Board
Areas of InterestNapoleonic
American Civil War
Featured Hobby News Article
Featured Link
Top-Rated Ruleset
Featured Showcase Article
Featured Book Review
|
| forwardmarchstudios | 15 Apr 2012 1:15 p.m. PST |
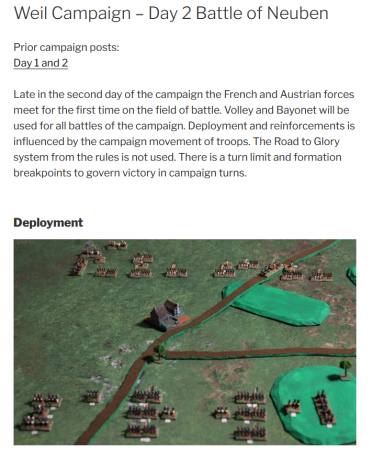
(cross-posted because of similar terrain considerations and O8 is coming out with Naps sooner than later…) Hello all, So, Friday night I tried out an experiment with foam-core as a base because I wasn't totally happy with my previous mat/caulk based attempts. The idea was that I could do a 4x4 foot board and do Gettysburg on it at the brigade level. This ended up being a total disaster and cost me a few tubes of caulk, a bunch of foam core and the better part of the evening. To be brief, foam core does warp when you put three pounds of caulk on it plus cat little as filler. So be warned if you go down that route. So, I was back to my original idea, which was to do up another mat from scratch. The idea was that it would be a bunch of checkered farm fields in various shades, and that I could put down roads and such as needed. I could then recreate big battles just by adding various features to the generic farm-field underlay. I had the 4x4 foot piece of cloth, but the idea of covering the entire thing with farm fields did not appeal to me. So I was in a bit of a bind when I started messing around with some cloth and small bits of clump foliage. That's when the idea came to me of how to resolve a bunch of issues I've had with this scale. I basically came up with a new terrain system for my figs that is 1) light weight, 2) very portable, 3) infinitely variable, 4) allows me to work new pieces in with the old ones seemlessly, 5) can be used to re-create any battle field and 6) works in concert with my pre-existing terrain pieces/mat. Here are the results:


It was pretty easy, and it had been looking me in the face for awhile. The difference between this and what I had been doing are sort of subtle, but made all the difference. The first issue was that I was making the clump foliage too big at the ground scale. I was making it big enough to look like a full sized tree compared to the figs, when I should have been making it the the ground scale. So I chopped up the pieces I had into smaller bits and arranged them around the board at a dense, uniform level to create a carpet effect. It worked out well. You might notice in the distance, over on the left edge of the field, the forest canopies I made last week or so. I simply sheared those down to a uniform hight and yanked out the nail/trunks that went around the edges and put them down. They look exactly like the other forests. Bottom Dollar, when he first saw these, asked if I was going to put the figs on top of the foliage. I'd said no. But then I realized that this was a mistake, and that I should just put the figs on top of the trees. It looks more than less fine, since this is basically for gaming. You could, if you wanted, put the figs down into the trees of course, but if they sit on top the terrain can't get moved around. And, the fine pieces have a tendency to "stick" in place, so that once you drop the stuff down its in place and you can play on it, which solves one of the problems I had with granularity at this scale. Also, the terrain I have now would let me play at any either brigade scale or regimental scale. For now I like to imagine that each base in the above photos is a regiment, with 60mm frontage being about 100 meters and 300 men… The other big piece of the puzzle, and the more important one, came to me while I was experimenting with a piece of extra cloth. I was trying to figure out the most effective way to make farm fields that abut one another. I was using a thinner piece of material, a grass green thing I've had for years that more like a rough bed sheet, or maybe like very fine canvas. It's a lot floppier than the heavy canvas I used to make the big mat. I'd been wondering how this material would hold up to caulking, so I tried it and realized something very interesting, which was that the weight of the caulk has a tendency to hold the cloth flat while drying, and results in very little, if any noticeable warping. So what I did next anyone can do, and this is what I'll do from now on in the future. I took several big pieces of the thin cloth, say one foot by one foot sections, and I pre-mixed several shades of grass from my three bags of Woodlands scenics foliage. Then I hit each piece of cloth with caulk and made each one a single color. Now I had three big "fields." I let these dry and then cut out geometric shapes from these. These are the small farm fields you see on here. They lie so flat that as long as you're careful and cut in a straight line, you can put the pieces together side by side and you can barely see the break even if you're really close to it. Here's a shot from an earlier point when I had first started to work on this:
The brown strips are rough roads made of caulk based by plastic-wrap, which I've since backed away from in favor of the other mat as a back drop. But you can see how tightly you can fit the fields. I think the caulk has a lot to do with this- its much harder to cut a piece of fabric straight, but the caulk is easier and holds the ends of the threads together nicely. So, from now on this is how I'm going to do my 3mm terrain. I think it captures exactly what I wanted. The ability to model all the small, broken fields, treelines and woods that give an ACW game its particular feel as opposed to, say, a Napoleonic game fought in big open spaces. I'm going to make up a bunch more small fields, since they are really fast and cheap to make, and get another two or three bags of clump foliage so I can really cover the board with trees. Some other ideas that I think will work well are longer pieces of cloth with winding streams or even rivers on them, which are big enough to go from one side of the map to the other. The same thing could work with roads, and eventually train tracks. I've gotten over my fence issues- I just won't have any. At the scale the map is at they wouldn't be very visible anyways. I do have an actual hill in the background there, but I'm also going to try a few long ovals and a color coded elevation system, that would be like the fields but built up in contour lines. I've also been inspired by Extra Crispy's advice to use sand arcs to show ridgelines and blind spots. I think there's some way I could show this on the terrain pieces and get it to look right without have to mess with sand. The nice thing about the terrain this way is its modular so I can experiment with small pieces and if I screw them up I can just throw them away. Also, I can add special terrain sections (like Devils den) in as some sort of feature on the map. Since I can move the fields around as needed I don't have to worry about getting them "just right" on a permanent map. I could, for instance, do Gettysburg with all the fields in the correct position just by placing the key ones (piece orchard, wheatfield, devils den) and then filling in the "generic space" with a combination of treelines and other fields. Ok, so after about 6 months messing with the 3mm figs and terrain, I think I can declare the hard-core experimental stage of this project complete. I'll be doing all of my ACW stuff this way and, when they come out with it, the Naps. That wasn't so bad! |
| Bottom Dollar | 15 Apr 2012 1:28 p.m. PST |
FMS, I have to say VERY impressive. Congrats ! I can't believe that's 4 x 4 as it looks like a gigantic table. It's like being in a hot air balloon. On top of the tree is fine too. The only thing I would've done differently is halve the base size, so I could get 1 stand per 40/50 yards or so to play micro-tacticals as well :) |
| Desert Fox | 15 Apr 2012 1:31 p.m. PST |
What do you here about O8 and Napoleonics? |
| forwardmarchstudios | 15 Apr 2012 1:43 p.m. PST |
O8 is coming out with Napoleonics sometime in the near future. I've heard it from Pico Armor and there's an interview with the sculptor out there on the internets as well where he talks about the line, although rather vaguely. At any rate, the Pico Armor guys have been saying the line is imminent for a few moths now, and the sculptor said last winter that he was looking forward to them sometime this year. I don't know anything more specific than that, and I haven't seen any pics. I have been repeatedly told that the things are on the horizon though. I have about 7000 ACW figs in 3mm right now, and if the Naps come out I'll be quitting that project to start on the Naps. I honestly couldn't say how big that project is going to be, but its going to be a lot bigger than the ACW one, and at a higher ratio of representation. I don't even care if its a "complete" line. I just want tens of thousands of naps per side, going at it. 9000 O8 figs is about $200. USD For the cost of two medium sized 10mm armies you could have two armies of over 10k troops on the table top, with all the fixins. My camera is not quite good enough to grab all the details on the figs unless its super close. You shouldn't judge the effect of all those figs based on my photos. They look a lot better in person than they do here. As my agonized experiments on here have shown, the real trick is to make terrain that works with the figs. As it turned out this was easier said than done, and now that I know how to do it it'll be easier than other scales. BD- Thanks for the compliments! I'm still retaining some extra bases without flags so that I can flex the game scale anywhere from 30:1 to 2:1. I just use larger fields for he higher fig rations. Also, the original idea was 4x4, but this is my old 6x5 mat that I made awhile back. Of course, you could make a table of any size by moving the pieces around, and I'll be making up a few smaller battle mats to do just that. |
| Desert Fox | 15 Apr 2012 2:43 p.m. PST |
Sounds great. I am really looking forward to 3mm Napoleonics. Regarding completeness of the line, I would be happy with foot and horse in bearskins, mitres, shakos, helmet, and bicorne/tricornes. I don't need different bearskins, shakos etc for each and every nationality. It is 3mm! |
| greatwhitezulu | 15 Apr 2012 2:51 p.m. PST |
|
| Macunaima | 15 Apr 2012 4:24 p.m. PST |
Wonderful stuff, FMS! One question: are the woods based on anything or is it just flock scatter? |
| forwardmarchstudios | 15 Apr 2012 5:55 p.m. PST |
Desert fox- Exactly my thoughts. Heck, if he puts out the exact list you just mentioned plus the two types of arty carriage and some wagons thatnwould cover everything from the WSS straight up to almost the Franco Prussian war. He would have almost everything covered right there, at least at this scale. Macunaima- the woods are scattered, although my based up woods I made last week are in the background at the hill. I ripped out the nails, sheared the trees even with scissors and plopped them down. They work fine, but most of the foliage is loose. Its the only way I could get the fine control I needed to make all the little fields and treelines. But, the key to the trees, as I found out, was to scale them to the ground, and not to the mini. Thats why this looks better than my other forests that were made with bigger clumps. I went through two bags plus my other left over clump foliage (about three bags total on there, plus a bag on the glued together patches), and carefully ripped them up into tiny pieces so that they are in keeping with the ground scale. Then I spread them in a layer one piece deep, but very densely, so that they look like a forest. Theyre not much bigger than a fig, but they match up with the sizes of the fields to create the airplane look Id been trying for. You can also game with them on there- they tend to stick to the flock, and theyre dense and uniform enough so that the figs will sit on them level. Thats why its important to get them all small that way. |
| Bottom Dollar | 15 Apr 2012 8:17 p.m. PST |
It really does look super-realistic, especially with the shading on those real open fields/meadows alongside that road. |
| Bottom Dollar | 15 Apr 2012 8:20 p.m. PST |
Now, how would it look if you put a couple of regiments with 10mm or 15mm figs on it ? To my eyes that might look awesome actually :) |
| forwardmarchstudios | 15 Apr 2012 9:29 p.m. PST |
BD- it looks ok with other figure scales. 10mm it works with alright, and I think you could do it with 15mm in a pinch. My bases are about 20m thick, and when I did have 15mm ACW figs I based mine that deep, in two ranks. I figure that the harcore on here will appreciate that O8 makes their ACW infantry shoulder to shoulder, and not in ragged lines. I carted the whole thing down to the local hobby shop today and set it up, and the people there were very impressed with it, despite not being too interested in historics. Im glad I did this, because I found out some interesting things. Firstly, I could potentially make the board as big across as 7 feet and people could reach across it. I checked on the 4 foot wide tables at the place. You can reach almost all the way across such a table. The only problem, as the owner pointed out, is that large stomachs of some wargamers might knock terrain bits on the edges off. He demonstrated with his own stomach, and I believe he has a point. Im thinking to employ street urchins as figure-movers for my big games…. To set up a 4 ft x 6 ft table, randomly, takes about 45 minutes, an hour with putting figs down. This will be good to know when I finally get around to some convention games and I have to set up two, or even three of these. I need more foliage. The one weakness of this style of set-up is that it requires a ton of clump foliage. Im not sure, because I havent done it yet, but to have a table 75% coved with foliage, or more, would take 5 or six bags at $7 USD a bag. Sort of pricey. Worth it, but a bit pricey. This has to be weighed against the rather low cost of the basae mat and the fields, which cost very little to make. And really this takes very little time compared to other methods of making terain mats. Im not up in the air over which battle to try out first. Its a toss up between Gettysburg and Sharpesburg. Gettysburg was obviously very dramatic, but before today I was really worried about ground scales, since my terrain system forces me to a rather fine degree of acuracy. But now, seeing that I could potentially make a battlefield thats 8 feet across…. Give or take… It doesnt seem that impossible. If you figure that 60mm equals 100m, I could do the thing at 1:6, which to my knowledge has never been done before. But Im also tempted by Sharpesburg/Antietem. This interest only began today when I found a map that outlines every farm field in very vivid color. All Id have to do is make an underlay of the battlefields road network and then copy the fields indivudually, then lay them out and add trees. The advantage of Antietem is that it was a much more dense battle, based on numbers of troops in a given space, and so might make for a more exciting looking display. Plus there were still all kinds of zuoves and such at Antietem. So, basically, I dont know which its going to be. Either would require a giant table (actually several tables joined together) to play on and some serious outlay of time. I dont have enough figs for either yet. I set out part of Pickets charge today, and just about half of it covers 8 feet of frontage. What would be really awesome, and what Id ideally like to do, is do Gettysburg over 3 days during hcon, and have a dozen ro so players per side, plus a team of refs, and let the players do what they want to do. Say three 6 hour games. That would require quite an output of time/effort though. Not that Im adverse to that. Its just that they have these Napoleonics comeing down the chute..". |
Chortle  | 15 Apr 2012 10:40 p.m. PST |
The results are fantastic. Hope you will have a chance to show this off at conventions, to inspire people. >three pounds of caulk on it plus cat litter Are you not afraid that pussy will go plop-plops on your lovely battlefield? |
| Macunaima | 15 Apr 2012 10:57 p.m. PST |
My first attempt at terrain modules was done much the same way. You can see them here: link I'm not the stickler for scale that you are FMS, but I've always found that scaling terrain down one level makes a better looking board, so I did that with mine. Given that 3mm figs are 1/600 scale, my board terrain is set at 1/900 scale. That's still not ground scale, by a long shot: I play that an inch on the table is roughly 250m for modern and WWII and perhaps double that for sci fi. You'll notice that that the main problem with those terrain modules is that they warped. :/ Now I'm building my modules on 30x60 cm framed blank artists' canvases. No warping and it's all ready to go! |
| KniazSuvorov | 16 Apr 2012 5:09 a.m. PST |
Very, very cool looking! Thanks a bunch for sharing. |
| Battlescale | 16 Apr 2012 6:41 a.m. PST |
|
| forwardmarchstudios | 16 Apr 2012 10:21 p.m. PST |
Thanks for the compliments.
Macunaima- I didnt realize that was your website. Thats where I got the idea for the loose clump foliage bits. It definitely looks good. Id like to see some of your maps done on painters canvases. Thats a really good idea, and one I might try myself. No warping! |
| forwardmarchstudios | 17 Apr 2012 8:55 p.m. PST |
TMP link Whoa! 3 tables on wheels??? This changes EVERYTHING! |
| The Picktree Brag | 06 Oct 2014 6:27 a.m. PST |
This is so deeply deeply inspiring. What I would do for such beautiful terrain. I know this is rather thread necromancy but does anyone have a link to a complete tutorial on this method? In particular the earlier stages caulking and flocking the mat? Many thanks! |
| Beeker | 06 Oct 2014 6:51 a.m. PST |
|
| forwardmarchstudios | 06 Oct 2014 8:11 a.m. PST |
Arise! Arise!! Glad you guys found this project inspiring. There is a step-by-step with pics on here somewhere. As chance would have it I just finished up a new, improved terrain mat this weekend that incorporates a bunch of ideas I've had on this over the past year or so. It's a bit different because I wanted it to specifically show a complete road network at a certain scale. It's going to look even better than the stuff above, I think. I'm going for the effect War Artisan gets, or the guy who does 1866/FPW. Anyways, I'll post some links to it later on. |
| Beeker | 06 Oct 2014 8:55 a.m. PST |
Ah! Bruce Weigle! You are entering the pantheon of game board gods! LOL! |
| ACW Gamer | 06 Oct 2014 10:10 a.m. PST |
Dr. Josh, Look here for some tips: link |
| The Picktree Brag | 07 Oct 2014 8:37 a.m. PST |
Thanks for that! forwardmarchstudios I have been unable to spot your step by step, can I just ask a couple of questions abut the mat pictured above? 1. Is it a canvas material like a dropcloth?
2. Did you put caulking on the whole mat?
3. Was the caulking coloured or did you paint it after, or did you just flock straight into the wet caulk?
4. If their flocking on the base mat or just the field areas?
5. What kind of flock? Many thanks in advance! |
| forwardmarchstudios | 07 Oct 2014 9:34 a.m. PST |
Hi Dr Josh, I'll check up on that old how-to later. It's a few years old by this point. To quickly answer your questions…. 1: It's a rather heavy canvas. I wouldn't recommend going too heavy or you'll have problems draping the stuff over things to create elevations. On the one I just made I'm using a very fine canvas and tacky glue instead of caulk, but that's because I need to model very fine elevation changes. If you're using heavier figs also, you'll want heavier material. 2: Everyhting was caulked except the river, which was painted. I remember that the roads were extremely difficult. I made those by putting down a ribbon of caulk and then hitting it with dirt from the parking lot. The roads went down first, then the fields. It was pretty hard to get the caulk to cooperate when I'd put the fields in along the roads. Please try to find a better way! 3: The caulk was pre-colored, it's the only way to go. 4: Everything is flocked. Except the corn fields- those were put right into the mat with a plastic tool. The small fields are made from other pieces of material that i flocked seperately and then cut into shape, then put down on the mat and rung in with foliage. 5: Woodland scenics, GW, literally every flock I had at the time went down. |
| The Picktree Brag | 07 Oct 2014 12:29 p.m. PST |
Hi forwardmarchstudios, Many thanks for those quick replies. Might I ask just 2 more questions? 1. Did you colour the caulk yourself? If so with acrylic paint or something else? 2. Did you adhere the flock into the wet caulk itself or attach it later with glue to the dry caulk? Many thanks again! |
| forwardmarchstudios | 07 Oct 2014 12:47 p.m. PST |
Hi again! 1: The caulk comes pre-colored. Check out a hardware store. You want colored latex caulk. It's out there. Here in the US it's about $3 USD a tube, and I think my 8x6 mat took 4 or 5 tubes, but it may have been more. I can't remember. 2: Yes. What you want to do is dump flock onto the wet caulk and then press it down with your hands quite firmly. You want to get the stuff in there. You want to work with three bags of flock minumum, and mix and match them as you go to make fades, splotches, etc across the mat. You might also take one color, sprinkle it down first, then add them main color over top of it. This can give some good contrast. |
| The Picktree Brag | 07 Oct 2014 1:49 p.m. PST |
|
| ACW Gamer | 07 Oct 2014 7:54 p.m. PST |
|
| forwardmarchstudios | 07 Oct 2014 9:10 p.m. PST |
Hmm… last link has the idea to use white acrylic with paint.. I may try that at some point in the future. White caulk is a lot cheaper than color stuff, since the cheapest generics tend to only come in white. Might take a lot of paint though, although if you have the cheap stuff on hand it might work out in your favor… |
| The Picktree Brag | 07 Oct 2014 10:26 p.m. PST |
Great links, thanks ACW Gamer! |
| ACW Gamer | 08 Oct 2014 5:09 a.m. PST |
FMS, Don't forget that you can get paints matched at your local big box hardware stores. I have a gallon of Beastie Brown in the basement. And before anyone gets worried about the Evil Empire striking back, THEY suggested the idea in an issue of their house magazine! Dr J, Pictures when you are finished! : ) |
| The Picktree Brag | 08 Oct 2014 7:50 a.m. PST |
Most certainly – I will try and make a start this weekend (I have 2 children under 4 so best laid plans and all that…) Thanks for all your help FMS and ACW Gamer. |
| forwardmarchstudios | 08 Oct 2014 11:29 a.m. PST |
Oh yeah, I also wanted to add, the gromet idea from the last link is awesome also. I came very close to adding them to my most recent mat. I was able to pin the mat in place with thumb tacks, which kept the mat from getting all screwed up from shrinkage, but it seems like having the gromets could be useful in pinning the thing down. As it is I'm going to do what War Artisan does,that is, pin the thing down to rubber mats and the substrate in such a manner that it's noit obvious (trees, houses as pins, etc). |
| davesimpson | 01 Nov 2014 3:03 p.m. PST |
|
|