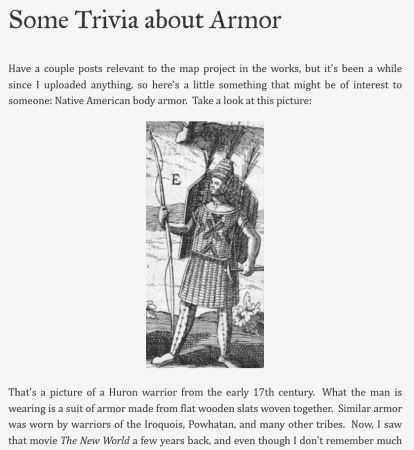
Lt. Col. Sir William Hood gazed across the snow covered lake at the ranks of Rebel soldiers, their officers desperately trying to get them into orderly lines in anticipation of Hood's attack. Hood and his men had come across the Rebels the day before, and had immediately given chase over the frozen waters of Lake Champlain. It had become a race to see if the British could force an action before the colonists reached the safety of the guns of Ticonderoga, a race Hood had been determined to win.
The terrain was constricting. The lake here was narrow, and on both sides was held in by rising hills covered in a light pine forest. The ice was solid though, so Hood had ordered his regiments into line, the Grenadiers forming on the left with the 7th Royal Fuzileers to their right. Behind the Grenadiers were the Highlanders while the Provincials stood behind in support of the 7th. Immediately to the right of the 7th Hood positioned his Grasshopper, it's gunner protected on their right by the 17th Light Dragoons with some Provincial light dragoons in support. Finally Hood had asked his Six Nation allies to clear the woods on the left of the Grenadiers and to protect their flank as they advanced.
From his vantage point Hood determined that the Rebels were forming in a similar fashion. He could clearly make out the sharp uniforms of the Continentals deployed across from the Grenadiers, especially in contrast to the large mob of militia men deployed in front of the 7th. Each unit was supported by another militia unit to it's rear and a 6 pound gun between them. Across from the British horse was a unit of Continental light dragoons. Finally, glancing into the woods, Hood saw Colonial riflemen moving in loose formation on the woods near both his flanks.
Despite being outnumbered, the British commander wasted little time in ordering the advance. The Grenadiers immediately stepped off, and in perfect order began to close the ground towards the Continentals quickly. To their right though the 7th struggled to make progress and keep order, their feet sinking into the deep snow. To make matters worse, the undisciplined Provincials twice marched directly into the backs of the 7th, causing more confusion.
As the gap closed, the Rebel lines suddenly exploded into a fury of sound and smoke as the infantry men began firing their muskets and the artillerists opened up with their guns. Grenadiers began falling, the toll getting more terrible by the minute.
Almost simultaneously the Rebel riflemen let out a holler and charged the Natives, intent on breaking them. The ensuing melee though went poorly for the Colonists, who fled uncontrolled from the now excited Iroquois.
Unable to advance any further, the Grenadiers halted and had just finished aligning themselves when suddenly they were charged by the Continentals. The two lines crashed into one another and Hood rushed over to desperately encourage his men to stand firm. And stand firm they did! Despite being heavily outnumbered, the Grenadiers not only held off the Continentals, but in one great burst broke the Continentals and sent them routing to the rear of the Rebel lines.
All was not well though for the British. While the infantry scrum was being settled, the Rebel cavalry amazingly charged it's British counterpart and in a series of desperate actions routed both the 17th and the Provincial cavalry units. Luckily for the British, this had taken the Rebel cavalry far from the battlefield, preventing the Rebel dragoons from returning before the fight was decided.
Back in the center, the 7th finally straightened out their lines and smartly advanced on the Rebel militia, supporting by the cool and efficient handling of the British Grasshopper. The 7th stopped only briefly to deliver a devastating opening volley into the militia before hurling their gleaming bayonets forward in a well ordered charge. The militia broke almost immediately, unable to withstand the ferocity of the charge, and with them broke the Rebel army.
========================================
This battle was based on another battle I recently saw here, devised for General De Brigade (sorry, I don't have the link). The Fins were simply substituted with Americans, while the Russians were substituted with the British.
The game was played with the rules British Grenadier. It lasted a leisurely pace of around 3 hours, and was decided pretty conclusively in the end. The Americans had the advantage of being on the defensive (a nice advantage in BG) as well as having significantly (25% on average) larger units. The British had a notable quality advantage, but had a smaller piece of artillery and less skirmishers.
Americans
---------
1 unit of Continentals (Line, 24 men)
3 units of Militia (Militia, roughly 24 men each)
2 units of Rifle Armed Skirmishers (Militia skirmishers)
1 unit of Continental Light Dragoons (Line, 8 men)
1 6# gun
3 Officers
British
-------
1 unit of Combined Grenadiers (Elite, 16 men)
2 units of British Line (Line, 16 men each)
1 unit of Provincials (Second Line, 20 men)
1 unit of Native American skirmishers
1 unit of British Light Dragoons (Line, 6 men)
1 unit of Provincial Light Dragoons (Second Line, 6 men)
1 3# Grasshopper
2 officers
The game played as you might expect. The skirmishers dueled back and forth, and though the Iroqouis got the upper hand, they weren't able to do much with it. The British line gobbled up disruption points during their advance, in particular the 7th who kept rolling terribly causing them to fall well behind the Grenadiers. The Americans by comparison remained in their initial deployment location.
The Grenadiers faced the larger Continentals, and from the start got the worse of the firefight, even losing 25% of their original numbers. Just as things seemed bleak for them, the Continentals charged, intent on glory, but were beaten back by the Grenadiers. That marked the beginning of the end of the Americans. With the arrival and subsequent charge of the 7th against the militia, the British had won a convincing victory.
Die rolling was fairly even I think, with one important exception. Without fail, the British rolled fantastically when firing their 3# gun, while the Americans couldn't have rolled worse with their 6# gun. What should have been an advantage for the Americans turned out to be a clear advantage for the British instead.


")


